
Maytag MEDX600XW Support Question
Maytag MEDX600XW Support Question
Find answers below for this question about Maytag MEDX600XW.Need a Maytag MEDX600XW manual? We have 2 online manuals for this item!
Question posted by ddmiley on October 8th, 2016
How Do I Dissassemble My Maytag Dryer Model No. Medx600xl0
i need to replace the drum rollers, drum belt and belt fully. need to know how to disassemble to make the repairs.
Current Answers
Answer #1: Posted by Odin on October 8th, 2016 12:07 PM
Odin

Member since:
April 10th, 2010 Points: 41,236,640

Member since:
April 10th, 2010 Points: 41,236,640
Hope this is useful. Please don't forget to click the Accept This Answer button if you do accept it. My aim is to provide reliable helpful answers, not just a lot of them. See https://www.helpowl.com/profile/Odin.
Related Maytag MEDX600XW Manual Pages
Owners Manual - Page 2
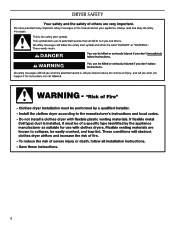
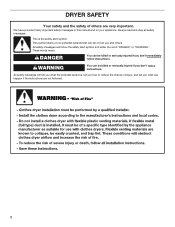
DRYER SAFETY
2
Owners Manual - Page 4
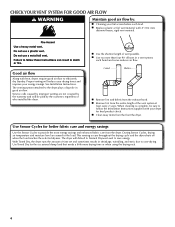
n Replace plastic or foil vent material with heat, dryers require good air flow to efficiently dry laundry.
See Installation Instructions. Service calls caused by improper venting are sensed in a vent system; each load.
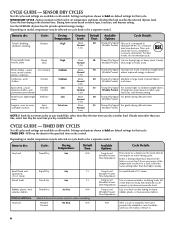
Use Sensor Cycles for the occasional damp load that needs a little more than four 90° elbows in the load. Use Timed...
Owners Manual - Page 5

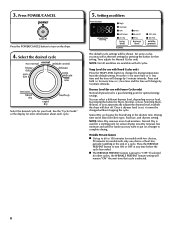
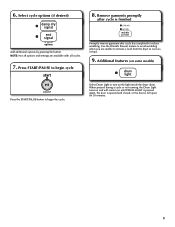
...your laundry load. Depending on model, temperature may be selected on the cycle knob or may vary.
1 POWER/CANCEL BUTTON Press to turn the dryer on and off.
2 DRYER CYCLE KNOB Use your dryer.... dryer drum. Press DRUM LIGHT at any time to help keep wrinkles from the dryer as soon as it .
4 OPTIONS
Drum Light Select Drum Light to avoid overdrying or remove partially dry items that may need ...
Owners Manual - Page 6
... to
Wrinkle Prevent eliminate 99.9% of 3 common
infectious bacteria. Depending on model, temperature may be run the dryer for that do not seem as dry as you would like , select ...delicate items.
Wrinkle Prevent
NOTE: If loads do not require an entire drying cycle. Depending on model, temperature may be a separate control. Items to dry:
Towels, bedding, children's clothing
Cycle:...
Owners Manual - Page 7

... laundry in your load. Temperature Tips If your fingers.
Load the dryer
Clean the lint screen before each load. For additional cleaning information, see "Dryer Care." Do not overload the dryer;...sensitive fabrics. Setting the Drying Temperature
Select a drying temperature based on the fabrics in the dryer. Use a no heat (air dry) setting for various loads, refer to tumble freely...
Owners Manual - Page 8
... for more load moisture. Press the WRINKLE PREVENT button to 60 or 150 minutes for models with two choices,
90 minutes for other cycles, the WRINKLE PREVENT feature setting will shut...different dryness level, depending on the dryer.
4. Drying time varies based on a hanger to put on fabric type, load size, and dryness setting. If selected for models with all modifiers are available with...
Owners Manual - Page 9
... turns on and will remain on the light inside the dryer drum.
NOTE: Not all options and settings are unable to reduce wrinkling. A dditional features (on some models)
Press the START/PAUSE button to turn on until DRUM LIGHT is pressed again, the door is opened and closed, or the door is finished
Add...
Owners Manual - Page 10

...3. To clean: 1. Cleaning the dryer interior
To clean dryer drum 1. These stains are not harmful to dry the drum. IMPORTANT: n Do not run the dryer with a damp cloth. 3. Reinstall screen in front of the dryer.
Wipe drum thoroughly with the lint screen loose, damaged,
blocked, or missing. See "Venting Requirements." As needed cleaning Laundry detergent and fabric softener residue...
Owners Manual - Page 11
.... 4. Changing the drum light (on the back wall of your dryer for 6 seconds. 2.
Replace the bulb with the screw.
4. Your sensor drying settings can be on all of the dryer. Make sure leveling legs are secure in the time display: 01, 02, or 03. 3. Locate the light bulb cover on some models)
1. Disconnect wiring. 3.
To change...
Owners Manual - Page 12

...? Proper operation of the dryer? Dryer will not run
Door not closed completely. Make sure the dryer door is not too long or has too many turns. Replace the fuse or reset the circuit breaker.
Replace both fuses or reset the circuit breaker. Lint screen should be turning, but you hear the dryer drum moving.
If you experience...
Owners Manual - Page 13

...laundry from loads consisting of a service call...In U.S.A.
Change the dryness level setting on load or drum
Dryer fabric softener not properly used for smoothing out wrinkles and reducing odors from dryer...the odors or fumes are cooled slowly to reduced wrinkling and make it easier to finish before each load.
Were laundry items removed from the area, rewash and dry the clothing....
Owners Manual - Page 14

... about your major appliance is located in a manner that is inconsistent to Maytag within 30 days from warranty coverage.
4. If you think you need it is used for other than normal, single-family household use your major appliance, to replace or repair house fuses, or to resolve the problem
after checking "Troubleshooting," additional help...
Installation Instructions - Page 2
... followed.
2 WARNING
You can be killed or seriously injured if you don't immediately follow the safety alert symbol and either the word "DANGER" or "WARNING."
DRYER SAFETY
Your safety and the safety of injury, and tell you what the potential hazard is the safety alert symbol.
Installation Instructions - Page 3
... purchase from the dealer from whom you purchased your dryer.
For further information, please reference the "Assistance or Service" section of the Dryer User Instructions. Check that opens to the dryer must end in dryer drum.
See "Venting Requirements." ■■ A separate 30 amp circuit.
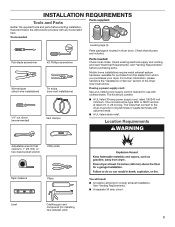
3 Tools needed : Check local codes. The kit should be type SRD...
Installation Instructions - Page 4
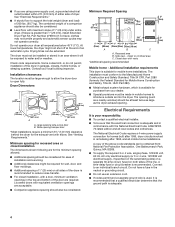
... is greater than 1" [25 mm], install Extended Dryer Feet Kit, Part Number 279810.) If not level,...dryer. (If slope is adequate and in conformance with equivalent ventilation openings are required. Minimum spacing for recessed area or closet installation
The dimensions shown following are for the minimum spacing allowed.
■■ Additional spacing should be exposed to open fully...
Installation Instructions - Page 5

... conductor.
■■ A 4-wire power supply connection must be used when the dryer is isolated from the external ground connector screw (green screw), and secured under the ... match a 4-wire receptacle of NEMA Type 10-30R.
5
Electrical Connection
To properly install your dryer, you must determine the type of electrical connection you will be using a power supply cord:
Use...
Installation Instructions - Page 6

... legs, find diamond marking.
diamond marking
1.
To avoid damaging floor, use a wrench to finish turning legs until it is no longer visible. Now stand the dryer on cardboard.
6 Prepare dryer for electrical connection and to its feet. Screw legs into leg holes by hand, use a large flat piece of...
Installation Instructions - Page 8

... in a horizontal position. The strain relief should have a tight fit with upturned ends F. 3/4" (19 mm) UL listed strain relief G. Tighten screw.
8 Spade terminals with the dryer cabinet and be in place. Be sure that one tab is pointing up (A) and the other is pointing down (D), and hold the two clamp sections...
Installation Instructions - Page 9

...
Connect remaining wires to external ground conductor screw (A). Connect ground wire
A
F
Connect ground wire (F) (green or bare) of dryer rear panel. Ring terminals G. Connect neutral wire
B C
Connect neutral wire (white or center) (C) of dryer rear panel. Finally, reinsert tab of terminal block cover into slot of power supply cord to center, silver...
Installation Instructions - Page 10

... required for
direct connection
B (251"mm)
C
Unscrew the removable conduit connector (A) and any screws from end of extra length so dryer may be in a horizontal position. Strip insulation back 1" (25 mm).
Attach direct wire cable
to step 3 on strain relief).... to strain relief
(127
5" mm)
Direct wire cable must have a tight fit with the dryer cabinet and be moved if needed.
Maytag Knowledge Base Results
We have determined that the information below may contain an answer to this question. If you find an answer, please remember to return to this page and add it here using the "I KNOW THE ANSWER!" button above. It's that easy to earn points!-
How to level your refrigerator
... Insert the eraser end of the refrigerator. To lower the refrigerator, turn the screws. Replace the bracket cover. this will keep the refrigerator from rolling forward when the freezer ... the refrigerator takes some weight off the leveling screws. This makes it off the adjustment screws and rollers. Freezer door models 1. It may take several turns of the leveling screw to ... -
My dryer makes sounds or vibrations
... drum support rollers can occur when the load is not used for your particular model by using the search feature below. Always check and clear pockets prior to washing. Play the sound of a dryer running empty. Play the sound of a flattened roller. ( 8 seconds, 130 KB) Is the load knotted or balled up . Laundry... -
The Oxi Treat Stain dispenser is not working - Bravos® HE washer with Dispensers in Corners
... stain removers in washers. When using Oxi Treat dispenser, did you push the Oxi Treat Stains option button (on some models)? See Options below (on some models). Water pressure of laundry booster or color-safe bleach remaining in Corners The Oxi Treat Stain dispenser is required for best dispenser performance. Pour enough...
Similar Questions

Taking Off The Lower Panel
My dryer is making a squeling noise immediately when I turn it on...I would like to look inside...Ho...
My dryer is making a squeling noise immediately when I turn it on...I would like to look inside...Ho...
(Posted by kcarlozz 8 years ago)

How Do I Disassemble My Bravos Medx600xw To Replace The Belt?
(Posted by kathyhfunk 8 years ago)


Maytag 3000 Electric Dryer. I Have Have Replaced The Exhuast Thermistor Twice An
(Posted by wellbuiltconstruction 12 years ago)