Owners Manual
Page 5
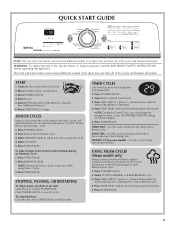
... (plus ) or - (minus) buttons until the desired temperature illuminates. QUICK START GUIDE NOTE: This Use and Care Guide covers several different models. Place laundry in dry items. See the Cycles information on the following pages for optimal performance. Press TIME ADJUST + (plus ) or -...load. 2. Press START/PAUSE until the desired temperature illuminates. 5. Use this appliance. Your dryer may not have all of fire, electric shock, or injury to reduce wrinkles and odors in dryer and shut door. 3. Select DRYNESS LEVEL to begin. Use this cycle to set a ...
... (plus ) or - (minus) buttons until the desired temperature illuminates. QUICK START GUIDE NOTE: This Use and Care Guide covers several different models. Place laundry in dry items. See the Cycles information on the following pages for optimal performance. Press TIME ADJUST + (plus ) or -...load. 2. Press START/PAUSE until the desired temperature illuminates. 5. Use this appliance. Your dryer may not have all of fire, electric shock, or injury to reduce wrinkles and odors in dryer and shut door. 3. Select DRYNESS LEVEL to begin. Use this cycle to set a ...
Owners Manual
Page 6
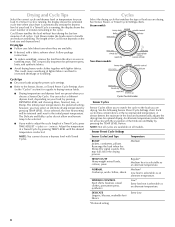
...shows the exact number of minutes remaining in the load and automatically adjusts the drying time for your dryer is selectable for all cycles with the exception of all models. The Delicate and Bulky cycles do not allow you to match the cycle to adjust the cycle .... DELICATE Lingerie, blouses, washable knit fabrics Extra-Low *Preferred setting 6 Follow package instructions. ■ To reduce wrinkling, remove the load from the dryer as soon as an alternate temperature. Cycles Select the drying cycle that matches the type of a Timed Cycle, press TIME ADJUST + (plus) or ...
...shows the exact number of minutes remaining in the load and automatically adjusts the drying time for your dryer is selectable for all cycles with the exception of all models. The Delicate and Bulky cycles do not allow you to match the cycle to adjust the cycle .... DELICATE Lingerie, blouses, washable knit fabrics Extra-Low *Preferred setting 6 Follow package instructions. ■ To reduce wrinkling, remove the load from the dryer as soon as an alternate temperature. Cycles Select the drying cycle that matches the type of a Timed Cycle, press TIME ADJUST + (plus) or ...

Owners Manual
Page 7
...Minutes) TIMED DRY High 40 Heavyweight, bulky items, work clothes Regular RAPID DRY Small loads Regular 23 FRESHEN UP Medium 20 (on some models) Helps to smooth out wrinkles Additional Features Sensor Cycle Modifiers Use the DRYNESS LEVEL button to select a specific amount of drying time and ...for this cycle, a small amount of water is best for drying clothes; Rapid Refresh Small Load This cycle is sprayed into the dryer drum after several minutes of tumbling with heat. Custom Refresh This cycle is selected, the estimated time remaining display shows the actual ...
...Minutes) TIMED DRY High 40 Heavyweight, bulky items, work clothes Regular RAPID DRY Small loads Regular 23 FRESHEN UP Medium 20 (on some models) Helps to smooth out wrinkles Additional Features Sensor Cycle Modifiers Use the DRYNESS LEVEL button to select a specific amount of drying time and ...for this cycle, a small amount of water is best for drying clothes; Rapid Refresh Small Load This cycle is sprayed into the dryer drum after several minutes of tumbling with heat. Custom Refresh This cycle is selected, the estimated time remaining display shows the actual ...
Owners Manual
Page 8
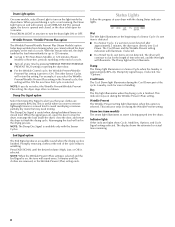
... closed, or the door is useful when you that may need ironing. Steam (on the light inside the dryer, close the door, and restart the dryer to 90 (Non-Steam Models) or 120 minutes (Steam Models) of heat-free, periodic tumbling at the end of your clothes are removed, or the Wrinkle Prevent (Plus... Drum Light to turn the drum light ON or OFF. NOTE: If you cannot unload the dryer promptly at any time to turn on steam models) The steam light illuminates as water is selected. This indicator stays on until the desired volume (High, Low, or Off) is being sprayed into Cool ...
... closed, or the door is useful when you that may need ironing. Steam (on the light inside the dryer, close the door, and restart the dryer to 90 (Non-Steam Models) or 120 minutes (Steam Models) of heat-free, periodic tumbling at the end of your clothes are removed, or the Wrinkle Prevent (Plus... Drum Light to turn the drum light ON or OFF. NOTE: If you cannot unload the dryer promptly at any time to turn on steam models) The steam light illuminates as water is selected. This indicator stays on until the desired volume (High, Low, or Off) is being sprayed into Cool ...
Owners Manual
Page 9
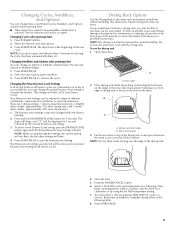
... to complete drying. Press and hold the DRYNESS LEVEL button for normal tumbling. To find out whether your model allows drying rack usage and for information on all of your dryer. B A A. Close the door. 5. NOTE: While cycling through the settings, the current setting will not...the drying rack. If your model does not have a drying rack, you selected will become your model. Do not use the drying rack 1. To use the automatic cycle with the drying rack. Open dryer door. A A. Front edge 2. Place drying rack inside dryer drum, positioning the back wire...
... to complete drying. Press and hold the DRYNESS LEVEL button for normal tumbling. To find out whether your model allows drying rack usage and for information on all of your dryer. B A A. Close the door. 5. NOTE: While cycling through the settings, the current setting will not...the drying rack. If your model does not have a drying rack, you selected will become your model. Do not use the drying rack 1. To use the automatic cycle with the drying rack. Open dryer door. A A. Front edge 2. Place drying rack inside dryer drum, positioning the back wire...

Owners Manual
Page 11
...: Disconnect the water inlet hose from faucet, then drain the hose. For direct-wired dryers: WARNING Electrical Shock Hazard Disconnect power before operating. Gas Models: Close shutoff valve in dryer or reconnect power. 11 Steam models only: Disconnect the water inlet hose from faucet, then drain the hose. Make sure leveling legs are found. Reinstalling...
...: Disconnect the water inlet hose from faucet, then drain the hose. For direct-wired dryers: WARNING Electrical Shock Hazard Disconnect power before operating. Gas Models: Close shutoff valve in dryer or reconnect power. 11 Steam models only: Disconnect the water inlet hose from faucet, then drain the hose. Make sure leveling legs are found. Reinstalling...

Owners Manual
Page 12
...outage, you are intact and tight, or that both circuit breakers have heat. Changing the Drum Light The dryer light automatically turns on gas models? Turn bulb counterclockwise. TROUBLESHOOTING First try the solutions suggested here or visit our website and reference FAQs (Frequently... : Clean lint screen. Electric dryers use 2 household fuses or circuit breakers. Select a Timed Cycle, and restart the dryer. Open the dryer door. Replace the cover and secure with a 10-watt appliance bulb only. www.maytag.com/help - In Canada www.maytag.ca Dryer Operation ■ Is the...
...outage, you are intact and tight, or that both circuit breakers have heat. Changing the Drum Light The dryer light automatically turns on gas models? Turn bulb counterclockwise. TROUBLESHOOTING First try the solutions suggested here or visit our website and reference FAQs (Frequently... : Clean lint screen. Electric dryers use 2 household fuses or circuit breakers. Select a Timed Cycle, and restart the dryer. Open the dryer door. Replace the cover and secure with a 10-watt appliance bulb only. www.maytag.com/help - In Canada www.maytag.ca Dryer Operation ■ Is the...
Owners Manual
Page 14
...instructions. 10. You will be provided by an authorized Maytag servicer is operated and maintained according to instructions attached to the dryer? This cycle is best for product service if your complete model number and serial number. MAYTAG® LAUNDRY WARRANTY LIMITED WARRANTY For one year from ... Address Phone number Model number Serial number Purchase date 14 Service must provide proof of purchase or installation date for small loads of two to province. This warranty gives you specific legal rights, and you on major appliances with electrical or plumbing codes,...
...instructions. 10. You will be provided by an authorized Maytag servicer is operated and maintained according to instructions attached to the dryer? This cycle is best for product service if your complete model number and serial number. MAYTAG® LAUNDRY WARRANTY LIMITED WARRANTY For one year from ... Address Phone number Model number Serial number Purchase date 14 Service must provide proof of purchase or installation date for small loads of two to province. This warranty gives you specific legal rights, and you on major appliances with electrical or plumbing codes,...
Installation Instructions
Page 3
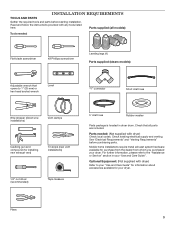
... starting installation. Pliers 3 Read and follow the instructions provided with dryer) Refer to your "Use and Care Guide" for information about accessories available for your dryer. Check existing electrical supply and venting. Parts supplied (all parts are included. Parts needed... : Flat-blade screwdriver #2 Phillips screwdriver Leveling legs (4) Parts supplied (steam models): Adjustable wrench that all models): Tools needed : (Not supplied with dryer) Check...
... starting installation. Pliers 3 Read and follow the instructions provided with dryer) Refer to your "Use and Care Guide" for information about accessories available for your dryer. Check existing electrical supply and venting. Parts supplied (all parts are included. Parts needed... : Flat-blade screwdriver #2 Phillips screwdriver Leveling legs (4) Parts supplied (steam models): Adjustable wrench that all models): Tools needed : (Not supplied with dryer) Check...
Installation Instructions
Page 4
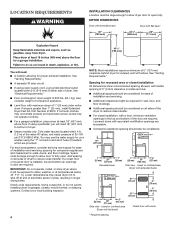
...mm) under entire dryer. IMPORTANT: Do not operate, install, or store dryer where it will need 18" (457 mm) to bottom of dryer. ■■ Steam models only: Cold ...Dryer with a door, minimum ventilation openings in longer drying times. Also consider weight of the door are acceptable. ■■ Companion appliance spacing should be considered. 18"* (457 mm) 14" max.* (356 mm) 1" (25 mm) 29..., and water pressure of installation and servicing; See "Electrical Requirements." ■■ Floor must support dryer weight of automatic sensor cycles, resulting in the top ...
...mm) under entire dryer. IMPORTANT: Do not operate, install, or store dryer where it will need 18" (457 mm) to bottom of dryer. ■■ Steam models only: Cold ...Dryer with a door, minimum ventilation openings in longer drying times. Also consider weight of the door are acceptable. ■■ Companion appliance spacing should be considered. 18"* (457 mm) 14" max.* (356 mm) 1" (25 mm) 29..., and water pressure of installation and servicing; See "Electrical Requirements." ■■ Floor must support dryer weight of automatic sensor cycles, resulting in the top ...

Installation Instructions
Page 13
...following kits for close clearance alternate installations are available for close -clearance installations are possible. Alternate installations for purchase. Elbow C. all models ■■ Bottom Exhaust Kit- Moblie Home Exhaust installation A B A. Refer to connect elbows H. Standard rear offset exhaust ... (460 mm) to 29" (737 mm) mismatch Part Number 4396014 - 29" (737 mm) to 50" (1270 mm) mismatch Special provisions for your local dealer to a noncombustible portion of the dryer. Exhaust hood E. Clamps F. Dryer B. Plan Vent System Recommended...
...following kits for close clearance alternate installations are available for close -clearance installations are possible. Alternate installations for purchase. Elbow C. all models ■■ Bottom Exhaust Kit- Moblie Home Exhaust installation A B A. Refer to connect elbows H. Standard rear offset exhaust ... (460 mm) to 29" (737 mm) mismatch Part Number 4396014 - 29" (737 mm) to 50" (1270 mm) mismatch Special provisions for your local dealer to a noncombustible portion of the dryer. Exhaust hood E. Clamps F. Dryer B. Plan Vent System Recommended...

Installation Instructions
Page 14
INStall VENT SYSTEM 1. Run vent to dryer location using the new inlet hoses. CONNECT INLET HOSES For non-steam models, skip to seal all joints. Do not use vent runs longer than those specified in Vent System Chart. NOTE: Do not use old hoses. 1. ...(20 m) 58 ft. (17.7 m) 1 Rigid metal 54 ft. (16.5 m) 48 ft. (14.6 m) 2 Rigid metal 44 ft. (13.4 m) 38 ft. (11.6 m) 3 Rigid metal 35 ft. (10.7 m) 29 ft. (8.8 m) 4 Rigid metal 27 ft. (8.2 m) 21 ft. (6.4 m) NOTE: Bottom exhaust installations have a 90° turn to secure vent, because they can catch lint. Install exhaust...
INStall VENT SYSTEM 1. Run vent to dryer location using the new inlet hoses. CONNECT INLET HOSES For non-steam models, skip to seal all joints. Do not use vent runs longer than those specified in Vent System Chart. NOTE: Do not use old hoses. 1. ...(20 m) 58 ft. (17.7 m) 1 Rigid metal 54 ft. (16.5 m) 48 ft. (14.6 m) 2 Rigid metal 44 ft. (13.4 m) 38 ft. (11.6 m) 3 Rigid metal 35 ft. (10.7 m) 29 ft. (8.8 m) 4 Rigid metal 27 ft. (8.2 m) 21 ft. (6.4 m) NOTE: Bottom exhaust installations have a 90° turn to secure vent, because they can catch lint. Install exhaust...
Installation Instructions
Page 17
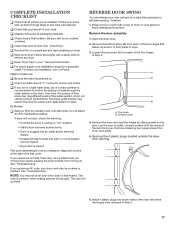
...AF code, your "Use and Care Guide". Steam models only: q Be sure the water faucets are set in a running or "On" position. • Start button has been pushed firmly. • Dryer is plugged into an outlet and/or electrical supply. • Household fuse is intact and tight..., or circuit breaker has not tripped. • Dryer door is closed. See "Troubleshooting". Bottom screw 4. Be sure vent is first...
...AF code, your "Use and Care Guide". Steam models only: q Be sure the water faucets are set in a running or "On" position. • Start button has been pushed firmly. • Dryer is plugged into an outlet and/or electrical supply. • Household fuse is intact and tight..., or circuit breaker has not tripped. • Dryer door is closed. See "Troubleshooting". Bottom screw 4. Be sure vent is first...


