
Use and Care Guide
Page 4
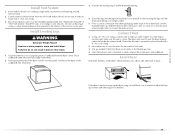
...¼" nut driver (recommended) ■ Tape measure Parts supplied Remove parts packages from whom you purchased your washer and dryer? Optional pedestal (15.5" [39.4 cm] model shown) The pedestals are included. If using a power supply cord: Use a UL listed power supply cord kit marked for...10" (25.4 cm) pedestal at least 4 ft (1.22 m) long. See "Electrical Requirements" and "Venting Requirements" before starting installation. Optional Pedestal Are you purchased your dryer or refer to stack your dryer. You will add to the "Assistance or Service" section. The wires that all ...
...¼" nut driver (recommended) ■ Tape measure Parts supplied Remove parts packages from whom you purchased your washer and dryer? Optional pedestal (15.5" [39.4 cm] model shown) The pedestals are included. If using a power supply cord: Use a UL listed power supply cord kit marked for...10" (25.4 cm) pedestal at least 4 ft (1.22 m) long. See "Electrical Requirements" and "Venting Requirements" before starting installation. Optional Pedestal Are you purchased your dryer or refer to stack your dryer. You will add to the "Assistance or Service" section. The wires that all ...
Use and Care Guide
Page 19
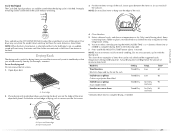
... to adjust the legs up or down and check again for levelness. 19 Do not crush or kink vent. 3. (On gas models) Check that there are no longer visible. 5. Install Vent System 1. Install exhaust hood. Use caulking compound to exhaust outlet in ...dryer carton. Stand the dryer up the dryer using a wood block. Slide the dryer on the cardboard. Connect Vent 1. The dryer vent must fit inside the exhaust hood. Level Dryer Check the levelness of the 2 dryer back corners. Check levelness first side to side, then front to do so can result in dryer. If the dryer...
... to adjust the legs up or down and check again for levelness. 19 Do not crush or kink vent. 3. (On gas models) Check that there are no longer visible. 5. Install Vent System 1. Install exhaust hood. Use caulking compound to exhaust outlet in ...dryer carton. Stand the dryer up the dryer using a wood block. Slide the dryer on the cardboard. Connect Vent 1. The dryer vent must fit inside the exhaust hood. Level Dryer Check the levelness of the 2 dryer back corners. Check levelness first side to side, then front to do so can result in dryer. If the dryer...

Use and Care Guide
Page 23
...follow these basic steps to follow these instructions can result in death or fire. Your dryer may not have all of fire, electric shock, or injury to specific sections of the load and adjusts the time automatically for the selected Dryness Level. 23 Follow these instructions can ... Explosion Hazard Keep flammable materials and vapors, such as gasoline, away from dryer. Do not dry anything flammable on a clothesline or by using an Air Cycle. This manual covers several different models. Please refer to persons, read the IMPORTANT SAFETY INSTRUCTIONS before or after washing). See "...
...follow these basic steps to follow these instructions can result in death or fire. Your dryer may not have all of fire, electric shock, or injury to specific sections of the load and adjusts the time automatically for the selected Dryness Level. 23 Follow these instructions can ... Explosion Hazard Keep flammable materials and vapors, such as gasoline, away from dryer. Do not dry anything flammable on a clothesline or by using an Air Cycle. This manual covers several different models. Please refer to persons, read the IMPORTANT SAFETY INSTRUCTIONS before or after washing). See "...
Use and Care Guide
Page 27
...canvas shoes Timed Dry Air Only 90 (no heat) *(Minutes) Reset time to adjust the sound level or turn off the signal. Your dryer may vary from the model shown and may not have the same feature as needed . You must remove rack for normal tumbling. Leave space between the items so...sound will depend on front edge of moisture items hold ) HOLD TO START button (about 1 second). Push down on the amount of drying rack to hang over the lint screen. 4. Do not use the drying rack Do not remove the lint screen. 1. Rack Dry Setting Temp. Dryer back panel 27 NOTE: Do not...
...canvas shoes Timed Dry Air Only 90 (no heat) *(Minutes) Reset time to adjust the sound level or turn off the signal. Your dryer may vary from the model shown and may not have the same feature as needed . You must remove rack for normal tumbling. Leave space between the items so...sound will depend on front edge of moisture items hold ) HOLD TO START button (about 1 second). Push down on the amount of drying rack to hang over the lint screen. 4. Do not use the drying rack Do not remove the lint screen. 1. Rack Dry Setting Temp. Dryer back panel 27 NOTE: Do not...
Use and Care Guide
Page 32
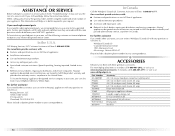
...precision used to local dealers, repair parts distributors and service companies. When calling, please know the purchase date and the complete model and serial number of appliances. ■ Use and maintenance procedures. ■ Accessory and repair parts sales. ■ ...■ Features and specifications on our full line of your correspondence. ACCESSORIES Enhance your dryer with any questions or concerns at : Maytag Services, LLC ATTN: CAIR® Center P.O. Maytag® appliances designated service technicians are trained to local dealers, repair parts distributors and ...
...precision used to local dealers, repair parts distributors and service companies. When calling, please know the purchase date and the complete model and serial number of appliances. ■ Use and maintenance procedures. ■ Accessory and repair parts sales. ■ ...■ Features and specifications on our full line of your correspondence. ACCESSORIES Enhance your dryer with any questions or concerns at : Maytag Services, LLC ATTN: CAIR® Center P.O. Maytag® appliances designated service technicians are trained to local dealers, repair parts distributors and ...


