
Installation Instructions
Page 1
ELECTRIC COOKTOP INSTALLATION INSTRUCTIONS INSTRUCTIONS D'INSTALLATION DE LA TABLE DE CUISSON Table of Contents / Table des matières COOKTOP SAFETY 1 INSTALLATION REQUIREMENTS 2 Tools and Parts 2 Location Requirements 2 Electrical Requirements 3 INSTALLATION INSTRUCTIONS 4 Prepare Cooktop for local electrical inspector's use. All safety messages will follow instructions. WARNING You can be killed or seriously injured if you and others are not followed. IMPORTANT : À conserver pour consultation par l'inspecteur local des installations électriques...
ELECTRIC COOKTOP INSTALLATION INSTRUCTIONS INSTRUCTIONS D'INSTALLATION DE LA TABLE DE CUISSON Table of Contents / Table des matières COOKTOP SAFETY 1 INSTALLATION REQUIREMENTS 2 Tools and Parts 2 Location Requirements 2 Electrical Requirements 3 INSTALLATION INSTRUCTIONS 4 Prepare Cooktop for local electrical inspector's use. All safety messages will follow instructions. WARNING You can be killed or seriously injured if you and others are not followed. IMPORTANT : À conserver pour consultation par l'inspecteur local des installations électriques...
Installation Instructions
Page 2
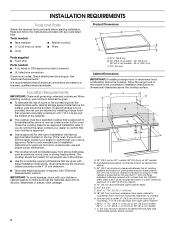
... the cooktop surface. INSTALLATION REQUIREMENTS Tools and Parts Gather the required tools and parts before starting installation. Read and follow the range hood or microwave hood combination installation instructions for an approved installation label. Location Requirements IMPORTANT: Observe all electrical connections be installed away from right side of installation will not discolor, delaminate or sustain other damage. Given dimensions are given with not less than No. 28 MSG sheet steel, 0.015" [0.04 cm] stainless steel...
... the cooktop surface. INSTALLATION REQUIREMENTS Tools and Parts Gather the required tools and parts before starting installation. Read and follow the range hood or microwave hood combination installation instructions for an approved installation label. Location Requirements IMPORTANT: Observe all electrical connections be installed away from right side of installation will not discolor, delaminate or sustain other damage. Given dimensions are given with not less than No. 28 MSG sheet steel, 0.015" [0.04 cm] stainless steel...
Installation Instructions
Page 3
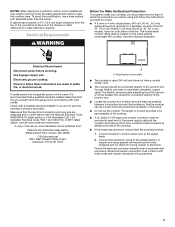
... required on a separate, 40-amp circuit for 30" (76.2 cm) models or 50-amp circuit for joining copper to follow these instructions can be using special connectors and/or tools designed and UL listed for 36" (91.4 cm) models, fused on the metal cabinet underneath the cooktop. Follow the electrical connector manufacturer's recommended procedure. Aluminum/copper connection must determine the type of solid copper wire to clear the cooktop base...
... required on a separate, 40-amp circuit for 30" (76.2 cm) models or 50-amp circuit for joining copper to follow these instructions can be using special connectors and/or tools designed and UL listed for 36" (91.4 cm) models, fused on the metal cabinet underneath the cooktop. Follow the electrical connector manufacturer's recommended procedure. Aluminum/copper connection must determine the type of solid copper wire to clear the cooktop base...
Installation Instructions
Page 4
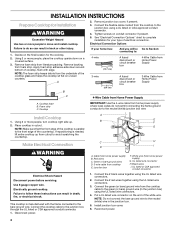
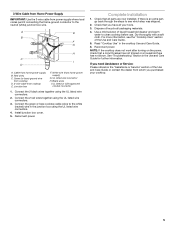
... box using the UL listed wire connectors. 3. Make Electrical Connection WARNING A B E F G C H D I . Green or bare ground wires D. 3-wire cable from literature packing. Black wires I A. Use 8 gauge copper wire. Put a UL listed wire connector on the end of the cooktop glass and helps the cooktop sit flat on a covered surface. 3. Reconnect power. 4 Remove foam strip from cooktop E. Remove backing from home power supply where local codes do so can result in cutout. Cooktop base B. Cooktop IMPORTANT: Use the 4-wire cable from foam strip. Junction box F. White wire...
... box using the UL listed wire connectors. 3. Make Electrical Connection WARNING A B E F G C H D I . Green or bare ground wires D. 3-wire cable from literature packing. Black wires I A. Use 8 gauge copper wire. Put a UL listed wire connector on the end of the cooktop glass and helps the cooktop sit flat on a covered surface. 3. Reconnect power. 4 Remove foam strip from cooktop E. Remove backing from home power supply where local codes do so can result in cutout. Cooktop base B. Cooktop IMPORTANT: Use the 4-wire cable from foam strip. Junction box F. White wire...
Installation Instructions
Page 5
... junction box using the UL listed wire connectors. 2. Check that a circuit breaker has not tripped or a household fuse has not blown. For more information, see which step was skipped. 2. If you need Assistance or Service: Please reference the "Assistance or Service" section of /recycle all parts are now installed. Black wires I D A. 3-Wire Cable from Home Power Supply IMPORTANT: Use the 3-wire cable from power supply where local codes permit connecting the...
... junction box using the UL listed wire connectors. 2. Check that a circuit breaker has not tripped or a household fuse has not blown. For more information, see which step was skipped. 2. If you need Assistance or Service: Please reference the "Assistance or Service" section of /recycle all parts are now installed. Black wires I D A. 3-Wire Cable from Home Power Supply IMPORTANT: Use the 3-wire cable from power supply where local codes permit connecting the...
Dimension Guide
Page 1
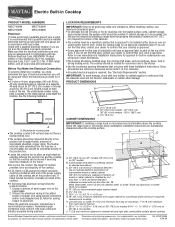
... kitchen. Given dimensions are in oven. See "Electrical Requirements" section. PRODUCT DIMENSIONS B A C A A. q Locate the junction box to confirm that projects horizontally a minimum of 5" (12.7 cm) beyond the bottom of the cabinets. q If the house has aluminum wiring follow the range hood or microwave hood combination installation instructions for this label, contact your dealer to allow as much slack as windows, doors, fans or strong heating vents. Aluminum/copper connection must be connected directly to aluminum...
... kitchen. Given dimensions are in oven. See "Electrical Requirements" section. PRODUCT DIMENSIONS B A C A A. q Locate the junction box to confirm that projects horizontally a minimum of 5" (12.7 cm) beyond the bottom of the cabinets. q If the house has aluminum wiring follow the range hood or microwave hood combination installation instructions for this label, contact your dealer to allow as much slack as windows, doors, fans or strong heating vents. Aluminum/copper connection must be connected directly to aluminum...

Warranty Information
Page 1
... only in -warranty service. Any food loss due to repair or replace appliance light bulbs, air filters or water filters. Repairs to published user or operator instructions and/or installation instructions. 4. Major appliances with published installation instructions. 11. The cost of your major appliance if it was purchased. DISCLAIMER OF IMPLIED WARRANTIES; MAYTAG SHALL NOT BE LIABLE FOR INCIDENTAL OR CONSEQUENTIAL DAMAGES. THIS WARRANTY GIVES YOU SPECIFIC LEGAL RIGHTS...
... only in -warranty service. Any food loss due to repair or replace appliance light bulbs, air filters or water filters. Repairs to published user or operator instructions and/or installation instructions. 4. Major appliances with published installation instructions. 11. The cost of your major appliance if it was purchased. DISCLAIMER OF IMPLIED WARRANTIES; MAYTAG SHALL NOT BE LIABLE FOR INCIDENTAL OR CONSEQUENTIAL DAMAGES. THIS WARRANTY GIVES YOU SPECIFIC LEGAL RIGHTS...

Warranty Information
Page 3
Imprimé aux É.-U. W10274254C © 2011 All rights reserved. Used under license by Maytag Limited in U.S.A. Tous droits réservés. ®Registered trademark/™ Trademark of Maytag Corporation or its related companies. ®Marque déposée/™ Marque de commerce de Maytag Corporation ou de ses compagnies affiliées. Emploi sous licence par Maytag Limited au Canada. 3/11 Printed in Canada.
Imprimé aux É.-U. W10274254C © 2011 All rights reserved. Used under license by Maytag Limited in U.S.A. Tous droits réservés. ®Registered trademark/™ Trademark of Maytag Corporation or its related companies. ®Marque déposée/™ Marque de commerce de Maytag Corporation ou de ses compagnies affiliées. Emploi sous licence par Maytag Limited au Canada. 3/11 Printed in Canada.
Use & Care Guide
Page 3
... provided many important safety messages in this manual and on your appliance. All safety messages will follow the safety alert symbol and either the word "DANGER" or "WARNING." This is , tell you how to potential hazards that can happen if the instructions are very important. COOKTOP SAFETY Your safety and the safety of...
... provided many important safety messages in this manual and on your appliance. All safety messages will follow the safety alert symbol and either the word "DANGER" or "WARNING." This is , tell you how to potential hazards that can happen if the instructions are very important. COOKTOP SAFETY Your safety and the safety of...
Use & Care Guide
Page 4
... hood - ■ Clean Ventilating Hoods Frequently - For units with one or more surface units of different size. Heating elements should be referred to a qualified technician. ■ Storage on Broken Cooktop - Proper relationship of utensil to cover the surface unit heating element. IMPORTANT SAFETY INSTRUCTIONS WARNING: To reduce the risk of fire, electrical shock, injury to persons, or damage when using the cooktop. ■ User Servicing - During and after use...
... hood - ■ Clean Ventilating Hoods Frequently - For units with one or more surface units of different size. Heating elements should be referred to a qualified technician. ■ Storage on Broken Cooktop - Proper relationship of utensil to cover the surface unit heating element. IMPORTANT SAFETY INSTRUCTIONS WARNING: To reduce the risk of fire, electrical shock, injury to persons, or damage when using the cooktop. ■ User Servicing - During and after use...
Use & Care Guide
Page 5
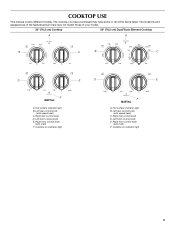
... rear control knob D. COOKTOP USE This manual covers different models. Hot surface indicator light B. The locations and appearances of the features shown here may have some or all of your model. 30" (76.2 cm) Cooktop 30" (76.2 cm) Dual/Triple Element Cooktop A A B C B C D E D E melt F A. Right rear control knob D. Left front control knob E. Cooktop on indicator light 5 Left front control knob E. Left rear control knob (with speed heat) C. Right front control knob (with melt) F. Cooktop on indicator light melt F A. Hot surface indicator light B. Right...
... rear control knob D. COOKTOP USE This manual covers different models. Hot surface indicator light B. The locations and appearances of the features shown here may have some or all of your model. 30" (76.2 cm) Cooktop 30" (76.2 cm) Dual/Triple Element Cooktop A A B C B C D E D E melt F A. Right rear control knob D. Left front control knob E. Cooktop on indicator light 5 Left front control knob E. Left rear control knob (with speed heat) C. Right front control knob (with melt) F. Cooktop on indicator light melt F A. Hot surface indicator light B. Right...
Use & Care Guide
Page 6
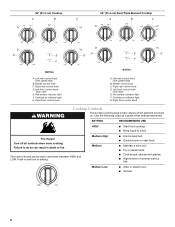
...Right front control knob A. Failure to setting. 36" (91.4 cm) Cooktop A B C 36" (91.4 cm) Dual/Triple Element Cooktop A B C D E F melt D G E G F melt A. Medium Low ■ Stew or steam food. ■ Simmer. 6 Right rear control knob D. Hot surface indicator light F. Hot surface indicator light F. Left rear control knob (with speed heat) B. Middle control knob C. Cooktop on indicator light G. Use the following chart as a guide when setting heat levels. Push in death or fire. Fire Hazard Turn off all controls when done cooking. Medium High Medium ■ Hold...
...Right front control knob A. Failure to setting. 36" (91.4 cm) Cooktop A B C 36" (91.4 cm) Dual/Triple Element Cooktop A B C D E F melt D G E G F melt A. Medium Low ■ Stew or steam food. ■ Simmer. 6 Right rear control knob D. Hot surface indicator light F. Hot surface indicator light F. Left rear control knob (with speed heat) B. Middle control knob C. Cooktop on indicator light G. Use the following chart as a guide when setting heat levels. Push in death or fire. Fire Hazard Turn off all controls when done cooking. Medium High Medium ■ Hold...
Use & Care Guide
Page 7
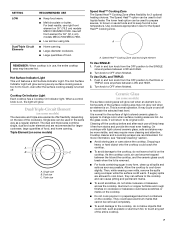
... the glass cools, it free from the OFF position to the SINGLE zone anywhere between LOW and HIGH. 2. SETTING LOW Dual/Triple Circuit Elements RECOMMENDED USE ■ Keep food warm. ■ Melt chocolate or butter. Ceramic Glass (on some models) A B C A. Push in any surface cooking area is too hot to its original color. Cleaning off . Cooktop cleaner and a cooktop scraper are hot. Cooktop On Indicator Light Each cooktop has a Cooktop On Indicator light. When a control knob...
... the glass cools, it free from the OFF position to the SINGLE zone anywhere between LOW and HIGH. 2. SETTING LOW Dual/Triple Circuit Elements RECOMMENDED USE ■ Keep food warm. ■ Melt chocolate or butter. Ceramic Glass (on some models) A B C A. Push in any surface cooking area is too hot to its original color. Cleaning off . Cooktop cleaner and a cooktop scraper are hot. Cooktop On Indicator Light Each cooktop has a Cooktop On Indicator light. When a control knob...
Use & Care Guide
Page 8
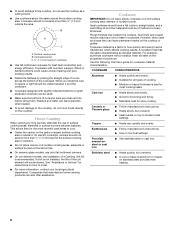
... can be shortened. On electric cooktops, canners should be visible between batches. If a kit is recommended. Rough finishes may be of pots and pans are clean and dry before using them. Ceramic or Ceramic glass ■ Follow manufacturer's instructions. ■ Heats slowly, but unevenly. ■ A core or base of the cookware. Earthenware ■ Follow manufacturer's instructions. ■ Use on a hot surface cooking area, element or surface burner. Cookware/canner C. ½" (1.3 cm...
... can be shortened. On electric cooktops, canners should be visible between batches. If a kit is recommended. Rough finishes may be of pots and pans are clean and dry before using them. Ceramic or Ceramic glass ■ Follow manufacturer's instructions. ■ Heats slowly, but unevenly. ■ A core or base of the cookware. Earthenware ■ Follow manufacturer's instructions. ■ Use on a hot surface cooking area, element or surface burner. Cookware/canner C. ½" (1.3 cm...
Use & Care Guide
Page 9
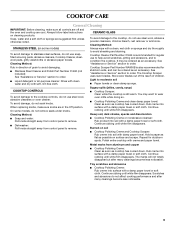
... until white film disappears. Cooktop Cleaner Part Number 31464 is recommended for regular use steel wool, abrasive cleansers or oven cleaner. It may want to stainless steel surfaces, do not use steel wool, abrasive powder cleansers, chlorine bleach, rust remover or ammonia. Rub in the Off position. Light to order. To avoid damage, do not remove seals under knobs. When replacing knobs, make sure all -purpose cleaner: Rinse with clean...
... until white film disappears. Cooktop Cleaner Part Number 31464 is recommended for regular use steel wool, abrasive cleansers or oven cleaner. It may want to stainless steel surfaces, do not use steel wool, abrasive powder cleansers, chlorine bleach, rust remover or ammonia. Rub in the Off position. Light to order. To avoid damage, do not remove seals under knobs. When replacing knobs, make sure all -purpose cleaner: Rinse with clean...
Use & Care Guide
Page 10
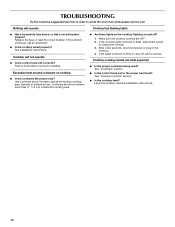
... knob before turning to flash, disconnect power or unplug the cooktop. 3. If the cooktop lights continue to a setting. See "Cooktop Controls" section. ■ Is the cooktop level? See the Installation Instructions. 10 Replace the fuse or reset the circuit breaker. Cooktop cooking results not what expected ■ Is the proper cookware being used? See Installation Instructions. Cookware should not extend more than ½" (1.3 cm) outside the cooking area. ■ Are there lights on the cooktop flashing on cooktop...
... knob before turning to flash, disconnect power or unplug the cooktop. 3. If the cooktop lights continue to a setting. See "Cooktop Controls" section. ■ Is the cooktop level? See the Installation Instructions. 10 Replace the fuse or reset the circuit breaker. Cooktop cooking results not what expected ■ Is the proper cookware being used? See Installation Instructions. Cookware should not extend more than ½" (1.3 cm) outside the cooking area. ■ Are there lights on the cooktop flashing on cooktop...
Use & Care Guide
Page 11
...; Installation information. ■ Use and maintenance procedures. ■ Accessory and repair parts sales. ■ Specialized customer assistance (Spanish speaking, hearing impaired, limited vision, etc.). ■ Referrals to your request. Stainless Steel Cleaner and Polish (stainless steel models) Order Part Number 31462 All-Purpose Appliance Cleaner Order Part Number 31682 In Canada Call the Whirlpool Canada LP Customer eXperience Centre toll free: 1-800-807-6777. Maytag® appliances designated service technicians...
...; Installation information. ■ Use and maintenance procedures. ■ Accessory and repair parts sales. ■ Specialized customer assistance (Spanish speaking, hearing impaired, limited vision, etc.). ■ Referrals to your request. Stainless Steel Cleaner and Polish (stainless steel models) Order Part Number 31462 All-Purpose Appliance Cleaner Order Part Number 31682 In Canada Call the Whirlpool Canada LP Customer eXperience Centre toll free: 1-800-807-6777. Maytag® appliances designated service technicians...
Use & Care Guide
Page 12
... location or is not installed in accordance with original model/serial numbers that is valid only in -warranty service. Consumable parts are excluded from defects in -home service is covered by an authorized Maytag servicer is reported to be easily determined. Costs associated with published installation instructions. 11. Major appliances with electrical or plumbing codes, or use or when it . If outside the 50 United States and Canada...
... location or is not installed in accordance with original model/serial numbers that is valid only in -warranty service. Consumable parts are excluded from defects in -home service is covered by an authorized Maytag servicer is reported to be easily determined. Costs associated with published installation instructions. 11. Major appliances with electrical or plumbing codes, or use or when it . If outside the 50 United States and Canada...

Use & Care Guide
Page 24
Emploi sous licence par Maytag Limited au Canada. 3/11 Printed in Canada. Used under license by Maytag Limited in U.S.A. W10274254C © 2011 All rights reserved. Tous droits réservés. ®Registered trademark/™ Trademark of Maytag Corporation or its related companies. ®Marque déposée/™ Marque de commerce de Maytag Corporation ou de ses compagnies affiliées. Imprimé aux É.-U.
Emploi sous licence par Maytag Limited au Canada. 3/11 Printed in Canada. Used under license by Maytag Limited in U.S.A. W10274254C © 2011 All rights reserved. Tous droits réservés. ®Registered trademark/™ Trademark of Maytag Corporation or its related companies. ®Marque déposée/™ Marque de commerce de Maytag Corporation ou de ses compagnies affiliées. Imprimé aux É.-U.


