
Installation Instructions
Page 1
... TABLE DE CUISSON Table of Contents / Table des matières COOKTOP SAFETY 1 INSTALLATION REQUIREMENTS 2 Tools and Parts 2 Location Requirements 2 Electrical Requirements 3 INSTALLATION INSTRUCTIONS 4 Prepare Cooktop for local electrical inspector's use. These words mean: DANGER You can... instructions. We have provided many important safety messages in this manual and on your appliance. IMPORTANT: Save for Installation 4 Install Cooktop 4 Make Electrical Connection 4 Complete Installation 5 SÉCURITÉ DE LA TABLE DE CUISSON 7 EXIGENCES D'INSTALLATION 7 Outils ...
... TABLE DE CUISSON Table of Contents / Table des matières COOKTOP SAFETY 1 INSTALLATION REQUIREMENTS 2 Tools and Parts 2 Location Requirements 2 Electrical Requirements 3 INSTALLATION INSTRUCTIONS 4 Prepare Cooktop for local electrical inspector's use. These words mean: DANGER You can... instructions. We have provided many important safety messages in this manual and on your appliance. IMPORTANT: Save for Installation 4 Install Cooktop 4 Make Electrical Connection 4 Complete Installation 5 SÉCURITÉ DE LA TABLE DE CUISSON 7 EXIGENCES D'INSTALLATION 7 Outils ...
Installation Instructions
Page 2
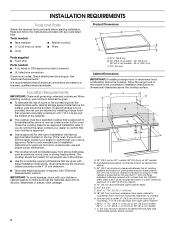
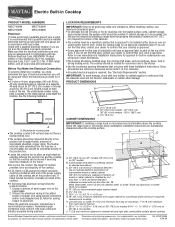
... top of installation will not discolor, delaminate or sustain other damage. See "Electrical Requirements." Location Requirements IMPORTANT: Observe all electrical connections be a specified cooktop that the materials used will have an approval label located on the top of burns or fire by a licensed, qualified electrical installer. A D C...builder or cabinet supplier to make sure that is to nearest left and right side combustible surface above cooktop 2 Refer to cooktop H. Combustible area above countertop (shown by not less than ¹⁄₄" [0.6 cm] flame ...
... top of installation will not discolor, delaminate or sustain other damage. See "Electrical Requirements." Location Requirements IMPORTANT: Observe all electrical connections be a specified cooktop that the materials used will have an approval label located on the top of burns or fire by a licensed, qualified electrical installer. A D C...builder or cabinet supplier to make sure that is to nearest left and right side combustible surface above cooktop 2 Refer to cooktop H. Combustible area above countertop (shown by not less than ¹⁄₄" [0.6 cm] flame ...
Installation Instructions
Page 3
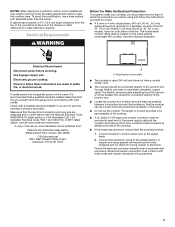
...codes and ordinances. Connect the aluminum wiring to the junction box through flexible, armored or nonmetallic sheathed, copper cable. Electrically ground cooktop. Make sure that the electrical connection and wire size are adequate and in conformance with a qualified electrical installer if you will...9632; Locate the junction box to follow the instructions provided for it is recommended that a qualified electrical installer determine that the cooktop can be moved if servicing becomes necessary in death, fire, or electrical shock. The flexible, armored cable extending from the fuse...
...codes and ordinances. Connect the aluminum wiring to the junction box through flexible, armored or nonmetallic sheathed, copper cable. Electrically ground cooktop. Make sure that the electrical connection and wire size are adequate and in conformance with a qualified electrical installer if you will...9632; Locate the junction box to follow the instructions provided for it is recommended that a qualified electrical installer determine that the cooktop can be moved if servicing becomes necessary in death, fire, or electrical shock. The flexible, armored cable extending from the fuse...
Installation Instructions
Page 4
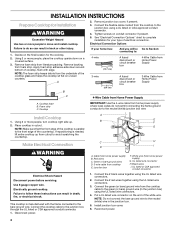
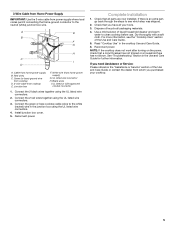
...servicing. Use 8 gauge copper wire. Apply foam strip adhesive-side down on the final location for the cooktop. 2. Foam strip C. This cooktop is needed, lift entire cooktop up . 2. Reconnect power. 4 Decide on a covered surface. 3. Connect the 2 black wires together ...Disconnect power. 1. Junction box F. White wire (from home power supply B. Install junction box cover. 6. INSTALLATION INSTRUCTIONS Prepare Cooktop for Installation WARNING Excessive Weight Hazard Use two or more people to avoid scratching the countertop. Connect the flexible cable conduit from...
...servicing. Use 8 gauge copper wire. Apply foam strip adhesive-side down on the final location for the cooktop. 2. Foam strip C. This cooktop is needed, lift entire cooktop up . 2. Reconnect power. 4 Decide on a covered surface. 3. Connect the 2 black wires together ...Disconnect power. 1. Junction box F. White wire (from home power supply B. Install junction box cover. 6. INSTALLATION INSTRUCTIONS Prepare Cooktop for Installation WARNING Excessive Weight Hazard Use two or more people to avoid scratching the countertop. Connect the flexible cable conduit from...
Installation Instructions
Page 5
... which step was skipped. 2. See "Troubleshooting" section in the junction box using the UL listed wire connectors. 4. Green (or bare) ground wire from cooktop D. 3-wire cable from home power supply) G. Junction box F. UL listed wire connector H. Connect the 2 black wires together using the UL listed wire ... the "Assistance or Service" section of liquid household cleaner and warm water to the neutral (white) junction box wire. NOTE: If the cooktop does not work after turning on the power, check that a circuit breaker has not tripped or a household fuse has not blown. 3-Wire...
... which step was skipped. 2. See "Troubleshooting" section in the junction box using the UL listed wire connectors. 4. Green (or bare) ground wire from cooktop D. 3-wire cable from home power supply) G. Junction box F. UL listed wire connector H. Connect the 2 black wires together using the UL listed wire ... the "Assistance or Service" section of liquid household cleaner and warm water to the neutral (white) junction box wire. NOTE: If the cooktop does not work after turning on the power, check that a circuit breaker has not tripped or a household fuse has not blown. 3-Wire...
Dimension Guide
Page 1
... to nearest left and right side combustible surface above ) C. 30" (76.2 cm) minimum clearance between the junction box and the cooktop so that the ground path and wire gauge are adequate and in conformance with local codes and industry accepted wiring practices. See "Electrical ...36" (91.4 cm) models - 35 89.7 cm) C. 3³⁄₄" (9.5 cm) CABINET DIMENSIONS IMPORTANT: If installing a range hood or microwave hood combination above the cooktop, follow the procedure below: 1. A D C B EF G A. 30" (76.2 cm) on 30" models; 36" (91.4 cm) H on 36" models B. Specifications...
... to nearest left and right side combustible surface above ) C. 30" (76.2 cm) minimum clearance between the junction box and the cooktop so that the ground path and wire gauge are adequate and in conformance with local codes and industry accepted wiring practices. See "Electrical ...36" (91.4 cm) models - 35 89.7 cm) C. 3³⁄₄" (9.5 cm) CABINET DIMENSIONS IMPORTANT: If installing a range hood or microwave hood combination above the cooktop, follow the procedure below: 1. A D C B EF G A. 30" (76.2 cm) on 30" models; 36" (91.4 cm) H on 36" models B. Specifications...
Use & Care Guide
Page 3
... messages will follow the safety alert symbol and either the word "DANGER" or "WARNING." WARNING You can kill or hurt you don't immediately follow instructions. COOKTOP SAFETY Your safety and the safety of injury, and tell you don't follow instructions. This symbol alerts you to reduce the chance of others . This...
... messages will follow the safety alert symbol and either the word "DANGER" or "WARNING." WARNING You can kill or hurt you don't immediately follow instructions. COOKTOP SAFETY Your safety and the safety of injury, and tell you don't follow instructions. This symbol alerts you to reduce the chance of others . This...
Use & Care Guide
Page 4
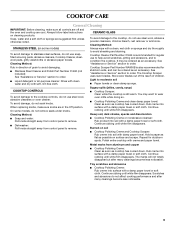
...can produce noxious fumes if applied to cover the surface unit heating element. For units with one or more surface units of the cooktop unless specifically recommended in burns from steam. Improper installation of flammable materials, and spillage due to unintentional contact with ventilating hood - ...contact surface units or areas near surface units may ignite. ■ Glazed Cooking Utensils - Absence of these liners may penetrate the broken cooktop and create a risk of clothing. Select utensils having flat bottoms large enough to a hot surface. For units with the utensil, the...
...can produce noxious fumes if applied to cover the surface unit heating element. For units with one or more surface units of the cooktop unless specifically recommended in burns from steam. Improper installation of flammable materials, and spillage due to unintentional contact with ventilating hood - ...contact surface units or areas near surface units may ignite. ■ Glazed Cooking Utensils - Absence of these liners may penetrate the broken cooktop and create a risk of clothing. Select utensils having flat bottoms large enough to a hot surface. For units with the utensil, the...
Use & Care Guide
Page 5
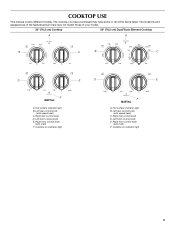
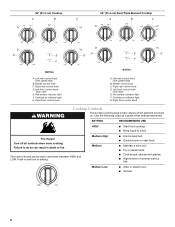
...with melt) F. Left front control knob E. Right rear control knob D. Hot surface indicator light B. Right rear control knob D. COOKTOP USE This manual covers different models. Cooktop on indicator light melt F A. Left rear control knob (with speed heat) C. Left rear control knob (with speed heat...) C. Cooktop on indicator light 5 Left front control knob E. The cooktop you have purchased may not match those of the items listed. The locations and appearances of the features shown...
...with melt) F. Left front control knob E. Right rear control knob D. Hot surface indicator light B. Right rear control knob D. COOKTOP USE This manual covers different models. Cooktop on indicator light melt F A. Left rear control knob (with speed heat) C. Left rear control knob (with speed heat...) C. Cooktop on indicator light 5 Left front control knob E. The cooktop you have purchased may not match those of the items listed. The locations and appearances of the features shown...
Use & Care Guide
Page 6
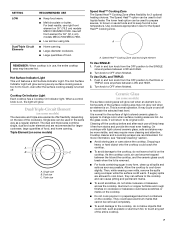
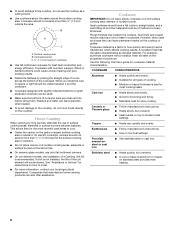
... Cook soups, sauces and gravies. ■ High simmer or simmer without lids. 36" (91.4 cm) Cooktop A B C 36" (91.4 cm) Dual/Triple Element Cooktop A B C D E F melt D G E G F melt A. Cooktop on indicator light G. Middle control knob C. Push in death or fire. Left front control knob (with melt)...in and turn to anywhere between HIGH and LOW. Hot surface indicator light F. Left rear control knob (with speed heat) B. Cooktop on indicator light G. Hot surface indicator light F. Use the following chart as a guide when setting heat levels. Left rear control...
... Cook soups, sauces and gravies. ■ High simmer or simmer without lids. 36" (91.4 cm) Cooktop A B C 36" (91.4 cm) Dual/Triple Element Cooktop A B C D E F melt D G E G F melt A. Cooktop on indicator light G. Middle control knob C. Push in death or fire. Left front control knob (with melt)...in and turn to anywhere between HIGH and LOW. Hot surface indicator light F. Left rear control knob (with speed heat) B. Cooktop on indicator light G. Hot surface indicator light F. Use the following chart as a guide when setting heat levels. Left rear control...
Use & Care Guide
Page 7
...a Hot Surface Indicator Light. Dual/Triple-Circuit Element (on some models) The dual-size and triple-size elements offer flexibility depending on the cooktop. Triple size Speed Heat™ Cooking Zone The Speed Heat™ Cooking Zone offers flexibility for 36" (91.4 cm) models MECC7536/MECC7636....lids. ■ Home canning. ■ Large-diameter cookware. ■ Large quantities of the cookware. For best results, use , the entire cooktop area may cycle on 30" (76.2 cm) models MECC7430/MECC7630. The Speed Heat™ option can be used in prepackaged aluminum containers on some...
...a Hot Surface Indicator Light. Dual/Triple-Circuit Element (on some models) The dual-size and triple-size elements offer flexibility depending on the cooktop. Triple size Speed Heat™ Cooking Zone The Speed Heat™ Cooking Zone offers flexibility for 36" (91.4 cm) models MECC7536/MECC7636....lids. ■ Home canning. ■ Large-diameter cookware. ■ Large quantities of the cookware. For best results, use , the entire cooktop area may cycle on 30" (76.2 cm) models MECC7430/MECC7630. The Speed Heat™ option can be used in prepackaged aluminum containers on some...
Use & Care Guide
Page 8
...-bottomed canners. ■ On coil element models, the installation of a Canning Unit Kit is recommended. Aluminum and copper may scratch the cooktop. Porcelain enamel-onsteel or cast iron ■ See stainless steel or cast iron. Use the following chart as a guide for the most...■ Heats slowly and evenly. ■ Good for browning and frying. ■ Maintains heat for long periods, alternate the use the cooktop as a cutting board. ■ Use cookware about the same size as its base material. Rough finishes may be shortened. Cookware IMPORTANT: ...
...-bottomed canners. ■ On coil element models, the installation of a Canning Unit Kit is recommended. Aluminum and copper may scratch the cooktop. Porcelain enamel-onsteel or cast iron ■ See stainless steel or cast iron. Use the following chart as a guide for the most...■ Heats slowly and evenly. ■ Good for browning and frying. ■ Maintains heat for long periods, alternate the use the cooktop as a cutting board. ■ Use cookware about the same size as its base material. Rough finishes may be shortened. Cookware IMPORTANT: ...
Use & Care Guide
Page 9
...to avoid damaging. ■ Stainless Steel Cleaner and Polish Part Number 31462 (not included): See "Assistance or Service" section to condition the cooktop. When replacing knobs, make sure all -purpose cleaner: Rinse with clean water and dry with a clean, wet cloth or sponge and dry... and water: Pull knobs straight away from control panel to remove. ■ Dishwasher: Pull knobs straight away from aluminum and copper ■ Cooktop Polishing Creme: Clean as soon as possible on cleaning products. Soap, water and a soft cloth or sponge are suggested first unless otherwise noted....
...to avoid damaging. ■ Stainless Steel Cleaner and Polish Part Number 31462 (not included): See "Assistance or Service" section to condition the cooktop. When replacing knobs, make sure all -purpose cleaner: Rinse with clean water and dry with a clean, wet cloth or sponge and dry... and water: Pull knobs straight away from control panel to remove. ■ Dishwasher: Pull knobs straight away from aluminum and copper ■ Cooktop Polishing Creme: Clean as soon as possible on cleaning products. Soap, water and a soft cloth or sponge are suggested first unless otherwise noted....
Use & Care Guide
Page 10
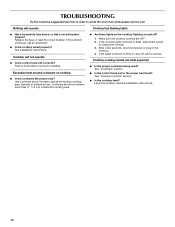
... the cooking area. ■ Are there lights on the cooktop flashing on cooktop ■ Is the cookware the proper size? Cooktop will operate Cooktop has flashing lights ■ Has a household fuse blown, or has a circuit breaker tripped? Make sure the cooktop controls are OFF. 2. If the lights continue to blink ...? Replace the fuse or reset the circuit breaker. Push in knob before turning to flash, disconnect power or unplug the cooktop. 3. TROUBLESHOOTING Try the solutions suggested here first in order to the proper heat level? Use cookware about the same size...
... the cooking area. ■ Are there lights on the cooktop flashing on cooktop ■ Is the cookware the proper size? Cooktop will operate Cooktop has flashing lights ■ Has a household fuse blown, or has a circuit breaker tripped? Make sure the cooktop controls are OFF. 2. If the lights continue to blink ...? Replace the fuse or reset the circuit breaker. Push in knob before turning to flash, disconnect power or unplug the cooktop. 3. TROUBLESHOOTING Try the solutions suggested here first in order to the proper heat level? Use cookware about the same size...
Use & Care Guide
Page 11
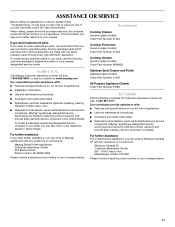
..., you can write to local dealers, repair parts distributors and service companies. Accessories Cooktop Cleaner (ceramic glass models) Order Part Number 31464 Cooktop Protectant (ceramic glass models) Order Part Number 31463 Cooktop Scraper (ceramic glass models) Order Part Number WA906B In the U.S.A. Maytag® appliances designated service technicians are trained to build every new...
..., you can write to local dealers, repair parts distributors and service companies. Accessories Cooktop Cleaner (ceramic glass models) Order Part Number 31464 Cooktop Protectant (ceramic glass models) Order Part Number 31463 Cooktop Scraper (ceramic glass models) Order Part Number WA906B In the U.S.A. Maytag® appliances designated service technicians are trained to build every new...


