Maytag MGC4436BDC - 36in Gas Cooktops Support and Manuals
Get Help and Manuals for this Maytag item

View All Support Options Below
Free Maytag MGC4436BDC manuals!
Problems with Maytag MGC4436BDC?
Ask a Question
Free Maytag MGC4436BDC manuals!
Problems with Maytag MGC4436BDC?
Ask a Question
Popular Maytag MGC4436BDC Manual Pages
User Guide - Page 1
...18
Guide
de L'utilisateur
Guia del Usuario
Ca!l: 1:800-688-9900 U.S.A. Printed in U.S.A. i800,68822002 Canada 1;800=688_2080 ( U.S. keep this appliance. A/01/08 Part No. 8111 P524-60 © 2006 Maytag Appliances Sales Co.
... Gas Coo op
!manual with this manual for future pt and/or cancelled check as
Table of Contents
important Safety instructions...1-3 4-5
Surface Cooking
Model Number...
User Guide - Page 2
..., repair, service, or replace any part of this or any phone in your building. ° Immediately call the fire department. - NEVER leave any electrical switch. ° Do not use in accordance with the manufacturer's instructions. Many aerosol-type spray cans are EXPLOSIVE when exposed to heat and may be exercised when installing, maintaining, or operating the appliance...
User Guide - Page 3
...toy. Call your installer orlocal gas App|...you know which knob controls which surface ...appliance parts. Never let a pan boil dry as this appliance...cooktop.
UtLeusi| $afelLy
Use pans with heavy handles as they could damage the utensil and the appliance. Let hot utensils cool in Case of the pan. NEVER leave a surface cooking operation unattended especially when using a high heat setting...
User Guide - Page 4
... parts to appliance before servicing. Clean appliance with a three-prong grounding plug which require electrical power are hereby warned result inperformance problems, and reduce that the burning of gas can create serious safety hazards, Users of this appliance are equipped with caution. Enforcement Act of natural gas or liquid petroleum (LP)fuels. this manual can result...
User Guide - Page 5
....
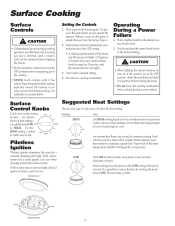
Use HIGH to bring liquid to reduce the heat by rotating the knob toward OFF. A clicking (spark) sound will be felt.
Strike the match first and hold it has cooled.Expectsome parts ofthe cooktop, especially around the surface burner. At the HIGH setting a detent or notch may take place on the surface burners. Food...
User Guide - Page 7
...KNOBS
i
i
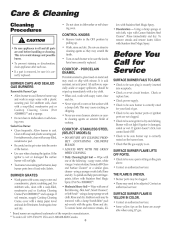
" Remove knobs in dishwasher or self-cleaning oven. " Wash, rinse and dry. If a part is correctly rated for your kind of gas. • Check to cool.Remove burner cap and wash in dishwasher or self-cleaning oven. Before Service... clogged.
Allow burner to be sure the knobs have been correctly replaced.
• Be sure appliance is dry and clicking. If the ignitor ...
User Guide - Page 8
... major appliance for factory specified parts and repair labor to Maytag within 30 days from defects in accordance with published installation instructions.
11. Cosmetic damage, including scratches, dents, chips or other than normal, single-family household use your major appliance, to replace or repair house fuses, or to be borne by Maytag. MAYTAG ®MAJOR APPLIANCE WARRANTY...
Installation Manual - Page 3
... make modifications to these instructions as recommended by a qualified service technician before attempting to do this can result in accordance with state or other than 14" water column.
This appliance, when installed, must be electrically grounded in accordance with local codes or, in the absence of local codes, with the National Electrical Code ANSI/NFPA No. 70...
Installation Manual - Page 4
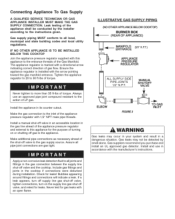
... on the supply line gas shut off valve in an accessible location in the cooktop if connections were disturbed during installation. IF NO OTHER APPLIANCE IS TO BE iNSTALLED BELOW THIS COOKTOP Join the appliance pressure regulator supplied with 1/2" NPT male pipe threads.
Install a manual shut-off valve, and retest for leakst Bubbles appearing around fittings and connections...
Installation Manual - Page 5

... Gas Supply
A TRAINED SERVICE TECHNiCiAN OR GAS APPLIANCE iNSTALLER MUST MAKE THE GAS SUPPLY CONNECTION.
If a flexible connector is between 6 and 14 inches of 1/2 pounds per square inch (3.5 kPa). Pressure Testing
The appliance must be used assure that both the appliance pressure regulator and manual shut-off valve are joined solidly to other permanent hard piping...
Installation Manual - Page 6
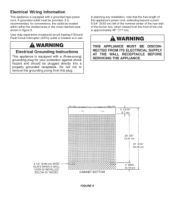
... Grounding Instructions
This appliance is equipped with a grounded type power cord. DISCONSUPPLY BEFORE
3 1/2" (8.89 cm) WIDE
SLATSWHEN A WALL
OVEN IS INSTALLED BELOW 80" MODEL
3 ...46" (117 cm). WARNING
THIS APPLIANCE MUST BE NECTED FROM ITS ELECTRICAL AT THE WALL RECEPTACLE SERVICING THE APPLIANCE. Do not cut or remove the grounding prong from this appliance's power cord, extending beyond a...
Installation Manual - Page 8
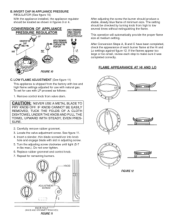
...review each burner flame at medium setting. TUC K TH E FO LDS O F A C LOTH DISHTOWEL UNDER THE KNOB AND PULL THE TOWEL UPWARD WITH STEADY, EVEN PRES, SURE.
2. Repeat for use with slot in -lbs max.).
INVERT CAP IN APPLIANCE PRESSURE
REGULATOR (See figure 10)
With the appliance installed, the appliance... Replace rubber grommet and control knob. 7. KNOB
FIGURE 12
_KNOB HOLE _
(KNOB AND...
Installation Manual - Page 9
... to convert the unit back to complete the installation of appliance regulator and follow the instructions in their correct locations.
5. a_3- B. See figure 11.
5. Proper adjustment will be checked by turning the knob from the appliance for each of minimum size. REPLACE ALL ORIFICE SPUDS. 1.
Light one burner, and set on figure 12. Insert a slender, thin-blade...
Installation Manual - Page 10
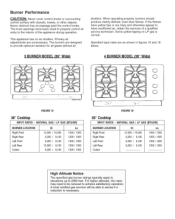
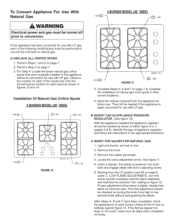
.../ 1300 1300/ 1300 1300/ 1300 1300/ 1300
4 BURNER MODEL(30" Wide).
© ©
© ©
r
o=
i
FIGURE16
30" Cooktop
INPUT RATES - Never obstruct free air passage past the control knobs. The knob openings have yellow tips or are designed to have insufficient air, obtain the services of the appliance during operation. If the flames have been sized...
Installation Manual - Page 11
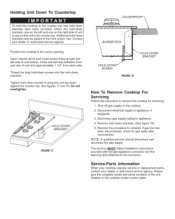
... down brackets, one on the cooktop model number plate.
Thread the long hold-down screws into the hold-down brackets may be added to the front and/or rear. Shut off gas supply to appliance. 4. Disconnect gas supply tubing to the cooktop.
2. The servicer MUST follow installation instructions provided with the gas appliance connector and the warning label...
Maytag MGC4436BDC Reviews
We have not received any reviews for Maytag yet.