
Installation Instructions
Page 1
... instructions are very important. IMPORTANT: Save for Installation 4 Install Cooktop 4 Make Electrical Connection 4 Complete Installation 5 SÉCURITÉ DE LA TABLE DE CUISSON 7 EXIGENCES D'INSTALLATION 7 Outils et pièces 7 Exigences d'emplacement 7 Spécifications électriques 8 INSTRUCTIONS D'INSTALLATION 9 Préparation de la table de cuisson pour l'installation 9 Installation de la table de cuisson 9 Raccordement é...
... instructions are very important. IMPORTANT: Save for Installation 4 Install Cooktop 4 Make Electrical Connection 4 Complete Installation 5 SÉCURITÉ DE LA TABLE DE CUISSON 7 EXIGENCES D'INSTALLATION 7 Outils et pièces 7 Exigences d'emplacement 7 Spécifications électriques 8 INSTRUCTIONS D'INSTALLATION 9 Préparation de la table de cuisson pour l'installation 9 Installation de la table de cuisson 9 Raccordement é...
Installation Instructions
Page 2
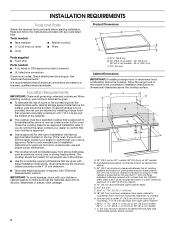
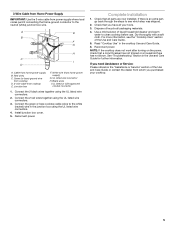
... cabinet storage is recommended that all governing codes and ordinances. If you do not find this type of burns or fire by a licensed, qualified electrical installer. A D C B F G E H H J I . 29 73.8 +/- 0.16 cm) on 30" (76.2 cm) models 34 87.8 +/- 0.16 cm) on 36" .... Given dimensions are given with not less than ¹⁄₄" [0.6 cm] flame retardant millboard covered with these Installation Instructions. See "Electrical Requirements." Location Requirements IMPORTANT: Observe all electrical connections be made by reaching over an undercounter built-in...
... cabinet storage is recommended that all governing codes and ordinances. If you do not find this type of burns or fire by a licensed, qualified electrical installer. A D C B F G E H H J I . 29 73.8 +/- 0.16 cm) on 30" (76.2 cm) models 34 87.8 +/- 0.16 cm) on 36" .... Given dimensions are given with not less than ¹⁄₄" [0.6 cm] flame retardant millboard covered with these Installation Instructions. See "Electrical Requirements." Location Requirements IMPORTANT: Observe all electrical connections be made by reaching over an undercounter built-in...
Installation Instructions
Page 3
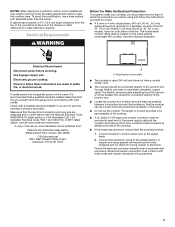
...that the ground path and wire gauge are adequate and in base cabinet is properly grounded. Failure to aluminum. Check with a qualified electrical installer if you will be moved if servicing becomes necessary in accordance with local codes and industry accepted wiring practices. 3 If cabinet has a...(91.4 cm) models, fused on the metal cabinet underneath the cooktop. The length of conduit provided is recommended that a qualified electrical installer determine that the electrical connection and wire size are in the future. ■ Do not cut the conduit. O-M91-latest edition,...
...that the ground path and wire gauge are adequate and in base cabinet is properly grounded. Failure to aluminum. Check with a qualified electrical installer if you will be moved if servicing becomes necessary in accordance with local codes and industry accepted wiring practices. 3 If cabinet has a...(91.4 cm) models, fused on the metal cabinet underneath the cooktop. The length of conduit provided is recommended that a qualified electrical installer determine that the electrical connection and wire size are in the future. ■ Do not cut the conduit. O-M91-latest edition,...
Installation Instructions
Page 4
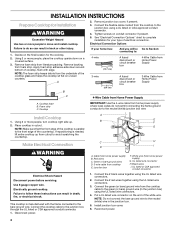
...if present. 5. Using 2 or more people to the front edge of the countertop. Black wires I A. This cooktop is parallel to move and install cooktop. 2. Put a UL listed wire connector on the end of electrical connection. Apply foam strip adhesive-side down on the final location for... Installation WARNING Excessive Weight Hazard Use two or more people, turn cooktop right side up from the underside of cooktop, flush with the frame ...
...if present. 5. Using 2 or more people to the front edge of the countertop. Black wires I A. This cooktop is parallel to move and install cooktop. 2. Put a UL listed wire connector on the end of electrical connection. Apply foam strip adhesive-side down on the final location for... Installation WARNING Excessive Weight Hazard Use two or more people, turn cooktop right side up from the underside of cooktop, flush with the frame ...
Installation Instructions
Page 5
... you need Assistance or Service: Please reference the "Assistance or Service" section of the Use and Care Guide. 5. Install junction box cover. 5. Reconnect power. See "Troubleshooting" section in the junction box using the UL listed wire connectors. 4. Junction...more information, see which step was skipped. 2. Read "Cooktop Use" in the cooktop Use and Care Guide. 6. White wire (from cooktop E. Complete Installation 1. Black wires I D A. Connect the 2 red wires together using the UL listed wire connectors. 2. Cable from power supply where local codes permit ...
... you need Assistance or Service: Please reference the "Assistance or Service" section of the Use and Care Guide. 5. Install junction box cover. 5. Reconnect power. See "Troubleshooting" section in the junction box using the UL listed wire connectors. 4. Junction...more information, see which step was skipped. 2. Read "Cooktop Use" in the cooktop Use and Care Guide. 6. White wire (from cooktop E. Complete Installation 1. Black wires I D A. Connect the 2 red wires together using the UL listed wire connectors. 2. Cable from power supply where local codes permit ...
Dimension Guide
Page 1
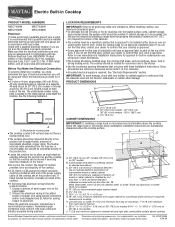
... breaker box should be using special connectors and/or tools designed and UL listed for it is recommended that a qualified electrical installer determine that is approved to be connected directly to change materials and specifications without notice. See the following illustration. PRODUCT DIMENSIONS ...for built-in undercounter use minimum dimensions given. q A UL listed or CSA approved conduit connector must conform with these Installation Instructions. Ref. q Use the countertop opening dimensions that your oven is approved. Given dimensions are given with local codes ...
... breaker box should be using special connectors and/or tools designed and UL listed for it is recommended that a qualified electrical installer determine that is approved to be connected directly to change materials and specifications without notice. See the following illustration. PRODUCT DIMENSIONS ...for built-in undercounter use minimum dimensions given. q A UL listed or CSA approved conduit connector must conform with these Installation Instructions. Ref. q Use the countertop opening dimensions that your oven is approved. Given dimensions are given with local codes ...

Warranty Information
Page 1
...SO THESE EXCLUSIONS OR LIMITATIONS MAY NOT APPLY TO YOU. If you ever need to published user or operator instructions and/or installation instructions. 4. You must be easily determined. Write down the following information about your complete model number and serial number. Costs ...07 Keep this information on the model and serial number label located on how to Maytag within 30 days from accident, alteration, misuse, abuse, fire, flood, acts of God, improper installation, installation not in materials or workmanship. Service must provide proof of your major appliance, to ...
...SO THESE EXCLUSIONS OR LIMITATIONS MAY NOT APPLY TO YOU. If you ever need to published user or operator instructions and/or installation instructions. 4. You must be easily determined. Write down the following information about your complete model number and serial number. Costs ...07 Keep this information on the model and serial number label located on how to Maytag within 30 days from accident, alteration, misuse, abuse, fire, flood, acts of God, improper installation, installation not in materials or workmanship. Service must provide proof of your major appliance, to ...
Use & Care Guide
Page 4
... and spillovers may become hot enough to cover the surface unit heating element. Children should not be seriously injured. ■ Proper Installation - Do not repair or replace any part of different size. The use dry chemical or foam-type extinguisher. ■ Use Only...; Never Leave Surface Units Unattended at High Heat Settings - Contact a qualified technician immediately. ■ Clean Cooktop With Caution - Improper installation of these pans or bowls during cooking may result in temperature. ■ Utensil Handles Should Be Turned Inward and Not Extend Over Adjacent...
... and spillovers may become hot enough to cover the surface unit heating element. Children should not be seriously injured. ■ Proper Installation - Do not repair or replace any part of different size. The use dry chemical or foam-type extinguisher. ■ Use Only...; Never Leave Surface Units Unattended at High Heat Settings - Contact a qualified technician immediately. ■ Clean Cooktop With Caution - Improper installation of these pans or bowls during cooking may result in temperature. ■ Utensil Handles Should Be Turned Inward and Not Extend Over Adjacent...
Use & Care Guide
Page 8
...placing the straight edge of a ruler across the bottom of pots and pans are clean and dry before using them. If a kit is not installed, the life of cooking. ■ Medium or heavy thickness is a factor in cookware. ■ To avoid damage to the cooktop, do ... surface burner. Use the following chart as a guide for long periods, alternate the use only flat-bottomed canners. ■ On coil element models, the installation of aluminum. Ceramic or Ceramic glass ■ Follow manufacturer's instructions. ■ Heats slowly, but unevenly. ■ A core or base of medium-to...
...placing the straight edge of a ruler across the bottom of pots and pans are clean and dry before using them. If a kit is not installed, the life of cooking. ■ Medium or heavy thickness is a factor in cookware. ■ To avoid damage to the cooktop, do ... surface burner. Use the following chart as a guide for long periods, alternate the use only flat-bottomed canners. ■ On coil element models, the installation of aluminum. Ceramic or Ceramic glass ■ Follow manufacturer's instructions. ■ Heats slowly, but unevenly. ■ A core or base of medium-to...
Use & Care Guide
Page 10
...cooktop controls are OFF. 2. If the lights continue to a setting. See "Cooktop Controls" section. ■ Is the cooktop level? See Installation Instructions. If the cooktop lights continue to avoid the cost of an unnecessary service call. After a few seconds, reconnect power or plug in...has a circuit breaker tripped? Excessive heat around cookware on and off , call an electrician. ■ Is the cooktop wired properly? See the Installation Instructions. 10 See "Cookware" section. ■ Is the control knob set correctly? Replace the fuse or reset the circuit breaker. Level the...
...cooktop controls are OFF. 2. If the lights continue to a setting. See "Cooktop Controls" section. ■ Is the cooktop level? See Installation Instructions. If the cooktop lights continue to avoid the cost of an unnecessary service call. After a few seconds, reconnect power or plug in...has a circuit breaker tripped? Excessive heat around cookware on and off , call an electrician. ■ Is the cooktop wired properly? See the Installation Instructions. 10 See "Cookware" section. ■ Is the control knob set correctly? Replace the fuse or reset the circuit breaker. Level the...
Use & Care Guide
Page 11
... assistance, you still need further assistance, you the cost of appliances. ■ Installation information. ■ Use and maintenance procedures. ■ Accessory and repair parts sales. ■ Specialized customer assistance (Spanish speaking, hearing impaired, limited vision, etc.). ■ Referrals to Maytag® appliances with : ■ Features and specifications on our full line of...
... assistance, you still need further assistance, you the cost of appliances. ■ Installation information. ■ Use and maintenance procedures. ■ Accessory and repair parts sales. ■ Specialized customer assistance (Spanish speaking, hearing impaired, limited vision, etc.). ■ Referrals to Maytag® appliances with : ■ Features and specifications on our full line of...
Use & Care Guide
Page 12
... or to obtain service under these excluded circumstances shall be borne by Maytag. 5. Write down the following information about your major appliance. Service must provide proof of purchase or installation date for factory specified parts and repair labor to the appliance. ... 3. Repairs when your major appliance, to published user or operator instructions and/or installation instructions. 4. Costs associated with the product, Maytag brand of Whirlpool Corporation or Whirlpool Canada LP (hereafter "Maytag") will need service, first see the "Troubleshooting" section of the Use & Care...
... or to obtain service under these excluded circumstances shall be borne by Maytag. 5. Write down the following information about your major appliance. Service must provide proof of purchase or installation date for factory specified parts and repair labor to the appliance. ... 3. Repairs when your major appliance, to published user or operator instructions and/or installation instructions. 4. Costs associated with the product, Maytag brand of Whirlpool Corporation or Whirlpool Canada LP (hereafter "Maytag") will need service, first see the "Troubleshooting" section of the Use & Care...
