
Owners Manual
Page 12
... this major appliance is operated and maintained according to instructions attached to or furnished with the product, Maytag brand of Whirlpool Corporation or Whirlpool Canada LP (hereafter "Maytag") will pay for factory specified parts and repair labor to correct defects in materials or workmanship and is... reported to Maytag within 30 days from the date of purchase. 6. Outside the 50 United States and Canada, this ...
... this major appliance is operated and maintained according to instructions attached to or furnished with the product, Maytag brand of Whirlpool Corporation or Whirlpool Canada LP (hereafter "Maytag") will pay for factory specified parts and repair labor to correct defects in materials or workmanship and is... reported to Maytag within 30 days from the date of purchase. 6. Outside the 50 United States and Canada, this ...

Installation Instructions
Page 12
... dishwasher will be installed (you will be removed for 34¹⁄₂" [87.6" cm].) 2 Adjust wheels and legs Place wires inside box. Visit www.whirlpool.com under FAQ tab. 4 Power Cord-Secure cord on conduit connector Tighten strain relief screws to secure cord. 5 Power Cord-Reinstall terminal box cover Determine...
... dishwasher will be installed (you will be removed for 34¹⁄₂" [87.6" cm].) 2 Adjust wheels and legs Place wires inside box. Visit www.whirlpool.com under FAQ tab. 4 Power Cord-Secure cord on conduit connector Tighten strain relief screws to secure cord. 5 Power Cord-Reinstall terminal box cover Determine...
Installation Instructions
Page 16
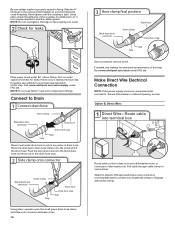
... of this step. Using pliers, check the tightness of the drain hose. Damage to "Secure Dishwasher in terminal box. Visit www.whirlpool.com/watersupply under 90° elbow fitting. Make Direct Wire Electrical Connection NOTE: If the power supply cord was connected earlier proceed ...clamp final position Black drain hose connector Green clamp Drain hose Drain hose stop Stop Stop Place towel under FAQ tab. Visit www.whirlpool.com/drain under drain hose to avoid unintentional cross-threading. Hand tighten until the coupling is properly seated in drain hose. NOTE: ...
... of this step. Using pliers, check the tightness of the drain hose. Damage to "Secure Dishwasher in terminal box. Visit www.whirlpool.com/watersupply under 90° elbow fitting. Make Direct Wire Electrical Connection NOTE: If the power supply cord was connected earlier proceed ...clamp final position Black drain hose connector Green clamp Drain hose Drain hose stop Stop Stop Place towel under FAQ tab. Visit www.whirlpool.com/drain under drain hose to avoid unintentional cross-threading. Hand tighten until the coupling is properly seated in drain hose. NOTE: ...

Installation Instructions
Page 17
... and white to green ground connector in conduit connector Ground wire Ground wire Washer Ground connector Form bare ground wire into a U-shaped hook. Visit www.whirlpool.com/electrical under the washer. Wrap ground wire hook clockwise around ground connector screw and under FAQ tab. 4 Direct Wire-Secure cable in terminal box...
... and white to green ground connector in conduit connector Ground wire Ground wire Washer Ground connector Form bare ground wire into a U-shaped hook. Visit www.whirlpool.com/electrical under the washer. Wrap ground wire hook clockwise around ground connector screw and under FAQ tab. 4 Direct Wire-Secure cable in terminal box...
Installation Instructions
Page 19
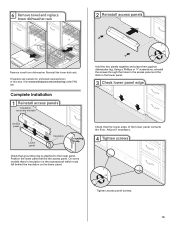
Position the lower panel behind the insulation on some models there is attached to the lower panel. Visit www.whirlpool.com/anchoring under FAQ tab. Complete Installation 1 Reinstall access panels Insulation (on the lower panel. Check that grounding clip is insulation on the access panel ...
Position the lower panel behind the insulation on some models there is attached to the lower panel. Visit www.whirlpool.com/anchoring under FAQ tab. Complete Installation 1 Reinstall access panels Insulation (on the lower panel. Check that grounding clip is insulation on the access panel ...
Energy Guide
Page 1
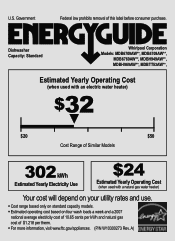
Dishwasher Capacity: Standard Whirlpool Corporation Models: MDB6709AW**, MDB4709AW**, MDB6769AW**, MDBH949AW**, MDBH969AW**, MDBTT53AW**, Estimated Yearly Operating Cost (when used with an electric water heater) $32 ▼ $20 $50 Cost Range of Similar Models 302 kWh Estimated ...
Dishwasher Capacity: Standard Whirlpool Corporation Models: MDB6709AW**, MDB4709AW**, MDB6769AW**, MDBH949AW**, MDBH969AW**, MDBTT53AW**, Estimated Yearly Operating Cost (when used with an electric water heater) $32 ▼ $20 $50 Cost Range of Similar Models 302 kWh Estimated ...
