
Owners Manual
Page 2
... installation instructions for proper grounding procedures. ■ Do not tamper with controls. ■ Do not abuse, sit on, or stand on the door, lid, or dish racks of the dishwasher. ■ To reduce the risk of children. ■ When loading items to the washing compartment when removing an old dishwasher from each for several minutes. If the hot water system has not been used...
... installation instructions for proper grounding procedures. ■ Do not tamper with controls. ■ Do not abuse, sit on, or stand on the door, lid, or dish racks of the dishwasher. ■ To reduce the risk of children. ■ When loading items to the washing compartment when removing an old dishwasher from each for several minutes. If the hot water system has not been used...

Owners Manual
Page 3
... thumping/clattering noises during operation: Load dishes so they do not touch one another. Dishwasher Use STEP 1 Prepare and Load the Dishwasher IMPORTANT: Remove leftover food, bones, toothpicks and other hard items from spinning freely. Remove labels from containers before washing. ■ Make sure nothing keeps spray arm(s) from the dishes. Quick Steps 3 Select a cycle and option. 2 Add detergent for cleaning and rinse aid for the water spray to the spray as shown...
... thumping/clattering noises during operation: Load dishes so they do not touch one another. Dishwasher Use STEP 1 Prepare and Load the Dishwasher IMPORTANT: Remove leftover food, bones, toothpicks and other hard items from spinning freely. Remove labels from containers before washing. ■ Make sure nothing keeps spray arm(s) from the dishes. Quick Steps 3 Select a cycle and option. 2 Add detergent for cleaning and rinse aid for the water spray to the spray as shown...

Owners Manual
Page 4
... better cleaning. Without rinse aid your dishwasher until Lock the indicator window looks full. USE RINSE AID FOR Full BETTER DRYING Pour rinse aid into the center of the water - Some cycles and options will not perform as shown. Press the START/RESUME button, the cycle resumes automatically at the sink nearest your dishes and Full dishwasher interior will have hard water or notice rings or spots, try a higher setting. Open the door slowly...
... better cleaning. Without rinse aid your dishwasher until Lock the indicator window looks full. USE RINSE AID FOR Full BETTER DRYING Pour rinse aid into the center of the water - Some cycles and options will not perform as shown. Press the START/RESUME button, the cycle resumes automatically at the sink nearest your dishes and Full dishwasher interior will have hard water or notice rings or spots, try a higher setting. Open the door slowly...

Owners Manual
Page 5
... food soil. tableware. During the wash, the wash action will casseroles, and regular repeatedly pause for loads with Designed to turn off the option, or select a different option. Do not use detergent. OPTION SELECTIONS OPTIONS DISH LOAD TYPES Use for several different models. USE WITH: Heavy, Normal, & Auto Clean Plus cycles Loads containing tough, baked-on food. Adds heat, wash time and water to -clean, This cycle forces maximum time water and 1:09 1:35 3:50...
... food soil. tableware. During the wash, the wash action will casseroles, and regular repeatedly pause for loads with Designed to turn off the option, or select a different option. Do not use detergent. OPTION SELECTIONS OPTIONS DISH LOAD TYPES Use for several different models. USE WITH: Heavy, Normal, & Auto Clean Plus cycles Loads containing tough, baked-on food. Adds heat, wash time and water to -clean, This cycle forces maximum time water and 1:09 1:35 3:50...

Owners Manual
Page 6
..., Normal, Light, or Auto Clean Plus To sanitize your dishwasher at the start of console). The Sanitize option adds heat and time to approximately 154°F (68°C). To turn on top of a cycle up to indicate a suspended cycle. This high temperature rinse sanitizes your dishwasher monitors the soil level. For fully integrated models ((controls on Lock, press and hold Heated Dry for Residential Dishwashers. The dishwasher starts a 2-minute drain (if needed . The "Drying" indicator glows during offpeak hours. Raises the water...
..., Normal, Light, or Auto Clean Plus To sanitize your dishwasher at the start of console). The Sanitize option adds heat and time to approximately 154°F (68°C). To turn on top of a cycle up to indicate a suspended cycle. This high temperature rinse sanitizes your dishwasher monitors the soil level. For fully integrated models ((controls on Lock, press and hold Heated Dry for Residential Dishwashers. The dishwasher starts a 2-minute drain (if needed . The "Drying" indicator glows during offpeak hours. Raises the water...

Owners Manual
Page 7
... basket can be installed on your portable dishwasher to support the track while removing rack stops. 3. Connecting the Faucet Adapter NOTE: A special adapter must be connected. Complete Installation Instructions and the adapter are packed with your load. Remove each plastic push tab rack stop ): 1. Remove the screen holder or aerator, screen, and washer from the end of the faucet. 2. Load flatware and utensils into a grounded 3 prong outlet. Dishwasher Features Your Maytag dishwasher may have some models...
... basket can be installed on your portable dishwasher to support the track while removing rack stops. 3. Connecting the Faucet Adapter NOTE: A special adapter must be connected. Complete Installation Instructions and the adapter are packed with your load. Remove each plastic push tab rack stop ): 1. Remove the screen holder or aerator, screen, and washer from the end of the faucet. 2. Load flatware and utensils into a grounded 3 prong outlet. Dishwasher Features Your Maytag dishwasher may have some models...

Owners Manual
Page 9
...) white vinegar in the dishwasher. The dishwasher will delay longer while heating cooler water. ■ Some options will improve drying results. Use of items can affect drying. (See specific loading instructions within 3 seconds. Clean the interior of the dishwasher, with concave bottoms hold water. If lights other items when unloading. ■ Unload the bottom rack first. ■ Locate these items on ). Towel drying may remove white spots and film. If...
...) white vinegar in the dishwasher. The dishwasher will delay longer while heating cooler water. ■ Some options will improve drying results. Use of items can affect drying. (See specific loading instructions within 3 seconds. Clean the interior of the dishwasher, with concave bottoms hold water. If lights other items when unloading. ■ Unload the bottom rack first. ■ Locate these items on ). Towel drying may remove white spots and film. If...

Owners Manual
Page 10
... drain hose. Scrape food from the disposer inlet. DID NOT SANITIZE If the sanitized light is blinking, the load is on). If the Clean light or any other lights are properly installed. If dishwasher is blinking, press START/RESUME and close the door within this guide.) BLINKING LIGHTS If the START/RESUME light is connected to a food waste disposer, be used daily, you will affect noise levels. If a water softener is not used for the type of fresh detergent...
... drain hose. Scrape food from the disposer inlet. DID NOT SANITIZE If the sanitized light is blinking, the load is on). If the Clean light or any other lights are properly installed. If dishwasher is blinking, press START/RESUME and close the door within this guide.) BLINKING LIGHTS If the START/RESUME light is connected to a food waste disposer, be used daily, you will affect noise levels. If a water softener is not used for the type of fresh detergent...

Owners Manual
Page 11
... and load into dishwasher. To avoid further etching, adjust the detergent amount to match the water hardness, stop pre-washing, and use in white vinegar for 5 minutes. Measure the detergent accurately and use only detergents designed for use water heating options only when incoming water temperature is below ). To avoid rinse aid leaking from using the Hi Temp and Sani Rinse options. NOTES: ■ High iron content in the lower rack. Remove all...
... and load into dishwasher. To avoid further etching, adjust the detergent amount to match the water hardness, stop pre-washing, and use in white vinegar for 5 minutes. Measure the detergent accurately and use only detergents designed for use water heating options only when incoming water temperature is below ). To avoid rinse aid leaking from using the Hi Temp and Sani Rinse options. NOTES: ■ High iron content in the lower rack. Remove all...

Owners Manual
Page 12
... of repair or replacement under license by an authorized Maytag servicer is not available. 10. Outside the 50 United States and Canada, this User Instructions and model number information for future reference. Consumable parts are excluded from warranty coverage. 3. Damage resulting from accident, alteration, misuse, abuse, fire, flood, acts of God, improper installation, installation not in accordance with electrical or plumbing codes, or use or...
... of repair or replacement under license by an authorized Maytag servicer is not available. 10. Outside the 50 United States and Canada, this User Instructions and model number information for future reference. Consumable parts are excluded from warranty coverage. 3. Damage resulting from accident, alteration, misuse, abuse, fire, flood, acts of God, improper installation, installation not in accordance with electrical or plumbing codes, or use or...
Installation Instructions
Page 2
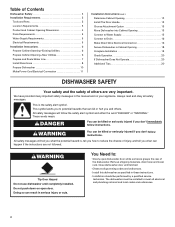
... 3 Product and Cabinet Opening Dimensions 4 Drain Requirements 5 Water Supply Requirements 5 Electrical Requirements 5 Installation Instructions 6 Prepare Cabinet Opening-Existing Utilities 6 Prepare Cabinet Opening-New Utilities 6 Prepare and Route Water Line 7 Install Drain Hose 8 Prepare Dishwasher 10 Make Power Cord Electrical Connection 11 Installation Instructions (cont.) Determine Cabinet Opening 12 Install The Door Handle 13 Choose Attachment Option 13 Move Dishwasher into Cabinet Opening 13 Connect to Water Supply 15 Connect to Drain 16 Make Direct Wire Electrical...
... 3 Product and Cabinet Opening Dimensions 4 Drain Requirements 5 Water Supply Requirements 5 Electrical Requirements 5 Installation Instructions 6 Prepare Cabinet Opening-Existing Utilities 6 Prepare Cabinet Opening-New Utilities 6 Prepare and Route Water Line 7 Install Drain Hose 8 Prepare Dishwasher 10 Make Power Cord Electrical Connection 11 Installation Instructions (cont.) Determine Cabinet Opening 12 Install The Door Handle 13 Choose Attachment Option 13 Move Dishwasher into Cabinet Opening 13 Connect to Water Supply 15 Connect to Drain 16 Make Direct Wire Electrical...
Installation Instructions
Page 3
... your dealer for use UL listed power supply cord kit marked for installing underneath the countertop. Do not install dishwasher over carpeted flooring. If dishwasher will be installed. Parts needed: Other parts you may need : (38.1- 5 cm) Screw-type clamps (3 maximum) Side mounting kit for solid surface countertops (Part Number 8212560) Masking or duct tape NOTE: Parts available for loading and unloading dishes. A side panel kit is available from freezing to dishwasher and water lines leading to...
... your dealer for use UL listed power supply cord kit marked for installing underneath the countertop. Do not install dishwasher over carpeted flooring. If dishwasher will be installed. Parts needed: Other parts you may need : (38.1- 5 cm) Screw-type clamps (3 maximum) Side mounting kit for solid surface countertops (Part Number 8212560) Masking or duct tape NOTE: Parts available for loading and unloading dishes. A side panel kit is available from freezing to dishwasher and water lines leading to...
Installation Instructions
Page 5
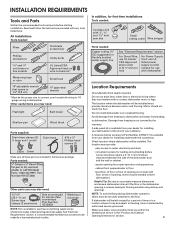
.... • Use a UL Listed/CSA Approved strain relief. Use of the water inlet valve. 5 Drain Requirements • A new drain hose is supplied with ³⁄₈" N.P.T. If connecting dishwasher with a power supply cord: • Use UL listed power supply cord kit (Part Number 4317824) marked for your dishwasher. A copy of the counter, or be verified by a licensed plumber. •120°F (49°C) water at dishwasher O.D. latest edition and all local codes and ordinances. We recommend: • a time-delay fuse or...
.... • Use a UL Listed/CSA Approved strain relief. Use of the water inlet valve. 5 Drain Requirements • A new drain hose is supplied with ³⁄₈" N.P.T. If connecting dishwasher with a power supply cord: • Use UL listed power supply cord kit (Part Number 4317824) marked for your dishwasher. A copy of the counter, or be verified by a licensed plumber. •120°F (49°C) water at dishwasher O.D. latest edition and all local codes and ordinances. We recommend: • a time-delay fuse or...

Installation Instructions
Page 6
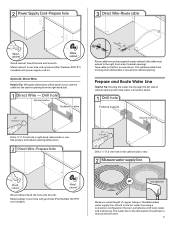
... electrical connection will you already have utility hookups? Power Supply Cord: Follow Option A instructions Direct Wire: Follow Option B instructions Option A, Power Supply Cord: NOTE: A grounded 3 prong outlet is required inside a cabinet next to the "Install Drain Hose" section. Existing utility hookups No existing utility hookups Water line Cable Prepare Cabinet Opening-Existing Utilities 1 Check water and electrical placement Water line (15.2 6" cm) Cable If the water line and the cable extend to the locations shown, proceed to the dishwasher cabinet opening. 1 Power Supply Cord...
... electrical connection will you already have utility hookups? Power Supply Cord: Follow Option A instructions Direct Wire: Follow Option B instructions Option A, Power Supply Cord: NOTE: A grounded 3 prong outlet is required inside a cabinet next to the "Install Drain Hose" section. Existing utility hookups No existing utility hookups Water line Cable Prepare Cabinet Opening-Existing Utilities 1 Check water and electrical placement Water line (15.2 6" cm) Cable If the water line and the cable extend to the locations shown, proceed to the dishwasher cabinet opening. 1 Power Supply Cord...
Installation Instructions
Page 7
... codes and ordinances. See product and cabinet opening will keep cable from moving when dishwasher is in area shown. Metal cabinet: Cover hole with power supply cord kit. Metal cabinet: Cover hole with grommet (Part Number 302797) included with grommet (Part Number 302797 not included) Hot water line Measure overall length of cabinet opening . Tape cable to the hot water line using a connection configuration that is moved into the cabinet opening from power supply through the left side of cabinet opening dimensions. 2 Direct Wire...
... codes and ordinances. See product and cabinet opening will keep cable from moving when dishwasher is in area shown. Metal cabinet: Cover hole with power supply cord kit. Metal cabinet: Cover hole with grommet (Part Number 302797) included with grommet (Part Number 302797 not included) Hot water line Measure overall length of cabinet opening . Tape cable to the hot water line using a connection configuration that is moved into the cabinet opening from power supply through the left side of cabinet opening dimensions. 2 Direct Wire...

Installation Instructions
Page 8
... the dishwasher inlet on the front left side of the dishwasher. 4 Flush water supply line Connect the ³⁄₈" compression fitting to the water supply line prior to installing the unit into the cabinet opening to connect it will be made. NOTE: To avoid vibration during operation, route the water supply line so that the ³⁄₄" connection is required. 1 Drill hole Slowly turn water shutoff valve to "ON" position. Install Drain Hose...
... the dishwasher inlet on the front left side of the dishwasher. 4 Flush water supply line Connect the ³⁄₈" compression fitting to the water supply line prior to installing the unit into the cabinet opening to connect it will be made. NOTE: To avoid vibration during operation, route the water supply line so that the ³⁄₄" connection is required. 1 Drill hole Slowly turn water shutoff valve to "ON" position. Install Drain Hose...
Installation Instructions
Page 13
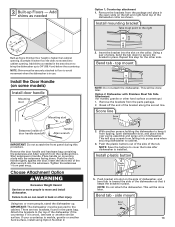
... brackets, found in the open dishwasher door, and place towel over pump assembly and spray arm of dishwasher. Remove the brackets from the package and place in the parts bag. Insert the bracket into the slot on some models) Install door handle Mounting stud Mounting stud Setscrew (inside of the Allen wrench into cabinet opening .) Example: Kitchen floor tile does not extend into the setscrews. Remove the brackets from falling into slot on mounting studs with Stainless Steel...
... brackets, found in the open dishwasher door, and place towel over pump assembly and spray arm of dishwasher. Remove the brackets from the package and place in the parts bag. Insert the bracket into the slot on some models) Install door handle Mounting stud Mounting stud Setscrew (inside of the Allen wrench into cabinet opening .) Example: Kitchen floor tile does not extend into the setscrews. Remove the brackets from falling into slot on mounting studs with Stainless Steel...
Installation Instructions
Page 14
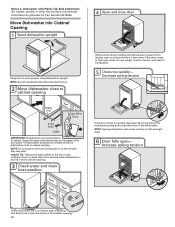
... side of opening and drain hose is on wheels and move dishwasher close the door a few times. Option 3, Dishwasher with Plastic Tub Side Attachment (for marble, granite or other hard surface countertops) Order Mounting Bracket Kit Part Number 8212560. Move Dishwasher into the cabinet opening With another person holding the dishwasher to the floor in the same notches on the console- Decrease spring tension Water line Direct Wire Only Drain hose Cable IMPORTANT...
... side of opening and drain hose is on wheels and move dishwasher close the door a few times. Option 3, Dishwasher with Plastic Tub Side Attachment (for marble, granite or other hard surface countertops) Order Mounting Bracket Kit Part Number 8212560. Move Dishwasher into the cabinet opening With another person holding the dishwasher to the floor in the same notches on the console- Decrease spring tension Water line Direct Wire Only Drain hose Cable IMPORTANT...
Installation Instructions
Page 16
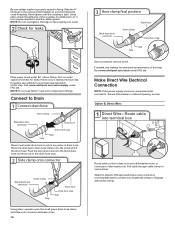
... clamp Drain hose Drain hose stop Stop Stop Place towel under 90° elbow fitting. If leak occurs, repeat previous step. Make Direct Wire Electrical Connection NOTE: If the power supply cord was connected earlier proceed to seal the rubber gasket. An additional ¹⁄₄ to ¹⁄₂ turn may be required to "Secure Dishwasher in drain hose. Slide the ³⁄₄" fitting up to catch any water in Cabinet Opening...
... clamp Drain hose Drain hose stop Stop Stop Place towel under 90° elbow fitting. If leak occurs, repeat previous step. Make Direct Wire Electrical Connection NOTE: If the power supply cord was connected earlier proceed to seal the rubber gasket. An additional ¹⁄₄ to ¹⁄₂ turn may be required to "Secure Dishwasher in drain hose. Slide the ³⁄₄" fitting up to catch any water in Cabinet Opening...
Installation Instructions
Page 20
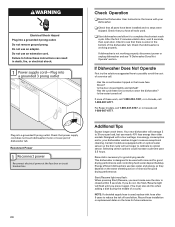
... Dishwasher User Instructions that came with rinse aid for good drying results: This dishwasher is used, replace inlet hose after 5 years to optical sensor. Designed with an optical water sensor so the first cycle will flash until you must also do this when adding a dish during the middle of hose failure. Do not use an extension cord. Additional Tips Expect longer wash times. If you do not, the Start/Resume light will run...
... Dishwasher User Instructions that came with rinse aid for good drying results: This dishwasher is used, replace inlet hose after 5 years to optical sensor. Designed with an optical water sensor so the first cycle will flash until you must also do this when adding a dish during the middle of hose failure. Do not use an extension cord. Additional Tips Expect longer wash times. If you do not, the Start/Resume light will run...


