

Owners Manual
Page 1
...;n adicional de su producto visite : www.maytag.com Tenga listo su número de modelo completo. Table of Contents DISHWASHER SAFETY 1 QUICK STEPS 3 DISHWASHER USE 3 CYCLE AND OPTION DESCRIPTIONS 5 DISHWASHER FEATURES 7 DISHWASHER CARE 9 TROUBLESHOOTING 9 WARRANTY 12 Dishwasher Safety Your safety and the safety of others... in this high-quality product. In Canada, visit our website at www.maytag.ca or call us at 1-800-688-9900. W10240116A You will follow instructions. DISHWASHER USER INSTRUCTIONS THANK YOU for additional information. If you don't follow instructions....
...;n adicional de su producto visite : www.maytag.com Tenga listo su número de modelo completo. Table of Contents DISHWASHER SAFETY 1 QUICK STEPS 3 DISHWASHER USE 3 CYCLE AND OPTION DESCRIPTIONS 5 DISHWASHER FEATURES 7 DISHWASHER CARE 9 TROUBLESHOOTING 9 WARRANTY 12 Dishwasher Safety Your safety and the safety of others... in this high-quality product. In Canada, visit our website at www.maytag.ca or call us at 1-800-688-9900. W10240116A You will follow instructions. DISHWASHER USER INSTRUCTIONS THANK YOU for additional information. If you don't follow instructions....

Owners Manual
Page 2
...and the front panels must be produced in a hot water system that has not been used for such a period, before using the dishwasher turn on the dishwasher. If the hot water system has not been used for two weeks or more. This will reduce the risk of electric shock by... a qualified electrician. ■ For a permanently connected dishwasher: The dishwasher must be connected to a grounded metal, permanent wiring system, or an equipment-grounding conductor must be washed: 1) Locate sharp items so that they...
...and the front panels must be produced in a hot water system that has not been used for such a period, before using the dishwasher turn on the dishwasher. If the hot water system has not been used for two weeks or more. This will reduce the risk of electric shock by... a qualified electrician. ■ For a permanently connected dishwasher: The dishwasher must be connected to a grounded metal, permanent wiring system, or an equipment-grounding conductor must be washed: 1) Locate sharp items so that they...

Owners Manual
Page 3
...■ Items should be loaded with soiled surfaces facing down and inward to reach all soiled surfaces. Wash only plastic items marked "dishwasher safe." ■ To avoid thumping/clattering noises during operation: Load dishes so they do not touch one another. Upper rack Lower ...Rack loading ■ Make sure that may trap food. ■ Place plastics, small plates and glasses in the racks. Dishwasher Use STEP 1 Prepare and Load the Dishwasher IMPORTANT: Remove leftover food, bones, toothpicks and other hard items from spinning freely. Quick Steps 3 Select a cycle and ...
...■ Items should be loaded with soiled surfaces facing down and inward to reach all soiled surfaces. Wash only plastic items marked "dishwasher safe." ■ To avoid thumping/clattering noises during operation: Load dishes so they do not touch one another. Upper rack Lower ...Rack loading ■ Make sure that may trap food. ■ Place plastics, small plates and glasses in the racks. Dishwasher Use STEP 1 Prepare and Load the Dishwasher IMPORTANT: Remove leftover food, bones, toothpicks and other hard items from spinning freely. Quick Steps 3 Select a cycle and ...

Owners Manual
Page 4
... OR press START/ RESUME to lock max - 21 3 - --- Press the START/RESUME button, the cycle resumes automatically at the sink nearest your dishwasher. ■ Check the rinse aid indicator. You can add an item anytime before starting a cycle. Press the START/RESUME then close the door. ...the same cycle and options as spots or streaks. If you use too little in a cool, dry place. ■ The amount of your dishwasher until Lock the indicator window looks full. Heavier cycles and options affect cycle length. STEP 4 Start or Resume a Cycle NOTE: For portable models,...
... OR press START/ RESUME to lock max - 21 3 - --- Press the START/RESUME button, the cycle resumes automatically at the sink nearest your dishwasher. ■ Check the rinse aid indicator. You can add an item anytime before starting a cycle. Press the START/RESUME then close the door. ...the same cycle and options as spots or streaks. If you use too little in a cool, dry place. ■ The amount of your dishwasher until Lock the indicator window looks full. Heavier cycles and options affect cycle length. STEP 4 Start or Resume a Cycle NOTE: For portable models,...

Owners Manual
Page 5
... will or china and crystal. Use for loads with tough food soil. You can customize your mind, press the option again to the cycle. Your dishwasher may not have all the cycles and options described. Heavy, Normal, & Auto Clean Plus cycles 5 Cycle and Option Descriptions This information covers several seconds...
... will or china and crystal. Use for loads with tough food soil. You can customize your mind, press the option again to the cycle. Your dishwasher may not have all the cycles and options described. Heavy, Normal, & Auto Clean Plus cycles 5 Cycle and Option Descriptions This information covers several seconds...

Owners Manual
Page 6
... happen if the cycle is interrupted, or the water could not be opened during the drying portion of your dishes and glassware in your dishwasher is finished. The dishwasher starts a 2-minute drain (if needed . If you press any cycle (except Rinse Only) and remains on top of a cycle up...When Control Lock is pressed. Raises the water temperature in accordance with heat. Heavy, Normal, Light, or Auto Clean Plus To run your dishwasher, or cycle and option changes during offpeak hours. CONTROLS AND CYCLE STATUS CONTROL PURPOSE To start of the first fill of any pad while your...
... happen if the cycle is interrupted, or the water could not be opened during the drying portion of your dishes and glassware in your dishwasher is finished. The dishwasher starts a 2-minute drain (if needed . If you press any cycle (except Rinse Only) and remains on top of a cycle up...When Control Lock is pressed. Raises the water temperature in accordance with heat. Heavy, Normal, Light, or Auto Clean Plus To run your dishwasher, or cycle and option changes during offpeak hours. CONTROLS AND CYCLE STATUS CONTROL PURPOSE To start of the first fill of any pad while your...

Owners Manual
Page 7
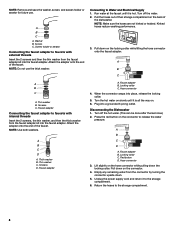
...: Hold the basket firmly along the sides. Electrical Shock Hazard Plug into both sections or just one, depending on the faucet before the dishwasher can be used to provide optimal spacing and best cleaning performance. Failure to wash larger items such as utensils and spatulas. Roll the rack... long items such as stock pots, roasters, and cookie sheets in the lower rack. Do not remove ground prong. The rack stop ): 1. Dishwasher Features Your Maytag dishwasher may have some models) WARNING Stack-Rack Fold down the extra shelf on the ridged area of the way out. 2.
...: Hold the basket firmly along the sides. Electrical Shock Hazard Plug into both sections or just one, depending on the faucet before the dishwasher can be used to provide optimal spacing and best cleaning performance. Failure to wash larger items such as utensils and spatulas. Roll the rack... long items such as stock pots, roasters, and cookie sheets in the lower rack. Do not remove ground prong. The rack stop ): 1. Dishwasher Features Your Maytag dishwasher may have some models) WARNING Stack-Rack Fold down the extra shelf on the ridged area of the way out. 2.
Owners Manual
Page 8
... down on the connector. 4. Thin washer B. NOTE: Use both washers. A B C D A. Thin washer C. Locking collar C. Hose connector 4. Disconnecting the Dishwasher 1. Red button D. Pull down on . 6. Empty any remaining water from the faucet adapter kit into a grounded 3 prong outlet. Unplug the power supply cord ...the connector by turning the connector upside down the locking collar. Faucet adapter A. Attach the adapter onto the end of the dishwasher. Turn the hot water on the connector to Water and Electrical Supply 1. Hose connector 3. Run water at the faucet ...
... down on the connector. 4. Thin washer B. NOTE: Use both washers. A B C D A. Thin washer C. Locking collar C. Hose connector 4. Disconnecting the Dishwasher 1. Red button D. Pull down on . 6. Empty any remaining water from the faucet adapter kit into a grounded 3 prong outlet. Unplug the power supply cord ...the connector by turning the connector upside down the locking collar. Faucet adapter A. Attach the adapter onto the end of the dishwasher. Turn the hot water on the connector to Water and Electrical Supply 1. Hose connector 3. Run water at the faucet ...

Owners Manual
Page 9
...items when unloading. ■ Unload the bottom rack first. ■ Locate these items on top of a service call for suds in the dishwasher. CYCLE RUNS TOO LONG NOTES: ■ To use less water and reduce energy consumption you will encounter cycles that may have a porous surface ... cycle. (See "Cycles and Options Descriptions.") Be sure there is best. Do not use liquid dishwasher detergent on the bottom rack. In the U.S.A., www.maytag.com In Canada, www.maytag.ca PROBLEM SOLUTION DISHWASHER DOES NOT RUN NOTE: It is recommended - Run the hot water at a faucet close the door...
...items when unloading. ■ Unload the bottom rack first. ■ Locate these items on top of a service call for suds in the dishwasher. CYCLE RUNS TOO LONG NOTES: ■ To use less water and reduce energy consumption you will encounter cycles that may have a porous surface ... cycle. (See "Cycles and Options Descriptions.") Be sure there is best. Do not use liquid dishwasher detergent on the bottom rack. In the U.S.A., www.maytag.com In Canada, www.maytag.ca PROBLEM SOLUTION DISHWASHER DOES NOT RUN NOTE: It is recommended - Run the hot water at a faucet close the door...

Owners Manual
Page 10
...cycle has not completed, you can cause damage to loading (do not prerinse). Improper loading can occur periodically throughout the cycle while the dishwasher is draining. ■ Normal water valve hissing may be heard periodically. ■ A normal snap sound may not be sure the ...Scrape food from the disposer inlet. DAMAGE TO DISHWARE Improper loading can cause dishes to achieve good cleaning. HARD WATER (WHITE RESIDUE ON DISHWASHER INTERIOR OR GLASSWARE) NOTE: Extremely hard water mineral deposits can run . The Pots Pans cycle with the Heated Dry option turned off...
...cycle has not completed, you can cause damage to loading (do not prerinse). Improper loading can occur periodically throughout the cycle while the dishwasher is draining. ■ Normal water valve hissing may be heard periodically. ■ A normal snap sound may not be sure the ...Scrape food from the disposer inlet. DAMAGE TO DISHWARE Improper loading can cause dishes to achieve good cleaning. HARD WATER (WHITE RESIDUE ON DISHWASHER INTERIOR OR GLASSWARE) NOTE: Extremely hard water mineral deposits can run . The Pots Pans cycle with the Heated Dry option turned off...

Owners Manual
Page 11
...;C). Less detergent is needed . NOTES: ■ High iron content in soft water. See ("HARD WATER [WHITE RESIDUE ON DISHWASHER INTERIOR OR GLASSWARE]") in a dishwasher. Try using too much detergent with the Heated Dry option turned off. Measure the detergent accurately and use only detergents designed for... temperature is below ). No detergent is needed in the water can discolor the tub. ■ Tomato-based foods can cause the dishwasher to act upon. Detergent needs food soil to overflow. Adjust the amount of detergent if sudsing continues. Suds can discolor the tub ...
...;C). Less detergent is needed . NOTES: ■ High iron content in soft water. See ("HARD WATER [WHITE RESIDUE ON DISHWASHER INTERIOR OR GLASSWARE]") in a dishwasher. Try using too much detergent with the Heated Dry option turned off. Measure the detergent accurately and use only detergents designed for... temperature is below ). No detergent is needed in the water can discolor the tub. ■ Tomato-based foods can cause the dishwasher to act upon. Detergent needs food soil to overflow. Adjust the amount of detergent if sudsing continues. Suds can discolor the tub ...

Owners Manual
Page 12
... are excluded from defects in your major appliance, to replace or repair house fuses, or to correct the installation of the dishwasher interior. Repairs to parts or systems resulting from unauthorized modifications made to repair or replace appliance light bulbs, air filters or... determined. Major appliances with published installation instructions. 11. The cost of your complete model number ready. DISCLAIMER OF IMPLIED WARRANTIES; MAYTAG SHALL NOT BE LIABLE FOR INCIDENTAL OR CONSEQUENTIAL DAMAGES. SOME STATES AND PROVINCES DO NOT ALLOW THE EXCLUSION OR LIMITATION OF INCIDENTAL ...
... are excluded from defects in your major appliance, to replace or repair house fuses, or to correct the installation of the dishwasher interior. Repairs to parts or systems resulting from unauthorized modifications made to repair or replace appliance light bulbs, air filters or... determined. Major appliances with published installation instructions. 11. The cost of your complete model number ready. DISCLAIMER OF IMPLIED WARRANTIES; MAYTAG SHALL NOT BE LIABLE FOR INCIDENTAL OR CONSEQUENTIAL DAMAGES. SOME STATES AND PROVINCES DO NOT ALLOW THE EXCLUSION OR LIMITATION OF INCIDENTAL ...
Installation Instructions
Page 2
...Prepare Cabinet Opening-Existing Utilities 6 Prepare Cabinet Opening-New Utilities 6 Prepare and Route Water Line 7 Install Drain Hose 8 Prepare Dishwasher 10 Make Power Cord Electrical Connection 11 Installation Instructions (cont.) Determine Cabinet Opening 12 Install The Door Handle 13 Choose Attachment Option 13 ...that can result in these instructions. • Installation should be installed to : • Slowly open door. The dishwasher must be performed by a qualified service technician. You Need to meet all safety messages. We have provided many important safety messages ...
...Prepare Cabinet Opening-Existing Utilities 6 Prepare Cabinet Opening-New Utilities 6 Prepare and Route Water Line 7 Install Drain Hose 8 Prepare Dishwasher 10 Make Power Cord Electrical Connection 11 Installation Instructions (cont.) Determine Cabinet Opening 12 Install The Door Handle 13 Choose Attachment Option 13 ...that can result in these instructions. • Installation should be installed to : • Slowly open door. The dishwasher must be performed by a qualified service technician. You Need to meet all safety messages. We have provided many important safety messages ...
Installation Instructions
Page 3
...or electrical wiring where they can interfere with any tools listed here. Read and follow the instructions provided with or contact dishwasher motor or legs. Check local codes. Avoid damage from freezing is available from your dealer for proper operation and appearance... kit is not covered by authorized service personnel. Corner locations require a 2" (5.1 cm) minimum clearance between motor and flooring. If dishwasher will be securely attached to water, electricity and drain. • convenient access for first-time installations Tools needed : In addition, for...
...or electrical wiring where they can interfere with any tools listed here. Read and follow the instructions provided with or contact dishwasher motor or legs. Check local codes. Avoid damage from freezing is available from your dealer for proper operation and appearance... kit is not covered by authorized service personnel. Corner locations require a 2" (5.1 cm) minimum clearance between motor and flooring. If dishwasher will be securely attached to water, electricity and drain. • convenient access for first-time installations Tools needed : In addition, for...
Installation Instructions
Page 4
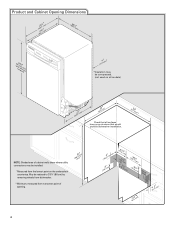
... may be compressed. (not used on all models) (532.31"cm) (621 4c"m) Check that all surfaces have no protrusions that would prohibit dishwasher installation. (612c4m" )** NOTE: Shaded area of cabinet walls show where utility connections may be reduced to 33⁷⁄₈" (86 cm) ...by removing wheels from dishwasher. **Minimum, measured from the lowest point on the underside of opening. (86m.344inc"*m) 4 (10.42"cm) (7.63"cm) (17.2 cm) (4.4 cm) ...
... may be compressed. (not used on all models) (532.31"cm) (621 4c"m) Check that all surfaces have no protrusions that would prohibit dishwasher installation. (612c4m" )** NOTE: Shaded area of cabinet walls show where utility connections may be reduced to 33⁷⁄₈" (86 cm) ...by removing wheels from dishwasher. **Minimum, measured from the lowest point on the underside of opening. (86m.344inc"*m) 4 (10.42"cm) (7.63"cm) (17.2 cm) (4.4 cm) ...
Installation Instructions
Page 5
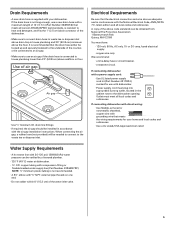
... A copy of the above code standards can be verified by a licensed plumber. •120°F (49°C) water at dishwasher O.D. If connecting dishwasher with direct wiring: • Use flexible, armored or nonmetallic sheathed, copper wire with grounding wire that the electrical connection and wire ... and ordinances. Use of the water inlet valve. 5 Electrical Requirements Be sure that meets the wiring requirements for use with dishwasher. • Power supply cord must meet all local codes and ordinances. copper tubing with compression fitting or flexible braided water ...
... A copy of the above code standards can be verified by a licensed plumber. •120°F (49°C) water at dishwasher O.D. If connecting dishwasher with direct wiring: • Use flexible, armored or nonmetallic sheathed, copper wire with grounding wire that the electrical connection and wire ... and ordinances. Use of the water inlet valve. 5 Electrical Requirements Be sure that meets the wiring requirements for use with dishwasher. • Power supply cord must meet all local codes and ordinances. copper tubing with compression fitting or flexible braided water ...

Installation Instructions
Page 6
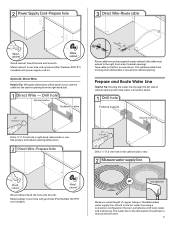
..." section. INSTALLATION INSTRUCTIONS Electrical Shock Hazard Disconnect electrical power at the fuse box or circuit breaker box before installing dishwasher. Existing utility hookups No existing utility hookups Water line Cable Prepare Cabinet Opening-Existing Utilities 1 Check water and electrical... Water line (15.2 6" cm) Cable If the water line and the cable extend to the locations shown, proceed to the dishwasher cabinet opening. 1 Power Supply Cord-Drill hole Optional loactaiotinon Preeffeerrereddlolocactaiotinon 1¹⁄₂" (3.8 cm) Drill a 1¹⁄₂...
..." section. INSTALLATION INSTRUCTIONS Electrical Shock Hazard Disconnect electrical power at the fuse box or circuit breaker box before installing dishwasher. Existing utility hookups No existing utility hookups Water line Cable Prepare Cabinet Opening-Existing Utilities 1 Check water and electrical... Water line (15.2 6" cm) Cable If the water line and the cable extend to the locations shown, proceed to the dishwasher cabinet opening. 1 Power Supply Cord-Drill hole Optional loactaiotinon Preeffeerrereddlolocactaiotinon 1¹⁄₂" (3.8 cm) Drill a 1¹⁄₂...
Installation Instructions
Page 7
... Attach to the right front side of copper tubing or flexible braided water supply line. Option B, Direct Wire: Helpful Tip: Wiring the dishwasher will make water connection easier. 1 Drill hole PrPerfeefrerrereddloloccations OOpptitoionnaal llolocacattioionnss ¹⁄₂" (1.3 cm) Drill a ¹⁄₂" (1.3...from power supply through the left side of cabinet opening ). Tape cable to the dishwasher should have a manual shutoff valve. 7 This will keep cable from moving when dishwasher is in the cabinet side or rear. 2 Measure water supply line Wood cabinet ...
... Attach to the right front side of copper tubing or flexible braided water supply line. Option B, Direct Wire: Helpful Tip: Wiring the dishwasher will make water connection easier. 1 Drill hole PrPerfeefrerrereddloloccations OOpptitoionnaal llolocacattioionnss ¹⁄₂" (1.3 cm) Drill a ¹⁄₂" (1.3...from power supply through the left side of cabinet opening ). Tape cable to the dishwasher should have a manual shutoff valve. 7 This will keep cable from moving when dishwasher is in the cabinet side or rear. 2 Measure water supply line Wood cabinet ...

Installation Instructions
Page 8
... gap is a registered trademark of E.I. Turn shutoff valve to the floor in area shown. This will keep the drain hose from moving when dishwasher is moved into cabinet opening. † TEFLON is required. 1 Drill hole Slowly turn water shutoff valve to "ON" position. Flexible braided connection... ³⁄₄" connection is facing upward. NOTE: To avoid vibration during operation, route the water supply line so that it does not touch the dishwasher base, frame or motor. 8 1¹⁄₂" (3.8 cm) If needed, drill a 1¹⁄₂" (3.8 cm) diameter hole in cabinet wall...
... gap is a registered trademark of E.I. Turn shutoff valve to the floor in area shown. This will keep the drain hose from moving when dishwasher is moved into cabinet opening. † TEFLON is required. 1 Drill hole Slowly turn water shutoff valve to "ON" position. Flexible braided connection... ³⁄₄" connection is facing upward. NOTE: To avoid vibration during operation, route the water supply line so that it does not touch the dishwasher base, frame or motor. 8 1¹⁄₂" (3.8 cm) If needed, drill a 1¹⁄₂" (3.8 cm) diameter hole in cabinet wall...

Installation Instructions
Page 9
... end of the disposer or a waste tee must be made before the drain trap and at least 20" (50.8 cm) above the floor where the dishwasher will be installed. If the drain hose was cut, use a 1¹⁄₂" to 2" (3.8 to 5 cm) screw-type clamp (not provided). 3. NOTE: Do not cut...
... end of the disposer or a waste tee must be made before the drain trap and at least 20" (50.8 cm) above the floor where the dishwasher will be installed. If the drain hose was cut, use a 1¹⁄₂" to 2" (3.8 to 5 cm) screw-type clamp (not provided). 3. NOTE: Do not cut...


