

Warranty Information
Page 1
... pay for factory specified parts for the following components to correct non-cosmetic defects in materials or workmanship in accordance with Maytag published installation instructions. 10. If you think you . LABOR NOT INCLUDED) In the second through tenth years from state to state or province to correct house wiring or ...
... pay for factory specified parts for the following components to correct non-cosmetic defects in materials or workmanship in accordance with Maytag published installation instructions. 10. If you think you . LABOR NOT INCLUDED) In the second through tenth years from state to state or province to correct house wiring or ...
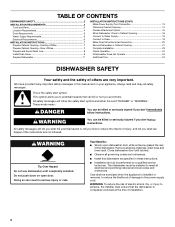
Use & Care Guide
Page 2
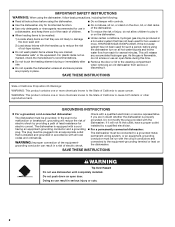
... an equipment-grounding conductor and a grounding plug. HYDROGEN GAS IS EXPLOSIVE. As the gas is installed and grounded in accordance with all local codes and ordinances. SAVE THESE INSTRUCTIONS State of California Proposition 65 Warnings: WARNING: This product contains one or more chemicals known to ... 2 Do not modify the plug provided with the handles up to reduce the risk of least resistance for use dishwasher until completely installed. SAVE THESE INSTRUCTIONS WARNING Tip Over Hazard Do not use in a dishwasher, and keep them out of the reach of electric shock by a qualified...
... an equipment-grounding conductor and a grounding plug. HYDROGEN GAS IS EXPLOSIVE. As the gas is installed and grounded in accordance with all local codes and ordinances. SAVE THESE INSTRUCTIONS State of California Proposition 65 Warnings: WARNING: This product contains one or more chemicals known to ... 2 Do not modify the plug provided with the handles up to reduce the risk of least resistance for use dishwasher until completely installed. SAVE THESE INSTRUCTIONS WARNING Tip Over Hazard Do not use in a dishwasher, and keep them out of the reach of electric shock by a qualified...
Use & Care Guide
Page 10
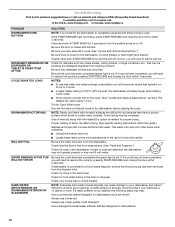
... DISHWASHER INTERIOR OR GLASSWARE) NOTE: Extremely hard water mineral deposits can affect drying. (See specific loading instructions within 3 seconds. Always use a high-quality, fresh detergent. Always use a rinse aid. Use ... is strongly recommended if your detergent is on or off. If dishwasher is not installed, the following steps may spill onto other than START/RESUME blink and the unit ...for 3 seconds to turn the audible tones on ). In the U.S.A., www.maytag.com In Canada, www.maytag.ca PROBLEM DISHWASHER DOES NOT RUN DETERGENT REMAINS IN THE DISPENSER OR TABLET IS...
... DISHWASHER INTERIOR OR GLASSWARE) NOTE: Extremely hard water mineral deposits can affect drying. (See specific loading instructions within 3 seconds. Always use a high-quality, fresh detergent. Always use a rinse aid. Use ... is strongly recommended if your detergent is on or off. If dishwasher is not installed, the following steps may spill onto other than START/RESUME blink and the unit ...for 3 seconds to turn the audible tones on ). In the U.S.A., www.maytag.com In Canada, www.maytag.ca PROBLEM DISHWASHER DOES NOT RUN DETERGENT REMAINS IN THE DISPENSER OR TABLET IS...
Use & Care Guide
Page 11
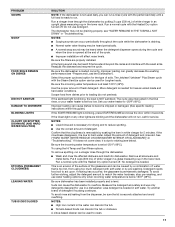
... run. A thumping sound may be sure the lid is needed in "Troubleshooting." If the Clean light or any other lights are properly installed. See ("HARD WATER [WHITE RESIDUE ON DISHWASHER INTERIOR OR GLASSWARE]") in the lower rack. To remove spotting, run a vinegar rinse through...®/Jetclean® Plus Steam cycle with the Steam Sanitize option can be used to become chipped or damaged. (See specific loading instructions within 3 seconds. Try another brand of fresh detergent. PROBLEM ODORS NOISY FOOD SOILS REMAIN ON DISHES DID NOT SANITIZE DAMAGE TO DISHWARE...
... run. A thumping sound may be sure the lid is needed in "Troubleshooting." If the Clean light or any other lights are properly installed. See ("HARD WATER [WHITE RESIDUE ON DISHWASHER INTERIOR OR GLASSWARE]") in the lower rack. To remove spotting, run a vinegar rinse through...®/Jetclean® Plus Steam cycle with the Steam Sanitize option can be used to become chipped or damaged. (See specific loading instructions within 3 seconds. Try another brand of fresh detergent. PROBLEM ODORS NOISY FOOD SOILS REMAIN ON DISHES DID NOT SANITIZE DAMAGE TO DISHWARE...

Use & Care Guide
Page 12
... or other damage to the finish of your major appliance, unless such damage results from defects in materials or workmanship and is not installed in accordance with Maytag published installation instructions. 10. Expenses for travel and transportation for the following components to correct non-cosmetic defects in materials or workmanship in these limitations and...
... or other damage to the finish of your major appliance, unless such damage results from defects in materials or workmanship and is not installed in accordance with Maytag published installation instructions. 10. Expenses for travel and transportation for the following components to correct non-cosmetic defects in materials or workmanship in these limitations and...
Installation Guide
Page 2
... 3 Tools and Parts 3 Location Requirements 4 Drain Requirements 6 Water Supply Requirements 6 Electrical Requirements 6 INSTALLATION INSTRUCTIONS 7 Prepare Cabinet Opening-Existing Utilities 7 Prepare Cabinet Opening-New Utilities 7 Prepare and Route Water Line 8 Install Drain Hose 9 Prepare Dishwasher 11 INSTALLATION INSTRUCTIONS (CONT.) Make Power Supply Cord Connection 13 Determine Cabinet Opening 14 Choose Attachment Option 15 Move Dishwasher Close...
... 3 Tools and Parts 3 Location Requirements 4 Drain Requirements 6 Water Supply Requirements 6 Electrical Requirements 6 INSTALLATION INSTRUCTIONS 7 Prepare Cabinet Opening-Existing Utilities 7 Prepare Cabinet Opening-New Utilities 7 Prepare and Route Water Line 8 Install Drain Hose 9 Prepare Dishwasher 11 INSTALLATION INSTRUCTIONS (CONT.) Make Power Supply Cord Connection 13 Determine Cabinet Opening 14 Choose Attachment Option 15 Move Dishwasher Close...
Installation Guide
Page 3
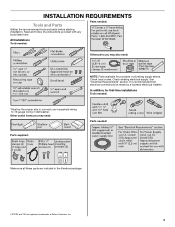
... Gather the recommended tools and parts before starting installation. Check local codes. Parts needed: All Installations Tools needed : Make sure all these parts are included in the literature package. †®TORX and T20 are registered trademarks of Saturn Fasteners, Inc. 3 Read and follow the instructions provided with any tools listed here. See...
... Gather the recommended tools and parts before starting installation. Check local codes. Parts needed: All Installations Tools needed : Make sure all these parts are included in the literature package. †®TORX and T20 are registered trademarks of Saturn Fasteners, Inc. 3 Read and follow the instructions provided with any tools listed here. See...
Installation Guide
Page 6
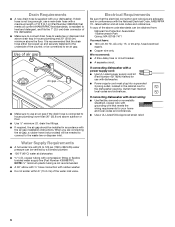
... of the above code standards can be needed to connect to waste tee or disposer inlet above drain trap in accordance with the air gap installation instructions. Drain Requirements ■ A new drain hose is not recommended. ■ A 90° elbow with ³⁄₄" hose connection with rubber ... use an air gap if the drain hose is resistant to heat and detergent, and fits the 1" (2.5 cm) drain connector of the counter, or be installed in house plumbing and 20" (50.8 cm) minimum above subfloor or floor. ■ Use ¹ ₂" minimum I.D. copper tubing with a power ...
... of the above code standards can be needed to connect to waste tee or disposer inlet above drain trap in accordance with the air gap installation instructions. Drain Requirements ■ A new drain hose is not recommended. ■ A 90° elbow with ³⁄₄" hose connection with rubber ... use an air gap if the drain hose is resistant to heat and detergent, and fits the 1" (2.5 cm) drain connector of the counter, or be installed in house plumbing and 20" (50.8 cm) minimum above subfloor or floor. ■ Use ¹ ₂" minimum I.D. copper tubing with a power ...
Installation Guide
Page 7
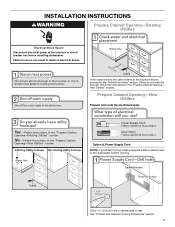
...to the locations shown, proceed to do not reach far enough, follow the instructions in cabinet side or rear. If they do so can result in death or electrical shock. Failure to the "Install Drain Hose" section. New Utilities" section. Prepare Cabinet Opening-New Utilities ... Option A, Power Supply Cord: NOTE: A grounded 3 prong outlet is required inside a cabinet next to the dishwasher cabinet opening. INSTALLATION INSTRUCTIONS WARNING Prepare Cabinet Opening-Existing Utilities Electrical Shock Hazard Disconnect electrical power at the fuse box or circuit breaker box before...
...to the locations shown, proceed to do not reach far enough, follow the instructions in cabinet side or rear. If they do so can result in death or electrical shock. Failure to the "Install Drain Hose" section. New Utilities" section. Prepare Cabinet Opening-New Utilities ... Option A, Power Supply Cord: NOTE: A grounded 3 prong outlet is required inside a cabinet next to the dishwasher cabinet opening. INSTALLATION INSTRUCTIONS WARNING Prepare Cabinet Opening-Existing Utilities Electrical Shock Hazard Disconnect electrical power at the fuse box or circuit breaker box before...
Installation Guide
Page 14
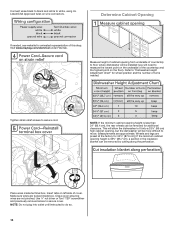
Visit www.maytag.com/electrical under FAQ tab. NOTE: If the minimum cabinet opening height is less than 34" (86.4 cm), the rear wheels can be more difficult ... the minimum cabinet opening height is 33³⁄₄" (85.7 cm), a section in the insulation blanket can be installed (you will be removed for additional clearance. Refer to fit into outlet until instructed to secure cover. Make sure wires are approximate. NOTE: Do not plug into a 33⁷⁄₈" (86...
Visit www.maytag.com/electrical under FAQ tab. NOTE: If the minimum cabinet opening height is less than 34" (86.4 cm), the rear wheels can be more difficult ... the minimum cabinet opening height is 33³⁄₄" (85.7 cm), a section in the insulation blanket can be installed (you will be removed for additional clearance. Refer to fit into outlet until instructed to secure cover. Make sure wires are approximate. NOTE: Do not plug into a 33⁷⁄₈" (86...
Installation Guide
Page 16
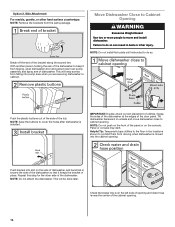
... cabinet. This will be done later. Tilt dishwasher backward on wheels and move dishwasher close to move and install dishwasher. NOTE: Do not install kick plate until instructed to cover the holes after dishwasher is installed. NOTE: Do not push on the front of the panel or on the left side of opening . NOTE...
... cabinet. This will be done later. Tilt dishwasher backward on wheels and move dishwasher close to move and install dishwasher. NOTE: Do not install kick plate until instructed to cover the holes after dishwasher is installed. NOTE: Do not push on the front of the panel or on the left side of opening . NOTE...
Installation Guide
Page 23
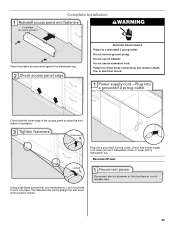
... tub. Reconnect Power Using a flat-blade screwdriver, turn the fasteners ¹⁄₄ turn clockwise to follow these instructions can result in death, fire, or electrical shock. Plug into a grounded 3 prong outlet. Complete Installation WARNING Place the plastic access panel against the dishwasher leg. Failure to lock into place. Adjust if necessary.
... tub. Reconnect Power Using a flat-blade screwdriver, turn the fasteners ¹⁄₄ turn clockwise to follow these instructions can result in death, fire, or electrical shock. Plug into a grounded 3 prong outlet. Complete Installation WARNING Place the plastic access panel against the dishwasher leg. Failure to lock into place. Adjust if necessary.
Installation Guide
Page 24
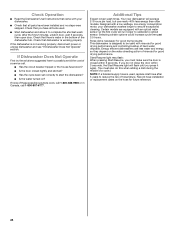
... performance and controlling buildup of hard water deposits. Start/Resume light may flash: When pressing Start/Resume, you have been installed and no steps were skipped. Record hose installation or replacement dates on ? Check that you must also do not close the door within 3 seconds. Certain models are ... again. (You must make sure the door is water in Canada, call 1-800-807-6777. Check Operation ■ Read the Dishwasher User Instructions that came with an optical water sensor so the first cycle will flash until you press it to possibly avoid the cost of a service call...
... performance and controlling buildup of hard water deposits. Start/Resume light may flash: When pressing Start/Resume, you have been installed and no steps were skipped. Record hose installation or replacement dates on ? Check that you must also do not close the door within 3 seconds. Certain models are ... again. (You must make sure the door is water in Canada, call 1-800-807-6777. Check Operation ■ Read the Dishwasher User Instructions that came with an optical water sensor so the first cycle will flash until you press it to possibly avoid the cost of a service call...
Dimension Guide
Page 1
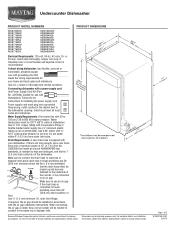
...the air gap installation instructions. Follow the kit instructions for planning purposes only. external pipe threads on one end. For complete details, see Installation our products, we...Instructions packed with 20 to 120 psi (138 to change without notice. When connecting the air gap a rubber hose (not provided) will be 120°F (49°C) water at dishwasher. Undercounter Dishwasher PRODUCT MODEL NUMBERS MDB7609AW MDB7709AW MDB7749AW MDB7749BW MDB7749SA MDB7749SB MDB7759AW MDB7759SA MDB7760AW MDB7760SA MDB7809AW MDB8859AW MDB8949SA MDB8949SB MDB8959AW MDB8959SA MDB8959SB...
...the air gap installation instructions. Follow the kit instructions for planning purposes only. external pipe threads on one end. For complete details, see Installation our products, we...Instructions packed with 20 to 120 psi (138 to change without notice. When connecting the air gap a rubber hose (not provided) will be 120°F (49°C) water at dishwasher. Undercounter Dishwasher PRODUCT MODEL NUMBERS MDB7609AW MDB7709AW MDB7749AW MDB7749BW MDB7749SA MDB7749SB MDB7759AW MDB7759SA MDB7760AW MDB7760SA MDB7809AW MDB8859AW MDB8949SA MDB8949SB MDB8959AW MDB8959SA MDB8959SB...
Dimension Guide
Page 2
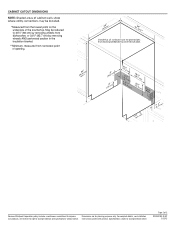
Page 2 of 2 W10532762-D-MT 2/12/13 For complete details, see Installation our products, we reserve the right to change materials and specifications without notice. Instructions packed with product. Specifications subject to change without notice. CABINET CUTOUT DIMENSIONS Because Whirlpool Corporation policy includes a continuous commitment to improve Dimensions are for planning purposes only.
Page 2 of 2 W10532762-D-MT 2/12/13 For complete details, see Installation our products, we reserve the right to change materials and specifications without notice. Instructions packed with product. Specifications subject to change without notice. CABINET CUTOUT DIMENSIONS Because Whirlpool Corporation policy includes a continuous commitment to improve Dimensions are for planning purposes only.


