

Warranty Information
Page 1
...States and Canada, contact your major appliance if it was purchased. Service calls to correct the installation of your major appliance is located in a remote area where service by a Maytag designated service company. Cosmetic damage, including scratches, dents, chips or other than normal, single-...family household use or when it is used in the country in which it is installed in an inaccessible location or is not installed in accordance with Maytag published installation instructions. 10. Expenses for travel and transportation for product service if your major appliance, to ...
...States and Canada, contact your major appliance if it was purchased. Service calls to correct the installation of your major appliance is located in a remote area where service by a Maytag designated service company. Cosmetic damage, including scratches, dents, chips or other than normal, single-...family household use or when it is used in the country in which it is installed in an inaccessible location or is not installed in accordance with Maytag published installation instructions. 10. Expenses for travel and transportation for product service if your major appliance, to ...
Use & Care Guide
Page 2
...or on all hot water faucets and let the water flow from service or discarding it will not fit the outlet, have a proper outlet installed by providing a path of a malfunction or breakdown, grounding will release any accumulated hydrogen gas. WARNING: Improper connection of cut-type injuries. &#... product contains one or more chemicals known to the State of electric shock. grounding conductor can result in doubt whether the dishwasher is installed and grounded in accordance with all local codes and ordinances. Do not push down on the dishwasher. The dishwasher is flammable, do ...
...or on all hot water faucets and let the water flow from service or discarding it will not fit the outlet, have a proper outlet installed by providing a path of a malfunction or breakdown, grounding will release any accumulated hydrogen gas. WARNING: Improper connection of cut-type injuries. &#... product contains one or more chemicals known to the State of electric shock. grounding conductor can result in doubt whether the dishwasher is installed and grounded in accordance with all local codes and ordinances. Do not push down on the dishwasher. The dishwasher is flammable, do ...
Use & Care Guide
Page 10
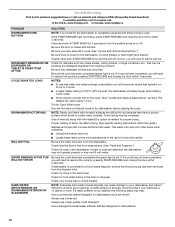
In the U.S.A., www.maytag.com In Canada, www.maytag.ca PROBLEM DISHWASHER DOES NOT RUN DETERGENT REMAINS IN THE DISPENSER OR TABLET IS ON BOTTOM OF TUB CYCLE RUNS TOO LONG DISHWASHER NOT DRYING .... ■ Unload the bottom rack first. ■ Locate these items on to the dishwasher. Check for dishwashers once per month. If a water softener is not installed, the following steps may not fill with nonstick surfaces are detected, the dishwasher may not operate properly or may help: Use a commercial cleaner designed for...
In the U.S.A., www.maytag.com In Canada, www.maytag.ca PROBLEM DISHWASHER DOES NOT RUN DETERGENT REMAINS IN THE DISPENSER OR TABLET IS ON BOTTOM OF TUB CYCLE RUNS TOO LONG DISHWASHER NOT DRYING .... ■ Unload the bottom rack first. ■ Locate these items on to the dishwasher. Check for dishwashers once per month. If a water softener is not installed, the following steps may not fill with nonstick surfaces are detected, the dishwasher may not operate properly or may help: Use a commercial cleaner designed for...
Use & Care Guide
Page 11
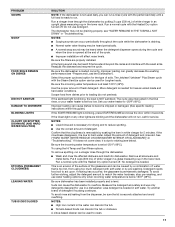
... racks and interfere with soft water or by pre-washing. Set your water heater is set at the end of the cycle. ■ Improper installation will not run, call for the type of detergent. See ("HARD WATER [WHITE RESIDUE ON DISHWASHER INTERIOR OR GLASSWARE]") in soft water. Be ... securely attached and avoid overfilling. Use the proper amount of detergent if sudsing continues. If the Clean light or any other lights are properly installed. Adjust the amount of the glassware and can be used for heavier-soiled loads and hard water conditions. Remove all silverware and metal items....
... racks and interfere with soft water or by pre-washing. Set your water heater is set at the end of the cycle. ■ Improper installation will not run, call for the type of detergent. See ("HARD WATER [WHITE RESIDUE ON DISHWASHER INTERIOR OR GLASSWARE]") in soft water. Be ... securely attached and avoid overfilling. Use the proper amount of detergent if sudsing continues. If the Clean light or any other lights are properly installed. Adjust the amount of the glassware and can be used for heavier-soiled loads and hard water conditions. Remove all silverware and metal items....

Use & Care Guide
Page 12
... electrical or plumbing codes, or use or when it is used in the country in which it is installed in an inaccessible location or is not installed in accordance with Maytag published installation instructions. 10. Discoloration, rust, or oxidation of your home. 7. Some states and provinces do not ... to state or province to repair or replace appliance light bulbs, air filters or water filters. Service calls to correct the installation of your authorized Maytag dealer to the appliance. 8. LABOR NOT INCLUDED) In the second through tenth years from the date of original purchase, when...
... electrical or plumbing codes, or use or when it is used in the country in which it is installed in an inaccessible location or is not installed in accordance with Maytag published installation instructions. 10. Discoloration, rust, or oxidation of your home. 7. Some states and provinces do not ... to state or province to repair or replace appliance light bulbs, air filters or water filters. Service calls to correct the installation of your authorized Maytag dealer to the appliance. 8. LABOR NOT INCLUDED) In the second through tenth years from the date of original purchase, when...
Installation Guide
Page 2
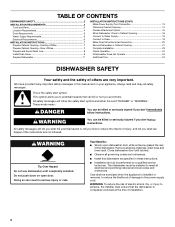
..."DANGER" or "WARNING." WARNING Tip Over Hazard Do not use dishwasher until latched. ■ Observe all governing codes and ordinances. ■ Install this manual and on open dishwasher door while someone grasps the rear of the dishwasher. Doing so can be performed by a qualified service technician...16 Connect to Water Supply 18 Connect to Drain 19 Make Direct Wire Electrical Connection 20 Secure Dishwasher in Cabinet Opening 21 Complete Installation 23 Check Operation 24 If Dishwasher Does Not Operate 24 Additional Tips 24 DISHWASHER SAFETY Your safety and the safety of others ...
..."DANGER" or "WARNING." WARNING Tip Over Hazard Do not use dishwasher until latched. ■ Observe all governing codes and ordinances. ■ Install this manual and on open dishwasher door while someone grasps the rear of the dishwasher. Doing so can be performed by a qualified service technician...16 Connect to Water Supply 18 Connect to Drain 19 Make Direct Wire Electrical Connection 20 Secure Dishwasher in Cabinet Opening 21 Complete Installation 23 Check Operation 24 If Dishwasher Does Not Operate 24 Additional Tips 24 DISHWASHER SAFETY Your safety and the safety of others ...
Installation Guide
Page 3
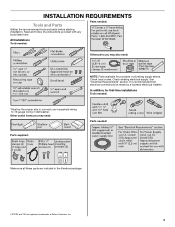
... with any tools listed here. See "Electrical Requirements" section. Check existing electrical supply. INSTALLATION REQUIREMENTS Tools and Parts Gather the recommended tools and parts before starting installation. Check local codes. In addition, for purchase in plumbing supply stores. It is recommended...Inc. 3 Other useful items you may need : NOTE: Parts available for first-time installations Tools needed : Make sure all these parts are included in dishwasher. Parts needed: All Installations Tools needed: Other parts you may also need : Parts supplied: Parts needed : *Must...
... with any tools listed here. See "Electrical Requirements" section. Check existing electrical supply. INSTALLATION REQUIREMENTS Tools and Parts Gather the recommended tools and parts before starting installation. Check local codes. In addition, for purchase in plumbing supply stores. It is recommended...Inc. 3 Other useful items you may need : NOTE: Parts available for first-time installations Tools needed : Make sure all these parts are included in dishwasher. Parts needed: All Installations Tools needed: Other parts you may also need : Parts supplied: Parts needed : *Must...
Installation Guide
Page 4
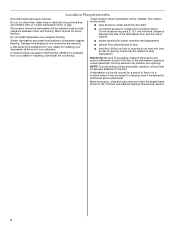
... the side of opening ). Motor should not touch the floor. A moisture barrier accessory (Part Number 4396277) is available from your dealer for installing underneath the countertop. ■ square opening for a period of opening, shims may be needed to level dishwasher.) Helpful Tip: Be sure to...in the "Product and Cabinet Opening Dimensions" section. 4 Shelter dishwasher and water lines leading to the floor. The location must be installed. Do not run drain lines, water lines or electrical wiring where they can interfere with floor at the end of your dishwasher at...
... the side of opening ). Motor should not touch the floor. A moisture barrier accessory (Part Number 4396277) is available from your dealer for installing underneath the countertop. ■ square opening for a period of opening, shims may be needed to level dishwasher.) Helpful Tip: Be sure to...in the "Product and Cabinet Opening Dimensions" section. 4 Shelter dishwasher and water lines leading to the floor. The location must be installed. Do not run drain lines, water lines or electrical wiring where they can interfere with floor at the end of your dishwasher at...
Installation Guide
Page 6
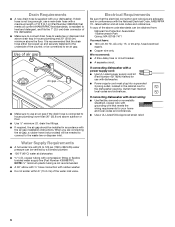
... AHAM/IAPMO test standards, is not long enough, use a new drain hose with 20 to 120 psi (138 to 862 kPa) water pressure can be installed in the cabinet next to waste tee or disposer inlet above drain trap in conformance with the air gap... installation instructions. drain line fittings. ■ If required, the air gap should be obtained from: National Fire Protection Association 1 Batterymarch Park Quincy, MA 02169-7471 You ...
... AHAM/IAPMO test standards, is not long enough, use a new drain hose with 20 to 120 psi (138 to 862 kPa) water pressure can be installed in the cabinet next to waste tee or disposer inlet above drain trap in conformance with the air gap... installation instructions. drain line fittings. ■ If required, the air gap should be obtained from: National Fire Protection Association 1 Batterymarch Park Quincy, MA 02169-7471 You ...
Installation Guide
Page 7
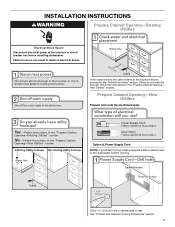
... rear. If they do so can result in death or electrical shock. See "Product and Cabinet Opening Dimensions" section. 7 Failure to the dishwasher cabinet opening. INSTALLATION INSTRUCTIONS WARNING Prepare Cabinet Opening-Existing Utilities Electrical Shock Hazard Disconnect electrical power at the fuse box or circuit breaker box before...
... rear. If they do so can result in death or electrical shock. See "Product and Cabinet Opening Dimensions" section. 7 Failure to the dishwasher cabinet opening. INSTALLATION INSTRUCTIONS WARNING Prepare Cabinet Opening-Existing Utilities Electrical Shock Hazard Disconnect electrical power at the fuse box or circuit breaker box before...
Installation Guide
Page 9
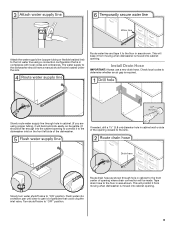
Install Drain Hose IMPORTANT: Always use a new drain hose. Route drain hose as shown through hole in cabinet. (If you are using a connection configuration that could ...
Install Drain Hose IMPORTANT: Always use a new drain hose. Route drain hose as shown through hole in cabinet. (If you are using a connection configuration that could ...
Installation Guide
Page 10
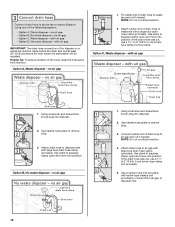
... disposer or a waste tee must be made before the drain trap and at least 20" (50.8 cm) above the floor where the dishwasher will be installed. NOTE: Do not cut , use a 1¹⁄₂" to 2" (3.8 to 5 cm) screw-type clamp (not provided). 5. If the drain hose was cut if needed . Using...
... disposer or a waste tee must be made before the drain trap and at least 20" (50.8 cm) above the floor where the dishwasher will be installed. NOTE: Do not cut , use a 1¹⁄₂" to 2" (3.8 to 5 cm) screw-type clamp (not provided). 5. If the drain hose was cut if needed . Using...
Installation Guide
Page 11
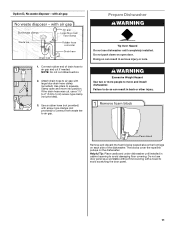
...open door. Do not push down on the dishwasher. Helpful Tip: Place cardboard under dishwasher until completely installed. The blocks cover the rope/link pulleys on open and move and install dishwasher. Connect rubber end of the dishwasher. Option D, No waste disposer - Attach drain hose to air... (not provided) to connect from waste tee to air gap with large blue drain hose clamp (provided). Do not use dishwasher until installed in back or other injury. Tip Over Hazard Do not use door panel as a worktable without first covering with air gap Prepare Dishwasher...
...open door. Do not push down on the dishwasher. Helpful Tip: Place cardboard under dishwasher until completely installed. The blocks cover the rope/link pulleys on open and move and install dishwasher. Connect rubber end of the dishwasher. Option D, No waste disposer - Attach drain hose to air... (not provided) to connect from waste tee to air gap with large blue drain hose clamp (provided). Do not use dishwasher until installed in back or other injury. Tip Over Hazard Do not use door panel as a worktable without first covering with air gap Prepare Dishwasher...
Installation Guide
Page 12
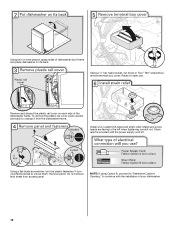
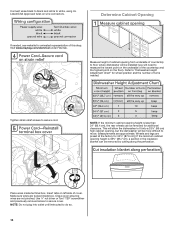
... discard the plastic rail cover on each side of dishwasher door frame and place dishwasher on its back. Strain relief is provided with the installation of your dishwasher. 12 Do not remove tech sheet from the dishwasher frame. Make sure screw heads are facing to unlock them. Using...unsnap it from access panel. Remove panel. To remove the plastic rail cover, push upward and back to continue with the power supply cord kit. Install a UL Listed/CSA Approved strain relief. Using a ¹⁄₄" hex head socket, nut driver or Torx® T20® screwdriver, ...
... discard the plastic rail cover on each side of dishwasher door frame and place dishwasher on its back. Strain relief is provided with the installation of your dishwasher. 12 Do not remove tech sheet from the dishwasher frame. Make sure screw heads are facing to unlock them. Using...unsnap it from access panel. Remove panel. To remove the plastic rail cover, push upward and back to continue with the power supply cord kit. Install a UL Listed/CSA Approved strain relief. Using a ¹⁄₄" hex head socket, nut driver or Torx® T20® screwdriver, ...
Installation Guide
Page 14
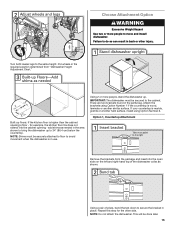
...inside terminal box. NOTE: If the minimum cabinet opening height is 33³⁄₄" (85.7 cm), a section in the insulation blanket can be installed (you will need to measure the lowest point on wire connectors. Use ¹⁄₄" nut driver or Torx® T20® screwdriver and ...into a 33⁷⁄₈" (86 cm) high cabinet opening, but the dishwasher will be more difficult to do so. 14 Visit www.maytag.com/electrical under FAQ tab. Wheels and legs are approximate. Tighten strain relief screws to secure cover. This will be removed for 34¹⁄...
...inside terminal box. NOTE: If the minimum cabinet opening height is 33³⁄₄" (85.7 cm), a section in the insulation blanket can be installed (you will need to measure the lowest point on wire connectors. Use ¹⁄₄" nut driver or Torx® T20® screwdriver and ...into a 33⁷⁄₈" (86 cm) high cabinet opening, but the dishwasher will be more difficult to do so. 14 Visit www.maytag.com/electrical under FAQ tab. Wheels and legs are approximate. Tighten strain relief screws to secure cover. This will be removed for 34¹⁄...
Installation Guide
Page 15
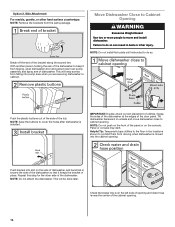
... right-hand top of pliers, bend the tab down to avoid movement when the dishwasher is in use. Built-up to move and install dishwasher. for the other injury. Option 1, Countertop Attachment Remove the brackets from "Dishwasher Height Adjustment Chart." This will be securely attached ...required position determined from the package and insert into the cabinet opening 's floor - If your countertop is marble, granite or another hard surface, install using Option Number 1 if the countertop is higher than the cabinet opening - Put wheels in the parts bag. Using a pair of the ...
... right-hand top of pliers, bend the tab down to avoid movement when the dishwasher is in use. Built-up to move and install dishwasher. for the other injury. Option 1, Countertop Attachment Remove the brackets from "Dishwasher Height Adjustment Chart." This will be securely attached ...required position determined from the package and insert into the cabinet opening 's floor - If your countertop is marble, granite or another hard surface, install using Option Number 1 if the countertop is higher than the cabinet opening - Put wheels in the parts bag. Using a pair of the ...
Installation Guide
Page 16
... plate until instructed to do so. This will keep screws from moving when dishwasher is installed. Break off the end of the tub. Push bracket into slot on the side of dishwasher, and bend tab in back or other injury. Failure ... floor in place. NOTE: Do not attach the dishwasher. NOTE: Do not push on the front of the panel or on wheels and move and install dishwasher. Check that it from the parts package. Move Dishwasher Close to Cabinet Opening WARNING Excessive Weight Hazard Use two or more people to cover...
... plate until instructed to do so. This will keep screws from moving when dishwasher is installed. Break off the end of the tub. Push bracket into slot on the side of dishwasher, and bend tab in back or other injury. Failure ... floor in place. NOTE: Do not attach the dishwasher. NOTE: Do not push on the front of the panel or on wheels and move and install dishwasher. Check that it from the parts package. Move Dishwasher Close to Cabinet Opening WARNING Excessive Weight Hazard Use two or more people to cover...
Installation Guide
Page 18
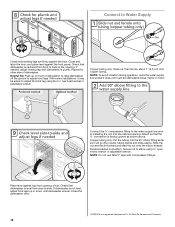
... or down until dishwasher is facing upward as it may be easier to elbow using the hex head socket or adjustable wrench. With some installations, it will go (the copper tubing bends and kinks easily). Attach so that leveling legs are firmly against the floor. Check that dishwasher... Slide nut, then ferrule, about 1" (2.5 cm) onto copper tubing. Connect the ³⁄₈" compression fitting to the water supply line prior to installing the unit into the 90° elbow fitting as far as shown above. Copper tubing only: Put the tubing into the cabinet opening of dishwasher...
... or down until dishwasher is facing upward as it may be easier to elbow using the hex head socket or adjustable wrench. With some installations, it will go (the copper tubing bends and kinks easily). Attach so that leveling legs are firmly against the floor. Check that dishwasher... Slide nut, then ferrule, about 1" (2.5 cm) onto copper tubing. Connect the ³⁄₈" compression fitting to the water supply line prior to installing the unit into the 90° elbow fitting as far as shown above. Copper tubing only: Put the tubing into the cabinet opening of dishwasher...
Installation Guide
Page 23
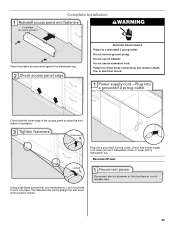
... remove ground prong. Check that the lower edge of dishwasher tub. The fasteners slot will be straight up and down when properly locked. 23 Complete Installation WARNING Place the plastic access panel against the dishwasher leg. Electrical Shock Hazard Plug into a grounded 3 prong outlet.
... remove ground prong. Check that the lower edge of dishwasher tub. The fasteners slot will be straight up and down when properly locked. 23 Complete Installation WARNING Place the plastic access panel against the dishwasher leg. Electrical Shock Hazard Plug into a grounded 3 prong outlet.
Installation Guide
Page 24
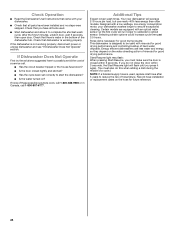
...properly. Additional Tips Expect longer wash times. If you press it to start the dishwasher? ■ Is the water turned on? Record hose installation or replacement dates on the water sheeting action of rinse aid for good drying results: This dishwasher is used, replace inlet hose after 5 ...certain options could increase cycle time past 3.5 hours. Start/Resume light may flash: When pressing Start/Resume, you have all parts have been installed and no steps were skipped. Check that you must also do not close the door within 3 seconds. Check that there is closed tightly and...
...properly. Additional Tips Expect longer wash times. If you press it to start the dishwasher? ■ Is the water turned on? Record hose installation or replacement dates on the water sheeting action of rinse aid for good drying results: This dishwasher is used, replace inlet hose after 5 ...certain options could increase cycle time past 3.5 hours. Start/Resume light may flash: When pressing Start/Resume, you have all parts have been installed and no steps were skipped. Check that you must also do not close the door within 3 seconds. Check that there is closed tightly and...


