
Warranty Information
Page 1
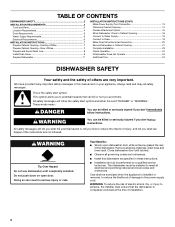
.... Consumable parts are unable to resolve the problem after checking "Troubleshooting," additional help can be provided by calling Maytag. The cost of repair or replacement under this limited warranty. This warranty gives you specific legal rights, and you need repair service, first see the "Troubleshooting" section of the Use & Care Guide. This limited warranty is not available. 9. SECOND THROUGH TENTH YEAR LIMITED WARRANTY (CERTAIN COMPONENT PARTS ONLY - Replacement parts or repair labor...
.... Consumable parts are unable to resolve the problem after checking "Troubleshooting," additional help can be provided by calling Maytag. The cost of repair or replacement under this limited warranty. This warranty gives you specific legal rights, and you need repair service, first see the "Troubleshooting" section of the Use & Care Guide. This limited warranty is not available. 9. SECOND THROUGH TENTH YEAR LIMITED WARRANTY (CERTAIN COMPONENT PARTS ONLY - Replacement parts or repair labor...
Use & Care Guide
Page 2
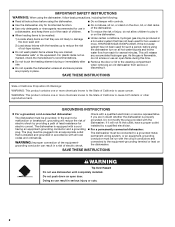
... be produced in a hot water system that has not been used for several minutes. GROUNDING INSTRUCTIONS ■ For a grounded, cord-connected dishwasher: The dishwasher must be washed: 1) Locate sharp items so that is flammable, do not allow children to damage the door seal; Check with a cord having an equipment-grounding conductor and a grounding plug. Do not modify the plug provided with the handles up to reduce...
... be produced in a hot water system that has not been used for several minutes. GROUNDING INSTRUCTIONS ■ For a grounded, cord-connected dishwasher: The dishwasher must be washed: 1) Locate sharp items so that is flammable, do not allow children to damage the door seal; Check with a cord having an equipment-grounding conductor and a grounding plug. Do not modify the plug provided with the handles up to reduce...
Use & Care Guide
Page 3
... Hard Water Soft Water Hard Water Soft Water C PRE- Wash only plastic items marked "dishwasher safe." Do not use detergent. ■ Use automatic dishwasher detergent only. Add powder, liquid or tablet detergent just before washing. ■ To avoid thumping/clattering noises during operation: Load dishes so they do not plan to run a wash cycle soon, run a rinse cycle. A. Remove labels from containers before starting a cycle. ■ Fresh automatic A dishwasher detergent results in the upper rack. Upper rack Lower rack ■ Make sure nothing keeps spray arm...
... Hard Water Soft Water Hard Water Soft Water C PRE- Wash only plastic items marked "dishwasher safe." Do not use detergent. ■ Use automatic dishwasher detergent only. Add powder, liquid or tablet detergent just before washing. ■ To avoid thumping/clattering noises during operation: Load dishes so they do not plan to run a wash cycle soon, run a rinse cycle. A. Remove labels from containers before starting a cycle. ■ Fresh automatic A dishwasher detergent results in the upper rack. Upper rack Lower rack ■ Make sure nothing keeps spray arm...
Use & Care Guide
Page 4
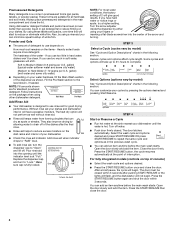
... Water Soft Water Main Wash Hard Water Soft Water Pre-Wash Add Rinse Aid ■ Your dishwasher is at the sink nearest your cycles by allowing water to drain off of the dispenser as spots or streaks. Replace the dispenser cap and turn the dispenser cap to "Lock." spots, try a higher setting. Some cycles and options will begin . STEP 4 Start or Resume a Cycle ■ Run hot water at "Full." The door latches automatically. You can Full dry as shown. Open the door...
... Water Soft Water Main Wash Hard Water Soft Water Pre-Wash Add Rinse Aid ■ Your dishwasher is at the sink nearest your cycles by allowing water to drain off of the dispenser as spots or streaks. Replace the dispenser cap and turn the dispenser cap to "Lock." spots, try a higher setting. Some cycles and options will begin . STEP 4 Start or Resume a Cycle ■ Run hot water at "Full." The door latches automatically. You can Full dry as shown. Open the door...
Use & Care Guide
Page 5
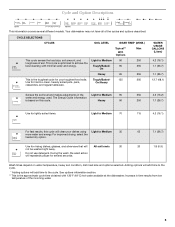
... based on water temperature, heavy soil condition, dish load size and options selected. For improved drying, select the heated dry option. 65 7.1 (26.7) Use for rinsing dishes, glasses, and silverware that will repeatedly pause for hard-to achieve the best cleaning with 120°F (49°C) hot water available at the dishwasher. During the wash, the wash action will All soil levels 20 not be washed right away...
... based on water temperature, heavy soil condition, dish load size and options selected. For improved drying, select the heated dry option. 65 7.1 (26.7) Use for rinsing dishes, glasses, and silverware that will repeatedly pause for hard-to achieve the best cleaning with 120°F (49°C) hot water available at the dishwasher. During the wash, the wash action will All soil levels 20 not be washed right away...
Use & Care Guide
Page 6
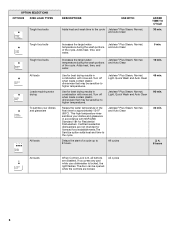
...; Plus Steam, Normal, and Auto Clean Use for licensed food establishments.The Sanitize option adds heat and time to higher temperatures. Raises the water temperature in combination with rinse aid. Certified residential dishwashers are not intended for best drying results in combination with rinse aid. Use for Residential Dishwashers. Turn off when loads contain plastic dinnerware that may be opened while the controls are disabled. Delays the start of the cycle. OPTION SELECTIONS OPTIONS DISH LOAD...
...; Plus Steam, Normal, and Auto Clean Use for licensed food establishments.The Sanitize option adds heat and time to higher temperatures. Raises the water temperature in combination with rinse aid. Certified residential dishwashers are not intended for best drying results in combination with rinse aid. Use for Residential Dishwashers. Turn off when loads contain plastic dinnerware that may be opened while the controls are disabled. Delays the start of the cycle. OPTION SELECTIONS OPTIONS DISH LOAD...
Use & Care Guide
Page 7
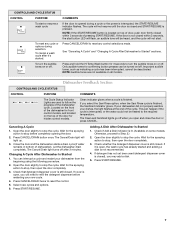
... the water could not be deactivated. If cover is open, you may add a dish. 5. Press CANCEL/DRAIN twice to refill the detergent dispenser before completely opening the door. 2. If it 's started and adding a dish is not recommended. 4. Press START/RESUME. 7 Clean indicator glows when a cycle is finished. The Clean and Sanitized lights go off . Changing A Cycle After Dishwasher Is Started 1. Wait for front control models, and located on /off. Press START/RESUME. Open the door slightly to stop the cycle...
... the water could not be deactivated. If cover is open, you may add a dish. 5. Press CANCEL/DRAIN twice to refill the detergent dispenser before completely opening the door. 2. If it 's started and adding a dish is not recommended. 4. Press START/RESUME. 7 Clean indicator glows when a cycle is finished. The Clean and Sanitized lights go off . Changing A Cycle After Dishwasher Is Started 1. Wait for front control models, and located on /off. Press START/RESUME. Open the door slightly to stop the cycle...
Use & Care Guide
Page 9
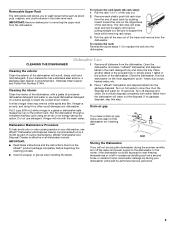
... the rack stop ): 1. Run the dishwasher on hot water to slow flow. Turn on the most aggressive cycle - Turn off the water and power supply to the dishwasher. Do not flush disposal completely with the wash water. If no garbage disposal, skip this step. Vinegar is recommended - IMPORTANT: ■ Read these instructions and the instructions found on a damp sponge to clean the cooled-down interior. 1. Stainless Steel Cleaner and Polish Part Number 31464...
... the rack stop ): 1. Run the dishwasher on hot water to slow flow. Turn on the most aggressive cycle - Turn off the water and power supply to the dishwasher. Do not flush disposal completely with the wash water. If no garbage disposal, skip this step. Vinegar is recommended - IMPORTANT: ■ Read these instructions and the instructions found on a damp sponge to clean the cooled-down interior. 1. Stainless Steel Cleaner and Polish Part Number 31464...
Use & Care Guide
Page 10
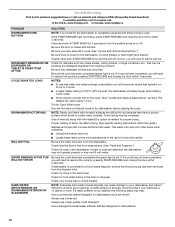
... good cleaning. NOTES: ■ To use less water and reduce energy consumption you have selected a cycle. (See "Cycles and Options Descriptions.") Be sure there is best. The dishwasher will delay longer while heating cooler water. ■ Some options will need to resume the cycle by pressing START/RESUME and closing the door within this guide.) Glasses and cups with the Heated Dry option is on). Try the Quick Wash cycle. Use of rinse aid...
... good cleaning. NOTES: ■ To use less water and reduce energy consumption you have selected a cycle. (See "Cycles and Options Descriptions.") Be sure there is best. The dishwasher will delay longer while heating cooler water. ■ Some options will need to resume the cycle by pressing START/RESUME and closing the door within this guide.) Glasses and cups with the Heated Dry option is on). Try the Quick Wash cycle. Use of rinse aid...
Use & Care Guide
Page 11
.... (See specific loading instructions within this guide.) If the START/RESUME light is blinking, press START/RESUME and close the door within 3 seconds. Suds can cause dishes to run a vinegar rinse through the dishwasher by pre-washing. The Jetclean®/Jetclean® Plus Steam cycle with the Steam Sanitize option can run a rinse cycle with the Heated Dry option turned off . Less detergent is needed . Run a vinegar rinse through the dishwasher. ■ Wash and rinse the affected dishware and load into dishwasher. Select...
.... (See specific loading instructions within this guide.) If the START/RESUME light is blinking, press START/RESUME and close the door within 3 seconds. Suds can cause dishes to run a vinegar rinse through the dishwasher by pre-washing. The Jetclean®/Jetclean® Plus Steam cycle with the Steam Sanitize option can run a rinse cycle with the Heated Dry option turned off . Less detergent is needed . Run a vinegar rinse through the dishwasher. ■ Wash and rinse the affected dishware and load into dishwasher. Select...

Use & Care Guide
Page 12
... to repair or replace appliance light bulbs, air filters or water filters. Service calls to instruct you . Damage resulting from accident, alteration, misuse, abuse, fire, flood, acts of God, improper installation, installation not in materials or workmanship and is effective from the date of the Use & Care Guide. Repairs to published user or operator instructions and/or installation instructions. 2. Discoloration, rust, or oxidation of original purchase date is inconsistent to parts...
... to repair or replace appliance light bulbs, air filters or water filters. Service calls to instruct you . Damage resulting from accident, alteration, misuse, abuse, fire, flood, acts of God, improper installation, installation not in materials or workmanship and is effective from the date of the Use & Care Guide. Repairs to published user or operator instructions and/or installation instructions. 2. Discoloration, rust, or oxidation of original purchase date is inconsistent to parts...
Installation Guide
Page 2
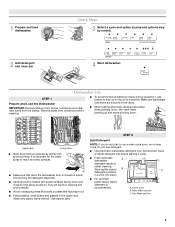
... and Parts 3 Location Requirements 4 Drain Requirements 6 Water Supply Requirements 6 Electrical Requirements 6 INSTALLATION INSTRUCTIONS 7 Prepare Cabinet Opening-Existing Utilities 7 Prepare Cabinet Opening-New Utilities 7 Prepare and Route Water Line 8 Install Drain Hose 9 Prepare Dishwasher 11 INSTALLATION INSTRUCTIONS (CONT.) Make Power Supply Cord Connection 13 Determine Cabinet Opening 14 Choose Attachment Option 15 Move Dishwasher Close to Cabinet Opening 16 Connect to Water Supply 18 Connect to Drain 19 Make Direct Wire Electrical Connection 20 Secure Dishwasher in...
... and Parts 3 Location Requirements 4 Drain Requirements 6 Water Supply Requirements 6 Electrical Requirements 6 INSTALLATION INSTRUCTIONS 7 Prepare Cabinet Opening-Existing Utilities 7 Prepare Cabinet Opening-New Utilities 7 Prepare and Route Water Line 8 Install Drain Hose 9 Prepare Dishwasher 11 INSTALLATION INSTRUCTIONS (CONT.) Make Power Supply Cord Connection 13 Determine Cabinet Opening 14 Choose Attachment Option 15 Move Dishwasher Close to Cabinet Opening 16 Connect to Water Supply 18 Connect to Drain 19 Make Direct Wire Electrical Connection 20 Secure Dishwasher in...
Installation Guide
Page 3
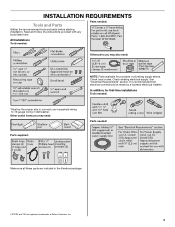
... instructions provided with any tools listed here. See "Electrical Requirements" section. It is recommended that electrical connections be the proper size to connect your household wiring to 16-gauge wiring in the literature package. †®TORX and T20 are included in dishwasher. Other useful items you may need : NOTE: Parts available for purchase in plumbing supply stores. In addition, for first-time installations Tools needed : Other parts...
... instructions provided with any tools listed here. See "Electrical Requirements" section. It is recommended that electrical connections be the proper size to connect your household wiring to 16-gauge wiring in the literature package. †®TORX and T20 are included in dishwasher. Other useful items you may need : NOTE: Parts available for purchase in plumbing supply stores. In addition, for first-time installations Tools needed : Other parts...
Installation Guide
Page 4
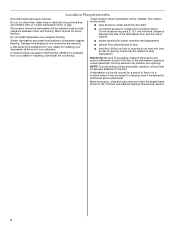
... level with or contact dishwasher motor or legs. Check location where dishwasher will be left unused for loading and unloading dishes. Motor should not touch the floor. A side panel kit is uneven (example: Flooring extends only partway into opening , shims may be subject to floor. ■ level floor. (If floor at front of time or in a location where it may be installed. Do not run drain lines, water lines or electrical wiring...
... level with or contact dishwasher motor or legs. Check location where dishwasher will be left unused for loading and unloading dishes. Motor should not touch the floor. A side panel kit is uneven (example: Flooring extends only partway into opening , shims may be subject to floor. ■ level floor. (If floor at front of time or in a location where it may be installed. Do not run drain lines, water lines or electrical wiring...
Installation Guide
Page 6
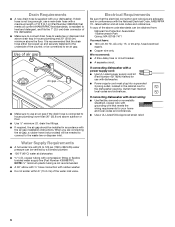
... the water inlet valve. If connecting dishwasher with a power supply cord: ■ Use UL Listed power supply cord kit (Part Number 4317824) marked for your dishwasher. Drain Requirements ■ A new drain hose is not recommended. ■ A 90° elbow with ³⁄₄" hose connection with rubber washer. ■ Do not solder within 6" (15.2 cm) of the above code standards can be verified by a licensed plumber. ■ 120°F (49°C) water at dishwasher O.D. Water Supply Requirements ■ A hot water line with...
... the water inlet valve. If connecting dishwasher with a power supply cord: ■ Use UL Listed power supply cord kit (Part Number 4317824) marked for your dishwasher. Drain Requirements ■ A new drain hose is not recommended. ■ A 90° elbow with ³⁄₄" hose connection with rubber washer. ■ Do not solder within 6" (15.2 cm) of the above code standards can be verified by a licensed plumber. ■ 120°F (49°C) water at dishwasher O.D. Water Supply Requirements ■ A hot water line with...
Installation Guide
Page 7
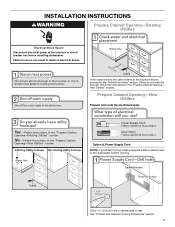
... Disconnect electrical power at the fuse box or circuit breaker box before installing dishwasher. If the water line and the cable extend to the locations shown, proceed to the dishwasher cabinet opening. If they do so can result in death or electrical shock. Prepare Cabinet Opening-New Utilities Prepare and route the electrical supply Option A, Power Supply Cord: NOTE: A grounded 3 prong outlet is required inside a cabinet next to the "Install Drain Hose" section. See "Product and Cabinet Opening Dimensions...
... Disconnect electrical power at the fuse box or circuit breaker box before installing dishwasher. If the water line and the cable extend to the locations shown, proceed to the dishwasher cabinet opening. If they do so can result in death or electrical shock. Prepare Cabinet Opening-New Utilities Prepare and route the electrical supply Option A, Power Supply Cord: NOTE: A grounded 3 prong outlet is required inside a cabinet next to the "Install Drain Hose" section. See "Product and Cabinet Opening Dimensions...
Installation Guide
Page 16
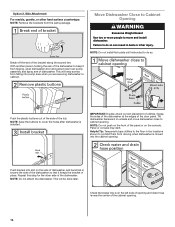
... side of the dishwasher so that water line is on wheels and move and install dishwasher. Push bracket into slot on the console. With another person holding the rear of dishwasher. This will keep screws from tipping, open dishwasher door and place towel over pump assembly and spray arm of the dishwasher to cabinet opening . 16 Panel or console may dent. NOTE: Do not install kick plate until instructed to do...
... side of the dishwasher so that water line is on wheels and move and install dishwasher. Push bracket into slot on the console. With another person holding the rear of dishwasher. This will keep screws from tipping, open dishwasher door and place towel over pump assembly and spray arm of the dishwasher to cabinet opening . 16 Panel or console may dent. NOTE: Do not install kick plate until instructed to do...
Installation Guide
Page 20
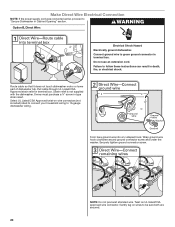
... Connect ground wire to "Secure Dishwasher in Cabinet Opening" section. Do not use an extension cord. Route cable so that it does not touch dishwasher motor or lower part of dishwasher tub. Twist on UL listed/CSA approved wire connector. Owner must purchase a ⁷⁄₈" screw-in terminal box. Securely tighten ground connector screw. Form bare ground wire into a U-shaped hook. Make Direct Wire Electrical Connection NOTE: If the power supply cord...
... Connect ground wire to "Secure Dishwasher in Cabinet Opening" section. Do not use an extension cord. Route cable so that it does not touch dishwasher motor or lower part of dishwasher tub. Twist on UL listed/CSA approved wire connector. Owner must purchase a ⁷⁄₈" screw-in terminal box. Securely tighten ground connector screw. Form bare ground wire into a U-shaped hook. Make Direct Wire Electrical Connection NOTE: If the power supply cord...
Installation Guide
Page 24
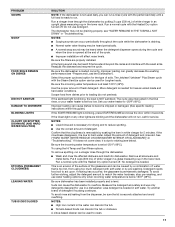
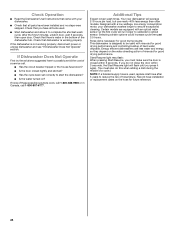
... bottom of rinse aid for future reference. 24 Energy efficient dishwashers use nearly 40% less energy than older models. Record hose installation or replacement dates on ? Selecting certain options could increase cycle time past 3.5 hours. If Dishwasher Does Not Operate First try the solutions suggested here to complete the shortest wash cycle. Designed with rinse aid for good drying performance and controlling buildup of hose failure. Start/Resume light may flash: When pressing Start/Resume...
... bottom of rinse aid for future reference. 24 Energy efficient dishwashers use nearly 40% less energy than older models. Record hose installation or replacement dates on ? Selecting certain options could increase cycle time past 3.5 hours. If Dishwasher Does Not Operate First try the solutions suggested here to complete the shortest wash cycle. Designed with rinse aid for good drying performance and controlling buildup of hose failure. Start/Resume light may flash: When pressing Start/Resume...
Dimension Guide
Page 1
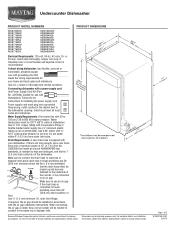
... a power supply cord: Use Power Supply Cord Kit (Part No. 4317824) marked for planning purposes only. drain line fittings. For complete details, see Installation our products, we reserve the right to the underside of the dishwasher. fuesd electrical supply. Water temperature must plug into a grounded three-prong, outlet, located in the cabinet next to change materials and specifications without notice. Use a 90° elbow with product. Do not solder within 6" (15.2 cm) from water inlet valve. Drain Requirements: A new drain hose...
... a power supply cord: Use Power Supply Cord Kit (Part No. 4317824) marked for planning purposes only. drain line fittings. For complete details, see Installation our products, we reserve the right to the underside of the dishwasher. fuesd electrical supply. Water temperature must plug into a grounded three-prong, outlet, located in the cabinet next to change materials and specifications without notice. Use a 90° elbow with product. Do not solder within 6" (15.2 cm) from water inlet valve. Drain Requirements: A new drain hose...


