Maytag MDB9979S Support and Manuals
Get Help and Manuals for this Maytag item
View All Support Options Below
Free Maytag MDB9979S manuals!
Problems with Maytag MDB9979S?
Ask a Question
Free Maytag MDB9979S manuals!
Problems with Maytag MDB9979S?
Ask a Question
Popular Maytag MDB9979S Manual Pages
Quick Start Guide - Page 1
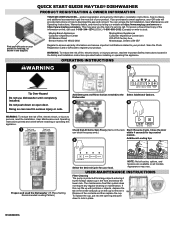
... code to person, read the Installation, User Maintenance and Operating Instructions printed and online before installing or operating this appliance. Additional Loading tips
Prepare and Load the Dishwasher (15 Place Setting Recommended Loading Pattern)
Auto Normal Quick
PowerBlast
Select the desired Cycle for top control models. Do not push down to get the most out of a service...
Cycle Guide - Page 1
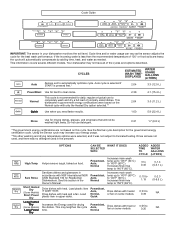
...dishes with heater or fan on food. Increases the Energy used in the Owner's Manual. Cycle Guide
IMPORTANT: The sensor in accordance with NSF International NSF/ ANSI Standard 184 for ...your dishwasher monitors the soil level. This dishwasher's government energy certifications were based on some models.
Powerblast, Auto, Normal
Dries dishes with heat or fan on the
2:04
3.0 (11...
Cycle Guide - Page 2
... needed). If you will need to stop , then open the door completely.
2. To turn off when the cycle is still closed . On some models. Depending on the model, an indicator light on Lock, press and hold START/RESUME for 3 seconds.
Press and hold heated dry for the spraying action to stop the...
Owners Manual - Page 4
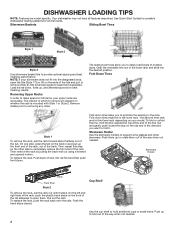
...Guides.... The sliding bowl tines allow you to rotate them .
To replace the rack, Push back of the way when not needed ....Bowl Tines
Style 1
Style 3
Style 2
Use silverware basket lids to support wine glasses and other side to open the lids (Style 1/3) or ...remove will depend on your model. Push the track stops closed.
NOTE: If your upper racks are model specific. On the left and ...
Owners Manual - Page 5
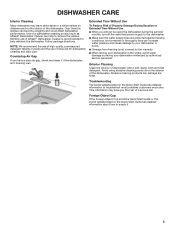
... detergent. Troubleshooting
The brand website listed on the Quick Start Guide has detailed information about how to remove the residue.
Extended Time Without Use
To Reduce Risk of a service call. This...dishwasher during the summer months, turn off the water and power supply to troubleshoot most problems customers encounter. Follow package directions. NOTE: We recommend the use of high...
Owners Manual - Page 6
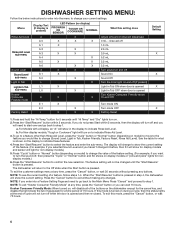
... "Normal" button and S0 shows on to indicate these features.
4. a.
To exit this mode is pressed. For Models with a Display, an "A" will show the current setting.
DISHWASHER SETTING MENU:
Follow the below instructions to enter into a Feature Setting Page and need to start over and go back to change (Sound Level, Light in Tub, Kosher...
Owners Manual - Page 7
...installation cycle while checking for service. Step 46. If the water cannot be turned off, DO NOT turn off power to unit. Call service
Ensure fill hose is any leaks.
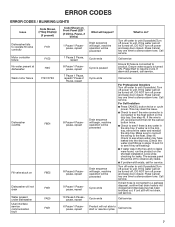
■ If problem...will be turned off, DO NOT turn off water to unit (if possible). ERROR CODES
ERROR CODES / BLINKING LIGHTS
Issue
Code Shown (7 Seg Display)
(if present)
Dishwasher fails to operate fill valve ...
Owners Manual - Page 13
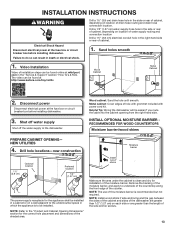
... to the undercounter space in which the appliance is recommended but not required. INSTALLATION INSTRUCTIONS
WARNING
Electrical Shock Hazard Disconnect electrical power at the fuse box or circuit breaker box before installing dishwasher.
3. Drill a 11/2" (3.8 cm) drain hose hole in the "Service & Support" section "How To's & FAQ. Shut off water supply
Shut off the water...
Owners Manual - Page 17
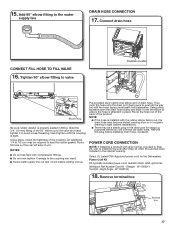
... -tighten.
Power Cord Kit Kit typically includes power cord, metallic strain relief, grommet. (Whirlpool Part Number Cord Kit - W11365011 Cord Kit - Then push the hose onto the drain port (being...
Damage to install wiring until the coupling is installed with compression fittings. ■ Do not over elbow end of the 90° elbow up . Remove this plug before setting unit up ...
Owners Manual - Page 19
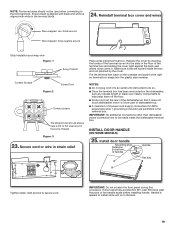
...come in the terminal block.
24.
INSTALL DOOR HANDLE
(ON SOME MODELS)
25. Reinstall terminal box cover ...part of dishwasher tub.
■ A maximum of the terminal cover into the plastic side member. NOTES:
■ Do not plug cord into an outlet until instructed... connecting to the terminal block. Install door handle
Mounting stud Setscrew (in the terminal box. Replace the cover by the cover....
Owners Manual - Page 20
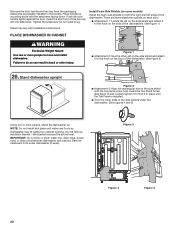
...setscrews. Place handle on the side of the dishwasher. (See figure 2)
26. Install Foam Side Shields (on some models)
Install the foam side shields on the front of the dishwashwe. (See figure 1)
PLACE... cardboard from the packaging. Failure to hold it to do so can result in place until instructed to do so.
Remove the door handle and hex key from under the dishwasher. (See ...
Owners Manual - Page 21

...models) • Snug the top foam into the cabinet.
28. CUSTOM PANEL INSTALLATION (CUSTOM PANEL MODELS ONLY)
For custom panel installation, refer to avoid any kinks. Complete custom panel installation...the cabinet opening to the Custom Panel Installation Instruction Sheet included in the insulation blanket. NOTE...21 Pull slack from bunching up in the parts bag to cabinet opening
6" (15.2 cm)...
Owners Manual - Page 24
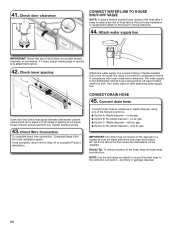
... codes and ordinances. If spacing is equal on after 5 years to complete Product Installation. NOTE: Use the red clamp provided to connect the drain hose to the dishwasher should have a manual ... least 20" (50.8 cm) above the floor where the dishwasher will be installed. 41. Record hose installation or replacement dates on the hose for future reference.
44. The water supply to the ...
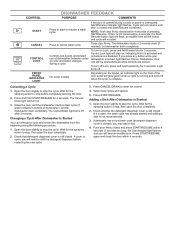
Owners Manual - Page 27

...Quick Start Guide that came with the access panel removed in this manual under the unit. Reinstall access panels and fasteners
Insulation (on the model. ■... complete the shortest Installation Cycle while checking unit for service.
See instructions on
0:01
1
0:30 (Maximum
5:00)
Pause
Initial Drain
2
2:00
Fill 3.8 L+
Wash motor pulses
5
(Some
3
4
models
0:20
Wash+ ...
Owners Manual - Page 28
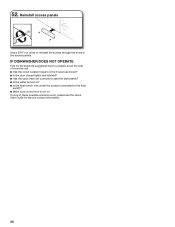
...set correctly to start the dishwasher? ■ Is the water turned on? ■ Is the float switch wire under the product connected to the float
switch? ■ Make sure control lock is not on. Reinstall access panels
Use a 5/16" nut driver... to possibly avoid the cost of these possible solutions work, please see the Quick Start Guide for service contact information.
28 IF...
Maytag MDB9979S Reviews
We have not received any reviews for Maytag yet.