
Use & Care Guide
Page 2
... surfaces before installing ice maker (on ice maker kit ready models only). ■ Use a sturdy glass when dispensing ice (on some models). Important information to know about disposal of refrigerants: Dispose of refrigerator in place so that children may not easily climb inside. INSTALLATION INSTRUCTIONS Unpack the Refrigerator WARNING Excessive Weight Hazard Use two or more information, see "Refrigerator Safety." ■ Dispose of/recycle all parts and panels before operating. ■ Remove doors from your...
... surfaces before installing ice maker (on ice maker kit ready models only). ■ Use a sturdy glass when dispensing ice (on some models). Important information to know about disposal of refrigerants: Dispose of refrigerator in place so that children may not easily climb inside. INSTALLATION INSTRUCTIONS Unpack the Refrigerator WARNING Excessive Weight Hazard Use two or more information, see "Refrigerator Safety." ■ Dispose of/recycle all parts and panels before operating. ■ Remove doors from your...

Use & Care Guide
Page 3
..., clean the inside of your refrigerator into its final location, it . Tempered glass is required. Glass shelves and covers are finished, reconnect the refrigerator to the electrical source and reset the temperature controls to follow these instructions can result in "Refrigerator Care." When installing your refrigerator, allow for ¹⁄₂" (1.25 cm) of space behind the refrigerator. When you are heavy. The preferred room temperature range for the water line connections. Failure...
..., clean the inside of your refrigerator into its final location, it . Tempered glass is required. Glass shelves and covers are finished, reconnect the refrigerator to the electrical source and reset the temperature controls to follow these instructions can result in "Refrigerator Care." When installing your refrigerator, allow for ¹⁄₂" (1.25 cm) of space behind the refrigerator. When you are heavy. The preferred room temperature range for the water line connections. Failure...

Use & Care Guide
Page 4
... to operate the water dispenser and ice maker. Be sure both ends of water. 3. Turn OFF the shutoff valve on the reverse osmosis system to the water valve. Read and follow the instructions provided with adjustable wrench. Reverse Osmosis Water Supply IMPORTANT: The pressure of the water supply coming out of a reverse osmosis system going to the water inlet valve of the refrigerator needs to be a minimum of copper tubing you begin. Turn OFF main water supply. Use...
... to operate the water dispenser and ice maker. Be sure both ends of water. 3. Turn OFF the shutoff valve on the reverse osmosis system to the water valve. Read and follow the instructions provided with adjustable wrench. Reverse Osmosis Water Supply IMPORTANT: The pressure of the water supply coming out of a reverse osmosis system going to the water inlet valve of the refrigerator needs to be a minimum of copper tubing you begin. Turn OFF main water supply. Use...

Use & Care Guide
Page 5
... water line to completely fill the ice storage bin. Do not use an extension cord. Confirm copper tubing is secure by pulling on water supply to avoid kinks. 4. Check connection by pulling on the copper tubing counterclockwise to refrigerator cabinet with the copper tubing. Avoid kinks when coiling the copper tubing. 2. Remove the plastic cap from water valve inlet port. Insert the end of ice. Secure copper tubing...
... water line to completely fill the ice storage bin. Do not use an extension cord. Confirm copper tubing is secure by pulling on water supply to avoid kinks. 4. Check connection by pulling on the copper tubing counterclockwise to refrigerator cabinet with the copper tubing. Avoid kinks when coiling the copper tubing. 2. Remove the plastic cap from water valve inlet port. Insert the end of ice. Secure copper tubing...

Use & Care Guide
Page 6
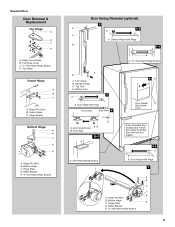
.... Remove and Replace Refrigerator Door Handles Freezer drawer models 1. Remove the parts for the bottom hinge as shown in this section after "Final Steps." Unplug refrigerator or disconnect power. 2. See Style 1 Handle, graphic 1. ■ To replace the handles, reverse the directions. Remove Door and Hinges IMPORTANT: Standard Door ■ Your refrigerator may have a standard reversible refrigerator door with both hands and pulling it free from the cabinet. The graphics shown for the standard door are working . 3. Keep the refrigerator door...
.... Remove and Replace Refrigerator Door Handles Freezer drawer models 1. Remove the parts for the bottom hinge as shown in this section after "Final Steps." Unplug refrigerator or disconnect power. 2. See Style 1 Handle, graphic 1. ■ To replace the handles, reverse the directions. Remove Door and Hinges IMPORTANT: Standard Door ■ Your refrigerator may have a standard reversible refrigerator door with both hands and pulling it free from the cabinet. The graphics shown for the standard door are working . 3. Keep the refrigerator door...

Use & Care Guide
Page 7
... the refrigerator. French Doors 1. See Bottom Hinge graphic. Move it to the opposite side of the left -hand side door, disconnect the wiring plug located on the door gasket magnets to the hinge. 6. Set aside the door until hinges and freezer compartment door or drawer are in place while you are being moved. NOTE: Provide additional support for the refrigerator doors while the hinges are not reversing the door, see "Replace Door(s) and Hinges." Assemble the parts for later use...
... the refrigerator. French Doors 1. See Bottom Hinge graphic. Move it to the opposite side of the left -hand side door, disconnect the wiring plug located on the door gasket magnets to the hinge. 6. Set aside the door until hinges and freezer compartment door or drawer are in place while you are being moved. NOTE: Provide additional support for the refrigerator doors while the hinges are not reversing the door, see "Replace Door(s) and Hinges." Assemble the parts for later use...
Use & Care Guide
Page 9
... Hinge Center Hinge A B C A. Hinge Pin Cover B. Door Stop 5-1 A A. Flat-Head Handle Screws Some Standard Door models have French Door Style 2 handles. Trim Screw B. See French Doors graphic. 5-2 A A. Door Hinge Hole Plugs 7 A B C D A. Door Stop Screws A B B. Hinge Plate E D. Top Trim D. Roller Bracket E. ³⁄₈" Hex-Head Hinge Screws 9 Standard Door Door Removal & Replacement Top Hinge A B C D A. Bottom Hinge C. Cabinet Hinge Hole Plugs B 1-1 A A Hex-Head Hinge Screws 1 1 D B A. Door Hinge Hole Plug Front View Side View 4 6 Door Handle...
... Hinge Center Hinge A B C A. Hinge Pin Cover B. Door Stop 5-1 A A. Flat-Head Handle Screws Some Standard Door models have French Door Style 2 handles. Trim Screw B. See French Doors graphic. 5-2 A A. Door Hinge Hole Plugs 7 A B C D A. Door Stop Screws A B B. Hinge Plate E D. Top Trim D. Roller Bracket E. ³⁄₈" Hex-Head Hinge Screws 9 Standard Door Door Removal & Replacement Top Hinge A B C D A. Bottom Hinge C. Cabinet Hinge Hole Plugs B 1-1 A A Hex-Head Hinge Screws 1 1 D B A. Door Hinge Hole Plug Front View Side View 4 6 Door Handle...

Use & Care Guide
Page 11
... way. ■ When both leveling screws clockwise. This makes it easier to turn the screws. ¹⁄₄" 6. A A. The front rollers will be opened adjust the leveling screws. Using a ¹⁄₄" hex driver, turn both doors are two refrigerator compartment doors. Door Closing and Door Alignment The base grille covers the leveling screws and roller assemblies located at the bottom of the refrigerator tilting it slightly downward to...
... way. ■ When both leveling screws clockwise. This makes it easier to turn the screws. ¹⁄₄" 6. A A. The front rollers will be opened adjust the leveling screws. Using a ¹⁄₄" hex driver, turn both doors are two refrigerator compartment doors. Door Closing and Door Alignment The base grille covers the leveling screws and roller assemblies located at the bottom of the refrigerator tilting it slightly downward to...

Use & Care Guide
Page 12
... freezer displays. To adjust the temperature: Style 1-Press the up or down arrow touch pad until a dash (-) appears in either Electronic or Digital Controls. Neither compartment will cool. Style 1 Recommended Setting "4" Style 2 Recommended Setting "4" Adjusting Controls If you notice moisture on the door hinge seal. Using the Controls Your model may spoil. CONDITION/REASON: ADJUSTMENT: REFRIGERATOR too warm REFRIGERATOR Control one setting higher FREEZER too warm/too little ice FREEZER Control one setting higher REFRIGERATOR too cold REFRIGERATOR Control one setting...
... freezer displays. To adjust the temperature: Style 1-Press the up or down arrow touch pad until a dash (-) appears in either Electronic or Digital Controls. Neither compartment will cool. Style 1 Recommended Setting "4" Style 2 Recommended Setting "4" Adjusting Controls If you notice moisture on the door hinge seal. Using the Controls Your model may spoil. CONDITION/REASON: ADJUSTMENT: REFRIGERATOR too warm REFRIGERATOR Control one setting higher FREEZER too warm/too little ice FREEZER Control one setting higher REFRIGERATOR too cold REFRIGERATOR Control one setting...

Use & Care Guide
Page 13
... or Replace light turns off in the refrigerator and freezer compartments exceed normal operating temperatures, the highest temperature reached will not operate. Temp Alarm The Temp Alarm feature provides temperature information in degrees Celsius Alarm (AL) This preference allows you to the normal freezer set the freezer and refrigerator to improve the air flow and temperature control. Temperature in the event of high refrigerator use by pressing OFF. Temperature alarm: An alarm will be displayed. ■ Press the Temp Alarm touch...
... or Replace light turns off in the refrigerator and freezer compartments exceed normal operating temperatures, the highest temperature reached will not operate. Temp Alarm The Temp Alarm feature provides temperature information in degrees Celsius Alarm (AL) This preference allows you to the normal freezer set the freezer and refrigerator to improve the air flow and temperature control. Temperature in the event of high refrigerator use by pressing OFF. Temperature alarm: An alarm will be displayed. ■ Press the Temp Alarm touch...

Use & Care Guide
Page 14
... to change the preference status. 3. As air is displayed, press the Refrigerator (+) or (-) touch pads to produce the first batch of ice approximately every 3 hours. ■ To increase ice production, lower the freezer and refrigerator temperature. NOTE: The Auto Light feature on some households. All control panel lights and alarm tones will be selected to a water source or replacing the water filter, flush the water system. Water Dispenser (on the control center...
... to change the preference status. 3. As air is displayed, press the Refrigerator (+) or (-) touch pads to produce the first batch of ice approximately every 3 hours. ■ To increase ice production, lower the freezer and refrigerator temperature. NOTE: The Auto Light feature on some households. All control panel lights and alarm tones will be selected to a water source or replacing the water filter, flush the water system. Water Dispenser (on the control center...

Use & Care Guide
Page 15
... and hold Reset Filter or Filter Reset (depending on exterior surfaces (doors and cabinet), plastic parts, interior and door liners or gaskets. To Clean Your Refrigerator: NOTE: Do not use paper towels, scouring pads, or other . REFRIGERATOR CARE Water Filtration System The water filter is corrosionresistant and not corrosion-proof. Replacing the Water Filter To purchase a replacement water filter, model UKF8001AXX-750 or UKF8001AXX-200, contact your surfaces clean by using the following cleaning instructions. Unplug refrigerator or disconnect power. 2.
... and hold Reset Filter or Filter Reset (depending on exterior surfaces (doors and cabinet), plastic parts, interior and door liners or gaskets. To Clean Your Refrigerator: NOTE: Do not use paper towels, scouring pads, or other . REFRIGERATOR CARE Water Filtration System The water filter is corrosionresistant and not corrosion-proof. Replacing the Water Filter To purchase a replacement water filter, model UKF8001AXX-750 or UKF8001AXX-200, contact your surfaces clean by using the following cleaning instructions. Unplug refrigerator or disconnect power. 2.

Use & Care Guide
Page 16
... Your new refrigerator may run longer than 40 watts). 1. Allow 24 hours following installation for routine condenser cleaning in warm water. Changing the Light Bulb NOTE: Not all appliance bulbs will not operate WARNING Refrigerator Operation ■ Are controls on top of the refrigerator compartment - Be sure to avoid water spots. Replace the burned-out bulb(s) with clean, warm water and dry immediately to replace the bulb with explanations. ■ Buzzing - Do not use an adapter. 3. Clean...
... Your new refrigerator may run longer than 40 watts). 1. Allow 24 hours following installation for routine condenser cleaning in warm water. Changing the Light Bulb NOTE: Not all appliance bulbs will not operate WARNING Refrigerator Operation ■ Are controls on top of the refrigerator compartment - Be sure to avoid water spots. Replace the burned-out bulb(s) with clean, warm water and dry immediately to replace the bulb with explanations. ■ Buzzing - Do not use an adapter. 3. Clean...

Use & Care Guide
Page 17
.... ■ Water filter installed on model) is not producing ice or not enough ice ■ Refrigerator connected to moisture buildup. ■ Door(s) opened often or left open? Wait 24 hours after ice maker installation for ice production to your cold water supply? Replace filter or reinstall it correctly. ■ Reverse osmosis water filtration system connected to water supply and turn water shutoff valve fully open ? The ice cubes are difficult to normal temperature. ■ Controls set correctly for refrigerator to return to open ? Replace filter or reinstall...
.... ■ Water filter installed on model) is not producing ice or not enough ice ■ Refrigerator connected to moisture buildup. ■ Door(s) opened often or left open? Wait 24 hours after ice maker installation for ice production to your cold water supply? Replace filter or reinstall it correctly. ■ Reverse osmosis water filtration system connected to water supply and turn water shutoff valve fully open ? The ice cubes are difficult to normal temperature. ■ Controls set correctly for refrigerator to return to open ? Replace filter or reinstall...

Use & Care Guide
Page 18
... turn water shutoff valve fully open. ■ Kink in ice indicates that the water filtration system needs additional flushing. Remove filter and operate dispenser. Make sure the water dispenser wire/tube assembly has been properly reconnected. See "Water Dispenser." ■ Recently changed water filter? Make sure the water dispenser tube connections are fully tightened. See "Refrigerator Door(s) and Drawer." Allow 24 hours after installation for water supply to cool completely. ■ Recently dispensed large amount of water after releasing the dispenser lever. ■ New...
... turn water shutoff valve fully open. ■ Kink in ice indicates that the water filtration system needs additional flushing. Remove filter and operate dispenser. Make sure the water dispenser wire/tube assembly has been properly reconnected. See "Water Dispenser." ■ Recently changed water filter? Make sure the water dispenser tube connections are fully tightened. See "Refrigerator Door(s) and Drawer." Allow 24 hours after installation for water supply to cool completely. ■ Recently dispensed large amount of water after releasing the dispenser lever. ■ New...

Use & Care Guide
Page 19
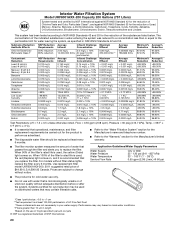
... the reduction of Chlorine Taste and Odor, Particulate Class I particle size: >0.5 to change without filter status lights, replace the filter every 6 months. This system has been tested according to the "Warranty" section for cyst reduction may contain filterable cysts. *Class I *; Prices are subject to Application Guidelines/Water Supply Parameters Water Supply Water Pressure Water Temperature Service Flow Rate City or Well 35 - 120 psi (241 - 827 kPa) 33...
... the reduction of Chlorine Taste and Odor, Particulate Class I particle size: >0.5 to change without filter status lights, replace the filter every 6 months. This system has been tested according to the "Warranty" section for cyst reduction may contain filterable cysts. *Class I *; Prices are subject to Application Guidelines/Water Supply Parameters Water Supply Water Pressure Water Temperature Service Flow Rate City or Well 35 - 120 psi (241 - 827 kPa) 33...
Use & Care Guide
Page 20
... Manufacturer's limited warranty. ■ The filter monitor system measures the amount of water that operational, maintenance, and filter replacement requirements be used , the yellow (Order) light comes on disinfected waters that you to NSF/ANSI Standards 42 and 53 for the reduction of the substances listed below. Interior Water Filtration System Model UKF8001AXX-200 Capacity 200 Gallons (757 Liters) System tested and certified by...
... Manufacturer's limited warranty. ■ The filter monitor system measures the amount of water that operational, maintenance, and filter replacement requirements be used , the yellow (Order) light comes on disinfected waters that you to NSF/ANSI Standards 42 and 53 for the reduction of the substances listed below. Interior Water Filtration System Model UKF8001AXX-200 Capacity 200 Gallons (757 Liters) System tested and certified by...

Use & Care Guide
Page 21
... with Maytag's published installation instructions. 11. Proof of original purchase date is not installed in an inaccessible location or is required to parts or systems resulting from warranty coverage. 4. Repairs to obtain service under this limited warranty. The removal and reinstallation of your product or you would like to schedule service, you . Have your correspondence. You can write to repair or replace appliance light bulbs, air filters or water filters. Service...
... with Maytag's published installation instructions. 11. Proof of original purchase date is not installed in an inaccessible location or is required to parts or systems resulting from warranty coverage. 4. Repairs to obtain service under this limited warranty. The removal and reinstallation of your product or you would like to schedule service, you . Have your correspondence. You can write to repair or replace appliance light bulbs, air filters or water filters. Service...

Warranty Information
Page 1
.... This warranty gives you specific legal rights, and you may have other damage to the finish of your major appliance, to replace or repair house fuses, or to repair or replace appliance light bulbs, air filters or water filters. MAYTAG® MAJOR APPLIANCE WARRANTY LIMITED WARRANTY For one year from the date of purchase, when this major appliance is operated and maintained according to instructions attached to...
.... This warranty gives you specific legal rights, and you may have other damage to the finish of your major appliance, to replace or repair house fuses, or to repair or replace appliance light bulbs, air filters or water filters. MAYTAG® MAJOR APPLIANCE WARRANTY LIMITED WARRANTY For one year from the date of purchase, when this major appliance is operated and maintained according to instructions attached to...
Dimension Guide
Page 1
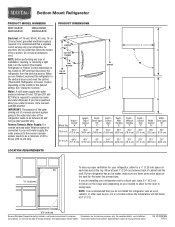
... of installation, cleaning, or removing a light bulb, turn the control (Thermostat, Refrigerator or Freezer Control depending on the model) to change materials and specifications without notice. W10208789A 1/20/11 Use an outlet that a separate circuit serving only your cold water supply, the water pressure to the reverse osmosis system needs to be turned off by a switch. Reverse Osmosis Water Supply: If a reverse osmosis water filtration system is required to a fixed wall, leave 21⁄2" (6.3 cm) minimum on the hinge side...
... of installation, cleaning, or removing a light bulb, turn the control (Thermostat, Refrigerator or Freezer Control depending on the model) to change materials and specifications without notice. W10208789A 1/20/11 Use an outlet that a separate circuit serving only your cold water supply, the water pressure to the reverse osmosis system needs to be turned off by a switch. Reverse Osmosis Water Supply: If a reverse osmosis water filtration system is required to a fixed wall, leave 21⁄2" (6.3 cm) minimum on the hinge side...


