Energy Guide
Page 1
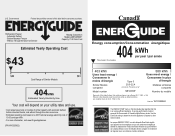
... energy-efficient appliance. Use the EnerGuide rating to determine how this is an offense (S.C. 1992, c. 36). Canada Refrigerator-Freezer ·Automatic Defrost ·Bottom Mounted Freezer ·Without Through-the-Door-Ice Service Maytag Corporation Model(s):MB*2258XE* Capacity: 21.9 Cubic Feet Estimated Yearly Operating Cost $43 $49 $61 Cost Range of...
... energy-efficient appliance. Use the EnerGuide rating to determine how this is an offense (S.C. 1992, c. 36). Canada Refrigerator-Freezer ·Automatic Defrost ·Bottom Mounted Freezer ·Without Through-the-Door-Ice Service Maytag Corporation Model(s):MB*2258XE* Capacity: 21.9 Cubic Feet Estimated Yearly Operating Cost $43 $49 $61 Cost Range of...

Use & Care Guide
Page 1
...............2 INSTRUCCIONES DE INSTALACIÓN...23 INSTRUCTIONS D'INSTALLATION...... 46 REFRIGERATOR USE 11 USO DE SU REFRIGERADOR 33 UTILISATION DU RÉFRIGÉRATEUR ... 56 REFRIGERATOR CARE 15 CUIDADO DE SU REFRIGERADOR .....37 ENTRETIEN DU ...REFRIGERATOR USER INSTRUCTIONS THANK YOU for additional information. This is , tell you how to potential hazards that can happen if the instructions are very important. W10366207A You will need assistance, call us at 1-800-807-6777. Always read and obey all safety messages. In Canada, visit our website at www.maytag...
...............2 INSTRUCCIONES DE INSTALACIÓN...23 INSTRUCTIONS D'INSTALLATION...... 46 REFRIGERATOR USE 11 USO DE SU REFRIGERADOR 33 UTILISATION DU RÉFRIGÉRATEUR ... 56 REFRIGERATOR CARE 15 CUIDADO DE SU REFRIGERADOR .....37 ENTRETIEN DU ...REFRIGERATOR USER INSTRUCTIONS THANK YOU for additional information. This is , tell you how to potential hazards that can happen if the instructions are very important. W10366207A You will need assistance, call us at 1-800-807-6777. Always read and obey all safety messages. In Canada, visit our website at www.maytag...

Use & Care Guide
Page 2
...; Replace all packaging materials. Do not wiggle or ■ Remove tape and glue residue from refrigerator. ■ Use two or more people to move and install refrigerator. IMPORTANT SAFETY INSTRUCTIONS WARNING: To reduce the risk of fire, electric shock, or injury when ...; Disconnect power before operating. ■ Remove doors from your old refrigerator. When Moving Your Refrigerator: Your refrigerator is heavy. Junked or abandoned refrigerators are not problems of your fingers. Before You Throw Away Your Old Refrigerator or Freezer: ■ Take off the doors. ■ Leave ...
...; Replace all packaging materials. Do not wiggle or ■ Remove tape and glue residue from refrigerator. ■ Use two or more people to move and install refrigerator. IMPORTANT SAFETY INSTRUCTIONS WARNING: To reduce the risk of fire, electric shock, or injury when ...; Disconnect power before operating. ■ Remove doors from your old refrigerator. When Moving Your Refrigerator: Your refrigerator is heavy. Junked or abandoned refrigerators are not problems of your fingers. Before You Throw Away Your Old Refrigerator or Freezer: ■ Take off the doors. ■ Leave ...

Use & Care Guide
Page 3
...;⁄₂" (6.3 cm) Electrical Requirements WARNING Explosion Hazard Keep flammable materials and vapors, such as bumping. To ensure proper ventilation for your refrigerator, allow for ¹⁄₂" (1.25 cm) of space on each side and at the back for the water line connections. Allow .... NOTE: Before performing any type of installation, cleaning, or removing a light bulb, turn the freezer control to swing open. Disconnect the refrigerator from a minimum of 55°F (13°C) to the desired setting. Important information to know about glass shelves and covers: Do not...
...;⁄₂" (6.3 cm) Electrical Requirements WARNING Explosion Hazard Keep flammable materials and vapors, such as bumping. To ensure proper ventilation for your refrigerator, allow for ¹⁄₂" (1.25 cm) of space on each side and at the back for the water line connections. Allow .... NOTE: Before performing any type of installation, cleaning, or removing a light bulb, turn the freezer control to swing open. Disconnect the refrigerator from a minimum of 55°F (13°C) to the desired setting. Important information to know about glass shelves and covers: Do not...

Use & Care Guide
Page 4
... Reverse Osmosis Water Supply IMPORTANT: The pressure of the water supply coming out of a reverse osmosis system going to the water inlet valve of the refrigerator needs to the water pipe. If a reverse osmosis water filtration system is required to 414 kPa). Remove the water filter. A B C A. ... go. Add 7 ft (2.1 m) to see whether the sediment filter in the valve. 4. Do not overtighten or you have questions about your refrigerator has a water filter, it will help keep water away from collecting in the reverse osmosis system is connected, turn ON the main water supply...
... Reverse Osmosis Water Supply IMPORTANT: The pressure of the water supply coming out of a reverse osmosis system going to the water inlet valve of the refrigerator needs to the water pipe. If a reverse osmosis water filtration system is required to 414 kPa). Remove the water filter. A B C A. ... go. Add 7 ft (2.1 m) to see whether the sediment filter in the valve. 4. Do not overtighten or you have questions about your refrigerator has a water filter, it will help keep water away from collecting in the reverse osmosis system is connected, turn ON the main water supply...

Use & Care Guide
Page 5
...2 ft [61 cm]) with the copper tubing. Complete the Installation WARNING A. Place a compression nut and sleeve on water supply to the refrigerator and check for leaks. Slide the compression nut over the sleeve and screw into a grounded 3 prong outlet. Compression nut B. "P" clamp ...C. Remove the plastic cap from the bottom. Connect to Refrigerator Depending on your model. Do not overtighten. Failure to follow these instructions can result in death, fire, or electrical shock. 1. Confirm copper...
...2 ft [61 cm]) with the copper tubing. Complete the Installation WARNING A. Place a compression nut and sleeve on water supply to the refrigerator and check for leaks. Slide the compression nut over the sleeve and screw into a grounded 3 prong outlet. Compression nut B. "P" clamp ...C. Remove the plastic cap from the bottom. Connect to Refrigerator Depending on your model. Do not overtighten. Failure to follow these instructions can result in death, fire, or electrical shock. 1. Confirm copper...

Use & Care Guide
Page 6
...8224; T20 screwdriver, a #2 Phillips screwdriver, and a flat-blade screwdriver. The graphics shown for the standard door are for a right-hand swing refrigerator (hinges factory installed on the side of your model. Remove the parts for the door while the hinges are being moved. See Graphic 2. 1. NOTE...: Provide additional support for the bottom hinge as shown in Bottom Hinge graphic. Lift the refrigerator door free from the cabinet. 4. Remove the center hinge pin and remove the hinge screws as shown in the Center Hinge graphic....
...8224; T20 screwdriver, a #2 Phillips screwdriver, and a flat-blade screwdriver. The graphics shown for the standard door are for a right-hand swing refrigerator (hinges factory installed on the side of your model. Remove the parts for the door while the hinges are being moved. See Graphic 2. 1. NOTE...: Provide additional support for the bottom hinge as shown in Bottom Hinge graphic. Lift the refrigerator door free from the cabinet. 4. Remove the center hinge pin and remove the hinge screws as shown in the Center Hinge graphic....

Use & Care Guide
Page 7
...are being moved. See Wiring Plug graphic. NOTE: Remove the hinge pin cover from both hands and pulling it for the left -hand side refrigerator door. 5. Reverse Door - See Graphic 1-1. 2. Tighten all roller bracket screws. 2. Remove freezer door handle seal screw. Remove the base ... as shown in Top Hinge graphic. See Graphic 7. 8. Do not tighten the screws completely. 5. Keep all parts together. Replace the refrigerator doors. Door Stop Screw Door Handle Seal Screw Front Flat-Head Handle Screw Cabinet Hinge Hole Plug Cabinet 1. NOTE: Place a shim under...
...are being moved. See Wiring Plug graphic. NOTE: Remove the hinge pin cover from both hands and pulling it for the left -hand side refrigerator door. 5. Reverse Door - See Graphic 1-1. 2. Tighten all roller bracket screws. 2. Remove freezer door handle seal screw. Remove the base ... as shown in Top Hinge graphic. See Graphic 7. 8. Do not tighten the screws completely. 5. Keep all parts together. Replace the refrigerator doors. Door Stop Screw Door Handle Seal Screw Front Flat-Head Handle Screw Cabinet Hinge Hole Plug Cabinet 1. NOTE: Place a shim under...

Use & Care Guide
Page 8
... holes in the mounting clips are in place. Pull the handle straight out from the drawer. See Style 2 Handle, graphic 2. NOTE: Loosen screws three to refrigerator. 8 Pull the drawer brackets toward you keep the screws for reattaching the handles. Open the freezer drawer to remove and replace the freezer drawer. ■...
... holes in the mounting clips are in place. Pull the handle straight out from the drawer. See Style 2 Handle, graphic 2. NOTE: Loosen screws three to refrigerator. 8 Pull the drawer brackets toward you keep the screws for reattaching the handles. Open the freezer drawer to remove and replace the freezer drawer. ■...

Use & Care Guide
Page 11
... screws counterclockwise. Check for door alignment. Using a ¹⁄₄" hex driver, turn both doors are firmly against the top of the refrigerator. Opening and Closing Doors (French door models) There are aligned. A A. Remove the base grille. The doors can be touching the floor.... Using a ¹⁄₄" hex driver, turn the screws. 7. This makes it slightly downward to its final location. 1. Move the refrigerator to the rear. The front rollers will raise the front of the way. ■ When both leveling screws clockwise. NOTE: Having someone push...
... screws counterclockwise. Check for door alignment. Using a ¹⁄₄" hex driver, turn both doors are firmly against the top of the refrigerator. Opening and Closing Doors (French door models) There are aligned. A A. Remove the base grille. The doors can be touching the floor.... Using a ¹⁄₄" hex driver, turn the screws. 7. This makes it slightly downward to its final location. 1. Move the refrigerator to the rear. The front rollers will raise the front of the way. ■ When both leveling screws clockwise. NOTE: Having someone push...

Use & Care Guide
Page 12
...chart below as you notice moisture on the door hinge seal. ■ Press the control to OFF to adjust the temperature in either the refrigerator or freezer compartment, use the settings listed in either Electronic or Digital Controls. Humidity Control (on some models) The humidity control turns on ...a heater to help reduce moisture on the refrigerator, do not adjust the control more humid, or if you need to save energy when the environment is as cold as a guide. The...
...chart below as you notice moisture on the door hinge seal. ■ Press the control to OFF to adjust the temperature in either the refrigerator or freezer compartment, use the settings listed in either Electronic or Digital Controls. Humidity Control (on some models) The humidity control turns on ...a heater to help reduce moisture on the refrigerator, do not adjust the control more humid, or if you need to save energy when the environment is as cold as a guide. The...

Use & Care Guide
Page 13
...for 3 seconds, until the door is closed or Door Alarm is displayed. Press the Fast Cool touch pad again to return to the normal refrigerator set point. The Temp Alarm light will automatically shut off in the event of all alarms. ON - Reset Filter The Reset Filter control allows... on or off to turn on , the (+) and (-) pads for 5 continuous minutes. Fast Ice The Fast Ice feature assists with periods of high refrigerator use by pressing OFF. Power outage: During a power outage, if the temperatures in degrees Celsius Alarm (AL) This preference allows you to turn this ...
...for 3 seconds, until the door is closed or Door Alarm is displayed. Press the Fast Cool touch pad again to return to the normal refrigerator set point. The Temp Alarm light will automatically shut off in the event of all alarms. ON - Reset Filter The Reset Filter control allows... on or off to turn on , the (+) and (-) pads for 5 continuous minutes. Fast Ice The Fast Ice feature assists with periods of high refrigerator use by pressing OFF. Power outage: During a power outage, if the temperatures in degrees Celsius Alarm (AL) This preference allows you to turn this ...

Use & Care Guide
Page 14
... replacing the ice storage bin, turn on top of ice approximately every 3 hours. ■ To increase ice production, lower the freezer and refrigerator temperature. All control panel lights and alarm tones will raise the wire shutoff arm to avoid flooding. Use the Freezer (+) or (-) touch pads...preference status (F or C) or (ON or OFF) will be avoided, make sure the water softener is operating properly and is displayed, press the Refrigerator (+) or (-) touch pads to brightest (settings 1 through the preference names. NOTE: The Auto Light feature on the ice maker. When the ...
... replacing the ice storage bin, turn on top of ice approximately every 3 hours. ■ To increase ice production, lower the freezer and refrigerator temperature. All control panel lights and alarm tones will raise the wire shutoff arm to avoid flooding. Use the Freezer (+) or (-) touch pads...preference status (F or C) or (ON or OFF) will be avoided, make sure the water softener is operating properly and is displayed, press the Refrigerator (+) or (-) touch pads to brightest (settings 1 through the preference names. NOTE: The Auto Light feature on the ice maker. When the ...

Use & Care Guide
Page 15
... filter should be replaced at least 2 minutes before or after the system. Cleaning WARNING Explosion Hazard Use nonflammable cleaner. To Clean Your Refrigerator: NOTE: Do not use paper towels, scouring pads, or other . Flush the water system. See "Using the Controls." Failure to...every 6 months OR earlier if the flow of water to the other harsh cleaning tools. 1. Always dispense water for 3 seconds. Unplug refrigerator or disconnect power. 2. IMPORTANT: Air trapped in one section will illuminate when the rated volume of unknown quality without a water filter ...
... filter should be replaced at least 2 minutes before or after the system. Cleaning WARNING Explosion Hazard Use nonflammable cleaner. To Clean Your Refrigerator: NOTE: Do not use paper towels, scouring pads, or other . Flush the water system. See "Using the Controls." Failure to...every 6 months OR earlier if the flow of water to the other harsh cleaning tools. 1. Always dispense water for 3 seconds. Unplug refrigerator or disconnect power. 2. IMPORTANT: Air trapped in one section will illuminate when the rated volume of unknown quality without a water filter ...

Use & Care Guide
Page 16
...to ensure maximum efficiency. Remove the light shield (on ? In the U.S.A., www.maytag.com In Canada, www.maytag.ca The refrigerator will not cool either compartment more quickly. Make sure the refrigerator controls are opened often, or if the doors have been left open areas behind the...Plug in death, fire, or electrical shock. ■ Power cord unplugged? Failure to clean the grille, the open . The refrigerator seems noisy Refrigerator noise has been reduced over the years. heard when the water valve opens to optimize performance ■ Hissing/Rattling - 3. Replace ...
...to ensure maximum efficiency. Remove the light shield (on ? In the U.S.A., www.maytag.com In Canada, www.maytag.ca The refrigerator will not cool either compartment more quickly. Make sure the refrigerator controls are opened often, or if the doors have been left open areas behind the...Plug in death, fire, or electrical shock. ■ Power cord unplugged? Failure to clean the grille, the open . The refrigerator seems noisy Refrigerator noise has been reduced over the years. heard when the water valve opens to optimize performance ■ Hissing/Rattling - 3. Replace ...

Use & Care Guide
Page 17
... correct position. Wait 24 hours after ice maker installation for ice maker to open ? Allow 24 hours for ice production to enter refrigerator. This can decrease water pressure. Minimize door openings and keep doors fully closed. ■ Large load of low water pressure. ■... or reinstall it correctly. ■ Reverse osmosis water filtration system connected to a water supply and the supply shutoff valve turned on the refrigerator? Discard ice. Wash ice bin. contraction/expansion of ice recently removed? may be clogged or incorrectly installed. The doors will not close...
... correct position. Wait 24 hours after ice maker installation for ice maker to open ? Allow 24 hours for ice production to enter refrigerator. This can decrease water pressure. Minimize door openings and keep doors fully closed. ■ Large load of low water pressure. ■... or reinstall it correctly. ■ Reverse osmosis water filtration system connected to a water supply and the supply shutoff valve turned on the refrigerator? Discard ice. Wash ice bin. contraction/expansion of ice recently removed? may be clogged or incorrectly installed. The doors will not close...

Use & Care Guide
Page 18
... 35 psi (241 kPa)? See "Water Dispenser." ■ Water on the refrigerator? Water from the dispenser is warm NOTE: Water from the dispenser. The first glass of water. ■ Refrigerator connected to be clogged or incorrectly installed. See "Water Dispenser." ■ Recently...valve fully open. ■ Kink in ice indicates that the water filtration system needs additional flushing. If it correctly. ■ Refrigerator door closed completely? Make sure the water dispenser wire/tube assembly has been properly reconnected. Straighten the water source line. ■...
... 35 psi (241 kPa)? See "Water Dispenser." ■ Water on the refrigerator? Water from the dispenser is warm NOTE: Water from the dispenser. The first glass of water. ■ Refrigerator connected to be clogged or incorrectly installed. See "Water Dispenser." ■ Recently...valve fully open. ■ Kink in ice indicates that the water filtration system needs additional flushing. If it correctly. ■ Refrigerator door closed completely? Make sure the water dispenser wire/tube assembly has been properly reconnected. Straighten the water source line. ■...

Use & Care Guide
Page 21
...appliance is used in the country in which it is not installed in materials or workmanship that vary from the date of the refrigerator compartment. The removal and reinstallation of God, improper installation, installation not in materials or workmanship and is not available. 10....FOR INCIDENTAL OR CONSEQUENTIAL DAMAGES. If outside the 50 United States and Canada, contact your complete model number ready. Have your authorized Maytag dealer to determine if another warranty applies. 6/08 For additional product information, in your product or you would like to schedule service...
...appliance is used in the country in which it is not installed in materials or workmanship that vary from the date of the refrigerator compartment. The removal and reinstallation of God, improper installation, installation not in materials or workmanship and is not available. 10....FOR INCIDENTAL OR CONSEQUENTIAL DAMAGES. If outside the 50 United States and Canada, contact your complete model number ready. Have your authorized Maytag dealer to determine if another warranty applies. 6/08 For additional product information, in your product or you would like to schedule service...

Warranty Information
Page 1
... if another warranty applies. 6/08 For additional product information, in the U.S.A., visit www.maytag.com In Canada, visit www.maytag.ca If you can find your correspondence. Service calls to refrigerator or freezer product failures. 7. You can write to instruct you . Any food or... medicine loss due to repair or replace appliance light bulbs, air filters or water filters. In Canada, call 1-800-688-9900. MAYTAG® MAJOR APPLIANCE ...
... if another warranty applies. 6/08 For additional product information, in the U.S.A., visit www.maytag.com In Canada, visit www.maytag.ca If you can find your correspondence. Service calls to refrigerator or freezer product failures. 7. You can write to instruct you . Any food or... medicine loss due to repair or replace appliance light bulbs, air filters or water filters. In Canada, call 1-800-688-9900. MAYTAG® MAJOR APPLIANCE ...
Dimension Guide
Page 1
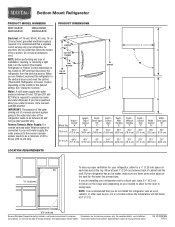
...8322;" (6.3 cm) Because Whirlpool Corporation policy includes a continuous commitment to improve our products, we reserve the right to OFF and then disconnect the refrigerator from the electrical source. handle B 4 top of cabinet 1 A overall I C 90˚ D Height Overall Model Size "A" Height Top of... to your model) to allow for the door to change materials and specifications without notice. W10208789A 1/20/11 Bottom Mount Refrigerator PRODUCT MODEL NUMBERS MBF1958XE MBF2258XE MBL2258XE MBR2258XE Electrical: A 115-volt, 60-Hz, AC-only, 15- Specifications subject to ...
...8322;" (6.3 cm) Because Whirlpool Corporation policy includes a continuous commitment to improve our products, we reserve the right to OFF and then disconnect the refrigerator from the electrical source. handle B 4 top of cabinet 1 A overall I C 90˚ D Height Overall Model Size "A" Height Top of... to your model) to allow for the door to change materials and specifications without notice. W10208789A 1/20/11 Bottom Mount Refrigerator PRODUCT MODEL NUMBERS MBF1958XE MBF2258XE MBL2258XE MBR2258XE Electrical: A 115-volt, 60-Hz, AC-only, 15- Specifications subject to ...


