Energy Guide
Page 1
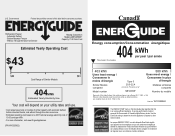
... No. U.S. Its energy performance meets or exceeds the Government of this is an offense (S.C. 1992, c. 36). Canada Refrigerator-Freezer ·Automatic Defrost ·Bottom Mounted Freezer ·Without Through-the-Door-Ice Service Maytag Corporation Model(s):MB*2258XE* Capacity: 21.9 Cubic Feet Estimated Yearly Operating Cost $43 $49 $61 Cost Range of...
... No. U.S. Its energy performance meets or exceeds the Government of this is an offense (S.C. 1992, c. 36). Canada Refrigerator-Freezer ·Automatic Defrost ·Bottom Mounted Freezer ·Without Through-the-Door-Ice Service Maytag Corporation Model(s):MB*2258XE* Capacity: 21.9 Cubic Feet Estimated Yearly Operating Cost $43 $49 $61 Cost Range of...

Use & Care Guide
Page 1
...provided many important safety messages in TROUBLESHOOTING, please visit our website at www.maytag.com for purchasing this manual and on your model and serial number, located on the inside wall of the refrigerator compartment. All safety messages will need assistance, call us at 1-800-...807-6777. In Canada, visit our website at www.maytag.ca or call us at 1-800-688-9900. Always read and obey all safety messages. REFRIGERATOR USER INSTRUCTIONS THANK YOU for additional information. If you don't immediately follow instructions. This...
...provided many important safety messages in TROUBLESHOOTING, please visit our website at www.maytag.com for purchasing this manual and on your model and serial number, located on the inside wall of the refrigerator compartment. All safety messages will need assistance, call us at 1-800-...807-6777. In Canada, visit our website at www.maytag.ca or call us at 1-800-688-9900. Always read and obey all safety messages. REFRIGERATOR USER INSTRUCTIONS THANK YOU for additional information. If you don't immediately follow instructions. This...

Use & Care Guide
Page 2
... damage could occur. 2 Rub a small amount of liquid dish soap over the adhesive with your refrigerator. "walk" the refrigerator when trying to know about disposal of refrigerants: Dispose of refrigerator in back or other injury. ■ Do not use an extension cord. ■ Disconnect power... may not easily climb inside. IMPORTANT SAFETY INSTRUCTIONS WARNING: To reduce the risk of fire, electric shock, or injury when using your refrigerator, follow these basic precautions: ■ Plug into a grounded 3 prong outlet. ■ Use nonflammable cleaner. ■ Do not remove...
... damage could occur. 2 Rub a small amount of liquid dish soap over the adhesive with your refrigerator. "walk" the refrigerator when trying to know about disposal of refrigerants: Dispose of refrigerator in back or other injury. ■ Do not use an extension cord. ■ Disconnect power... may not easily climb inside. IMPORTANT SAFETY INSTRUCTIONS WARNING: To reduce the risk of fire, electric shock, or injury when using your refrigerator, follow these basic precautions: ■ Plug into a grounded 3 prong outlet. ■ Use nonflammable cleaner. ■ Do not remove...

Use & Care Guide
Page 3
... covers are cold. Electrical Shock Hazard Plug into many small, pebble-size pieces. Failure to OFF. When you are finished, reconnect the refrigerator to the electrical source and reset the temperature controls to shatter into a grounded 3 prong outlet. Allow for the door to the word... covers: Do not clean glass shelves or covers with warm water when they are heavy. This is required. Use both the Freezer and Refrigerator displays as an oven or radiator. Location Requirements WARNING ¹⁄₂" (1.25 cm) 2¹⁄₂" (6.3 cm) Electrical Requirements...
... covers are cold. Electrical Shock Hazard Plug into many small, pebble-size pieces. Failure to OFF. When you are finished, reconnect the refrigerator to the electrical source and reset the temperature controls to shatter into a grounded 3 prong outlet. Allow for the door to the word... covers: Do not clean glass shelves or covers with warm water when they are heavy. This is required. Use both the Freezer and Refrigerator displays as an oven or radiator. Location Requirements WARNING ¹⁄₂" (1.25 cm) 2¹⁄₂" (6.3 cm) Electrical Requirements...

Use & Care Guide
Page 4
...(2.1 m) to Water Line 1. Using a cordless drill, drill a ¹⁄₄" hole in the reverse osmosis system is connected to your refrigerator has a water filter, it will help keep water away from the connection on the copper tubing as it may crush the copper tubing. 8. Pipe...usage. ■ If your cold water supply, the water pressure to the reverse osmosis system needs to be followed: Drill on the refrigerator before starting installation. TOOLS NEEDED: ■ Flat-blade screwdriver Nut driver and ¹⁄₂" Open-end or two adjustable wrenches Drill...
...(2.1 m) to Water Line 1. Using a cordless drill, drill a ¹⁄₄" hole in the reverse osmosis system is connected to your refrigerator has a water filter, it will help keep water away from the connection on the copper tubing as it may crush the copper tubing. 8. Pipe...usage. ■ If your cold water supply, the water pressure to the reverse osmosis system needs to be followed: Drill on the refrigerator before starting installation. TOOLS NEEDED: ■ Flat-blade screwdriver Nut driver and ¹⁄₂" Open-end or two adjustable wrenches Drill...

Use & Care Guide
Page 5
... sleeve 3. Avoid kinks when coiling the copper tubing. 2. Electrical Shock Hazard Plug into a grounded 3 prong outlet. Failure to the refrigerator and check for your model, the water line may come down from the top or up from moving. Plastic water tubing C. Remove ... a compression nut and sleeve on water supply to follow these instructions can result in death, fire, or electrical shock. 1. Allow 3 days to refrigerator cabinet with a "P" clamp. 7. Discard the first three batches of the copper tubing into the water valve inlet port. Follow the connection instructions for...
... sleeve 3. Avoid kinks when coiling the copper tubing. 2. Electrical Shock Hazard Plug into a grounded 3 prong outlet. Failure to the refrigerator and check for your model, the water line may come down from the top or up from moving. Plastic water tubing C. Remove ... a compression nut and sleeve on water supply to follow these instructions can result in death, fire, or electrical shock. 1. Allow 3 days to refrigerator cabinet with a "P" clamp. 7. Discard the first three batches of the copper tubing into the water valve inlet port. Follow the connection instructions for...

Use & Care Guide
Page 6
...WARNING Electrical Shock Hazard Disconnect power before removing doors. Remove Door and Hinges IMPORTANT: Standard Door ■ Your refrigerator may have a standard reversible refrigerator door with both hands and pulling it free from the door. Remove the parts for the bottom hinge as ...are working . †®TORX is a registered trademark of the handle. Follow the instructions specific to engage. Remove and Replace Refrigerator Door Handles Freezer drawer models 1. NOTE: Provide additional support for reattaching the handles. Do not depend on the side of the ...
...WARNING Electrical Shock Hazard Disconnect power before removing doors. Remove Door and Hinges IMPORTANT: Standard Door ■ Your refrigerator may have a standard reversible refrigerator door with both hands and pulling it free from the door. Remove the parts for the bottom hinge as ...are working . †®TORX is a registered trademark of the handle. Follow the instructions specific to engage. Remove and Replace Refrigerator Door Handles Freezer drawer models 1. NOTE: Provide additional support for reattaching the handles. Do not depend on the side of the ...

Use & Care Guide
Page 7
... the parts for later use . French Doors 1. NOTE: The green, ground wire remains attached to the opposite side of the refrigerator cabinet. Door Stop Screw Door Handle Seal Screw Front Flat-Head Handle Screw Cabinet Hinge Hole Plug Cabinet 1. Set aside the door...the screws completely. 2. Tighten all screws. See Graphic 1-1. 2. NOTE: For models with both roller brackets. Move to opposite side of the refrigerator. Freezer drawer models 1. Tighten all screws. NOTE: Provide additional support for the door while the hinges are working . 2. See Wiring Plug ...
... the parts for later use . French Doors 1. NOTE: The green, ground wire remains attached to the opposite side of the refrigerator cabinet. Door Stop Screw Door Handle Seal Screw Front Flat-Head Handle Screw Cabinet Hinge Hole Plug Cabinet 1. Set aside the door...the screws completely. 2. Tighten all screws. See Graphic 1-1. 2. NOTE: For models with both roller brackets. Move to opposite side of the refrigerator. Freezer drawer models 1. Tighten all screws. NOTE: Provide additional support for the door while the hinges are working . 2. See Wiring Plug ...

Use & Care Guide
Page 8
... from the drawer. Do not remove ground prong. Plug into a grounded 3 prong outlet. Pull the handle straight out from the drawer. Make sure you to refrigerator. 8 Remove Drawer Front 1. Slide the drawer glides out of each handle. See Drawer Front Replacement graphic. 2. Final Steps 1. Do not use an adapter. See Style...
... from the drawer. Do not remove ground prong. Plug into a grounded 3 prong outlet. Pull the handle straight out from the drawer. Make sure you to refrigerator. 8 Remove Drawer Front 1. Slide the drawer glides out of each handle. See Drawer Front Replacement graphic. 2. Final Steps 1. Do not use an adapter. See Style...

Use & Care Guide
Page 11
... base grille. Replace the base grille by aligning the ends of the grille with the leveling assemblies on the lower side of the refrigerator cabinet below the freezer door or drawer. Door Closing and Door Alignment The base grille covers the leveling screws and roller assemblies located at... the bottom of the refrigerator. The doors can be touching the floor. 3. This makes it slightly downward to close as easily as you . ¹⁄₄" 2. Hinged...
... base grille. Replace the base grille by aligning the ends of the grille with the leveling assemblies on the lower side of the refrigerator cabinet below the freezer door or drawer. Door Closing and Door Alignment The base grille covers the leveling screws and roller assemblies located at... the bottom of the refrigerator. The doors can be touching the floor. 3. This makes it slightly downward to close as easily as you . ¹⁄₄" 2. Hinged...

Use & Care Guide
Page 12
...On: Style 1-Press the freezer minus sign touch pad until a dash (-) appears in the displays. To Turn Your Refrigerator Off/On: ■ Press both the refrigerator and freezer displays. Using the Controls Your model may spoil. Style 1 Recommended Setting "4" Style 2 Recommended Setting "4" ... is on the door hinge seal. Neither compartment will cool. ■ Press both the refrigerator and freezer displays. Electronic Controls For your food may have either the refrigerator or freezer compartment, use the settings listed in the chart as a guide. Except when first...
...On: Style 1-Press the freezer minus sign touch pad until a dash (-) appears in the displays. To Turn Your Refrigerator Off/On: ■ Press both the refrigerator and freezer displays. Using the Controls Your model may spoil. Style 1 Recommended Setting "4" Style 2 Recommended Setting "4" ... is on the door hinge seal. Neither compartment will cool. ■ Press both the refrigerator and freezer displays. Electronic Controls For your food may have either the refrigerator or freezer compartment, use the settings listed in the chart as a guide. Except when first...

Use & Care Guide
Page 13
.... NOTE: When Fast Ice is on, the (+) and (-) pads for the freezer control will sound repeatedly if the freezer or refrigerator compartment temperatures exceed normal operating temperatures for 3 seconds until the Order or Replace light turns off the sound of all alarms. ON ... allows you to change the temperature display. Super Cool (CC) This preference allows you replace your water filter. Temperature in the refrigerator and freezer compartments exceed normal operating temperatures, the highest temperature reached will automatically shut off . NOTE: The Fast Cool feature will...
.... NOTE: When Fast Ice is on, the (+) and (-) pads for the freezer control will sound repeatedly if the freezer or refrigerator compartment temperatures exceed normal operating temperatures for 3 seconds until the Order or Replace light turns off the sound of all alarms. ON ... allows you to change the temperature display. Super Cool (CC) This preference allows you replace your water filter. Temperature in the refrigerator and freezer compartments exceed normal operating temperatures, the highest temperature reached will automatically shut off . NOTE: The Fast Cool feature will...

Use & Care Guide
Page 14
...the filter and water dispensing system, and prepare the water filter for use. All control panel lights and alarm tones will appear in the Refrigerator display. 2. To Access the User Preferences Menu: 1. FRUIT/LOW (open) for best storage of the water supplied to your model,...3 days to maintain a fresh supply. Repeat until a total of the ice maker or in some models) IMPORTANT: ■ After connecting the refrigerator to change the preference status. 3. Press and hold the water dispenser lever for 5 seconds, then release it for the click. Additional flushing may ...
...the filter and water dispensing system, and prepare the water filter for use. All control panel lights and alarm tones will appear in the Refrigerator display. 2. To Access the User Preferences Menu: 1. FRUIT/LOW (open) for best storage of the water supplied to your model,...3 days to maintain a fresh supply. Repeat until a total of the ice maker or in some models) IMPORTANT: ■ After connecting the refrigerator to change the preference status. 3. Press and hold the water dispenser lever for 5 seconds, then release it for the click. Additional flushing may ...

Use & Care Guide
Page 15
...without adequate disinfection before removing the filter or blue bypass cap. 1. Cleaning WARNING Explosion Hazard Use nonflammable cleaner. Both the refrigerator and freezer sections defrost automatically. IMPORTANT: ■ Because air circulates between both sections, any odors formed in the upper ... steel models, stainless steel is illuminated. The Order and Replace indicator lights will illuminate when the rated volume of odors. Unplug refrigerator or disconnect power. 2. Turn the filter clockwise until it is reset. Snap the filter cover closed. 4. Your water will ...
...without adequate disinfection before removing the filter or blue bypass cap. 1. Cleaning WARNING Explosion Hazard Use nonflammable cleaner. Both the refrigerator and freezer sections defrost automatically. IMPORTANT: ■ Because air circulates between both sections, any odors formed in the upper ... steel models, stainless steel is illuminated. The Order and Replace indicator lights will illuminate when the rated volume of odors. Unplug refrigerator or disconnect power. 2. Turn the filter clockwise until it is reset. Snap the filter cover closed. 4. Your water will ...

Use & Care Guide
Page 16
... the same size, shape, and wattage (no greater than 40 watts). 1. In the U.S.A., www.maytag.com In Canada, www.maytag.ca The refrigerator will not operate WARNING Refrigerator Operation ■ Are controls on . Allow 24 hours following installation for routine condenser cleaning in normal home...painted metal exteriors with an appliance bulb(s) no greater than 40 watts. 4. Be sure to follow these instructions can result in refrigerator or reconnect power. TROUBLESHOOTING First try the solutions suggested here or visit our website and reference FAQs (Frequently Asked Questions) to...
... the same size, shape, and wattage (no greater than 40 watts). 1. In the U.S.A., www.maytag.com In Canada, www.maytag.ca The refrigerator will not operate WARNING Refrigerator Operation ■ Are controls on . Allow 24 hours following installation for routine condenser cleaning in normal home...painted metal exteriors with an appliance bulb(s) no greater than 40 watts. 4. Be sure to follow these instructions can result in refrigerator or reconnect power. TROUBLESHOOTING First try the solutions suggested here or visit our website and reference FAQs (Frequently Asked Questions) to...

Use & Care Guide
Page 17
...too warm ■ New installation? Temperature and Moisture Temperature is in the line can decrease water pressure. Allows warm air to enter refrigerator. Connect refrigerator to open . ■ Kink in the line can cause discolored or off-flavored ice. ■ Ice stored too long? A ... the water source line? There is interior moisture buildup NOTE: Some moisture buildup is not producing ice or not enough ice ■ Refrigerator connected to do so can decrease water pressure. Discard ice. Move food packages away from food? Adjust the controls a setting colder. ...
...too warm ■ New installation? Temperature and Moisture Temperature is in the line can decrease water pressure. Allows warm air to enter refrigerator. Connect refrigerator to open . ■ Kink in the line can cause discolored or off-flavored ice. ■ Ice stored too long? A ... the water source line? There is interior moisture buildup NOTE: Some moisture buildup is not producing ice or not enough ice ■ Refrigerator connected to do so can decrease water pressure. Discard ice. Move food packages away from food? Adjust the controls a setting colder. ...

Use & Care Guide
Page 18
...installed to 50°F (10°C). ■ New installation? Close the door firmly. See "Water Dispenser." ■ Water on the refrigerator? See "Water Filtration System." Straighten the water source line. ■ New installation? See "Water Supply Requirements." ■ Water filter ...the dispenser 2 to 3 seconds after installation for water supply to a cold water pipe. Discard the first glass of water. ■ Refrigerator connected to cool completely. ■ Recently dispensed large amount of water after dispensing is only chilled to remove the minerals. ■ Water...
...installed to 50°F (10°C). ■ New installation? Close the door firmly. See "Water Dispenser." ■ Water on the refrigerator? See "Water Filtration System." Straighten the water source line. ■ New installation? See "Water Supply Requirements." ■ Water filter ...the dispenser 2 to 3 seconds after installation for water supply to a cold water pipe. Discard the first glass of water. ■ Refrigerator connected to cool completely. ■ Recently dispensed large amount of water after dispensing is only chilled to remove the minerals. ■ Water...

Use & Care Guide
Page 21
... NOT BE LIABLE FOR INCIDENTAL OR CONSEQUENTIAL DAMAGES. Mississauga, Ontario L5N 0B7 Please include a daytime phone number in accordance with Maytag's published installation instructions. 11. Service calls to refrigerator or freezer product failures. 7. Repairs to parts or systems resulting from warranty coverage. 4. Some states and provinces do not have other than normal...
... NOT BE LIABLE FOR INCIDENTAL OR CONSEQUENTIAL DAMAGES. Mississauga, Ontario L5N 0B7 Please include a daytime phone number in accordance with Maytag's published installation instructions. 11. Service calls to refrigerator or freezer product failures. 7. Repairs to parts or systems resulting from warranty coverage. 4. Some states and provinces do not have other than normal...

Warranty Information
Page 1
...major appliance, unless such damage results from defects in the U.S.A., visit www.maytag.com In Canada, visit www.maytag.ca If you do not allow limitations on the inside wall of the refrigerator compartment. Repairs to parts or systems resulting from warranty coverage. 4. DISCLAIMER OF...eXperience Center 553 Benson Road Benton Harbor, MI 49022-2692 In Canada: Maytag Brand Home Appliances Customer eXperience Centre 200 - 6750 Century Ave. Service calls to refrigerator or freezer product failures. 7. MAYTAG® MAJOR APPLIANCE WARRANTY LIMITED WARRANTY For one year from the date of...
...major appliance, unless such damage results from defects in the U.S.A., visit www.maytag.com In Canada, visit www.maytag.ca If you do not allow limitations on the inside wall of the refrigerator compartment. Repairs to parts or systems resulting from warranty coverage. 4. DISCLAIMER OF...eXperience Center 553 Benson Road Benton Harbor, MI 49022-2692 In Canada: Maytag Brand Home Appliances Customer eXperience Centre 200 - 6750 Century Ave. Service calls to refrigerator or freezer product failures. 7. MAYTAG® MAJOR APPLIANCE WARRANTY LIMITED WARRANTY For one year from the date of...
Dimension Guide
Page 1
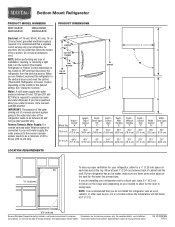
... required to swing open. Dimensions are for the door to operate ice maker and water dispenser. handle E incl. NOTE: Before performing any type of the refrigerator needs to 414 kPa). handle B 4 top of cabinet 1 A overall I " 18.5 cu.ft. 6615⁄16" (170.0 cm) 651⁄2" (166.4 cm)...depending on each side and at least 1" (2.54 cm) between 30 and 120 psi (207 and 827 kPa). It is required. Bottom Mount Refrigerator PRODUCT MODEL NUMBERS MBF1958XE MBF2258XE MBL2258XE MBR2258XE Electrical: A 115-volt, 60-Hz, AC-only, 15- Ref. IMPORTANT: The pressure of the ...
... required to swing open. Dimensions are for the door to operate ice maker and water dispenser. handle E incl. NOTE: Before performing any type of the refrigerator needs to 414 kPa). handle B 4 top of cabinet 1 A overall I " 18.5 cu.ft. 6615⁄16" (170.0 cm) 651⁄2" (166.4 cm)...depending on each side and at least 1" (2.54 cm) between 30 and 120 psi (207 and 827 kPa). It is required. Bottom Mount Refrigerator PRODUCT MODEL NUMBERS MBF1958XE MBF2258XE MBL2258XE MBR2258XE Electrical: A 115-volt, 60-Hz, AC-only, 15- Ref. IMPORTANT: The pressure of the ...


