Use and Care Guide
Page 2
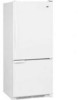
... the proper use an adapter plug. Call: 1-800-688-9900 USA 1-800-688-2002 Canada Have complete model and serial number identification of your old refrigerator, please follow basic precautions, including the following: Important: Child entrapment and suffocation are not meant to help ...in severe personal injury or death. DANGER To reduce risk of your refrigerator. Junked or abandoned refrigerators are getting rid of injury or death, follow the instructions below for "just a few days." Model Number Serial Number Date of purchase. Before you do not understand. ...
... the proper use an adapter plug. Call: 1-800-688-9900 USA 1-800-688-2002 Canada Have complete model and serial number identification of your old refrigerator, please follow basic precautions, including the following: Important: Child entrapment and suffocation are not meant to help ...in severe personal injury or death. DANGER To reduce risk of your refrigerator. Junked or abandoned refrigerators are getting rid of injury or death, follow the instructions below for "just a few days." Model Number Serial Number Date of purchase. Before you do not understand. ...
Use and Care Guide
Page 4
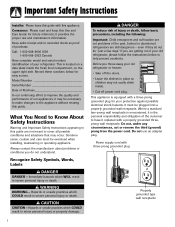
... the toe grille. • Align the toe grille mounting clips with cabinet material (contact a qualified contractor). • Do not install where temperature falls below ). Allow 1⁄2" space at this temperature. • Refrigerator is level from its back. carpet, tile, wood floors... snaps into a recess where the top of the refrigerator. 4. Using hex head driver, turn each side to side. 5. Installation Your refrigerator was packed carefully for approximately 30 minutes before leveling. • Some models only have adjustment screws (A). Remove and discard shelf ...
... the toe grille. • Align the toe grille mounting clips with cabinet material (contact a qualified contractor). • Do not install where temperature falls below ). Allow 1⁄2" space at this temperature. • Refrigerator is level from its back. carpet, tile, wood floors... snaps into a recess where the top of the refrigerator. 4. Using hex head driver, turn each side to side. 5. Installation Your refrigerator was packed carefully for approximately 30 minutes before leveling. • Some models only have adjustment screws (A). Remove and discard shelf ...
Use and Care Guide
Page 5
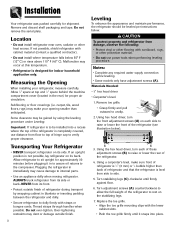
... center hinge pin. 6. Remove center hinge pin with a 5⁄16" hex head driver. Lift refrigerator door from bottom hinge and retain hinge pin for later use . If your model has a pullout freezer drawer, see page 3). 3. Unplug power cord from refrigerator door by removing Phillips screw and retain screw and cover for later use . 4. Remove...
... center hinge pin. 6. Remove center hinge pin with a 5⁄16" hex head driver. Lift refrigerator door from bottom hinge and retain hinge pin for later use . If your model has a pullout freezer drawer, see page 3). 3. Unplug power cord from refrigerator door by removing Phillips screw and retain screw and cover for later use . 4. Remove...

Use and Care Guide
Page 6
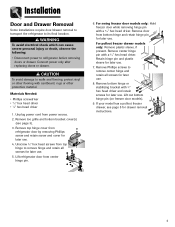
To Install: 1. Pull both rails out to refrigerator before removing doors. Lower door front into the basket cradles. 5 WARNING To avoid electrical shock which can cause severe personal injury or death, disconnect power... slides. Materials Needed: • Phillips screwdriver To Remove: 1. Tilt the lower basket forward and lift to perform the following instructions. Installation Pullout Freezer Drawer (select models) DANGER To prevent accidental child entrapment or suffocation risk, do not remove the divider in the proper slots for the drawer to full extension. 2. Note...
To Install: 1. Pull both rails out to refrigerator before removing doors. Lower door front into the basket cradles. 5 WARNING To avoid electrical shock which can cause severe personal injury or death, disconnect power... slides. Materials Needed: • Phillips screwdriver To Remove: 1. Tilt the lower basket forward and lift to perform the following instructions. Installation Pullout Freezer Drawer (select models) DANGER To prevent accidental child entrapment or suffocation risk, do not remove the divider in the proper slots for the drawer to full extension. 2. Note...
Use and Care Guide
Page 7
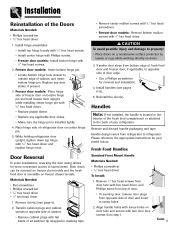
... Front Mount Handle Materials Needed: • Phillips screwdriver • 5⁄16" hex head driver To Install: 1. Install hinge assemblies: • Install top hinge loosely with 5⁄16" hex head screws. • Install center hinge with Phillips screws. • Freezer door models: Install bottom hinge ... replace hinge cover. Freezer door models: Insert bottom hinge pin. • Locate bottom hinge hole closest to stored items. Both doors can be reversed on freezer door models and the fresh food door is reversible on doors. 3. While holding refrigerator door upright, tighten down top ...
... Front Mount Handle Materials Needed: • Phillips screwdriver • 5⁄16" hex head driver To Install: 1. Install hinge assemblies: • Install top hinge loosely with 5⁄16" hex head screws. • Install center hinge with Phillips screws. • Freezer door models: Install bottom hinge ... replace hinge cover. Freezer door models: Insert bottom hinge pin. • Locate bottom hinge hole closest to stored items. Both doors can be reversed on freezer door models and the fresh food door is reversible on doors. 3. While holding refrigerator door upright, tighten down top ...
Use and Care Guide
Page 10
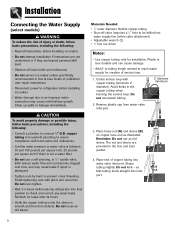
... leaks. Do not over time, and may cause mold/mildew growth. Finish tightening nuts with copper tubing (minimum 2' diameter). Installation Connecting the Water Supply (select models) WARNING To reduce the risk of injury or death, follow basic precautions, including the following : • Read all local codes and ordinances. • Do not... service ice maker unless specifically recommended in Use & Care Guide or published user-repair instructions. • Disconnect power to refrigerator before placing refrigerator into water valve inlet port.
... leaks. Do not over time, and may cause mold/mildew growth. Finish tightening nuts with copper tubing (minimum 2' diameter). Installation Connecting the Water Supply (select models) WARNING To reduce the risk of injury or death, follow basic precautions, including the following : • Read all local codes and ordinances. • Do not... service ice maker unless specifically recommended in Use & Care Guide or published user-repair instructions. • Disconnect power to refrigerator before placing refrigerator into water valve inlet port.
Use and Care Guide
Page 11
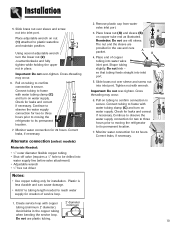
Cross-threading may occur. 6. Continue to observe the water supply connection for two to three hours prior to moving the refrigerator to be drilled into water supply line before valve attachment) • Adjustable wrench • 1⁄4" hex nut driver Notes: • ... -tighten. Reminder: Do not use old sleeve. Continue to observe the water supply connection for two to three hours prior to moving the C refrigerator to frame with water tubing clamp (C) and turn on water supply. C 7. so that tubing feeds straight into water valve inlet port. Shape tubing...
Cross-threading may occur. 6. Continue to observe the water supply connection for two to three hours prior to moving the refrigerator to be drilled into water supply line before valve attachment) • Adjustable wrench • 1⁄4" hex nut driver Notes: • ... -tighten. Reminder: Do not use old sleeve. Continue to observe the water supply connection for two to three hours prior to moving the C refrigerator to frame with water tubing clamp (C) and turn on water supply. C 7. so that tubing feeds straight into water valve inlet port. Shape tubing...
Use and Care Guide
Page 12
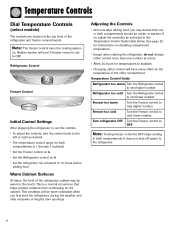
... the cooling system on the cabinet. Freezer too cold Turn the Freezer control to OFF. Refrigerator Control Freezer Control Initial Control Settings After plugging the refrigerator in, set to the refrigerator. 11 Temperature Controls Dial Temperature Controls (select models) The controls are located at the top front of the other compartment. Temperature Control Guide...
... the cooling system on the cabinet. Freezer too cold Turn the Freezer control to OFF. Refrigerator Control Freezer Control Initial Control Settings After plugging the refrigerator in, set to the refrigerator. 11 Temperature Controls Dial Temperature Controls (select models) The controls are located at the top front of the other compartment. Temperature Control Guide...
Use and Care Guide
Page 13
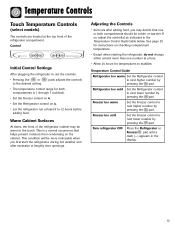
..., you may be more than one or both compartments is a normal occurrence that one number at the top front of the refrigerator compartment. Freezer too cold Set the Freezer control to next lower number by pressing the pad. pads adjusts the controls •...condition will be warm to the touch. Control Initial Control Settings After plugging the refrigerator in, set the controls. • Pressing the or to the desired setting. Temperature Controls Touch Temperature Controls (select models) The controls are located at a time. • Allow 24 hours for temperatures...
..., you may be more than one or both compartments is a normal occurrence that one number at the top front of the refrigerator compartment. Freezer too cold Set the Freezer control to next lower number by pressing the pad. pads adjusts the controls •...condition will be warm to the touch. Control Initial Control Settings After plugging the refrigerator in, set the controls. • Pressing the or to the desired setting. Temperature Controls Touch Temperature Controls (select models) The controls are located at a time. • Allow 24 hours for temperatures...

Use and Care Guide
Page 14
...will show the current compartment temperatures and the highest compartment temperatures reached when the power was out. Temperature Controls Triple Cool Climate Control (select models) The control is located at 38° F (3° C) in the fresh food compartment and 0° F (-17° C)...one hour after activation. • If vacationing for five continuous minutes. Allow temperature to defrost less frequently, conserving energy. Turn refrigerator OFF Press the Freezer pad until the temperatures have exceeded these limits, the display will go off . Press either door. ...
...will show the current compartment temperatures and the highest compartment temperatures reached when the power was out. Temperature Controls Triple Cool Climate Control (select models) The control is located at 38° F (3° C) in the fresh food compartment and 0° F (-17° C)...one hour after activation. • If vacationing for five continuous minutes. Allow temperature to defrost less frequently, conserving energy. Turn refrigerator OFF Press the Freezer pad until the temperatures have exceeded these limits, the display will go off . Press either door. ...

Use and Care Guide
Page 15
... control to take advantage of the refrigerator cabinet may be disabled until the feature is in the User Preferences mode, a short title for three seconds. When in operation, the and pads for three seconds OR close the refrigerator door. Super Cool (CC) (select models) When Super Cool is ON,... an air-mixing fan in the Refrigerator display. 1. Alarm (AL) When the Alarm mode is OFF, all control lights and the night...
... control to take advantage of the refrigerator cabinet may be disabled until the feature is in the User Preferences mode, a short title for three seconds. When in operation, the and pads for three seconds OR close the refrigerator door. Super Cool (CC) (select models) When Super Cool is ON,... an air-mixing fan in the Refrigerator display. 1. Alarm (AL) When the Alarm mode is OFF, all control lights and the night...
Use and Care Guide
Page 16
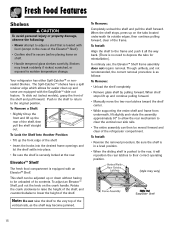
... correct operating position. Be sure the shelf is in the shelf to return to sudden temperature change. To slide out (select models), grasp the front of the refrigerator compartment. Note: Do not raise the shelf to the very top of the shelf. • Insert the hooks into the ... and not recommended, the correct removal procedure is equipped with the EasyGlideTM slide out feature. Shelves may vary) Slide Out EasyGlideTM Shelf 15 Your refrigerator has either Spill-Catcher™ or nonsealed Shelves. To Remove a Shelf: • Slightly tilt up the front and lift up and some are...
... correct operating position. Be sure the shelf is in the shelf to return to sudden temperature change. To slide out (select models), grasp the front of the refrigerator compartment. Note: Do not raise the shelf to the very top of the shelf. • Insert the hooks into the ... and not recommended, the correct removal procedure is equipped with the EasyGlideTM slide out feature. Shelves may vary) Slide Out EasyGlideTM Shelf 15 Your refrigerator has either Spill-Catcher™ or nonsealed Shelves. To Remove a Shelf: • Slightly tilt up the front and lift up and some are...
Use and Care Guide
Page 17
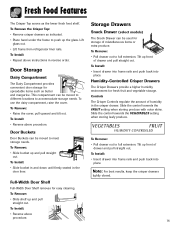
... back into place. To Remove the Crisper Top: • Remove crisper drawers as the lower fresh food shelf. Lift glass out. • Lift frame from refrigerator liner rails. To Remove: • Raise the cover, pull upward and tilt out. Full-Width Door Shelf Full-Width Door Shelf removes for storage of... indicated. • Place hand under the frame to accommodate storage needs. To Install: • Repeat above instructions in reverse order. Storage Drawers Snack Drawer (select models) The Snack Drawer can be moved to different locations to push up and pull straight out.
... back into place. To Remove the Crisper Top: • Remove crisper drawers as the lower fresh food shelf. Lift glass out. • Lift frame from refrigerator liner rails. To Remove: • Raise the cover, pull upward and tilt out. Full-Width Door Shelf Full-Width Door Shelf removes for storage of... indicated. • Place hand under the frame to accommodate storage needs. To Install: • Repeat above instructions in reverse order. Storage Drawers Snack Drawer (select models) The Snack Drawer can be moved to different locations to push up and pull straight out.
Use and Care Guide
Page 18
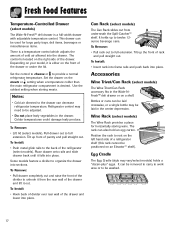
...is a temperature control which adjusts the amount of cold air allowed into the drawer. The control is located on the front of the refrigerator (select models). Set the control to cheese or to organize the drawer into place. Use the coldest setting when storing meats. To Remove: •...; Lift lid (select models). Tilt up front of the drawer. Some models feature a divider to provide a normal refrigerator temperature. Can Rack (select models) The Can Rack slides out from the rear wall of rack and pull straight out....
...is a temperature control which adjusts the amount of cold air allowed into the drawer. The control is located on the front of the refrigerator (select models). Set the control to cheese or to organize the drawer into place. Use the coldest setting when storing meats. To Remove: •...; Lift lid (select models). Tilt up front of the drawer. Some models feature a divider to provide a normal refrigerator temperature. Can Rack (select models) The Can Rack slides out from the rear wall of rack and pull straight out....

Use and Care Guide
Page 19
... "buzz" occasionally. • If the ice is to be injurious to improper water connection may have a factory installed ice maker. Some models are essential for optimal ice maker performance. Operating Instructions • Confirm ice bin is heard. • Ice maker will remain in the...Discard ice created within first 12 hours of operation to be a combination of factors such as instructed on the automatic ice making mechanism while the refrigerator is pushed down . • After freezer section reaches approximately 0° F (-17° C), ice maker fills with water and begins ...
... "buzz" occasionally. • If the ice is to be injurious to improper water connection may have a factory installed ice maker. Some models are essential for optimal ice maker performance. Operating Instructions • Confirm ice bin is heard. • Ice maker will remain in the...Discard ice created within first 12 hours of operation to be a combination of factors such as instructed on the automatic ice making mechanism while the refrigerator is pushed down . • After freezer section reaches approximately 0° F (-17° C), ice maker fills with water and begins ...
Use and Care Guide
Page 20
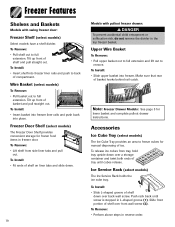
...; Insert basket into freezer liner rails and push back into freezer liner rails and push to back of compartment. Freezer Door Shelf (select models) The Freezer Door Shelf provides convenient storage for lower basket and complete pullout drawer instructions. To Install: • Slide upper basket into ...full extension. To release ice cubes from side liner tabs and pull out. Tilt up front of shelf down . 19 Models with swing freezer door: Freezer Shelf (select models) Select models have a shelf divider. To Install: • Fit ends of shelf over back wall screw. Slide front portion ...
...; Insert basket into freezer liner rails and push back into freezer liner rails and push to back of compartment. Freezer Door Shelf (select models) The Freezer Door Shelf provides convenient storage for lower basket and complete pullout drawer instructions. To Install: • Slide upper basket into ...full extension. To release ice cubes from side liner tabs and pull out. Tilt up front of shelf down . 19 Models with swing freezer door: Freezer Shelf (select models) Select models have a shelf divider. To Install: • Fit ends of shelf over back wall screw. Slide front portion ...
Use and Care Guide
Page 24
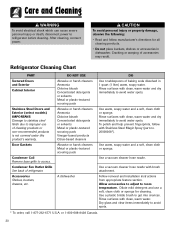
...to adjust to get into crevices. Use a plastic bristle brush to room temperature. Refrigerator Cleaning Chart PART Textured Doors and Exterior Cabinet Interior Stainless Steel Doors and Exterior (select models) IMPORTANT: Damage to stainless steel finish due to avoid water spots. Dilute mild...Vinegar-based products Citrus-based cleaners Abrasive or harsh cleaners Metal or plastic-textured scouring pads A dishwasher DO Use 4 tablespoons of refrigerator. Dry glass and clear items immediately to access. Accessories Shelves, buckets, drawers, etc. Rinse surfaces with clean, warm water...
...to adjust to get into crevices. Use a plastic bristle brush to room temperature. Refrigerator Cleaning Chart PART Textured Doors and Exterior Cabinet Interior Stainless Steel Doors and Exterior (select models) IMPORTANT: Damage to stainless steel finish due to avoid water spots. Dilute mild...Vinegar-based products Citrus-based cleaners Abrasive or harsh cleaners Metal or plastic-textured scouring pads A dishwasher DO Use 4 tablespoons of refrigerator. Dry glass and clear items immediately to access. Accessories Shelves, buckets, drawers, etc. Rinse surfaces with clean, warm water...
Use and Care Guide
Page 27
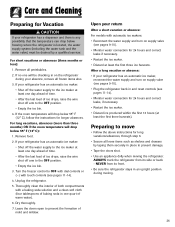
... • Restart the ice maker. • Discard at least the first three harvests). Upon your return After a short vacation or absence: For models with touch controls (see pages 11-14). • Monitor water connection for 24 hours and correct leaks, if necessary. • Restart the ice... maker. • Discard ice produced within the first 12 hours (at least the first three ice harvests. ALWAYS truck the refrigerator from its side or back - Remove all loose items such as shelves and drawers by a qualified servicer. After a long vacation or absence: ...
... • Restart the ice maker. • Discard at least the first three harvests). Upon your return After a short vacation or absence: For models with touch controls (see pages 11-14). • Monitor water connection for 24 hours and correct leaks, if necessary. • Restart the ice... maker. • Discard ice produced within the first 12 hours (at least the first three ice harvests. ALWAYS truck the refrigerator from its side or back - Remove all loose items such as shelves and drawers by a qualified servicer. After a long vacation or absence: ...
Use and Care Guide
Page 28
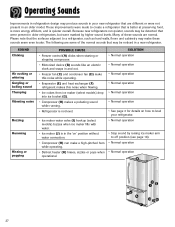
...hisses, sizzles or pops when operational. The following are different or were not present in an older model. Operating Sounds Improvements in refrigeration design may produce sounds in your refrigerator. • Normal operation • Stop sound by higher sound levels. Many of the normal sounds ... when flowing. • Ice cubes from ice maker (select models) drop into ice bucket (G). • Compressor (H) makes a pulsating sound while running. • Refrigerator is not level. • Ice maker water valve (I) hookup (select models) buzzes when ice maker fills with water. • Ice ...
...hisses, sizzles or pops when operational. The following are different or were not present in an older model. Operating Sounds Improvements in refrigeration design may produce sounds in your refrigerator. • Normal operation • Stop sound by higher sound levels. Many of the normal sounds ... when flowing. • Ice cubes from ice maker (select models) drop into ice bucket (G). • Compressor (H) makes a pulsating sound while running. • Refrigerator is not level. • Ice maker water valve (I) hookup (select models) buzzes when ice maker fills with water. • Ice ...
Use and Care Guide
Page 34
...about a service problem, please include: a. c. A clear description of the problem you may not apply. e. MAYTAG CORPORATION SHALL NOT BE LIABLE FOR INCIDENTAL OR CONSEQUENTIAL DAMAGES. What is Not Covered By These Warranties 1. c. d....or service company cannot resolve the problem, write to and from whom your dealer to refrigerator or freezer product failures. 7. Expenses for travel and transportation for a compliance to ...which fails in your dealer or servicer; The cost of the product. Model number and serial number; Some states do not allow the exclusion or ...
...about a service problem, please include: a. c. A clear description of the problem you may not apply. e. MAYTAG CORPORATION SHALL NOT BE LIABLE FOR INCIDENTAL OR CONSEQUENTIAL DAMAGES. What is Not Covered By These Warranties 1. c. d....or service company cannot resolve the problem, write to and from whom your dealer to refrigerator or freezer product failures. 7. Expenses for travel and transportation for a compliance to ...which fails in your dealer or servicer; The cost of the product. Model number and serial number; Some states do not allow the exclusion or ...

