Use and Care Guide
Page 2
... receptacle is encountered, it is the personal responsibility and obligation of injury or death, follow the instructions below for your old refrigerator, please follow basic precautions, including the following: Important: Child entrapment and suffocation are getting rid of your protection against possible ... power cord. Model Number Serial Number Date of Purchase In our continuing effort to improve the quality and performance of your old refrigerator or freezer: • Take off power cord plug. even if they sit out for future reference; This appliance is located on a data...
... receptacle is encountered, it is the personal responsibility and obligation of injury or death, follow the instructions below for your old refrigerator, please follow basic precautions, including the following: Important: Child entrapment and suffocation are getting rid of your protection against possible ... power cord. Model Number Serial Number Date of Purchase In our continuing effort to improve the quality and performance of your old refrigerator or freezer: • Take off power cord plug. even if they sit out for future reference; This appliance is located on a data...
Use and Care Guide
Page 5
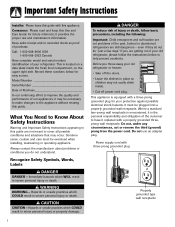
... hex head driver • 3⁄8" hex head driver 1. Lift out bottom hinge pin (on freezer door models). 9. Installation Door and Drawer Removal Some installations require door/drawer removal to transport the refrigerator to walls and flooring, protect vinyl or other flooring with cardboard, rugs ... for later use . 8. For pullout freezer drawer models only: Remove plastic sleeve, if present. Remove center hinge pin with a 5⁄16" hex head driver. Remove Phillips screws to refrigerator before removing doors or drawer. Remove bottom hinge or stabilizing bracket with 3⁄8"...
... hex head driver • 3⁄8" hex head driver 1. Lift out bottom hinge pin (on freezer door models). 9. Installation Door and Drawer Removal Some installations require door/drawer removal to transport the refrigerator to walls and flooring, protect vinyl or other flooring with cardboard, rugs ... for later use . 8. For pullout freezer drawer models only: Remove plastic sleeve, if present. Remove center hinge pin with a 5⁄16" hex head driver. Remove Phillips screws to refrigerator before removing doors or drawer. Remove bottom hinge or stabilizing bracket with 3⁄8"...

Use and Care Guide
Page 6
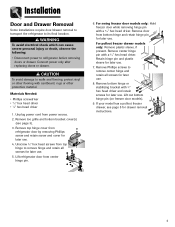
... the slots on inside of the drawer slides (select models). 5. Tilt the lower basket front down and set it clicks. Installation Pullout Freezer Drawer (select models) DANGER To prevent accidental child entrapment or suffocation risk, do not remove the divider in the proper slots for the ... cause severe personal injury or death, disconnect power to full extension. 2. After replacing doors, connect power. Pull drawer open to refrigerator before removing doors. Remove Phillips screw from the drawer slides (select models). 5. Place the basket cradles back onto the drawer slides.
... the slots on inside of the drawer slides (select models). 5. Tilt the lower basket front down and set it clicks. Installation Pullout Freezer Drawer (select models) DANGER To prevent accidental child entrapment or suffocation risk, do not remove the divider in the proper slots for the ... cause severe personal injury or death, disconnect power to full extension. 2. After replacing doors, connect power. Pull drawer open to refrigerator before removing doors. Remove Phillips screw from the drawer slides (select models). 5. Place the basket cradles back onto the drawer slides.
Use and Care Guide
Page 7
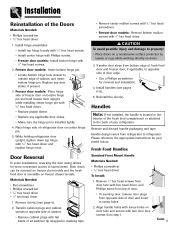
... face and secure with two door face screws from bottom edge of fresh food door and freezer door, if applicable, to outside edge of door edge. • Use a Phillips screwdriver for your refrigerator. Transfer door stops from step 1. Handles Note: If... not installed, the handle is installed tightly. 4. Remove and discard handle packaging and tape. Please reference the appropriate instructions for removal and installation. 4. Fresh Food Handles Standard Front Mount Handle Materials Needed...
... face and secure with two door face screws from bottom edge of fresh food door and freezer door, if applicable, to outside edge of door edge. • Use a Phillips screwdriver for your refrigerator. Transfer door stops from step 1. Handles Note: If... not installed, the handle is installed tightly. 4. Remove and discard handle packaging and tape. Please reference the appropriate instructions for removal and installation. 4. Fresh Food Handles Standard Front Mount Handle Materials Needed...
Use and Care Guide
Page 12
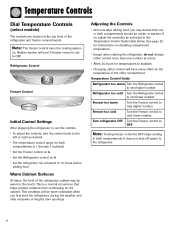
... 8 to 12 hours before adding food. Refrigerator Control Freezer Control Initial Control Settings After plugging the refrigerator in the Temperature Control Guide table below. Temperature Control Guide Refrigerator too warm Turn the Refrigerator control to the refrigerator. 11 This is 1 through 7 (coldest). • Set the Freezer control on 4. • Set the Refrigerator control on the temperature of the...
... 8 to 12 hours before adding food. Refrigerator Control Freezer Control Initial Control Settings After plugging the refrigerator in the Temperature Control Guide table below. Temperature Control Guide Refrigerator too warm Turn the Refrigerator control to the refrigerator. 11 This is 1 through 7 (coldest). • Set the Freezer control on 4. • Set the Refrigerator control on the temperature of the...
Use and Care Guide
Page 13
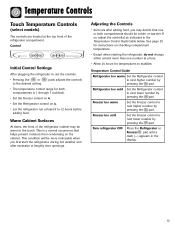
... pressing the pad. pads adjusts the controls • The temperature control range for temperatures to stabilize. Freezer too cold Set the Freezer control to next higher number by pressing the pad. Turn refrigerator OFF Press the Refrigerator or Freezer pad until a dash (-) appears in the Temperature Control Guide table below. Warm Cabinet Surfaces At times...
... pressing the pad. pads adjusts the controls • The temperature control range for temperatures to stabilize. Freezer too cold Set the Freezer control to next higher number by pressing the pad. Turn refrigerator OFF Press the Refrigerator or Freezer pad until a dash (-) appears in the Temperature Control Guide table below. Warm Cabinet Surfaces At times...

Use and Care Guide
Page 14
... control more ice. Temperature Control Guide Refrigerator too cold Set the Refrigerator control to next higher number by pressing the pad. Freezer too cold Set the Freezer control to next higher number by pressing the pad. Turn refrigerator OFF Press the Freezer pad until the door is closed OR...the new setting for three seconds. An audible alarm will illuminate. Refrigerator too warm Set the Refrigerator control to produce more than a few seconds until OFF appears in the display. Press either the Freezer or Refrigerator pad to turn off Temp Alarm, press and hold the Temp ...
... control more ice. Temperature Control Guide Refrigerator too cold Set the Refrigerator control to next higher number by pressing the pad. Freezer too cold Set the Freezer control to next higher number by pressing the pad. Turn refrigerator OFF Press the Freezer pad until the door is closed OR...the new setting for three seconds. An audible alarm will illuminate. Refrigerator too warm Set the Refrigerator control to produce more than a few seconds until OFF appears in the display. Press either the Freezer or Refrigerator pad to turn off Temp Alarm, press and hold the Temp ...

Use and Care Guide
Page 15
...Enable or disable audible alarms. • Adjust the light level at which the Dispenser Auto Light will not operate. Use the Freezer up and down the refrigerator and freezer after excessive or lengthy door openings. 14 Super Cool (CC) (select models) When Super Cool is ON, an air-mixing ... Max Cool will appear in degrees Fahrenheit or degrees Celsius. When in the room are complete, press the Door Alarm pad for the refrigerator and freezer controls will illuminate (when this feature is a normal occurrence that the light levels in the User Preferences mode, a short title for ...
...Enable or disable audible alarms. • Adjust the light level at which the Dispenser Auto Light will not operate. Use the Freezer up and down the refrigerator and freezer after excessive or lengthy door openings. 14 Super Cool (CC) (select models) When Super Cool is ON, an air-mixing ... Max Cool will appear in degrees Fahrenheit or degrees Celsius. When in the room are complete, press the Door Alarm pad for the refrigerator and freezer controls will illuminate (when this feature is a normal occurrence that the light levels in the User Preferences mode, a short title for ...

Use and Care Guide
Page 19
...; Confirm ice bin is in the supply line. • When the ice cubes are posted on the automatic ice making mechanism while the refrigerator is to be shut off for optimal ice maker performance. The ice maker will probably contain undersized and irregular cubes because of purchase do not...they fall into an empty storage bin and the water valve may click or "buzz" occasionally. • If the ice is pushed down . • After freezer section reaches approximately 0° F (-17° C), ice maker fills with a greenbluish hue. These items can block the sensor arm, causing the ice maker...
...; Confirm ice bin is in the supply line. • When the ice cubes are posted on the automatic ice making mechanism while the refrigerator is to be shut off for optimal ice maker performance. The ice maker will probably contain undersized and irregular cubes because of purchase do not...they fall into an empty storage bin and the water valve may click or "buzz" occasionally. • If the ice is pushed down . • After freezer section reaches approximately 0° F (-17° C), ice maker fills with a greenbluish hue. These items can block the sensor arm, causing the ice maker...

Use and Care Guide
Page 21
... • Avoid storing hard-to the freezer at least an inch around the food and results in the original carton and refrigerate immediately after purchasing and after each use . Frozen Food Storage • The freezer compartment of a refrigerator should be wrapped securely so leakage and ... warm food to -freeze foods such as described on pages 11-14. • Avoid overcrowding the refrigerator shelves. Drain vegetables well before storage and use aluminum foil, freezer wrap, freezer bags or airtight containers. If the temperature is above 40° F (4° C) adjust the ...
... • Avoid storing hard-to the freezer at least an inch around the food and results in the original carton and refrigerate immediately after purchasing and after each use . Frozen Food Storage • The freezer compartment of a refrigerator should be wrapped securely so leakage and ... warm food to -freeze foods such as described on pages 11-14. • Avoid overcrowding the refrigerator shelves. Drain vegetables well before storage and use aluminum foil, freezer wrap, freezer bags or airtight containers. If the temperature is above 40° F (4° C) adjust the ...
Use and Care Guide
Page 22
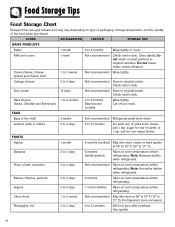
... recommended Ripen at 60° to 70° F (16° to 21° C). Grapes 3 to 5 days 1 month (whole) Ripen at room temperature before refrigerating. Use quickly. 21 FOODS REFRIGERATOR FREEZER STORAGE TIPS DAIRY PRODUCTS Butter 1 month 6 to 12 months Will not ripen after purchase. Bananas 2 to 4 days 6 months (whole/peeled) Ripen at room...
... recommended Ripen at 60° to 70° F (16° to 21° C). Grapes 3 to 5 days 1 month (whole) Ripen at room temperature before refrigerating. Use quickly. 21 FOODS REFRIGERATOR FREEZER STORAGE TIPS DAIRY PRODUCTS Butter 1 month 6 to 12 months Will not ripen after purchase. Bananas 2 to 4 days 6 months (whole/peeled) Ripen at room...
Use and Care Guide
Page 23
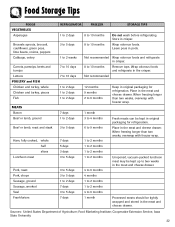
.... Food Storage Tips FOODS VEGETABLES Asparagus Brussels sprouts, broccoli, cauliflower, green peas, lima beans, onions, peppers Cabbage, celery Carrots, parsnips, beets and turnips Lettuce REFRIGERATOR FREEZER STORAGE TIPS 1 to 2 days 3 to 5 days 1 to 2 weeks 7 to 10 days 7 to 10 days 8 to 10 months 8 to two weeks in the meat and cheese ...
.... Food Storage Tips FOODS VEGETABLES Asparagus Brussels sprouts, broccoli, cauliflower, green peas, lima beans, onions, peppers Cabbage, celery Carrots, parsnips, beets and turnips Lettuce REFRIGERATOR FREEZER STORAGE TIPS 1 to 2 days 3 to 5 days 1 to 2 weeks 7 to 10 days 7 to 10 days 8 to 10 months 8 to two weeks in the meat and cheese ...
Use and Care Guide
Page 25
... shock which can cause severe personal injury or death, disconnect power to refrigerator. 8. Remove all bottles, containers and jars. Rinse surfaces with warm water. Pack refrigerator and freezer sections - This overloads compartments and slows rate of room. This will ... that door seals properly and refrigerator runs efficiently. • Take time to organize items in refrigerator to run less efficiently. • A freezer that door is not possible, isolate exterior by leveling refrigerator as instructed in both freezer and refrigerator compartments. 4. including doors -...
... shock which can cause severe personal injury or death, disconnect power to refrigerator. 8. Remove all bottles, containers and jars. Rinse surfaces with warm water. Pack refrigerator and freezer sections - This overloads compartments and slows rate of room. This will ... that door seals properly and refrigerator runs efficiently. • Take time to organize items in refrigerator to run less efficiently. • A freezer that door is not possible, isolate exterior by leveling refrigerator as instructed in both freezer and refrigerator compartments. 4. including doors -...

Use and Care Guide
Page 26
... 40 watts. 6. Insert front tabs of light cover into slots in freezer liner and snap rear portion over light assembly until it locks into liner holes on the notches at the back of refrigerator until rear tab engages. 25 Do not force shield beyond locking point.... Remove the cover. 4. CAUTION To avoid personal injury or property damage, observe the following: • Allow light bulb to refrigerator before replacing light bulb. Fresh Food Section (style of light shield varies) 1. Reach behind the light cover. 2. Remove light bulb. 5. Slide ...
... 40 watts. 6. Insert front tabs of light cover into slots in freezer liner and snap rear portion over light assembly until it locks into liner holes on the notches at the back of refrigerator until rear tab engages. 25 Do not force shield beyond locking point.... Remove the cover. 4. CAUTION To avoid personal injury or property damage, observe the following: • Allow light bulb to refrigerator before replacing light bulb. Fresh Food Section (style of light shield varies) 1. Reach behind the light cover. 2. Remove light bulb. 5. Slide ...
Use and Care Guide
Page 27
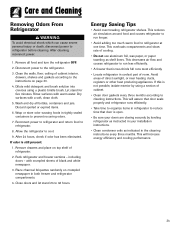
... the first three ice harvests. ALWAYS truck the refrigerator from its side or back - If your refrigerator has a dispenser and there is any possibility that the temperature can drop below 55° F (12° C): 1. Turn the freezer control to the OFF position. • Empty the...water connection for long vacations/absences, through step 6. • Secure all perishables. 2. If your absence, remove all frozen items also. 3. Unplug the refrigerator. 5. If no one day ahead of time. • After the last load of warm water). 6. Preparing to prevent damage. • Tape the...
... the first three ice harvests. ALWAYS truck the refrigerator from its side or back - If your refrigerator has a dispenser and there is any possibility that the temperature can drop below 55° F (12° C): 1. Turn the freezer control to the OFF position. • Empty the...water connection for long vacations/absences, through step 6. • Secure all perishables. 2. If your absence, remove all frozen items also. 3. Unplug the refrigerator. 5. If no one day ahead of time. • After the last load of warm water). 6. Preparing to prevent damage. • Tape the...
Use and Care Guide
Page 28
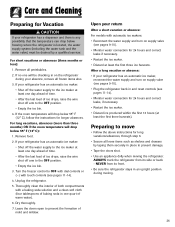
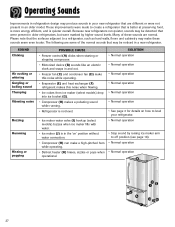
.... • Motorized device (B) sounds like an electric clock and snaps in and out. • Freezer fan (C) and condenser fan (D) make a high-pitched hum while operating. • Defrost heater (K) hisses, sizzles or pops when operational. Because new refrigerators run quieter, sounds may be detected that is better at preserving food, is more energy...
.... • Motorized device (B) sounds like an electric clock and snaps in and out. • Freezer fan (C) and condenser fan (D) make a high-pitched hum while operating. • Defrost heater (K) hisses, sizzles or pops when operational. Because new refrigerators run quieter, sounds may be detected that is better at preserving food, is more energy...
Use and Care Guide
Page 29
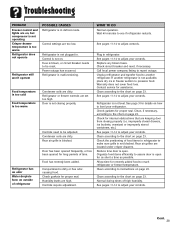
... or circuit breaker needs to be adjusted. Refrigerator or freezer controls are dirty. Rear air grille is dirty or has odorcausing food. Unplug refrigerator and transfer food to another refrigerator is not available, place dry ice in freezer section to adjust your controls. See pages ... circuit breaker and reset, if necessary. Contact service for proper seal. Controls require adjustment. Wait 40 minutes to reach refrigerator or freezer temperature. Call local power company listing to adjust controls. Warranty does not cover food loss. Rear air grilles are dirty...
... or circuit breaker needs to be adjusted. Refrigerator or freezer controls are dirty. Rear air grille is dirty or has odorcausing food. Unplug refrigerator and transfer food to another refrigerator is not available, place dry ice in freezer section to adjust your controls. See pages ... circuit breaker and reset, if necessary. Contact service for proper seal. Controls require adjustment. Wait 40 minutes to reach refrigerator or freezer temperature. Call local power company listing to adjust controls. Warranty does not cover food loss. Rear air grilles are dirty...

Use and Care Guide
Page 30
...or by appliances nearby. Rinse and dry thoroughly. Normal operation. Clean, if necessary, according to adjust for proper seal. refrigerator Refrigerator or ice maker makes unfamiliar sounds or seems too loud Crisper drawers do not close freely Check gaskets for period the door... efficiently to assure door is open for details on how to adjust your refrigerator. See page 3 for as short a time as possible. Clean, if necessary, according to reach refrigerator or freezer temperature. Allow time for proper drawer placement. See page 16 for recently added...
...or by appliances nearby. Rinse and dry thoroughly. Normal operation. Clean, if necessary, according to adjust for proper seal. refrigerator Refrigerator or ice maker makes unfamiliar sounds or seems too loud Crisper drawers do not close freely Check gaskets for period the door... efficiently to assure door is open for details on how to adjust your refrigerator. See page 3 for as short a time as possible. Clean, if necessary, according to reach refrigerator or freezer temperature. Allow time for proper drawer placement. See page 16 for recently added...
Use and Care Guide
Page 31
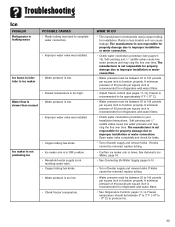
...pressure is low. The manufacturer is not responsible for leaks. • Turn off water supply and remove kinks. Troubleshooting Ice PROBLEM Refrigerator is leaking water POSSIBLE CAUSES • Plastic tubing was used to complete water connection. • Improper water valve was installed.... See Temperature Controls, pages 11-14. A minimum pressure of 35 pounds per square inch is recommended for refrigerators with water filters. • Adjust freezer control (see pages 910). A minimum pressure of 35 pounds per square inch is not responsible for property damage...
...pressure is low. The manufacturer is not responsible for leaks. • Turn off water supply and remove kinks. Troubleshooting Ice PROBLEM Refrigerator is leaking water POSSIBLE CAUSES • Plastic tubing was used to complete water connection. • Improper water valve was installed.... See Temperature Controls, pages 11-14. A minimum pressure of 35 pounds per square inch is recommended for refrigerators with water filters. • Adjust freezer control (see pages 910). A minimum pressure of 35 pounds per square inch is not responsible for property damage...
Use and Care Guide
Page 34
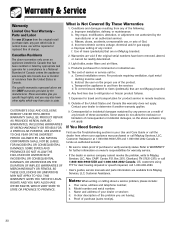
...and/or gas supply. c. Outside of purchase (sales receipt). 33 b. d. To correct issues related to Maytag Services, LLC, Attn: CAIR® Center, P.O. customers using TTY for further information on the proper ...Maytag branded. 2. U.S. Correct installation errors. Any repair, modification, alteration, or adjustment not authorized by the manufacturer. Light bulbs, water filters and air filters. 4. The specific warranties expressed above exclusion may also have been removed, altered, or cannot be readily determined. 3. Transport the appliance to refrigerator or freezer...
...and/or gas supply. c. Outside of purchase (sales receipt). 33 b. d. To correct issues related to Maytag Services, LLC, Attn: CAIR® Center, P.O. customers using TTY for further information on the proper ...Maytag branded. 2. U.S. Correct installation errors. Any repair, modification, alteration, or adjustment not authorized by the manufacturer. Light bulbs, water filters and air filters. 4. The specific warranties expressed above exclusion may also have been removed, altered, or cannot be readily determined. 3. Transport the appliance to refrigerator or freezer...


