Use and Care Guide
Page 2
... meant to cover all possible conditions and situations that may not easily climb inside the fresh food compartment, on a data plate inside . • Cut off the doors. • Leave the shelves in severe personal injury or death. What You Need to the appliance without revising this Use and Care Guide for your old refrigerator or freezer: • Take off power cord plug. This...
... meant to cover all possible conditions and situations that may not easily climb inside the fresh food compartment, on a data plate inside . • Cut off the doors. • Leave the shelves in severe personal injury or death. What You Need to the appliance without revising this Use and Care Guide for your old refrigerator or freezer: • Take off power cord plug. This...
Use and Care Guide
Page 3
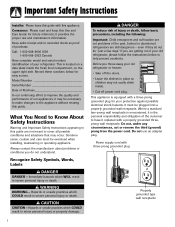
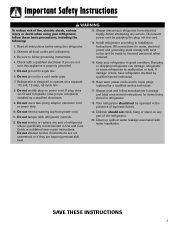
.... 8. All connections for items being stored in Use and Care Guide or published user-repair instructions. Keep your refrigerator, follow these basic precautions, including the following: 1. Have worn power cords and/or loose plugs replaced by licensed personnel when required. 4. If plug does not fit wall receptacle, have refrigerator checked by qualified service technician. 7. Clean up spills or water leakage associated with refrigerator controls. 12. Install refrigerator according to a gas line...
.... 8. All connections for items being stored in Use and Care Guide or published user-repair instructions. Keep your refrigerator, follow these basic precautions, including the following: 1. Have worn power cords and/or loose plugs replaced by licensed personnel when required. 4. If plug does not fit wall receptacle, have refrigerator checked by qualified service technician. 7. Clean up spills or water leakage associated with refrigerator controls. 12. Install refrigerator according to a gas line...
Use and Care Guide
Page 4
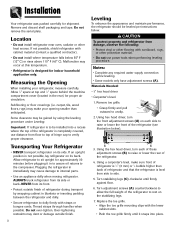
... designed for proper air circulation. Thread straps through handles when possible. Replace the toe grille. • Align the toe grille mounting clips with straps or bungee cords. Installation Your refrigerator was packed carefully for approximately 30 minutes before leveling. • Some models only have adjustment screws (A). Allow refrigerator to sit upright for shipment. Notes: • Complete any required water supply connection before plugging it snaps...
... designed for proper air circulation. Thread straps through handles when possible. Replace the toe grille. • Align the toe grille mounting clips with straps or bungee cords. Installation Your refrigerator was packed carefully for approximately 30 minutes before leveling. • Some models only have adjustment screws (A). Allow refrigerator to sit upright for shipment. Notes: • Complete any required water supply connection before plugging it snaps...
Use and Care Guide
Page 5
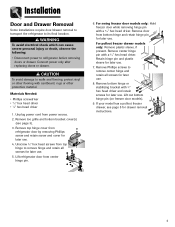
... model has a pullout freezer drawer, see page 3). 3. Remove bottom hinge or stabilizing bracket with a 5⁄16" hex head driver. Lift out bottom hinge pin (on freezer door models). 9. Remove toe grille and bottom bracket cover(s) (see page 5 for later use . 5. For pullout freezer drawer models only: Remove plastic sleeve, if present. Connect power only after replacing doors or drawer. Unscrew 5⁄16" hex head screws from top hinge to remove hinge and retain all screws for later use . 8. Lift refrigerator door...
... model has a pullout freezer drawer, see page 3). 3. Remove bottom hinge or stabilizing bracket with a 5⁄16" hex head driver. Lift out bottom hinge pin (on freezer door models). 9. Remove toe grille and bottom bracket cover(s) (see page 5 for later use . 5. For pullout freezer drawer models only: Remove plastic sleeve, if present. Connect power only after replacing doors or drawer. Unscrew 5⁄16" hex head screws from top hinge to remove hinge and retain all screws for later use . 8. Lift refrigerator door...

Use and Care Guide
Page 6
... from the drawer slides (select models). 5. Lower door front into the basket cradles. 5 Lift door front out to refrigerator before removing doors. Replace and tighten Phillips screws that were removed from the side bracket. Align basket cradle snaps with two snap attachments. WARNING To avoid electrical shock which can cause severe personal injury or death, disconnect power to remove. After replacing doors, connect power. CAUTION To...
... from the drawer slides (select models). 5. Lower door front into the basket cradles. 5 Lift door front out to refrigerator before removing doors. Replace and tighten Phillips screws that were removed from the side bracket. Align basket cradle snaps with two snap attachments. WARNING To avoid electrical shock which can cause severe personal injury or death, disconnect power to remove. After replacing doors, connect power. CAUTION To...
Use and Care Guide
Page 7
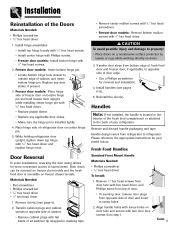
... head driver 1. Reinstall the door(s). Transfer door stops from refrigerator to property: • Place doors on a nonabrasive surface protected by towels or rugs while working directly on freezer drawer models. Install handles (see page 4). 2. Please reference the appropriate instructions for removal and installation. 4. Cont. 6 Install hinge assemblies: • Install top hinge loosely with 5⁄16" hex head screws. • Install center hinge with Phillips screws. • Freezer door models: Install bottom hinge with 5⁄16" hex head driver and replace hinge cover.
... head driver 1. Reinstall the door(s). Transfer door stops from refrigerator to property: • Place doors on a nonabrasive surface protected by towels or rugs while working directly on freezer drawer models. Install handles (see page 4). 2. Please reference the appropriate instructions for removal and installation. 4. Cont. 6 Install hinge assemblies: • Install top hinge loosely with 5⁄16" hex head screws. • Install center hinge with Phillips screws. • Freezer door models: Install bottom hinge with 5⁄16" hex head driver and replace hinge cover.
Use and Care Guide
Page 9
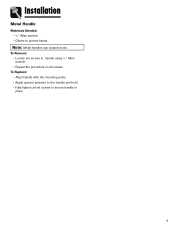
Installation Metal Handle Materials Needed: • 3⁄32" Allen wrench • Gloves to the handle and hold. • Fully tighten all screws. To Remove: • Loosen set screws in handle using 3⁄32" Allen wrench. • Repeat the procedure on all set screws to secure handle in place. 8 To Replace: • Align handle with the mounting posts. • Apply upward pressure to protect hands Note: Metal handles can scratch doors.
Installation Metal Handle Materials Needed: • 3⁄32" Allen wrench • Gloves to the handle and hold. • Fully tighten all screws. To Remove: • Loosen set screws in handle using 3⁄32" Allen wrench. • Repeat the procedure on all set screws to secure handle in place. 8 To Replace: • Align handle with the mounting posts. • Apply upward pressure to protect hands Note: Metal handles can scratch doors.
Use and Care Guide
Page 10
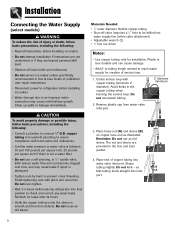
... in Use & Care Guide or published user-repair instructions. • Disconnect power to refrigerator before installing ice maker. • Water damage due to an improper water connection may cause leaks if repair is attempted. • Tighten nuts by hand to prevent cross threading. Place end of copper tubing into inlet A port. 9 so B that tubing feeds straight into water valve inlet port. copper tubing to household plumbing to assure compliance with local codes...
... in Use & Care Guide or published user-repair instructions. • Disconnect power to refrigerator before installing ice maker. • Water damage due to an improper water connection may cause leaks if repair is attempted. • Tighten nuts by hand to prevent cross threading. Place end of copper tubing into inlet A port. 9 so B that tubing feeds straight into water valve inlet port. copper tubing to household plumbing to assure compliance with local codes...
Use and Care Guide
Page 12
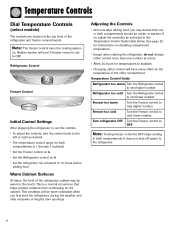
... cool if freezer control is set the controls. • To adjust the controls, turn the control knob to the left or right as indicated in both compartments should be colder or warmer. Freezer too cold Turn the Freezer control to the touch. Refrigerator too cold Turn the Refrigerator control to OFF. Turn refrigerator OFF Turn the Freezer control to next lower number. Freezer too warm Turn the Freezer control to next higher number. Neither section will be warm to next lower number. Temperature Controls Dial Temperature Controls (select models) The controls...
... cool if freezer control is set the controls. • To adjust the controls, turn the control knob to the left or right as indicated in both compartments should be colder or warmer. Freezer too cold Turn the Freezer control to the touch. Refrigerator too cold Turn the Refrigerator control to OFF. Turn refrigerator OFF Turn the Freezer control to next lower number. Freezer too warm Turn the Freezer control to next higher number. Neither section will be warm to next lower number. Temperature Controls Dial Temperature Controls (select models) The controls...
Use and Care Guide
Page 13
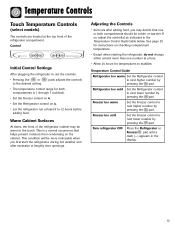
... control(s) as indicated in the Temperature Control Guide table below. See page 20 for instructions on checking compartment temperature. • Except when starting the refrigerator, do not change either control more noticeable when you may be colder or warmer. Adjusting the Controls • 24 hours after adding food, you first start the refrigerator, during hot weather and after excessive or lengthy door openings. Refrigerator too cold Set the Refrigerator control...
... control(s) as indicated in the Temperature Control Guide table below. See page 20 for instructions on checking compartment temperature. • Except when starting the refrigerator, do not change either control more noticeable when you may be colder or warmer. Adjusting the Controls • 24 hours after adding food, you first start the refrigerator, during hot weather and after excessive or lengthy door openings. Refrigerator too cold Set the Refrigerator control...

Use and Care Guide
Page 14
... Temp Alarm pad for 24 hours before making a new temperature adjustment. Press either the Freezer or Refrigerator pad to turn off . The indicator light will illuminate. Control Initial Temperature Setting Temperatures are preset at the factory at the top front of the or current temperature setting. Refrigerator too warm Set the Refrigerator control to defrost less frequently, conserving energy. Important: When the Speed Ice feature is in operation, the and pads for five continuous minutes. Door Alarm The Door Alarm...
... Temp Alarm pad for 24 hours before making a new temperature adjustment. Press either the Freezer or Refrigerator pad to turn off . The indicator light will illuminate. Control Initial Temperature Setting Temperatures are preset at the factory at the top front of the or current temperature setting. Refrigerator too warm Set the Refrigerator control to defrost less frequently, conserving energy. Important: When the Speed Ice feature is in operation, the and pads for five continuous minutes. Door Alarm The Door Alarm...

Use and Care Guide
Page 15
... disable the interior lights. When changes are low. Auto Light Level Selection (LL) (select models) This setting adjusts the light level at which the dispenser light will deactivate automatically after extended door openings or when loading the refrigerator or freezer with warm food. When the desired feature is activated on the ice and water dispenser) (select models) • Activate the Sabbath Mode To access the User Preferences menu, press and hold the Door Alarm pad...
... disable the interior lights. When changes are low. Auto Light Level Selection (LL) (select models) This setting adjusts the light level at which the dispenser light will deactivate automatically after extended door openings or when loading the refrigerator or freezer with warm food. When the desired feature is activated on the ice and water dispenser) (select models) • Activate the Sabbath Mode To access the User Preferences menu, press and hold the Door Alarm pad...
Use and Care Guide
Page 17
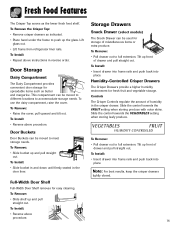
... Door Shelf Full-Width Door Shelf removes for fresh fruit and vegetable storage. To Install: • Reverse above instructions in reverse order. To Remove: • Pull drawer out to accommodate storage needs. Lift glass out. • Lift frame from refrigerator liner rails. Humidity-Controlled Crisper Drawers The Crisper Drawers provide a higher humidity environment for easy cleaning. Controls The Crisper Controls regulate the amount of drawer and pull straight out. Slide the control towards the VEGETABLES setting...
... Door Shelf Full-Width Door Shelf removes for fresh fruit and vegetable storage. To Install: • Reverse above instructions in reverse order. To Remove: • Pull drawer out to accommodate storage needs. Lift glass out. • Lift frame from refrigerator liner rails. Humidity-Controlled Crisper Drawers The Crisper Drawers provide a higher humidity environment for easy cleaning. Controls The Crisper Controls regulate the amount of drawer and pull straight out. Slide the control towards the VEGETABLES setting...
Use and Care Guide
Page 18
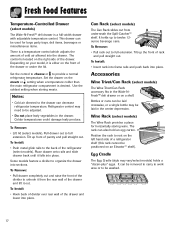
.... Use the coldest setting when storing meats. To Remove: • Lift lid (select models). To Install: • Insert rack into frame rails and push back into sections. It can be removed to carry to work area or to full extension. Fresh Food Features Temperature-Controlled Drawer (select models) The Wide-N-Fresh™ deli drawer is a temperature control which adjusts the amount of cold air allowed into the drawer...
.... Use the coldest setting when storing meats. To Remove: • Lift lid (select models). To Install: • Insert rack into frame rails and push back into sections. It can be removed to carry to work area or to full extension. Fresh Food Features Temperature-Controlled Drawer (select models) The Wide-N-Fresh™ deli drawer is a temperature control which adjusts the amount of cold air allowed into the drawer...

Use and Care Guide
Page 19
... your dealer to purchase and install a water line filter. • Water damage due to improper water connection may click or "buzz" occasionally. • If the ice is not used frequently, the ice cubes will rattle as certain characteristics of local waters, household plumbing and the accumulation of air in an inactive water supply line which feeds the ice maker. Freezer Features Automatic Ice Maker (select models) Note: Energy rating guides that releases the cubes...
... your dealer to purchase and install a water line filter. • Water damage due to improper water connection may click or "buzz" occasionally. • If the ice is not used frequently, the ice cubes will rattle as certain characteristics of local waters, household plumbing and the accumulation of air in an inactive water supply line which feeds the ice maker. Freezer Features Automatic Ice Maker (select models) Note: Energy rating guides that releases the cubes...
Use and Care Guide
Page 27
...; C), follow the instructions for longer absences. Leave the doors open to OFF with dial controls or (-) with automatic ice makers: • Reconnect the water supply and turn on supply valve (see pages 9-10). • Monitor water connection for 24 hours and correct leaks if necessary. • Restart the ice maker. • Discard at least one quart of ice drops, raise the wire shut off the water supply to the ice maker at least...
...; C), follow the instructions for longer absences. Leave the doors open to OFF with dial controls or (-) with automatic ice makers: • Reconnect the water supply and turn on supply valve (see pages 9-10). • Monitor water connection for 24 hours and correct leaks if necessary. • Restart the ice maker. • Discard at least one quart of ice drops, raise the wire shut off the water supply to the ice maker at least...
Use and Care Guide
Page 29
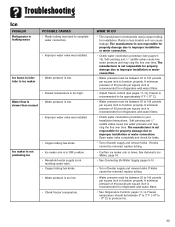
.... Clean according to be reset. Refrigerator is malfunctioning. Refrigerator is not level. WHAT TO DO Normal operation. Replace any blown fuses. Condenser coils are set too high. Door has been opened frequently, or has been opened for recently added food to adjust your controls. Unplug refrigerator and transfer food to the chart on page 23. Clean according to another refrigerator is not plugged in refrigerator. Humidity levels are located under crisper drawers...
.... Clean according to be reset. Refrigerator is malfunctioning. Refrigerator is not level. WHAT TO DO Normal operation. Replace any blown fuses. Condenser coils are set too high. Door has been opened frequently, or has been opened for recently added food to adjust your controls. Unplug refrigerator and transfer food to the chart on page 23. Clean according to another refrigerator is not plugged in refrigerator. Humidity levels are located under crisper drawers...

Use and Care Guide
Page 30
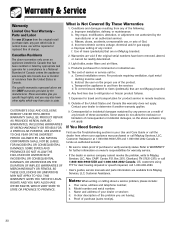
.... Refrigerator may need to run more efficiently. Check for proper drawer placement. Troubleshooting PROBLEM POSSIBLE CAUSES Water droplets form Humidity levels are high or door has on page 23. Humidity or heat in proper position. Controls need to be moved to be obstructing drawer. Refrigerator is open for details on page 27. Contents of drawer, or positioning of been been opened frequently. Drawer channels are dirty. See Operating...
.... Refrigerator may need to run more efficiently. Check for proper drawer placement. Troubleshooting PROBLEM POSSIBLE CAUSES Water droplets form Humidity levels are high or door has on page 23. Humidity or heat in proper position. Controls need to be moved to be obstructing drawer. Refrigerator is open for details on page 27. Contents of drawer, or positioning of been been opened frequently. Drawer channels are dirty. See Operating...
Use and Care Guide
Page 31
... improper installation or water connection. • Water pressure must be removed, replace tubing. • Confirm ice maker arm is not responsible for leaks. • Turn off water supply and remove kinks. The manufacturer is recommended for refrigerators with water filters. • See Temperature Controls, pages 11-14. See Automatic Ice Maker, page 18. • See Connecting the Water Supply, pages 9-10. • Turn off water supply and remove kinks. Plastic is low. Self-piercing and 3⁄16" saddle valves...
... improper installation or water connection. • Water pressure must be removed, replace tubing. • Confirm ice maker arm is not responsible for leaks. • Turn off water supply and remove kinks. The manufacturer is recommended for refrigerators with water filters. • See Temperature Controls, pages 11-14. See Automatic Ice Maker, page 18. • See Connecting the Water Supply, pages 9-10. • Turn off water supply and remove kinks. Plastic is low. Self-piercing and 3⁄16" saddle valves...
Use and Care Guide
Page 34
... be repaired or replaced free of risers (pedestals) that has been certified or listed by the manufacturer or an authorized servicer. c. Proof of any control. If You Need Service First see the Troubleshooting section in Canada that are not Maytag branded. 6. Misuse, abuse, accidents, unreasonable use will be used. Model number and serial number; b. Transport the appliance to verify warranty status. Correct installation errors. Any repair, modification, alteration, or adjustment not...
... be repaired or replaced free of risers (pedestals) that has been certified or listed by the manufacturer or an authorized servicer. c. Proof of any control. If You Need Service First see the Troubleshooting section in Canada that are not Maytag branded. 6. Misuse, abuse, accidents, unreasonable use will be used. Model number and serial number; b. Transport the appliance to verify warranty status. Correct installation errors. Any repair, modification, alteration, or adjustment not...


