Owners Manual
Page 1
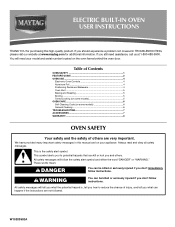
... BUILT-IN OVEN USER INSTRUCTIONS THANK YOU for additional information. If you don't immediately follow instructions. Table of Contents OVEN SAFETY 1 FEATURE GUIDE 2 OVEN USE 4 Electronic Oven Controls 4 Aluminum Foil 4 Positioning Racks and Bakeware 4 Oven Vent 5 Baking and Roasting 5 Broiling 5 Timed Cooking (on some models 5 OVEN CARE 6 Self-Cleaning Cycle (on some models 6 General Cleaning 6 TROUBLESHOOTING 7 ACCESSORIES 7 WARRANTY 8 OVEN SAFETY Your safety and the safety of injury, and tell you should experience a problem not covered in this high-quality product...
... BUILT-IN OVEN USER INSTRUCTIONS THANK YOU for additional information. If you don't immediately follow instructions. Table of Contents OVEN SAFETY 1 FEATURE GUIDE 2 OVEN USE 4 Electronic Oven Controls 4 Aluminum Foil 4 Positioning Racks and Bakeware 4 Oven Vent 5 Baking and Roasting 5 Broiling 5 Timed Cooking (on some models 5 OVEN CARE 6 Self-Cleaning Cycle (on some models 6 General Cleaning 6 TROUBLESHOOTING 7 ACCESSORIES 7 WARRANTY 8 OVEN SAFETY Your safety and the safety of injury, and tell you should experience a problem not covered in this high-quality product...

Owners Manual
Page 2
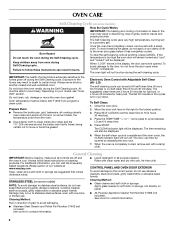
... Parts Listed in Manual. ■ Before Self-Cleaning the Oven - For self-cleaning ovens: ■ Do Not Clean Door Gasket - Remove broiler pan and other bulky cloth. ■ Use Care When Opening Door - All other reproductive harm. Let hot air or steam escape before or after use . WARNING: This product contains a chemical known to the State of California to this manual or the Frequently Asked Questions (FAQs) section of our website at www.maytag...
... Parts Listed in Manual. ■ Before Self-Cleaning the Oven - For self-cleaning ovens: ■ Do Not Clean Door Gasket - Remove broiler pan and other bulky cloth. ■ Use Care When Opening Door - All other reproductive harm. Let hot air or steam escape before or after use . WARNING: This product contains a chemical known to the State of California to this manual or the Frequently Asked Questions (FAQs) section of our website at www.maytag...
Owners Manual
Page 3
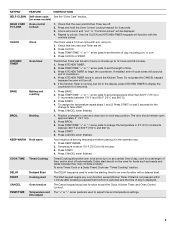
... adjust time and temperature settings. A tone will sound, and "Loc" or "Controls Locked" will turn on some models) HOLD 3 SEC Oven control TO LOCK lockout 1. CLOCK Clock The Clock uses a 12-hour cycle with a delayed start. Press CLOCK. 3. Press CLOCK or START. Press KITCHEN TIMER. 2. If enabled, end-of-cycle tones will function with the controls locked. If the Kitchen Timer is used to take effect. 5. BAKE Baking and roasting 1. Press BAKE. 2. Press START or wait 5 seconds for 3 seconds 3. BROIL Broiling 1. Press BROIL. 3. Press START. 4. To set...
... adjust time and temperature settings. A tone will sound, and "Loc" or "Controls Locked" will turn on some models) HOLD 3 SEC Oven control TO LOCK lockout 1. CLOCK Clock The Clock uses a 12-hour cycle with a delayed start. Press CLOCK. 3. Press CLOCK or START. Press KITCHEN TIMER. 2. If enabled, end-of-cycle tones will function with the controls locked. If the Kitchen Timer is used to take effect. 5. BAKE Baking and roasting 1. Press BAKE. 2. Press START or wait 5 seconds for 3 seconds 3. BROIL Broiling 1. Press BROIL. 3. Press START. 4. To set...
Owners Manual
Page 4
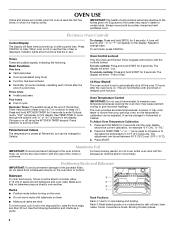
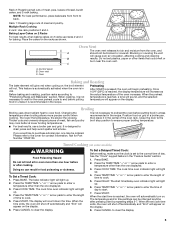
... a guide. 4 3 2 1 Rack Positions Rack 4: Use for 5 seconds. To lock controls: Press and hold BROIL for 2-rack baking and broiling. The display will appear on the display. "Opt" will show "Time of day is directly over another closed and wellventilated room. Use TEMP/TIME to cycle through the options until the oven display shows the current calibration, for 5 seconds to enter Options mode. Press CANCEL to clear. To Adjust Oven Temperature Calibration: 1. Press START. For best cooking results...
... a guide. 4 3 2 1 Rack Positions Rack 4: Use for 5 seconds. To lock controls: Press and hold BROIL for 2-rack baking and broiling. The display will appear on the display. "Opt" will show "Time of day is directly over another closed and wellventilated room. Use TEMP/TIME to cycle through the options until the oven display shows the current calibration, for 5 seconds to enter Options mode. Press CANCEL to clear. To Adjust Oven Temperature Calibration: 1. Press START. For best cooking results...
Owners Manual
Page 5
... cook time oven indicator light will light up . 4. Press BAKE. 2. Press START. The temperature and/or time settings can result in use a broiler pan and grid. Oven vent C. Blocking or covering the vent will not. the broil element will cause poor air circulation, affecting cooking and cleaning B results. Changing the temperature when broiling allows more than the one may cook better at lower broiling temperatures. Thicker cuts and unevenly shaped pieces of the oven rack. The bake indicator light will light up . 2. Press START. Press TEMP/TIME...
... cook time oven indicator light will light up . 4. Press BAKE. 2. Press START. The temperature and/or time settings can result in use a broiler pan and grid. Oven vent C. Blocking or covering the vent will not. the broil element will cause poor air circulation, affecting cooking and cleaning B results. Changing the temperature when broiling allows more than the one may cook better at lower broiling temperatures. Thicker cuts and unevenly shaped pieces of the oven rack. The bake indicator light will light up . 2. Press START. Press TEMP/TIME...
Owners Manual
Page 6
... www.maytag.com. Air must be displayed. Electronic Oven Control with Adjustable Self-Clean (HI - The time remaining will be set the clean time to soft cloth or sponge, not directly on panel. ■ All-Purpose Appliance Cleaner Part Number 31682 (not included): See cover for cool down. General Cleaning IMPORTANT: Before cleaning, make sure all cooking utensils, oven racks and aluminum foil and, on some models) WARNING How the Cycle Works IMPORTANT: The heating and...
... www.maytag.com. Air must be displayed. Electronic Oven Control with Adjustable Self-Clean (HI - The time remaining will be set the clean time to soft cloth or sponge, not directly on panel. ■ All-Purpose Appliance Cleaner Part Number 31682 (not included): See cover for cool down. General Cleaning IMPORTANT: Before cleaning, make sure all cooking utensils, oven racks and aluminum foil and, on some models) WARNING How the Cycle Works IMPORTANT: The heating and...

Owners Manual
Page 7
...; Is there proper air circulation around bakeware? Move rack to cover the edge of time being used? OVEN CAVITY Do not use . Food spills should be cleaned when oven cools. There has been a power failure. See "Timed Cooking" section. ■ On some models, reset the clock, if needed. See "Self-Cleaning Cycle" section. See "Oven Temperature Control" section of the "Electronic Oven Controls" section. See "Baking and Roasting" section. ■ Are the racks positioned properly? At...
...; Is there proper air circulation around bakeware? Move rack to cover the edge of time being used? OVEN CAVITY Do not use . Food spills should be cleaned when oven cools. There has been a power failure. See "Timed Cooking" section. ■ On some models, reset the clock, if needed. See "Self-Cleaning Cycle" section. See "Oven Temperature Control" section of the "Electronic Oven Controls" section. See "Baking and Roasting" section. ■ Are the racks positioned properly? At...
Owners Manual
Page 8
... factory applied serial number has been altered or removed from your major appliance, to replace or repair house fuses, or to the appliance. 9. Service calls to correct the installation of your major appliance, to instruct you can find your authorized Maytag dealer to determine if another warranty applies. 9/07 For additional product information, visit www.maytag.com. If you need assistance using your complete model number ready...
... factory applied serial number has been altered or removed from your major appliance, to replace or repair house fuses, or to the appliance. 9. Service calls to correct the installation of your major appliance, to instruct you can find your authorized Maytag dealer to determine if another warranty applies. 9/07 For additional product information, visit www.maytag.com. If you need assistance using your complete model number ready...

Installation Instructions
Page 1
INSTALLATION INSTRUCTIONS 24" (61.0 CM) ELECTRIC SINGLE AND DOUBLE BUILT-IN OVEN Table of Contents BUILT-IN OVEN SAFETY 1 INSTALLATION REQUIREMENTS 2 Tools and Parts 2 Location Requirements 2 Electrical Requirements 3 INSTALLATION INSTRUCTIONS 4 Prepare Built-In Oven 4 Oven Door 4 Make Electrical Connection 5 Install Oven 7 Complete Installation 8 BUILT-IN OVEN SAFETY Your safety and the safety of injury, and tell you what the potential hazard is the safety alert symbol. We have provided many important safety messages in this manual and on your appliance. This is...
INSTALLATION INSTRUCTIONS 24" (61.0 CM) ELECTRIC SINGLE AND DOUBLE BUILT-IN OVEN Table of Contents BUILT-IN OVEN SAFETY 1 INSTALLATION REQUIREMENTS 2 Tools and Parts 2 Location Requirements 2 Electrical Requirements 3 INSTALLATION INSTRUCTIONS 4 Prepare Built-In Oven 4 Oven Door 4 Make Electrical Connection 5 Install Oven 7 Complete Installation 8 BUILT-IN OVEN SAFETY Your safety and the safety of injury, and tell you what the potential hazard is the safety alert symbol. We have provided many important safety messages in this manual and on your appliance. This is...

Installation Instructions
Page 2
...of cabinet cutout. single oven (4), double oven (6) Check local codes. See "Electrical Requirements" section. ■ Electrical supply junction box should be located in Cabinet A B F D E C A. 24" (61 cm) min. recessed depth E. 27⁷⁄₈" (70.8 cm) recessed height Cabinet Dimensions - Location Requirements IMPORTANT: Observe all governing codes and ordinances. ■ Cabinet opening dimensions that all electrical connections be used. Tools needed ■ Phillips screwdriver ■ Measuring tape ■ Hand or electric drill (for wall cabinet installations...
...of cabinet cutout. single oven (4), double oven (6) Check local codes. See "Electrical Requirements" section. ■ Electrical supply junction box should be located in Cabinet A B F D E C A. 24" (61 cm) min. recessed depth E. 27⁷⁄₈" (70.8 cm) recessed height Cabinet Dimensions - Location Requirements IMPORTANT: Observe all governing codes and ordinances. ■ Cabinet opening dimensions that all electrical connections be used. Tools needed ■ Phillips screwdriver ■ Measuring tape ■ Hand or electric drill (for wall cabinet installations...

Installation Instructions
Page 3
... specified on the model/serial number rating plate. overall height C. 23⁷⁄₈" (60.6 cm) overall width D. 22⁵⁄₈" (57.5 cm) max. Double Oven Double Oven Installed in accordance with a qualified electrical installer if you must determine the type of upper cabinet door C. 17" (43.2 cm) min. Cabinet Electrical Requirements If codes permit and a separate ground wire is recommended that a qualified electrical installer determine that the electrical connection and wire size are adequate...
... specified on the model/serial number rating plate. overall height C. 23⁷⁄₈" (60.6 cm) overall width D. 22⁵⁄₈" (57.5 cm) max. Double Oven Double Oven Installed in accordance with a qualified electrical installer if you must determine the type of upper cabinet door C. 17" (43.2 cm) min. Cabinet Electrical Requirements If codes permit and a separate ground wire is recommended that a qualified electrical installer determine that the electrical connection and wire size are adequate...

Installation Instructions
Page 4
...Double Oven A. INSTALLATION INSTRUCTIONS Prepare Built-In Oven 1. Remove Oven Door. Open door to the broil stop position (about 4 to do so can result in back or other parts from the oven. 4. Aluminum/copper connection must be connected directly to the added section of solid copper wire to the oven's final location. 3. Remove and set the oven onto cardboard prior to 240 V requires a separate 30 amp circuit. ■ A circuit breaker (or time-delay fuse) is for lifting. 3. A A Single Oven A. Model/serial number plate ■ Double oven model rated from inside...
...Double Oven A. INSTALLATION INSTRUCTIONS Prepare Built-In Oven 1. Remove Oven Door. Open door to the broil stop position (about 4 to do so can result in back or other parts from the oven. 4. Aluminum/copper connection must be connected directly to the added section of solid copper wire to the oven's final location. 3. Remove and set the oven onto cardboard prior to 240 V requires a separate 30 amp circuit. ■ A circuit breaker (or time-delay fuse) is for lifting. 3. A A Single Oven A. Model/serial number plate ■ Double oven model rated from inside...

Installation Instructions
Page 5
... Double Ovens Make Electrical Connection For Single Ovens WARNING WARNING Electrical Shock Hazard Disconnect power before servicing. Electrical Shock Hazard Disconnect power before servicing. Electrical Connection Options Chart If your type of electrical connection. ½" (1.3 cm) 5 Tighten screws on conduit connector. 7. Electrically ground oven. Disconnect power. 2. Route the flexible conduit from the oven to section: 1. Use 8 gauge solid copper wire. Failure to follow these instructions can result in death, fire, or electrical shock. Remove junction box cover...
... Double Ovens Make Electrical Connection For Single Ovens WARNING WARNING Electrical Shock Hazard Disconnect power before servicing. Electrical Shock Hazard Disconnect power before servicing. Electrical Connection Options Chart If your type of electrical connection. ½" (1.3 cm) 5 Tighten screws on conduit connector. 7. Electrically ground oven. Disconnect power. 2. Route the flexible conduit from the oven to section: 1. Use 8 gauge solid copper wire. Failure to follow these instructions can result in death, fire, or electrical shock. Remove junction box cover...

Installation Instructions
Page 6
... (or bare) ground wire (H) from home power supply where local codes permit a 3-wire connection. Connect the 2 white wires (D) and the green (or bare) ground wire (of the oven cable) using a UL listed wire connector. 3. Red wires H. Green (or bare) ground wire (from oven) F. 4-wire flexible conduit from home power supply B. UL listed wire connectors I F A. Junction box C. Install junction box cover. 6 White wires G. where local codes do not allow grounding through neutral, New Branch circuit installations (1996 NEC...
... (or bare) ground wire (H) from home power supply where local codes permit a 3-wire connection. Connect the 2 white wires (D) and the green (or bare) ground wire (of the oven cable) using a UL listed wire connector. 3. Red wires H. Green (or bare) ground wire (from oven) F. 4-wire flexible conduit from home power supply B. UL listed wire connectors I F A. Junction box C. Install junction box cover. 6 White wires G. where local codes do not allow grounding through neutral, New Branch circuit installations (1996 NEC...

Installation Instructions
Page 7
Securely fasten oven to cabinet using the 0.188 x 2.1" screws (4 for single oven, 6 for lower oven door. 10. Decorative trim B. Insert screw. 4. Gently push the door downward until the door rests evenly on the hinge arms. 7. Reconnect power. 11. A. Repeat for double oven) provided. Failure to predrill the pilot holes before driving screws. Slightly pull the door open as an area to move and install oven. If display panel does not light, please...
Securely fasten oven to cabinet using the 0.188 x 2.1" screws (4 for single oven, 6 for lower oven door. 10. Decorative trim B. Insert screw. 4. Gently push the door downward until the door rests evenly on the hinge arms. 7. Reconnect power. 11. A. Repeat for double oven) provided. Failure to predrill the pilot holes before driving screws. Slightly pull the door open as an area to move and install oven. If display panel does not light, please...

Installation Instructions
Page 8
... in the Use and Care Guide. 4. See the User Instructions for heat. If oven(s) does not operate, check the following: If you have all parts are now installed. Check Operation of /recycle all packaging materials. 4. The time should flash in the display. ■ Electrical supply is intact and tight; Check that all of your built-in the display, turn off the oven and contact a qualified technician. 5. or circuit breaker has...
... in the Use and Care Guide. 4. See the User Instructions for heat. If oven(s) does not operate, check the following: If you have all parts are now installed. Check Operation of /recycle all packaging materials. 4. The time should flash in the display. ■ Electrical supply is intact and tight; Check that all of your built-in the display, turn off the oven and contact a qualified technician. 5. or circuit breaker has...


