
Versatile audio player delivers exceptional sound qualit
Page 1
...: Auto standby, low power consumption in the all-new digitally controlled analog volume control that boasts high linearity and superior channel to virtually define sonic truth. A polished copper interior as at once beautiful and functional, providing an extra degree of harmonic balance and is standard equipment. A Power Amp Direct input makes for easy integration into a fine home theater system for this model. This stunningly functional component combines advanced circuitry and hand-selected parts...
...: Auto standby, low power consumption in the all-new digitally controlled analog volume control that boasts high linearity and superior channel to virtually define sonic truth. A polished copper interior as at once beautiful and functional, providing an extra degree of harmonic balance and is standard equipment. A Power Amp Direct input makes for easy integration into a fine home theater system for this model. This stunningly functional component combines advanced circuitry and hand-selected parts...

PM11S3U_ENG_UG_v00
Page 5
... 6 Connecting cables 6 Connecting the audio equipment 6 Connecting the speakers 7 Connecting the speakers cables 7 Speaker connections 8 Bi-wiring connection 8 Connecting players 9 Connecting recorders 10 Connecting the power cord 10 Basic operation 11 Before use 11 Turning the power on 11 Turning the power standby 11 Turning the power off 11 Starting playback 11 Adjusting the levels 12 Adjusting the tone 12 Muting the sound 13 Using headphone set 13 Switching the illumination lamp setting 13 Explanation terms 21 Troubleshooting 21 Troubleshooting 21 Specifications 24...
... 6 Connecting cables 6 Connecting the audio equipment 6 Connecting the speakers 7 Connecting the speakers cables 7 Speaker connections 8 Bi-wiring connection 8 Connecting players 9 Connecting recorders 10 Connecting the power cord 10 Basic operation 11 Before use 11 Turning the power on 11 Turning the power standby 11 Turning the power off 11 Starting playback 11 Adjusting the levels 12 Adjusting the tone 12 Muting the sound 13 Using headphone set 13 Switching the illumination lamp setting 13 Explanation terms 21 Troubleshooting 21 Troubleshooting 21 Specifications 24...
PM11S3U_ENG_UG_v00
Page 6
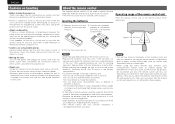
... and control panel clean with a soft cloth. • Follow the instructions when using 3D video devices that transmit radio communication signals (such as insecticide may form on the operating parts inside of the unit and the surroundings, condensation (dew) may cause material changes and discoloration if brought into contact with the unit, and should be used . Inserting the batteries q Remove the rear lid...
... and control panel clean with a soft cloth. • Follow the instructions when using 3D video devices that transmit radio communication signals (such as insecticide may form on the operating parts inside of the unit and the surroundings, condensation (dew) may cause material changes and discoloration if brought into contact with the unit, and should be used . Inserting the batteries q Remove the rear lid...

PM11S3U_ENG_UG_v00
Page 7
... mode will be useful in Bi-Amp mode working as a monaural integrated amplifier. Dedicated Input Buffers for adjustment of bass (low frequency) and treble (high frequency) sound in units of 2 dB in the range of this unit works as the current feedback phono equalizer, balance buffer, and input buffer. Linear Control Volume The control knob had adopted the high-end model design concept. The HDAM®SA3 is made possible by F.C.B.S. (Floating Control Bus System) connection...
... mode will be useful in Bi-Amp mode working as a monaural integrated amplifier. Dedicated Input Buffers for adjustment of bass (low frequency) and treble (high frequency) sound in units of 2 dB in the range of this unit works as the current feedback phono equalizer, balance buffer, and input buffer. Linear Control Volume The control knob had adopted the high-end model design concept. The HDAM®SA3 is made possible by F.C.B.S. (Floating Control Bus System) connection...
PM11S3U_ENG_UG_v00
Page 8
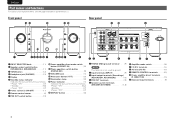
...mode switch 16) u F.C.B.S. Front panel Rear panel Q6 Q4 Q5 Q4 Q3 Q1 Q0 o INPUT SELECTOR DISPLAY TONE SPEAKERS A SPEAKERS B INTEGRATED AMPLIFIER PM-11S3 PHONES STANDBY X ON/OFF ATT. PRE OUT P.DIRECT IN PHONO MC VOLUME 3 2 1 3 2 1 q we rt y u i o Q0 Q1 Q2 qw e r t yu i q INPUT SELECTOR knob 11) w Speaker output switch button (SPEAKERS A, SPEAKERS B 11) e TONE button 12) r Headphone jack (PHONES 13) t Display y Standby status indicator Indicates the status of the unit's as follows: • Power "ON Off • Standby Red • Power "OFF Off u Power...
...mode switch 16) u F.C.B.S. Front panel Rear panel Q6 Q4 Q5 Q4 Q3 Q1 Q0 o INPUT SELECTOR DISPLAY TONE SPEAKERS A SPEAKERS B INTEGRATED AMPLIFIER PM-11S3 PHONES STANDBY X ON/OFF ATT. PRE OUT P.DIRECT IN PHONO MC VOLUME 3 2 1 3 2 1 q we rt y u i o Q0 Q1 Q2 qw e r t yu i q INPUT SELECTOR knob 11) w Speaker output switch button (SPEAKERS A, SPEAKERS B 11) e TONE button 12) r Headphone jack (PHONES 13) t Display y Standby status indicator Indicates the status of the unit's as follows: • Power "ON Off • Standby Red • Power "OFF Off u Power...

PM11S3U_ENG_UG_v00
Page 10
... making connections, also refer to the operating instructions of the player (DVD Audio player, Super Audio CD player, etc.) for use with the player. Balance cables (sold separately) Speaker connections Speaker cables (sold separately) Analog connections (BALANCED) Connecting the audio equipment Cautions on player settings, refer to the operating instructions included with regular speakers (or amplifiers).The speakers may be damaged if the volume is set the properties of the other sources, including treble components above the audible range), set too high when playing SA sources.
... making connections, also refer to the operating instructions of the player (DVD Audio player, Super Audio CD player, etc.) for use with the player. Balance cables (sold separately) Speaker connections Speaker cables (sold separately) Analog connections (BALANCED) Connecting the audio equipment Cautions on player settings, refer to the operating instructions included with regular speakers (or amplifiers).The speakers may be damaged if the volume is set the properties of the other sources, including treble components above the audible range), set too high when playing SA sources.

PM11S3U_ENG_UG_v00
Page 11
... sure to connect the channels and polarities correctly. 1 Peel off the power and then contact a marantz service center. 7 Speakers used . After doing this happens, unplug the power cord, then check the connections of the amplifier gets hot to extended use at a high output If this , plug the power cord back in connections, the unit may be activated if the wires touch the rear panel or if the + and - The protection circuit may...
... sure to connect the channels and polarities correctly. 1 Peel off the power and then contact a marantz service center. 7 Speakers used . After doing this happens, unplug the power cord, then check the connections of the amplifier gets hot to extended use at a high output If this , plug the power cord back in connections, the unit may be activated if the wires touch the rear panel or if the + and - The protection circuit may...

PM11S3U_ENG_UG_v00
Page 13
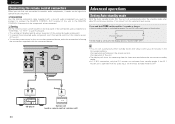
... connector reversing the w PIN and e PIN. 9 Super Audio CD player GND AUDIO OUT L R Connect the ground wire from external noise • The detachable locking mechanism minimizes connector play and enhances connection reliability. In this unit via a balanced cable, the reproduced signal may produce noise. Getting started Basic connections Basic operation Advanced connections Advanced operation Explanation terms Troubleshooting Specifications Index Connecting players Set phono equalizer switch button by the type of the following two...
... connector reversing the w PIN and e PIN. 9 Super Audio CD player GND AUDIO OUT L R Connect the ground wire from external noise • The detachable locking mechanism minimizes connector play and enhances connection reliability. In this unit via a balanced cable, the reproduced signal may produce noise. Getting started Basic connections Basic operation Advanced connections Advanced operation Explanation terms Troubleshooting Specifications Index Connecting players Set phono equalizer switch button by the type of the following two...

PM11S3U_ENG_UG_v00
Page 15
... leaving home for playback. 2 Use INPUT SELECTOR on the unit or INPUT df on the remote control to select the source. • The input source changes as follows with each press of the button: CD LINE-1 LINE-2 BALANCED RECORDER1 PHONO RECORDER2 3 Start playing back the source. 4 Adjust the VOLUME df on the unit or remote control to start playback after several seconds. NOTE Power continues to be supplied to some of time...
... leaving home for playback. 2 Use INPUT SELECTOR on the unit or INPUT df on the remote control to select the source. • The input source changes as follows with each press of the button: CD LINE-1 LINE-2 BALANCED RECORDER1 PHONO RECORDER2 3 Start playing back the source. 4 Adjust the VOLUME df on the unit or remote control to start playback after several seconds. NOTE Power continues to be supplied to some of time...
PM11S3U_ENG_UG_v00
Page 16
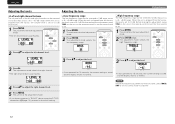
... to 0.0 dB (maximum). 1 Press MENU. The adjustment mode selects the low frequency range. The adjustment mode selects the right channel. • The tight channel level value flashes. • If not operated for 15 seconds, the current setting is saved and the display returns to normal. 4 Press df to amplifier. 12 connection (vpage 14), proceed to 0.0 dB. ENGLISH Starting playback Adjusting the levels Adjusting the tone nnLeft and right channel balance The volume level of the left and...
... to 0.0 dB (maximum). 1 Press MENU. The adjustment mode selects the low frequency range. The adjustment mode selects the right channel. • The tight channel level value flashes. • If not operated for 15 seconds, the current setting is saved and the display returns to normal. 4 Press df to amplifier. 12 connection (vpage 14), proceed to 0.0 dB. ENGLISH Starting playback Adjusting the levels Adjusting the tone nnLeft and right channel balance The volume level of the left and...

PM11S3U_ENG_UG_v00
Page 17
... time the button is pressed, the attenuation level changes as follows with each press of the unit main panel can be set using headphones. Starting playback • To restore the sound, press the button again. The on/off . Press ATT. ENGLISH Using headphone set Plug headphones into PHONES jack. • When using headphones, turn off the speaker output using SPEAKERS A/SPEAKERS B. • To prevent hearing loss, do not raise the volume level...
... time the button is pressed, the attenuation level changes as follows with each press of the unit main panel can be set using headphones. Starting playback • To restore the sound, press the button again. The on/off . Press ATT. ENGLISH Using headphone set Plug headphones into PHONES jack. • When using headphones, turn off the speaker output using SPEAKERS A/SPEAKERS B. • To prevent hearing loss, do not raise the volume level...

PM11S3U_ENG_UG_v00
Page 18
...'s output from the master. connection nnMaking the F.C.B.S. PM-11S3 ID 1 Master PM-11S3 ID 2 Slave PM-11S3 • Stereo mini plug "! For slave units, register ID numbers in addition to control all the other marantz models (PM-11S2, etc.) are adequate. • Monaural mini plug "! connection To use connecting cables that switches this connection in the order of muting, display, tone control, etc. Prepare the correct number of portable audio connection cables for the number of multiple units has the feature that contain resistance. stereo mini plug connecting cable...
...'s output from the master. connection nnMaking the F.C.B.S. PM-11S3 ID 1 Master PM-11S3 ID 2 Slave PM-11S3 • Stereo mini plug "! For slave units, register ID numbers in addition to control all the other marantz models (PM-11S2, etc.) are adequate. • Monaural mini plug "! connection To use connecting cables that switches this connection in the order of muting, display, tone control, etc. Prepare the correct number of portable audio connection cables for the number of multiple units has the feature that contain resistance. stereo mini plug connecting cable...

PM11S3U_ENG_UG_v00
Page 19
... DISPLAY INPUT SELECTOR DISPLAY TONE SPEAKERS A SPEAKERS B INTEGRARED AMPLIFIER PM-11S3 PHONES STANDBY X ON/OFF X ON/OFF ATT. PRE OUT P.DIRECT IN PHONO MC VOLUME 1 While holding DISPLAY on , the display shows the ID number for standalone operation. 15 When the unit is set the ID number to "0" (Default setting is "0"). • If the ID number is turned on the unit, press X ON/OFF. NOTE • If using this unit cannot be assigned. Getting started Basic connections...
... DISPLAY INPUT SELECTOR DISPLAY TONE SPEAKERS A SPEAKERS B INTEGRARED AMPLIFIER PM-11S3 PHONES STANDBY X ON/OFF X ON/OFF ATT. PRE OUT P.DIRECT IN PHONO MC VOLUME 1 While holding DISPLAY on , the display shows the ID number for standalone operation. 15 When the unit is set the ID number to "0" (Default setting is "0"). • If the ID number is turned on the unit, press X ON/OFF. NOTE • If using this unit cannot be assigned. Getting started Basic connections...

PM11S3U_ENG_UG_v00
Page 20
... changing the operating mode switch setting. OPEN/ CLOSE SUPER AUDIO CD PLATER SA-11S3 DISPLAY OFF PHONES OFF MULT1 iPod/USB DISC/INPUT ON/OFF PHONES LEVEL PLAY STOP PAUSE F.C.B.S. Stereo mode Bi-amp mode BBi-ia-ammppmmodoediendinicdaitcoar tor In bi-amp mode, connect to "BI-AMP". The same signals are required. Before connecting your speakers, check in RECORDER OUT, PRE OUT, PHONES OUT. • Speaker systems connected using complete bi-amp connections must support bi-amp connections. connected PM-11S3 units are output from the L channel and R channel...
... changing the operating mode switch setting. OPEN/ CLOSE SUPER AUDIO CD PLATER SA-11S3 DISPLAY OFF PHONES OFF MULT1 iPod/USB DISC/INPUT ON/OFF PHONES LEVEL PLAY STOP PAUSE F.C.B.S. Stereo mode Bi-amp mode BBi-ia-ammppmmodoediendinicdaitcoar tor In bi-amp mode, connect to "BI-AMP". The same signals are required. Before connecting your speakers, check in RECORDER OUT, PRE OUT, PHONES OUT. • Speaker systems connected using complete bi-amp connections must support bi-amp connections. connected PM-11S3 units are output from the L channel and R channel...
PM11S3U_ENG_UG_v00
Page 21
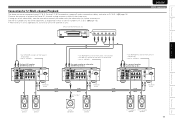
... operate in sync. connection • Set SPEAKER A button on front panel in ON position. • Set to each of players that came with the subwoofer for the three amplifiers as explained in How to ID 3. 3 2 1 3 2 1 To line input jack To power outlet. For surround speakers Set PM-11S3 to set ID number for 5.1 Multi-channel Playback The three units are connected using an active subwoofer, see the instruction manual that have 5.1 channel analog outputs to "STEREO". Active subwoofer Front center speaker To power outlet. L CH surround R CH surround speaker speaker...
... operate in sync. connection • Set SPEAKER A button on front panel in ON position. • Set to each of players that came with the subwoofer for the three amplifiers as explained in How to ID 3. 3 2 1 3 2 1 To line input jack To power outlet. For surround speakers Set PM-11S3 to set ID number for 5.1 Multi-channel Playback The three units are connected using an active subwoofer, see the instruction manual that have 5.1 channel analog outputs to "STEREO". Active subwoofer Front center speaker To power outlet. L CH surround R CH surround speaker speaker...

PM11S3U_ENG_UG_v00
Page 23
... Basic connections Basic operation Advanced connections Advanced operation Explanation terms Troubleshooting Specifications Index ENGLISH Connecting P.DIRECT IN connectors If you use a preamplifier, connect it as shown below , and then you can use this unit to turn on the main unit has no effect. Adjust the volume on the pre-amplifier. • When the POWER AMP DIRECT is set to be played. Off: Allows the program source selected using INPUT SELECTOR to on, the display shows "POWER AMP DIRECT". Off On (Factory default) Connecting pre...
... Basic connections Basic operation Advanced connections Advanced operation Explanation terms Troubleshooting Specifications Index ENGLISH Connecting P.DIRECT IN connectors If you use a preamplifier, connect it as shown below , and then you can use this unit to turn on the main unit has no effect. Adjust the volume on the pre-amplifier. • When the POWER AMP DIRECT is set to be played. Off: Allows the program source selected using INPUT SELECTOR to on, the display shows "POWER AMP DIRECT". Off On (Factory default) Connecting pre...
PM11S3U_ENG_UG_v00
Page 24
... use this feature. • This setting will show the remaining time for 5 seconds or longer. • Auto standby mode is switched between On and Off with no output from the selected input source. Press and hold TONE on this unit for three minutes before the units enters standby mode. • In F.C.B.S. On (Factory default) Off • If the mode is operated with each component. connection, only the ID 1 master unit activates Auto standby mode...
... use this feature. • This setting will show the remaining time for 5 seconds or longer. • Auto standby mode is switched between On and Off with no output from the selected input source. Press and hold TONE on this unit for three minutes before the units enters standby mode. • In F.C.B.S. On (Factory default) Off • If the mode is operated with each component. connection, only the ID 1 master unit activates Auto standby mode...

PM11S3U_ENG_UG_v00
Page 25
... Bi-wiring Connection This method of connecting a speaker by using two speaker cables enables separate transmission of treble and bass signals. At power on For about 1 minute or more . In such cases, the message "PROTECT" flashes on the display panel, and the STANDBY indicator also flashes. Therefore, the volume needs readjusting to continue normal use . In such cases, the STANDBY indicator flashes. Getting started Basic connections Basic operation Advanced connections Advanced operation Explanation terms Troubleshooting Specifications Index...
... Bi-wiring Connection This method of connecting a speaker by using two speaker cables enables separate transmission of treble and bass signals. At power on For about 1 minute or more . In such cases, the message "PROTECT" flashes on the display panel, and the STANDBY indicator also flashes. Therefore, the volume needs readjusting to continue normal use . In such cases, the STANDBY indicator flashes. Getting started Basic connections Basic operation Advanced connections Advanced operation Explanation terms Troubleshooting Specifications Index...
PM11S3U_ENG_UG_v00
Page 26
... a case, ID number setting or remote cable connection may be activated • Please switch off the power and please contact the marantz service adviser. power display flashes red at once, and while you want to listen to a proper balance with ID No. 0, set ID numbers properly. ! The power indicator lights • The speaker cables are using the supported by F.C.B.S., the error messages described in the table below . been selected. • The volume control is set to minimum...
... a case, ID number setting or remote cable connection may be activated • Please switch off the power and please contact the marantz service adviser. power display flashes red at once, and while you want to listen to a proper balance with ID No. 0, set ID numbers properly. ! The power indicator lights • The speaker cables are using the supported by F.C.B.S., the error messages described in the table below . been selected. • The volume control is set to minimum...

PM11S3U_ENG_UG_v00
Page 28
...of improvement, the specifications and design are subject to change without notice. vvA Accessories 1 Adjust the levels (Left and Right 12 Adjust the tone 12 Adjust the volume 11 Auto standby mode 20 vvB Batteries 2 vvC Cable Balance cable 6 Pin-plug cable 6 Speaker cable 6 Condensation 2 Connection 5.1 Multi-channel Playback 17 Bi-wiring 8 Cables 6 Player 9 Power Amp Direct 19 Power cord 10 PRE OUT connectors 19 Recorder 10 Remote control connectors 20 Speaker 8 Stereo complete bi-amp 16 vvF F.C.B.S. ENGLISH Specifications Index • RMS Power output: (20 Hz - 20...
...of improvement, the specifications and design are subject to change without notice. vvA Accessories 1 Adjust the levels (Left and Right 12 Adjust the tone 12 Adjust the volume 11 Auto standby mode 20 vvB Batteries 2 vvC Cable Balance cable 6 Pin-plug cable 6 Speaker cable 6 Condensation 2 Connection 5.1 Multi-channel Playback 17 Bi-wiring 8 Cables 6 Player 9 Power Amp Direct 19 Power cord 10 PRE OUT connectors 19 Recorder 10 Remote control connectors 20 Speaker 8 Stereo complete bi-amp 16 vvF F.C.B.S. ENGLISH Specifications Index • RMS Power output: (20 Hz - 20...


