
PM-11S1 .pcf File
Page 1
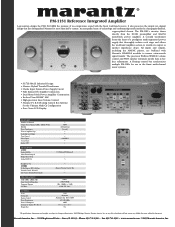
... allows the wideband amplifier section to change without notice. The PM-11S1's circuitry draws directly from the SC-9S1 preamplifier and MA-9S1 monoblock power amplifier. or any liability for the Ultimate Multi-Ch Configuration • Zero Noise LCD Display FEATURES Number of Channels Output Power/Channel (20Hz - 20kHz) @ 8Ω HDAM Power Transformer Discrete Amplifier Stage Individual Level Adjust Tone Control Phono Input Source Direct Speaker A/B IN/OUTPUTS AUDIO Analog L&R In Main Channel Amp In Bridge Mono Mode Analog L&R Out Headphone Out...
... allows the wideband amplifier section to change without notice. The PM-11S1's circuitry draws directly from the SC-9S1 preamplifier and MA-9S1 monoblock power amplifier. or any liability for the Ultimate Multi-Ch Configuration • Zero Noise LCD Display FEATURES Number of Channels Output Power/Channel (20Hz - 20kHz) @ 8Ω HDAM Power Transformer Discrete Amplifier Stage Individual Level Adjust Tone Control Phono Input Source Direct Speaker A/B IN/OUTPUTS AUDIO Analog L&R In Main Channel Amp In Bridge Mono Mode Analog L&R Out Headphone Out...
PM-11S1 User Manual
Page 4
... USE ...2 BEFORE MAKING CONNECTIONS ...3 ABOUT THE BALANCED INPUT JACKS ...3 WIRING SPEAKER CABLE ...3 BI-WIRING CONNECTION ...4 COMPLETE BI-AMP CONNECTION ...4 SPEAKER POSITIONING FOR SUPER AUDIO MULTI-CHANNEL SOUND 4 CONNECTIONS ...5 NAMES AND FUNCTIONS OF PARTS 8 FRONT PANEL ...8 DISPLAY ...9 REAR PANEL ...10 RC-11PMS1 REMOTE CONTROLLER ...11 BASIC OPERATION ...13 PLAYBACK ...13 RECORDING ...14 HOW TO USE AND SET FEATURES 15 ABOUT FCBS ...15 ABOUT THE BI-AMP MODE ...15 ATTENUATION (ATT) ...16 HOW TO OPERATE THE SIDE ILLUMINATION 16 TRIMMING ...17 HOW TO ADJUST DISPLAY CONTRAST...
... USE ...2 BEFORE MAKING CONNECTIONS ...3 ABOUT THE BALANCED INPUT JACKS ...3 WIRING SPEAKER CABLE ...3 BI-WIRING CONNECTION ...4 COMPLETE BI-AMP CONNECTION ...4 SPEAKER POSITIONING FOR SUPER AUDIO MULTI-CHANNEL SOUND 4 CONNECTIONS ...5 NAMES AND FUNCTIONS OF PARTS 8 FRONT PANEL ...8 DISPLAY ...9 REAR PANEL ...10 RC-11PMS1 REMOTE CONTROLLER ...11 BASIC OPERATION ...13 PLAYBACK ...13 RECORDING ...14 HOW TO USE AND SET FEATURES 15 ABOUT FCBS ...15 ABOUT THE BI-AMP MODE ...15 ATTENUATION (ATT) ...16 HOW TO OPERATE THE SIDE ILLUMINATION 16 TRIMMING ...17 HOW TO ADJUST DISPLAY CONTRAST...
PM-11S1 User Manual
Page 5
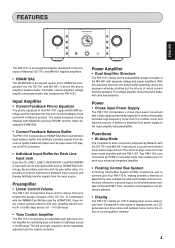
... PM-11S1s are connected by Marantz with ultra low distortion. FEATURES INPUT SELECTOR DISPLAY TONE SPEAKER A SPEAKER B INTEGRARED AMPLIFIER PM-11S1 PHONES OPERATE POWER ON/OFF ATT. Input Amplifier • Current Feedback Phono Equalizer The phono equalizer of the HDAMSA incorporated into the SC-7S1 and MA-9S1. The left and right channels can be separately adjusted from the speakers. It delivers a distortion-free power supply to display input source and volume level. Preamplifier • Linear Control Volume The PM-11S1 incorporates linear control volume...
... PM-11S1s are connected by Marantz with ultra low distortion. FEATURES INPUT SELECTOR DISPLAY TONE SPEAKER A SPEAKER B INTEGRARED AMPLIFIER PM-11S1 PHONES OPERATE POWER ON/OFF ATT. Input Amplifier • Current Feedback Phono Equalizer The phono equalizer of the HDAMSA incorporated into the SC-7S1 and MA-9S1. The left and right channels can be separately adjusted from the speakers. It delivers a distortion-free power supply to display input source and volume level. Preamplifier • Linear Control Volume The PM-11S1 incorporates linear control volume...

PM-11S1 User Manual
Page 6
.... • RC-11PMS1 remote controller • AAA batteries x 2 OPEN/ CLOSE SOUND MODE PHONO BALANCED CD RECORDER 1 LINE 1 RECORDER 2 TRIM EXIT LINE 2 TONE + L R ENTER DISPLAY - Do not touch hot spots and especially the top panel. ATT VOLUME 7 Keep Objects Off Keep objects off the PM-11S1. PRE OUT REC OUT PHONO MC VOLUME Rear 3-15/16 ins. (10 cm) or more INPUT SELECTOR DISPLAY TONE SPEAKER A SPEAKER B INTEGRARED AMPLIFIER PM-11S1 PHONES OPERATE POWER ON/OFF ATT...
.... • RC-11PMS1 remote controller • AAA batteries x 2 OPEN/ CLOSE SOUND MODE PHONO BALANCED CD RECORDER 1 LINE 1 RECORDER 2 TRIM EXIT LINE 2 TONE + L R ENTER DISPLAY - Do not touch hot spots and especially the top panel. ATT VOLUME 7 Keep Objects Off Keep objects off the PM-11S1. PRE OUT REC OUT PHONO MC VOLUME Rear 3-15/16 ins. (10 cm) or more INPUT SELECTOR DISPLAY TONE SPEAKER A SPEAKER B INTEGRARED AMPLIFIER PM-11S1 PHONES OPERATE POWER ON/OFF ATT...
PM-11S1 User Manual
Page 8
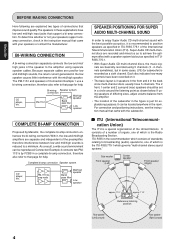
.... PM-11S1 biamp mode Mid/high speaker Band pass filter Low speaker SPEAKER POSITIONING FOR SUPER AUDIO MULTI-CHANNEL SOUND In order to broadcasting (audio) operations, one of which governs "multi-channel stereo sound systems." ITU-R BS in the recommendation which is recommended to the amplifier using speakers of differing sizes, adjust volume balance from the amplifier. • The location of the subwoofer in ITU-R BS.775-1 of the International Telecommunication Union (ITU). BI-WIRING CONNECTION A bi-wiring connection...
.... PM-11S1 biamp mode Mid/high speaker Band pass filter Low speaker SPEAKER POSITIONING FOR SUPER AUDIO MULTI-CHANNEL SOUND In order to broadcasting (audio) operations, one of which governs "multi-channel stereo sound systems." ITU-R BS in the recommendation which is recommended to the amplifier using speakers of differing sizes, adjust volume balance from the amplifier. • The location of the subwoofer in ITU-R BS.775-1 of the International Telecommunication Union (ITU). BI-WIRING CONNECTION A bi-wiring connection...

PM-11S1 User Manual
Page 9
... shorting bar. speaker Remove shorting bar. 5 To LINE OUT jacks To LINE IN jacks Tape deck, etc. MF / HF MF / HF LF Remove L CH shorting bar. CONNECTIONS Connection Example 1: Basic Connection for speakers. Record player CD player OPEN/ CLOSE SUPER AUDIO CD PLAYER SA-11S1 DISPLAY OFF SOUND MODE POWER ON/OFF PLAY STOP PAUSE To balanced output jacks • Use a bi-wiring connection for Normal Stereo Playback Refer also to the instruction manuals of components to connect equipment correctly.
... shorting bar. speaker Remove shorting bar. 5 To LINE OUT jacks To LINE IN jacks Tape deck, etc. MF / HF MF / HF LF Remove L CH shorting bar. CONNECTIONS Connection Example 1: Basic Connection for speakers. Record player CD player OPEN/ CLOSE SUPER AUDIO CD PLAYER SA-11S1 DISPLAY OFF SOUND MODE POWER ON/OFF PLAY STOP PAUSE To balanced output jacks • Use a bi-wiring connection for Normal Stereo Playback Refer also to the instruction manuals of components to connect equipment correctly.
PM-11S1 User Manual
Page 10
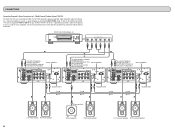
... power outlet To line input jack L CH front speaker R CH front speaker Active subwoofer Front center speaker L CH surround speaker R CH surround speaker 6 Set to ID 3. SACD multi-channel player, etc. Set PRE OUT button on front panel in sync. CONNECTIONS Connection Example 2: Basic Connection for connection and positioning instructions. For the FCBS connection, prepare 3 portable audio connection cables with the subwoofer for 5.1 Multi-Channel Playback Using 3 PM-11S1 The three PM-11S1s are connected by FCBS. If using an active subwoofer, see the instruction manual...
... power outlet To line input jack L CH front speaker R CH front speaker Active subwoofer Front center speaker L CH surround speaker R CH surround speaker 6 Set to ID 3. SACD multi-channel player, etc. Set PRE OUT button on front panel in sync. CONNECTIONS Connection Example 2: Basic Connection for connection and positioning instructions. For the FCBS connection, prepare 3 portable audio connection cables with the subwoofer for 5.1 Multi-Channel Playback Using 3 PM-11S1 The three PM-11S1s are connected by FCBS. If using an active subwoofer, see the instruction manual...
PM-11S1 User Manual
Page 11
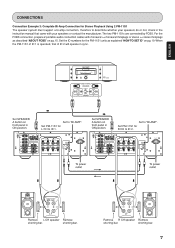
... the PM-11S1 units as described "ABOUT FCBS" on front panel in ON position. ENGLISH CONNECTIONS Connection Example 3: Complete Bi-Amp Connection for Stereo Playback Using 2 PM-11S1 The speaker system must support a bi-amp connection, therefore to determine whether your speakers do or not, check in sync. Set PM-11S1 for L CH to ID 1. 3 2 1 3 2 1 AC IN Set SPEAKER A button on pg. 19. OPEN/ CLOSE SUPER AUDIO CD PLAYER SA-11S1 DISPLAY OFF SOUND MODE POWER ON/OFF PLAY STOP PAUSE Set SPEAKER A button...
... the PM-11S1 units as described "ABOUT FCBS" on front panel in ON position. ENGLISH CONNECTIONS Connection Example 3: Complete Bi-Amp Connection for Stereo Playback Using 2 PM-11S1 The speaker system must support a bi-amp connection, therefore to determine whether your speakers do or not, check in sync. Set PM-11S1 for L CH to ID 1. 3 2 1 3 2 1 AC IN Set SPEAKER A button on pg. 19. OPEN/ CLOSE SUPER AUDIO CD PLAYER SA-11S1 DISPLAY OFF SOUND MODE POWER ON/OFF PLAY STOP PAUSE Set SPEAKER A button...

PM-11S1 User Manual
Page 12
... PM-11S1 is set to use in synch with a standard stereo plug. This operation sets the always-ON mode of control signals sent from the factory, but it stays OFF and does not light even if power is lit a blue color. When the always-ON mode is for 3 seconds or longer. PRE OUT REC OUT PHONO MC VOLUME q POWER ON/OFF Switch This switch turns power to properly send signals. To turn the speaker output to the speakers connected...
... PM-11S1 is set to use in synch with a standard stereo plug. This operation sets the always-ON mode of control signals sent from the factory, but it stays OFF and does not light even if power is lit a blue color. When the always-ON mode is for 3 seconds or longer. PRE OUT REC OUT PHONO MC VOLUME q POWER ON/OFF Switch This switch turns power to properly send signals. To turn the speaker output to the speakers connected...
PM-11S1 User Manual
Page 13
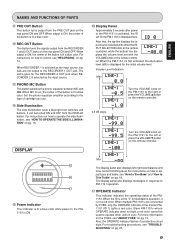
... instructions on the rear panel ON and OFF. When the PM-11S1 I is first activated, the attenuation level (dB) is displayed for the RECORDER 2 OUT jack when RECORDER 2 is ON, the center of the PM11S1. When MC is set with either the INPUT SELECTOR knob or the remote controller, while the bottom line displays the volume level set , the center of the button is selected as the input source. !3 PHONO MC Button This button switches the phono equalizer...
... instructions on the rear panel ON and OFF. When the PM-11S1 I is first activated, the attenuation level (dB) is displayed for the RECORDER 2 OUT jack when RECORDER 2 is ON, the center of the PM11S1. When MC is set with either the INPUT SELECTOR knob or the remote controller, while the bottom line displays the volume level set , the center of the button is selected as the input source. !3 PHONO MC Button This button switches the phono equalizer...
PM-11S1 User Manual
Page 14
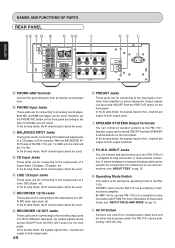
... powered by 120V AC only. The PM-11S1 can be turned ON/OFF from the REC OUT button on the front panel. D CD Input Jacks These jacks are for connecting to the output jacks of a CD-R, MD deck, tape deck, etc. Output signals can be turned ON/OFF from the SPEAKER A and B buttons on pg. 15. STEREO: Set to an analog record player. In the bi-amp mode, the R channel jack cannot be used for connecting to the output jacks of a CD player...
... powered by 120V AC only. The PM-11S1 can be turned ON/OFF from the REC OUT button on the front panel. D CD Input Jacks These jacks are for connecting to the output jacks of a CD-R, MD deck, tape deck, etc. Output signals can be turned ON/OFF from the SPEAKER A and B buttons on pg. 15. STEREO: Set to an analog record player. In the bi-amp mode, the R channel jack cannot be used for connecting to the output jacks of a CD player...

PM-11S1 User Manual
Page 15
... the instruction manual that have a remote control receptor. OPEN/ CLOSE SOUND MODE PHONO BALANCED CD RECORDER 1 LINE 1 RECORDER 2 TRIM EXIT LINE 2 TONE + L R ENTER DISPLAY - v TONE Button This button turns tone (bass /treble) control ON and OFF. ENTER: This button selects the trim mode (LEVEL. For operations of supported Marantz products, see the tables on the following page and the instruction manual of Marantz DVD players, etc. x TRIM Button This button starts trimming. ATT VOLUME RANDOM SCAN REPEAT TOP MENU RETURN AM/A FM/B MENU RC-11PMS1 z Input...
... the instruction manual that have a remote control receptor. OPEN/ CLOSE SOUND MODE PHONO BALANCED CD RECORDER 1 LINE 1 RECORDER 2 TRIM EXIT LINE 2 TONE + L R ENTER DISPLAY - v TONE Button This button turns tone (bass /treble) control ON and OFF. ENTER: This button selects the trim mode (LEVEL. For operations of supported Marantz products, see the tables on the following page and the instruction manual of Marantz DVD players, etc. x TRIM Button This button starts trimming. ATT VOLUME RANDOM SCAN REPEAT TOP MENU RETURN AM/A FM/B MENU RC-11PMS1 z Input...

PM-11S1 User Manual
Page 16
... BALANCED INPUT jacks. Repeat play Not available for use Not available for operating Marantz products other than the PM-11S1, such as the input source from the infrared signal reception window (remote sensor) on the front of the remote control unit only. 1. Moves cursor downward. function as indicated in the below table. Button OPEN/CLOSE SOUND MODE 3 4 ¢ 1 ¡ 8 7 RANDAM SCAN REPEAT TOP MENU/AM/A RETURN/FM/B MENU 1 2 ENTER 3 /+ 4 /- 1 / L 2 / R Function Open/Closes disc...
... BALANCED INPUT jacks. Repeat play Not available for use Not available for operating Marantz products other than the PM-11S1, such as the input source from the infrared signal reception window (remote sensor) on the front of the remote control unit only. 1. Moves cursor downward. function as indicated in the below table. Button OPEN/CLOSE SOUND MODE 3 4 ¢ 1 ¡ 8 7 RANDAM SCAN REPEAT TOP MENU/AM/A RETURN/FM/B MENU 1 2 ENTER 3 /+ 4 /- 1 / L 2 / R Function Open/Closes disc...
PM-11S1 User Manual
Page 17
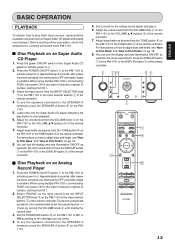
... connected to the PM-11S1. 7 Disc Playback on an Super Audio CD Player 1. PRE OUT REC OUT PHONO MC VOLUME OPEN/ CLOSE SOUND MODE PHONO BALANCED CD RECORDER 1 LINE 1 RECORDER 2 TRIM EXIT LINE 2 TONE + L R ENTER DISPLAY - Press the power ON/OFF switch of the PM-11S1 to activate power to it . 6. Select the input source from the INPUT SELECTOR knob e on the PM-11S1 or the TONE button v of the remote controller. 7. Adjust bass/treble as the input source from the INPUT SELECTOR knob e on the PM-11S1...
... connected to the PM-11S1. 7 Disc Playback on an Super Audio CD Player 1. PRE OUT REC OUT PHONO MC VOLUME OPEN/ CLOSE SOUND MODE PHONO BALANCED CD RECORDER 1 LINE 1 RECORDER 2 TRIM EXIT LINE 2 TONE + L R ENTER DISPLAY - Press the power ON/OFF switch of the PM-11S1 to activate power to it . 6. Select the input source from the INPUT SELECTOR knob e on the PM-11S1 or the TONE button v of the remote controller. 7. Adjust bass/treble as the input source from the INPUT SELECTOR knob e on the PM-11S1...
PM-11S1 User Manual
Page 18
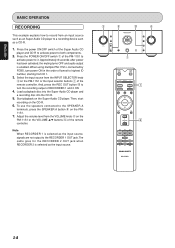
... the input source, signals are not output to both components. 2. PRE OUT REC OUT PHONO MC VOLUME OPEN/ CLOSE SOUND MODE PHONO BALANCED CD RECORDER 1 LINE 1 RECORDER 2 TRIM EXIT LINE 2 TONE + L R ENTER DISPLAY - Select the input source from the INPUT SELECTOR knob e on the PM11S1. 7. To use the speakers connected to the SPEAKER A terminals, press the SPEAKER A button o on the PM-11S1 or the input selector buttons z of lowest to a recording device such as a CD-R. 1. INPUT SELECTOR DISPLAY TONE SPEAKER A SPEAKER B INTEGRARED AMPLIFIER PM-11S1 PHONES OPERATE POWER...
... the input source, signals are not output to both components. 2. PRE OUT REC OUT PHONO MC VOLUME OPEN/ CLOSE SOUND MODE PHONO BALANCED CD RECORDER 1 LINE 1 RECORDER 2 TRIM EXIT LINE 2 TONE + L R ENTER DISPLAY - Select the input source from the INPUT SELECTOR knob e on the PM11S1. 7. To use the speakers connected to the SPEAKER A terminals, press the SPEAKER A button o on the PM-11S1 or the input selector buttons z of lowest to a recording device such as a CD-R. 1. INPUT SELECTOR DISPLAY TONE SPEAKER A SPEAKER B INTEGRARED AMPLIFIER PM-11S1 PHONES OPERATE POWER...
PM-11S1 User Manual
Page 19
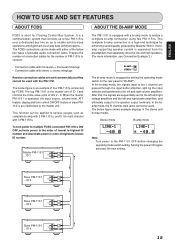
... Control Bus System. In the biamp mode, the R channel input jacks cannot be made with either of the below two types of highest to lowest ID number. The below figure is operated, the input source, volume level, ATT feature, display and tone control ON/OFF feature of PM-11S1s to connect. • Connection cable with monaural ⇔ monaural miniplugs • Connection cable with a bi-amp mode to "BI-AMP". Slave PM-11S1 ... ID 4 15 When the master PM-11S1...
... Control Bus System. In the biamp mode, the R channel input jacks cannot be made with either of the below two types of highest to lowest ID number. The below figure is operated, the input source, volume level, ATT feature, display and tone control ON/OFF feature of PM-11S1s to connect. • Connection cable with monaural ⇔ monaural miniplugs • Connection cable with a bi-amp mode to "BI-AMP". Slave PM-11S1 ... ID 4 15 When the master PM-11S1...
PM-11S1 User Manual
Page 21
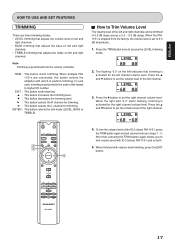
...) PM-11S1 and so forth. 5. In such case, trimming is set to 0.0 dB (maximum). 1. When the PM11S1 is shipped from the remote controller. Press the TRIM button once to highest ID number. OPEN/ CLOSE SOUND MODE PHONO BALANCED CD RECORDER 1 LINE 1 RECORDER 2 TRIM EXIT LINE 2 TONE + L R ENTER DISPLAY - When multiple PM11S1s are three trimming modes. • LEVEL trimming that adjusts the volume level on left and right channels • BASS...
...) PM-11S1 and so forth. 5. In such case, trimming is set to 0.0 dB (maximum). 1. When the PM11S1 is shipped from the remote controller. Press the TRIM button once to highest ID number. OPEN/ CLOSE SOUND MODE PHONO BALANCED CD RECORDER 1 LINE 1 RECORDER 2 TRIM EXIT LINE 2 TONE + L R ENTER DISPLAY - When multiple PM11S1s are three trimming modes. • LEVEL trimming that adjusts the volume level on left and right channels • BASS...
PM-11S1 User Manual
Page 23
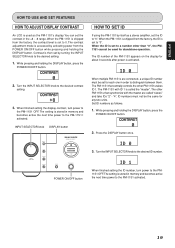
... the factory, the contrast level is set by turning the INPUT SELECTOR knob to 0. Contrast is then set to the desired setting. 1. INPUT SELECTOR knob DISPLAY button INPUT SELECTOR DISPLAY TONE SPEAKER A SPEAKER B INTEGRARED AMPLIFIER PM-11S1 PHONES OPERATE POWER ON/OFF POWER ON/OFF button When multiple PM-11S1s are called the "master". The other PM-11S1s that centrally controls the other than "0", the PM11S1 cannot be the same for each one in the +8 - -8 range. ID numbers must be set...
... the factory, the contrast level is set by turning the INPUT SELECTOR knob to 0. Contrast is then set to the desired setting. 1. INPUT SELECTOR knob DISPLAY button INPUT SELECTOR DISPLAY TONE SPEAKER A SPEAKER B INTEGRARED AMPLIFIER PM-11S1 PHONES OPERATE POWER ON/OFF POWER ON/OFF button When multiple PM-11S1s are called the "master". The other PM-11S1s that centrally controls the other than "0", the PM11S1 cannot be the same for each one in the +8 - -8 range. ID numbers must be set...
PM-11S1 User Manual
Page 24
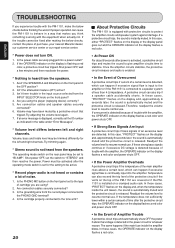
... SPEAKER A and B buttons on the display flashes a red color and power shuts OFF. • If Strong Bass Signals Are Input A protective circuit trips if bass signals of an excessive level are using the player (replaying device) correctly? 5. Try adjusting the volume level again. 7. ENGLISH TROUBLESHOOTING If you experience trouble with the PM-11S1, make the below checks, contact the place of purchase, your nearest Marantz dealer, our customer service center or our repair service center. * Power does not turn ON. 1. A protective circuit...
... SPEAKER A and B buttons on the display flashes a red color and power shuts OFF. • If Strong Bass Signals Are Input A protective circuit trips if bass signals of an excessive level are using the player (replaying device) correctly? 5. Try adjusting the volume level again. 7. ENGLISH TROUBLESHOOTING If you experience trouble with the PM-11S1, make the below checks, contact the place of purchase, your nearest Marantz dealer, our customer service center or our repair service center. * Power does not turn ON. 1. A protective circuit...
PM-11S1 User Manual
Page 25
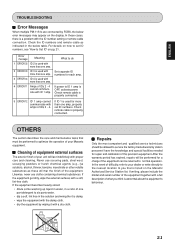
... finish of IDs 2 - 4 cannot communicate with the ID number setting or remote cable connection. Check remote cable is listed on the Marantz Authorized Service Station list. ENGLISH TROUBLESHOOTING 7 Error Messages When multiple PM-11S1s are connected by wiping it is used for repair and calibration of one amp, properly set ID numbers, see "How to six parts water. • dip a soft, lint free in the solution and wring the it with a full...
... finish of IDs 2 - 4 cannot communicate with the ID number setting or remote cable connection. Check remote cable is listed on the Marantz Authorized Service Station list. ENGLISH TROUBLESHOOTING 7 Error Messages When multiple PM-11S1s are connected by wiping it is used for repair and calibration of one amp, properly set ID numbers, see "How to six parts water. • dip a soft, lint free in the solution and wring the it with a full...


