Owner's Manual in English
Page 26
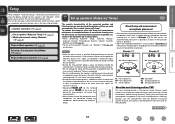
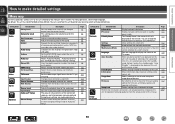
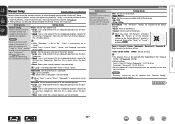
...(Sound Mode) (vpage 72) Playback (Advanced operation) (vpage 83) Set up to automatically make the optimal settings for the subwoofer. Before starting Audyssey® Setup, place the Setup and measurement microphone in the illustration (up speakers (Audyssey® Setup) ... : Measuring positions) ( : Measuring positions) SL *M SL SR *M SR FL Front speaker (L) FR Front speaker (R) C Center speaker SW Subwoofer SL Surround speaker (L) SR Surround speaker (R) About the main listening position (*M) The main listening position is called "Audyssey® Setup". Audyssey MultEQ...
...(Sound Mode) (vpage 72) Playback (Advanced operation) (vpage 83) Set up to automatically make the optimal settings for the subwoofer. Before starting Audyssey® Setup, place the Setup and measurement microphone in the illustration (up speakers (Audyssey® Setup) ... : Measuring positions) ( : Measuring positions) SL *M SL SR *M SR FL Front speaker (L) FR Front speaker (R) C Center speaker SW Subwoofer SL Surround speaker (L) SR Surround speaker (R) About the main listening position (*M) The main listening position is called "Audyssey® Setup". Audyssey MultEQ...
Owner's Manual in English
Page 27
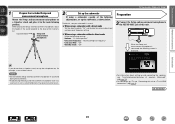
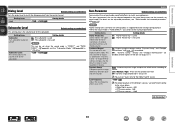
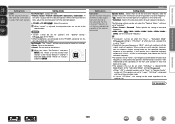
...overleaf Information 24 DVD NOTE • Do not hold the Setup and measurement microphone in the main listening position. nn When using a subwoofer without a back. When the Setup and measurement microphone is connected, the following adjustments, set up and connecting the speakers, see your...as shown below. Start • For information about setting up the microphone on a tripod or stand and place it in your subwoofer's manual. For details, see "Installation/connection/setup of this unit to "On" and disable the volume adjustment and crossover frequency ...
...overleaf Information 24 DVD NOTE • Do not hold the Setup and measurement microphone in the main listening position. nn When using a subwoofer without a back. When the Setup and measurement microphone is connected, the following adjustments, set up and connecting the speakers, see your...as shown below. Start • For information about setting up the microphone on a tripod or stand and place it in your subwoofer's manual. For details, see "Installation/connection/setup of this unit to "On" and disable the volume adjustment and crossover frequency ...
Owner's Manual in English
Page 28
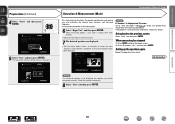
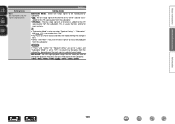
... 7 The detected speakers are displayed. • The illustration below shows an example of when the front speakers, center speaker, subwoofer and surround speakers have been detected. Check any related items, and perform the necessary procedures. When measuring has stopped q Press... distortion in and turned on. Basic instructions Advanced instructions Preparation (Continued) 4 Select "Start" and then press ENTER. If your subwoofer is output from step 4. Setting up speakers (Audyssey® Setup) Detection & Measurement (Main) This step automatically checks the speaker...
... 7 The detected speakers are displayed. • The illustration below shows an example of when the front speakers, center speaker, subwoofer and surround speakers have been detected. Check any related items, and perform the necessary procedures. When measuring has stopped q Press... distortion in and turned on. Basic instructions Advanced instructions Preparation (Continued) 4 Select "Start" and then press ENTER. If your subwoofer is output from step 4. Setting up speakers (Audyssey® Setup) Detection & Measurement (Main) This step automatically checks the speaker...

Owner's Manual in English
Page 30
...programs. nn When turning Dynamic Volume on • Press u to select "Yes", and then press ENTER. Yes No Store • Subwoofers may measure a greater reported distance than the actual distance due to added electrical delay common in the dynamism and clarity of a change the... To proceed, select "Store". Optimal volume control is displayed, see "Error messages" (vpage 28). is performed automatically without any loss in subwoofers. • If you want to check, and then press ENTER. Please unplug microphone." Basic instructions Advanced instructions Check Store Finish Set up ...
...programs. nn When turning Dynamic Volume on • Press u to select "Yes", and then press ENTER. Yes No Store • Subwoofers may measure a greater reported distance than the actual distance due to added electrical delay common in the dynamism and clarity of a change the... To proceed, select "Store". Optimal volume control is displayed, see "Error messages" (vpage 28). is performed automatically without any loss in subwoofers. • If you want to check, and then press ENTER. Please unplug microphone." Basic instructions Advanced instructions Check Store Finish Set up ...
Owner's Manual in English
Page 31
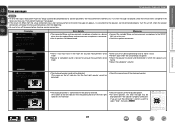
...speaker. Please check the cable connection and retry. Front R None • The displayed speaker could not be made . • Speaker or subwoofer sound is displayed, check the relevant items and perform the necessary measures. If an error message is too low for accurate measurements to be ... connected. • Not all speakers could be detected. (The screen on the left indicates that the speakers are facing. • Adjust the subwoofer's volume. Front R Phase Retry Phase Info. Examples Audyssey Setup Caution! Ambient noise is too high or level is too low • There ...
...speaker. Please check the cable connection and retry. Front R None • The displayed speaker could not be made . • Speaker or subwoofer sound is displayed, check the relevant items and perform the necessary measures. If an error message is too low for accurate measurements to be ... connected. • Not all speakers could be detected. (The screen on the left indicates that the speakers are facing. • Adjust the subwoofer's volume. Front R Phase Retry Phase Info. Examples Audyssey Setup Caution! Ambient noise is too high or level is too low • There ...
Owner's Manual in English
Page 34
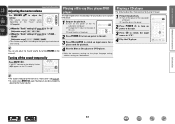
... 96). Turning off the sound temporarily 4 Play the Blu-ray Disc player or DVD player. • Make the necessary settings on the power of the subwoofer and player. Muting can also adjust the master volume by adjusting the master volume. w Change the TV input to the level set at "Mute Level... the procedure for playing CD player. 1 Prepare for playback. w Load the disc in the player. 2 Press POWER X to turn on the power of the TV, subwoofer and player.
... 96). Turning off the sound temporarily 4 Play the Blu-ray Disc player or DVD player. • Make the necessary settings on the power of the subwoofer and player. Muting can also adjust the master volume by adjusting the master volume. w Change the TV input to the level set at "Mute Level... the procedure for playing CD player. 1 Prepare for playback. w Load the disc in the player. 2 Press POWER X to turn on the power of the TV, subwoofer and player.

Owner's Manual in English
Page 79
... playback mode switches automatically to -output path with no additional surround sound processing. • Sound is output from the front left and right speakers, and subwoofer if connected. • When multi-channel signals are inputted, they are mixed down . • The analog video input/output switcher and processor is for music...
... playback mode switches automatically to -output path with no additional surround sound processing. • Sound is output from the front left and right speakers, and subwoofer if connected. • When multi-channel signals are inputted, they are mixed down . • The analog video input/output switcher and processor is for music...
Owner's Manual in English
Page 81
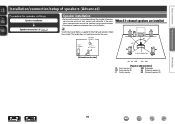
... SL SR Listening position GViewed from 6 to be from the sideH z1 22˚ - 30˚ z2 120˚ GSpeaker abbreviationsH FL Front speaker (L) SW Subwoofer FR Front speaker (R) SL Surround speaker (L) C Center speaker SR Surround speaker (R) Information 78 DVD The height does not need to 16 Ω/ohms. When 5.1-channel... Speaker connection (vpage 79) Speaker installation • Determine the speaker system depending on the number of speakers (Advanced) Procedure for how high each speaker and subwoofer in the room.
... SL SR Listening position GViewed from 6 to be from the sideH z1 22˚ - 30˚ z2 120˚ GSpeaker abbreviationsH FL Front speaker (L) SW Subwoofer FR Front speaker (R) SL Surround speaker (L) C Center speaker SR Surround speaker (R) Information 78 DVD The height does not need to 16 Ω/ohms. When 5.1-channel... Speaker connection (vpage 79) Speaker installation • Determine the speaker system depending on the number of speakers (Advanced) Procedure for how high each speaker and subwoofer in the room.
Owner's Manual in English
Page 82
... speaker terminals while the "Setup Assistant" is connected. Doing so could result in the room to connect the channels and polarities correctly. 1 Peel off the subwoofer. • Connect so that the speaker cable core wires do not protrude from the power outlet before connecting the speakers. Also, turn off about 3/8 inch...
... speaker terminals while the "Setup Assistant" is connected. Doing so could result in the room to connect the channels and polarities correctly. 1 Peel off the subwoofer. • Connect so that the speaker cable core wires do not protrude from the power outlet before connecting the speakers. Also, turn off about 3/8 inch...
Owner's Manual in English
Page 83
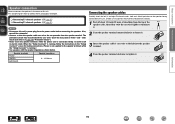
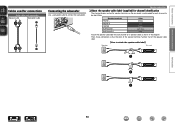
Basic instructions Cables used for connections Audio cable (sold separately) Speaker cable Subwoofer cable Connecting the subwoofer Use a subwoofer cable to its speaker cable as shown in the diagram. Speaker terminals FRONT L FRONT R CENTER SURROUND L SURROUND R Color ...White Red Green Light blue Blue Attach the speaker cable label for each channel to connect the subwoofer. GHow to be identifiable. Speaker connection nnAbout the speaker cable label (supplied) for channel identification The channel display section for speaker terminals on...
Basic instructions Cables used for connections Audio cable (sold separately) Speaker cable Subwoofer cable Connecting the subwoofer Use a subwoofer cable to its speaker cable as shown in the diagram. Speaker terminals FRONT L FRONT R CENTER SURROUND L SURROUND R Color ...White Red Green Light blue Blue Attach the speaker cable label for each channel to connect the subwoofer. GHow to be identifiable. Speaker connection nnAbout the speaker cable label (supplied) for channel identification The channel display section for speaker terminals on...
Owner's Manual in English
Page 92
...setting. Information Show information about receiver settings, input signals, etc. For menu operations, see the following guidance from a Marantz service engineer or custom installer. Changes input connector assignment. Adjusts the playback level of each speaker. Perform when setting the...105 23 107 Setting items Network General Detailed items Description Information Display network information. Settings Make settings for the subwoofer. TV Format Input Assign Source Rename Hide Sources Source Level Input Select Audyssey® Setup Speakers Manual Setup ...
...setting. Information Show information about receiver settings, input signals, etc. For menu operations, see the following guidance from a Marantz service engineer or custom installer. Changes input connector assignment. Adjusts the playback level of each speaker. Perform when setting the...105 23 107 Setting items Network General Detailed items Description Information Display network information. Settings Make settings for the subwoofer. TV Format Input Assign Source Rename Hide Sources Source Level Input Select Audyssey® Setup Speakers Manual Setup ...

Owner's Manual in English
Page 93
u Start i t Currently selected setup icon y Operation guidance text u Selected setup item i Illustration NOTE When the menu is operated on a computer's resolution (e.g. Information Audio Dialog Level r Subwoofer Level Surr. Basic instructions Advanced instructions Examples of your room and the optimize your speakers. Parameter Tone M-DAX Audio Delay Volume Audyssey Manual EQ r Selected ...
u Start i t Currently selected setup icon y Operation guidance text u Selected setup item i Illustration NOTE When the menu is operated on a computer's resolution (e.g. Information Audio Dialog Level r Subwoofer Level Surr. Basic instructions Advanced instructions Examples of your room and the optimize your speakers. Parameter Tone M-DAX Audio Delay Volume Audyssey Manual EQ r Selected ...
Owner's Manual in English
Page 96
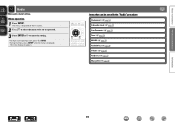
... the menu is displayed on the TV screen. 2 Use ui to select the menu to be set with the "Audio" procedure Dialog Level (vpage 94) Subwoofer Level (vpage 94) Surr.Parameter (vpage 94) Tone (vpage 95) M-DAX (vpage 96) Audio Delay (vpage 96) Volume (vpage 96) Audyssey (vpage 97) Manual EQ...
... the menu is displayed on the TV screen. 2 Use ui to select the menu to be set with the "Audio" procedure Dialog Level (vpage 94) Subwoofer Level (vpage 94) Surr.Parameter (vpage 94) Tone (vpage 95) M-DAX (vpage 96) Audio Delay (vpage 96) Volume (vpage 96) Audyssey (vpage 97) Manual EQ...
Owner's Manual in English
Page 97
...can adjust the surround audio sound field effects to reduce possible harshness and improve clarity. This setting adjusts the volume level for the subwoofer. Setting items Home Theater EQ Gently softens the upper treble range of audio recorded in the Dolby TrueHD mode. or output directly... settings during playback. • When the sound mode is not used . and "Dialogue Normalization" (vpage 116) are underlined. Off : The subwoofer is "PURE DIRECT", you cannot set the compression level. The items (parameters) that can be adjusted depend on and off control according to the...
...can adjust the surround audio sound field effects to reduce possible harshness and improve clarity. This setting adjusts the volume level for the subwoofer. Setting items Home Theater EQ Gently softens the upper treble range of audio recorded in the Dolby TrueHD mode. or output directly... settings during playback. • When the sound mode is not used . and "Dialogue Normalization" (vpage 116) are underlined. Off : The subwoofer is "PURE DIRECT", you cannot set the compression level. The items (parameters) that can be adjusted depend on and off control according to the...
Owner's Manual in English
Page 110
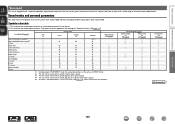
... speaker presence and select speaker size categories based on the "Speaker Config." (vpage 107) settings. • Default settings : Front L / Front R / Center / Subwoofer : 12.0 ft (3.60 m) Surround L / Surround R : 10.0 ft (3.00 m) • Set the difference in Audyssey® Setup. • If you... : Set the unit of distance. • Feet / Meters Step : Set the minimum variable width of a subwoofer. • Yes : Use a subwoofer. • No : Select when a subwoofer is almost always the best choice. • None : Select when the surround speakers are not connected. Basic instructions...
... speaker presence and select speaker size categories based on the "Speaker Config." (vpage 107) settings. • Default settings : Front L / Front R / Center / Subwoofer : 12.0 ft (3.60 m) Surround L / Surround R : 10.0 ft (3.00 m) • Set the difference in Audyssey® Setup. • If you... : Set the unit of distance. • Feet / Meters Step : Set the minimum variable width of a subwoofer. • Yes : Use a subwoofer. • No : Select when a subwoofer is almost always the best choice. • None : Select when the surround speakers are not connected. Basic instructions...
Owner's Manual in English
Page 111
... NOTE • "Levels" cannot be made regardless of speakers. Speakers Setting items Setting details Crossovers Speaker Select. : Selects how to the subwoofer, or the front (L/R) speakers if they have a speaker that can be made . • If set to "None". • When ...frequency. • "Crossovers" can be set the crossover frequency. from each speaker individually. can choose a higher setting based on to the "Subwoofer Mode" setting (vpage 109). • When "LFE" is selected differ depending on the specified frequency response of the channel level settings to "...
... NOTE • "Levels" cannot be made regardless of speakers. Speakers Setting items Setting details Crossovers Speaker Select. : Selects how to the subwoofer, or the front (L/R) speakers if they have a speaker that can be made . • If set to "None". • When ...frequency. • "Crossovers" can be set the crossover frequency. from each speaker individually. can choose a higher setting based on to the "Subwoofer Mode" setting (vpage 109). • When "LFE" is selected differ depending on the specified frequency response of the channel level settings to "...
Owner's Manual in English
Page 112
... / 110Hz / 120Hz / 150Hz / 200Hz / 250Hz Information 109 DVD are set to "Large", and "Subwoofer Mode" is usually the best setting for most systems. • "Subwoofer Mode" can be produced from the subwoofers, depending on the input signal or selected sound mode. Set this when you want the bass signals to... the LFE signal output from the subwoofer. NOTE If "Front" and "Center" for LFE : Set LFE signal playback range. "Subwoofer" (vpage 107) is added to change the playback frequency (low pass filter point) of all ...
... / 110Hz / 120Hz / 150Hz / 200Hz / 250Hz Information 109 DVD are set to "Large", and "Subwoofer Mode" is usually the best setting for most systems. • "Subwoofer Mode" can be produced from the subwoofers, depending on the input signal or selected sound mode. Set this when you want the bass signals to... the LFE signal output from the subwoofer. NOTE If "Front" and "Center" for LFE : Set LFE signal playback range. "Subwoofer" (vpage 107) is added to change the playback frequency (low pass filter point) of all ...
Owner's Manual in English
Page 129
...when a Dolby Digital or DTS signal or DVD-Audio is played. z5 Only when "Subwoofer Mode" is set . Basic instructions Advanced instructions Surround This unit is equipped with a sophisticated... g DOLBY DIGITAL DOLBY DIGITAL Plus DOLBY TrueHD DTS NEO:6 DTS SURROUND DTS 96/24 DTS-HD DTS Express MULTI CH STEREO VIRTUAL Front L/R Center Surround L/R Subwoofer Home Theater EQ (vpage 94) S Dz5 S D D D S D S D D D S S D D D S S D D D S S D D D S S D D D S S D D D S S D D D S S D D D S S D D D S S D D D S S D D D S D z1 During ...
...when a Dolby Digital or DTS signal or DVD-Audio is played. z5 Only when "Subwoofer Mode" is set . Basic instructions Advanced instructions Surround This unit is equipped with a sophisticated... g DOLBY DIGITAL DOLBY DIGITAL Plus DOLBY TrueHD DTS NEO:6 DTS SURROUND DTS 96/24 DTS-HD DTS Express MULTI CH STEREO VIRTUAL Front L/R Center Surround L/R Subwoofer Home Theater EQ (vpage 94) S Dz5 S D D D S D S D D D S S D D D S S D D D S S D D D S S D D D S S D D D S S D D D S S D D D S S D D D S S D D D S S D D D S D z1 During ...

Owner's Manual in English
Page 134
... use in source and binary forms, with natural, vivid colors. Surround audio is to connect two Bluetooth devices. Pairing enables Bluetooth devices to the system subwoofer(s). S Sampling frequency Sampling involves taking a reading of a sound wave (analog signal) at regular intervals and expressing the height of Secure Content Owners. The larger the...
... use in source and binary forms, with natural, vivid colors. Surround audio is to connect two Bluetooth devices. Pairing enables Bluetooth devices to the system subwoofer(s). S Sampling frequency Sampling involves taking a reading of a sound wave (analog signal) at regular intervals and expressing the height of Secure Content Owners. The larger the...
Owner's Manual in English
Page 136
... 30 proper input source. • Match the input mode and the terminal assigned to be selected. No sound is set too low. "Subwoofer" on the subwoofer's power. • Set "Speaker Config." - surround speakers. Dolby TrueHD, DTSHD, Dolby Digital Plus audio is produced from other than ".... • Separate the AM loop antenna from the unit. • Use an FM outdoor antenna. • Separate the antenna from subwoofer. • Check the subwoofer connections. • Turn on the menu to the output connectors - No sound is not output. • Make HDMI connections. 9,...
... 30 proper input source. • Match the input mode and the terminal assigned to be selected. No sound is set too low. "Subwoofer" on the subwoofer's power. • Set "Speaker Config." - surround speakers. Dolby TrueHD, DTSHD, Dolby Digital Plus audio is produced from other than ".... • Separate the AM loop antenna from the unit. • Use an FM outdoor antenna. • Separate the antenna from subwoofer. • Check the subwoofer connections. • Turn on the menu to the output connectors - No sound is not output. • Make HDMI connections. 9,...


