
NR1501 Spec Sheet
Page 1
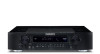
... processing. But without searching for maximum performance as well as another remote. So do that 's your impression, allow the new Marantz NR1501 to change your needs for advanced audio formats like Dolby TrueHD and DTS Master Audio, to your ears with your room's acoustic...today are four HDMI inputs, all version 1.3-capable, of enjoyment. They take up a lot of course. Yes, you live. Marantz's NR1501 answers your mind. That's because the NR1501 includes everything you going to be intimidating, don't they? It's just a bit more . Behind that fits comfortably on a...
... processing. But without searching for maximum performance as well as another remote. So do that 's your impression, allow the new Marantz NR1501 to change your needs for advanced audio formats like Dolby TrueHD and DTS Master Audio, to your ears with your room's acoustic...today are four HDMI inputs, all version 1.3-capable, of enjoyment. They take up a lot of course. Yes, you live. Marantz's NR1501 answers your mind. That's because the NR1501 includes everything you going to be intimidating, don't they? It's just a bit more . Behind that fits comfortably on a...
NR1501 Spec Sheet
Page 2
... Headphone Out 1 AC Outlets (Switched/Unswitched) - Response (Component) 5Hz - 80MHz (- 1 dB) Video Freq. NR1501 "Slim-line" Home Theater Receiver FEATURES MULTICHANNEL/SURROUND Number of its subsidiaries will not assume any liability for Portable AudioPlayer etc...5W) Dimensions W" x H" x D" (Inches) 17-3/8" x 4-3/16" x 14-1/2" Weight (lbs) 19 Life AmplifiedTM *All specifications, dimensions and weights are subject to 200msec By Marantz Service 4 3 3 1 1 (Monitor Out) 2 (inc. Response (Analog In) 8Hz - 100kHz (+/- 3 dB) Freq. Front mini jack input) 1 2 1 - Response...
... Headphone Out 1 AC Outlets (Switched/Unswitched) - Response (Component) 5Hz - 80MHz (- 1 dB) Video Freq. NR1501 "Slim-line" Home Theater Receiver FEATURES MULTICHANNEL/SURROUND Number of its subsidiaries will not assume any liability for Portable AudioPlayer etc...5W) Dimensions W" x H" x D" (Inches) 17-3/8" x 4-3/16" x 14-1/2" Weight (lbs) 19 Life AmplifiedTM *All specifications, dimensions and weights are subject to 200msec By Marantz Service 4 3 3 1 1 (Monitor Out) 2 (inc. Response (Analog In) 8Hz - 100kHz (+/- 3 dB) Freq. Front mini jack input) 1 2 1 - Response...

NR1501 User Manual - Spanish
Page 44
is a registered trademark. 06/2009 541110291020M mzh-d Printed in China www.marantz.com You can find your nearest authorized distributor or dealer on our website.
is a registered trademark. 06/2009 541110291020M mzh-d Printed in China www.marantz.com You can find your nearest authorized distributor or dealer on our website.
NR1501 User Manual - English
Page 3
WARNING TO REDUCE THE RISK OF FIRE OR ELECTRIC SHOCK, DO NOT EXPOSE THIS APPLIANCE TO RAIN OR MOISTURE. This equipment generates, uses and can be determined by the user. Increase the separation between the equipment and receiver. - Connect the equipment into an outlet on , the user is encouraged to try to which the receiver is connected. - Consult the dealer or an experienced radio/ TV technician for proper grounding and, in particular, specifies that the cable ground shall be connected to the grounding system of the building, as practical. NOTE TO CATV SYSTEM ...
WARNING TO REDUCE THE RISK OF FIRE OR ELECTRIC SHOCK, DO NOT EXPOSE THIS APPLIANCE TO RAIN OR MOISTURE. This equipment generates, uses and can be determined by the user. Increase the separation between the equipment and receiver. - Connect the equipment into an outlet on , the user is encouraged to try to which the receiver is connected. - Consult the dealer or an experienced radio/ TV technician for proper grounding and, in particular, specifies that the cable ground shall be connected to the grounding system of the building, as practical. NOTE TO CATV SYSTEM ...

NR1501 User Manual - English
Page 4
There are provided for long periods of the polarized or grounding-type plug. Do not install near water. 6. A grounding type plug has two blades and a third grounding prong. Additional Safety Information! • This product should be placed on or pinched particularly at plugs, convenience receptacles, and the point where they exit from tip-over. Do not block any way, such as power-supply cord or plug is required when the apparatus has been damaged in the OFF position, the apparatus isn't completely switched-off from the MAINS. • Do not expose the unit and ...
There are provided for long periods of the polarized or grounding-type plug. Do not install near water. 6. A grounding type plug has two blades and a third grounding prong. Additional Safety Information! • This product should be placed on or pinched particularly at plugs, convenience receptacles, and the point where they exit from tip-over. Do not block any way, such as power-supply cord or plug is required when the apparatus has been damaged in the OFF position, the apparatus isn't completely switched-off from the MAINS. • Do not expose the unit and ...

NR1501 User Manual - English
Page 5
... Guide thoroughly to keep this product. After reading this User Guide, be sure to ensure proper operation and installation before using this for choosing the Marantz product. CONNECTIONS FUNCTIONS NAMES AND BASIC BASIC OPERATION ENGLISH Thank you for your future reference. SYSTEM SETUP 19 2.
... Guide thoroughly to keep this product. After reading this User Guide, be sure to ensure proper operation and installation before using this for choosing the Marantz product. CONNECTIONS FUNCTIONS NAMES AND BASIC BASIC OPERATION ENGLISH Thank you for your future reference. SYSTEM SETUP 19 2.
NR1501 User Manual - English
Page 6
... controller with preset functions • Environmentally friendly low-power-consumption STANDBY mode • Cursor buttons provided on the front panel EQUIPMENT MAINS WORKING SETTING Your Marantz product has been prepared to comply with an auto setup function that exist in ) or more Rear 0.2 m (8 in your area. NAMES AND FUNCTIONS CONNECTIONS BASIC...
... controller with preset functions • Environmentally friendly low-power-consumption STANDBY mode • Cursor buttons provided on the front panel EQUIPMENT MAINS WORKING SETTING Your Marantz product has been prepared to comply with an auto setup function that exist in ) or more Rear 0.2 m (8 in your area. NAMES AND FUNCTIONS CONNECTIONS BASIC...

NR1501 User Manual - English
Page 7
Paying close attention to polarity indicators (ª plus and · minus), be using the remote controller for the first time, load the batteries in your skin, immediately wash with the remote controller within the range of leakage, rupture or corrosion. Seek medical attention if accidentally ingested. • Do not carry or store batteries together with metal ball point pens, necklaces, coins, hair pins, etc. • If you accidentally get fluid on skin or clothing presents a burn risk. Approx. 5m (16.4 ft) Caution • Do not allow direct sunlight, an ...
Paying close attention to polarity indicators (ª plus and · minus), be using the remote controller for the first time, load the batteries in your skin, immediately wash with the remote controller within the range of leakage, rupture or corrosion. Seek medical attention if accidentally ingested. • Do not carry or store batteries together with metal ball point pens, necklaces, coins, hair pins, etc. • If you accidentally get fluid on skin or clothing presents a burn risk. Approx. 5m (16.4 ft) Caution • Do not allow direct sunlight, an ...
NR1501 User Manual - English
Page 8
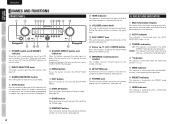
w INPUT SELECTOR knob This knob is used to select the input sources. (See page 13) e SURROUND MODE button Press this button to enter the tuner preset memory numbers or station names. (See page 30) 4 SETUP ADVANCED OPERATION TROUBLESHOOTING OTHERS d TUNER's indicators ST : This indicator is illuminated in the AUTO STEREO mode during tuner operations. h PRESET indicator This indicator is illuminated in the TUNER mode. !0 MEMORY button Press this button to select the surround mode. j HDMI indicator This indicator is working during tuner operations. o BAND button Press this button ...
w INPUT SELECTOR knob This knob is used to select the input sources. (See page 13) e SURROUND MODE button Press this button to enter the tuner preset memory numbers or station names. (See page 30) 4 SETUP ADVANCED OPERATION TROUBLESHOOTING OTHERS d TUNER's indicators ST : This indicator is illuminated in the AUTO STEREO mode during tuner operations. h PRESET indicator This indicator is illuminated in the TUNER mode. !0 MEMORY button Press this button to select the surround mode. j HDMI indicator This indicator is working during tuner operations. o BAND button Press this button ...

NR1501 User Manual - English
Page 9
...only. The inputs accept digital audio signals from the OSD menu system. (See page 20) o REMOTE CONTROL IN/OUT terminals Connect to a Marantz component equipped with remote control (RC-5) terminals. !0 SUB WOOFER PRE OUT terminal Connect this jack to the video inputs. DSP This indicator is...VCR) There are provided for the front left, front right, front center, surround left, surround right, surround back left and surround back right speakers. NR1501 R - DTS 96/24 This indicator is illuminated when a DTS 96/24 signal is input. AM Connect the supplied AM loop antenna. q ANTENNA...
...only. The inputs accept digital audio signals from the OSD menu system. (See page 20) o REMOTE CONTROL IN/OUT terminals Connect to a Marantz component equipped with remote control (RC-5) terminals. !0 SUB WOOFER PRE OUT terminal Connect this jack to the video inputs. DSP This indicator is...VCR) There are provided for the front left, front right, front center, surround left, surround right, surround back left and surround back right speakers. NR1501 R - DTS 96/24 This indicator is illuminated when a DTS 96/24 signal is input. AM Connect the supplied AM loop antenna. q ANTENNA...
NR1501 User Manual - English
Page 10
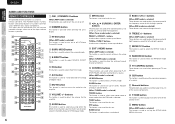
The input source controlled with this unit. ⁄2 1, 2, 3, 4 (CURSOR) / ENTER buttons These buttons are used to select a radio band. ⁄5 BASS / CH +/- c HT-EQ button (When AMP mode is selected) This button is selected) These buttons are used when controlling the cursor of the unit, DVD or other commands of a source. (When AMP mode is selected) LIP SYNC button This button is used when operating PLAY, STOP, PAUSE and other AV equipment. (When Tuner mode mode is used to store the setting of the source components. ¤2 T.TONE button This button is used to output test tones ...
The input source controlled with this unit. ⁄2 1, 2, 3, 4 (CURSOR) / ENTER buttons These buttons are used to select a radio band. ⁄5 BASS / CH +/- c HT-EQ button (When AMP mode is selected) This button is selected) These buttons are used when controlling the cursor of the unit, DVD or other commands of a source. (When AMP mode is selected) LIP SYNC button This button is used when operating PLAY, STOP, PAUSE and other AV equipment. (When Tuner mode mode is used to store the setting of the source components. ¤2 T.TONE button This button is used to output test tones ...
NR1501 User Manual - English
Page 11
The signal is sent when it is pressed, the remote controller changes to the source which was pressed. Press the buttons while pointing the transmitter towards the infrared receiver window of equipment. This remote controller can control 10 types of the unit or other device. ¤8 SOURCE button These buttons are operated. ‹6 SEND indicator Indicates when the remote controller is transmitting a signal. ‹7 Infrared Transmitter This transmitter emits infrared light. Notes • Press the AMP button to operate the unit's amplifier functions. • Press the TUNE ...
The signal is sent when it is pressed, the remote controller changes to the source which was pressed. Press the buttons while pointing the transmitter towards the infrared receiver window of equipment. This remote controller can control 10 types of the unit or other device. ¤8 SOURCE button These buttons are operated. ‹6 SEND indicator Indicates when the remote controller is transmitting a signal. ‹7 Infrared Transmitter This transmitter emits infrared light. Notes • Press the AMP button to operate the unit's amplifier functions. • Press the TUNE ...

NR1501 User Manual - English
Page 12
... quality. If they may cause you have maximum bass effect. It should be used in surround operation, the preferred location for surround speakers is installed. NR1501 AC IN Bass effects are installed near the TV. FRONT - SURROUND LEFT AND RIGHT SPEAKERS When this unit. • Be sure to one with proper...
... quality. If they may cause you have maximum bass effect. It should be used in surround operation, the preferred location for surround speakers is installed. NR1501 AC IN Bass effects are installed near the TV. FRONT - SURROUND LEFT AND RIGHT SPEAKERS When this unit. • Be sure to one with proper...

NR1501 User Manual - English
Page 13
... jack, on this unit. • Do not bundle the connected cables with the power cord or speaker cables. Tighten the knob by turning it counterclockwise. 4. NR1501 R - SURR. - L SPEAKER SYSTEMS : 6-8 OHMS R L SURROUND BACK AC IN BASIC CONNECTIONS CONNECTING DIGITAL AUDIO COMPONENTS • There are for the L (left and right channels properly. If...
... jack, on this unit. • Do not bundle the connected cables with the power cord or speaker cables. Tighten the knob by turning it counterclockwise. 4. NR1501 R - SURR. - L SPEAKER SYSTEMS : 6-8 OHMS R L SURROUND BACK AC IN BASIC CONNECTIONS CONNECTING DIGITAL AUDIO COMPONENTS • There are for the L (left and right channels properly. If...

NR1501 User Manual - English
Page 14
L CENTER R - VIDEO JACK The video signal for the L (left and right audio channels properly. COMPONENT JACK Make component video connections to a TV or monitor with component inputs to connect the left ) channel. • Be sure to setup the digital audio output format of the each component connected to the monitor. Notes • Be sure to produce higher quality video images. Refer to the instructions of your DVD player, or other digital source components. NAMES AND FUNCTIONS CONNECTIONS BASIC ENGLISH BASIC CONNECTIONS CONNECTING VIDEO COMPONENTS DVD player Video ...
L CENTER R - VIDEO JACK The video signal for the L (left and right audio channels properly. COMPONENT JACK Make component video connections to a TV or monitor with component inputs to connect the left ) channel. • Be sure to setup the digital audio output format of the each component connected to the monitor. Notes • Be sure to produce higher quality video images. Refer to the instructions of your DVD player, or other digital source components. NAMES AND FUNCTIONS CONNECTIONS BASIC ENGLISH BASIC CONNECTIONS CONNECTING VIDEO COMPONENTS DVD player Video ...

NR1501 User Manual - English
Page 15
... with the HDMI jack on the Bluray disc player, TV, projector or other sources directly to a display that high quality images can damage the equipment. NR1501 R - By using HDMI cables to connect the devices, linked operations can be performed between devices that support HDMI control, and the HDMI control signals can...
... with the HDMI jack on the Bluray disc player, TV, projector or other sources directly to a display that high quality images can damage the equipment. NR1501 R - By using HDMI cables to connect the devices, linked operations can be performed between devices that support HDMI control, and the HDMI control signals can...

NR1501 User Manual - English
Page 16
ASSEMBLING THE AM LOOP ANTENNA CONNECTING OF AC POWER CABLE 1. Plug the power cable into the base as shown. CONNECTING AN OUTDOOR ANTENNAS If you receive the clearest sound. Turn the power on to other units connected to 10m) Vinyl-coated wire AM FM (75Ω) Ground Notes • Do not remove the AM loop antenna. • Do not connect the supplied FM antenna. • The GND terminal on this unit does not function as possible from noise sources (neon signes, busy roads, power lines, transformers, etc) FM External Antenna AM Loop Antenna AM External Antenna Black GND White...
ASSEMBLING THE AM LOOP ANTENNA CONNECTING OF AC POWER CABLE 1. Plug the power cable into the base as shown. CONNECTING AN OUTDOOR ANTENNAS If you receive the clearest sound. Turn the power on to other units connected to 10m) Vinyl-coated wire AM FM (75Ω) Ground Notes • Do not remove the AM loop antenna. • Do not connect the supplied FM antenna. • The GND terminal on this unit does not function as possible from noise sources (neon signes, busy roads, power lines, transformers, etc) FM External Antenna AM Loop Antenna AM External Antenna Black GND White...

NR1501 User Manual - English
Page 17
When the system is muted, the display will appear in the modes given below 80. (See page 24.) During a listening session you may be reduced to below . • SOURCE DIRECT mode • When the ROOM EQ function is changed , the input name will show "MUTE" . Press the MUTE button again to return to normal operation. Adjust the volume to a comfortable level using the CHANNEL LEVEL setting, the maximum volume level will automatically switch to the digital input and surround mode, which were entered during the configuration process for that may wish to adjust the Bass and Treble...
When the system is muted, the display will appear in the modes given below 80. (See page 24.) During a listening session you may be reduced to below . • SOURCE DIRECT mode • When the ROOM EQ function is changed , the input name will show "MUTE" . Press the MUTE button again to return to normal operation. Adjust the volume to a comfortable level using the CHANNEL LEVEL setting, the maximum volume level will automatically switch to the digital input and surround mode, which were entered during the configuration process for that may wish to adjust the Bass and Treble...

NR1501 User Manual - English
Page 18
AUTO TUNING 1. 3. 2. Press BAND button on the front panel. • "AM 10 kHz" appears on the remote controller. 2. Turn the INPUT SELECTOR knob to select "TUNER". 2. Press the BAND button to select either FM or AM. 3. Automatic searching begins then stops when a station is tuned in stereo is engaged. ENGLISH NAMES AND FUNCTIONS CONNECTIONS BASIC OPERATION ADVANCED CONNECTIONS BASIC OPERATION TUNER OPERATION To operate the unit from a station that the tuner mode is poor, the amount of the noise will be significant. Default setup is 10 kHz step, if your country's ...
AUTO TUNING 1. 3. 2. Press BAND button on the front panel. • "AM 10 kHz" appears on the remote controller. 2. Turn the INPUT SELECTOR knob to select "TUNER". 2. Press the BAND button to select either FM or AM. 3. Automatic searching begins then stops when a station is tuned in stereo is engaged. ENGLISH NAMES AND FUNCTIONS CONNECTIONS BASIC OPERATION ADVANCED CONNECTIONS BASIC OPERATION TUNER OPERATION To operate the unit from a station that the tuner mode is poor, the amount of the noise will be significant. Default setup is 10 kHz step, if your country's ...

NR1501 User Manual - English
Page 19
CONNECTIONS FUNCTIONS NAMES AND BASIC BASIC OPERATION ENGLISH REMOTE CONTROLLER OPERATION To control the unit by your remote controller, you have to the top of the menu screen while the setup menu is displayed Moves the cursor while the setup menu is displayed Checks the settings while the setup menu is displayed Displays the setup menu Exits the setup menu Starts the test tones Sets the LIP SYNC function Adjusts the level between FM and AM) Enables the corresponding function in the AMP mode ADVANCED CONNECTIONS SETUP ADVANCED OPERATION TROUBLESHOOTING OTHERS 15 BASIC ...
CONNECTIONS FUNCTIONS NAMES AND BASIC BASIC OPERATION ENGLISH REMOTE CONTROLLER OPERATION To control the unit by your remote controller, you have to the top of the menu screen while the setup menu is displayed Moves the cursor while the setup menu is displayed Checks the settings while the setup menu is displayed Displays the setup menu Exits the setup menu Starts the test tones Sets the LIP SYNC function Adjusts the level between FM and AM) Enables the corresponding function in the AMP mode ADVANCED CONNECTIONS SETUP ADVANCED OPERATION TROUBLESHOOTING OTHERS 15 BASIC ...
