Owners Manual English
Page 1
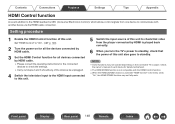
Connections Playback Settings Tips Appendix AV Pre Tuner AV7705 Front panel Display Rear panel 1 Remote Owner's Manual Index Contents .
Connections Playback Settings Tips Appendix AV Pre Tuner AV7705 Front panel Display Rear panel 1 Remote Owner's Manual Index Contents .
Owners Manual English
Page 5
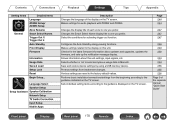
... Audyssey® Setup 206 173 Procedure for speaker settings (Audyssey® Setup) 208 178 Error messages 214 179 Retrieving Audyssey® Setup settings 216 180 Manual Setup 217 181 Amp Assign 217 184 Speaker Config. 223 186 Distances 228 186 Levels 230 188 Crossovers 231 193 Bass 232 197 Front Speaker...
... Audyssey® Setup 206 173 Procedure for speaker settings (Audyssey® Setup) 208 178 Error messages 214 179 Retrieving Audyssey® Setup settings 216 180 Manual Setup 217 181 Amp Assign 217 184 Speaker Config. 223 186 Distances 228 186 Levels 230 188 Crossovers 231 193 Bass 232 197 Front Speaker...
Owners Manual English
Page 8
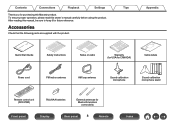
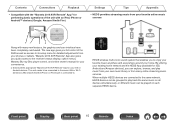
After reading this manual, be sure to keep it for Bluetooth/wireless connectivity Front panel Display Rear panel 8 Remote Index Quick Start Guide Safety Instructions Notes on radio Warranty (... Sound calibration microphone stand Remote control unit (RC037SR) R03/AAA batteries External antennas for future reference. Tips Appendix . To ensure proper operation, please read this Marantz product. Accessories Check that the following parts are supplied with the product. Contents Connections Playback Settings Thank you for purchasing this owner...
After reading this manual, be sure to keep it for Bluetooth/wireless connectivity Front panel Display Rear panel 8 Remote Index Quick Start Guide Safety Instructions Notes on radio Warranty (... Sound calibration microphone stand Remote control unit (RC037SR) R03/AAA batteries External antennas for future reference. Tips Appendix . To ensure proper operation, please read this Marantz product. Accessories Check that the following parts are supplied with the product. Contents Connections Playback Settings Thank you for purchasing this owner...
Owners Manual English
Page 15
... multi-room sound system that the iPhone or iPod touch is connected to the receiver's status display, option menus, Marantz Blu-ray Disc player control, and online owner's manual for your iOS or Android devices. The new app gives you can be connected to the same LAN or Wi-...Fi (wireless LAN) network that enables you quick access to . Contents Connections Playback 0 Compatible with the "Marantz 2016 AVR Remote" Appz for performing...
... multi-room sound system that the iPhone or iPod touch is connected to the receiver's status display, option menus, Marantz Blu-ray Disc player control, and online owner's manual for your iOS or Android devices. The new app gives you can be connected to the same LAN or Wi-...Fi (wireless LAN) network that enables you quick access to . Contents Connections Playback 0 Compatible with the "Marantz 2016 AVR Remote" Appz for performing...

Owners Manual English
Page 27
A Turn on the power of this unit. Front panel Display Rear panel 27 Remote Index Consult the owner's manual of the home automation controller for more information about serial control of this unit. Perform the operation below beforehand. B Turn clockwise until the antennas is ...
A Turn on the power of this unit. Front panel Display Rear panel 27 Remote Index Consult the owner's manual of the home automation controller for more information about serial control of this unit. Perform the operation below beforehand. B Turn clockwise until the antennas is ...
Owners Manual English
Page 43
For how to make a 11.1-channel connection. G AV7705 BALANCED XLR PRE OUT connector PIN arrangement H 12 3 A GND (Ground) B HOT (+) C COLD (-) The PIN arrangement in this unit. 0 This unit has UNBALANCED RCA PRE OUT ... power amp and subwoofer. When connecting a device that utilizes the USA type of PIN arrangement, replace the B and C plugs on speaker connections, see the Owner's Manual for the power amp. 0 This section shows how to make other speaker connections, see page 48. . Front panel Display Rear panel 43 Remote Index Connect...
For how to make a 11.1-channel connection. G AV7705 BALANCED XLR PRE OUT connector PIN arrangement H 12 3 A GND (Ground) B HOT (+) C COLD (-) The PIN arrangement in this unit. 0 This unit has UNBALANCED RCA PRE OUT ... power amp and subwoofer. When connecting a device that utilizes the USA type of PIN arrangement, replace the B and C plugs on speaker connections, see the Owner's Manual for the power amp. 0 This section shows how to make other speaker connections, see page 48. . Front panel Display Rear panel 43 Remote Index Connect...
Owners Manual English
Page 101
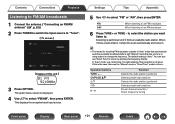
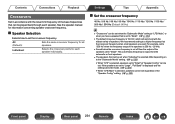
...buttons to tune in by entering the frequency directly. When it finds a radio station, it finds an available radio station. You can also use the "Manual" mode or "Direct Tune" mode to change the frequency. This displays the reception band input screen. to select the station you want listen to "... H Tuner CH 1 FM 92.10MHz STEREO AUTO Now Playing Tune Preset OPTION Option G Display of "Auto" mode that automatically searches available broadcast stations and "Manual" mode that lets you cannot tune in to select "FM/AM", then press ENTER. If this unit H .. 3 Press OPTION.
...buttons to tune in by entering the frequency directly. When it finds a radio station, it finds an available radio station. You can also use the "Manual" mode or "Direct Tune" mode to change the frequency. This displays the reception band input screen. to select the station you want listen to "... H Tuner CH 1 FM 92.10MHz STEREO AUTO Now Playing Tune Preset OPTION Option G Display of "Auto" mode that automatically searches available broadcast stations and "Manual" mode that lets you cannot tune in to select "FM/AM", then press ENTER. If this unit H .. 3 Press OPTION.
Owners Manual English
Page 103
... to select "Tune Mode", then press ENTER. 3 Use o p to select "Auto Preset Memory", then press ENTER. 3 Press ENTER. Manually change the mode to a receivable radio station. Front panel Display Rear panel 103 Remote Index The unit starts to tune in to radio stations automatically... the button is pressed. The option menu screen is displayed. 2 Use ui to select the tune mode, then press ENTER. Auto: Manual: Automatically search for about 5 seconds and the option menu screen turns off. 0 The preset memory is overwritten. Contents Connections Playback Changing the...
... to select "Tune Mode", then press ENTER. 3 Use o p to select "Auto Preset Memory", then press ENTER. 3 Press ENTER. Manually change the mode to a receivable radio station. Front panel Display Rear panel 103 Remote Index The unit starts to tune in to radio stations automatically... the button is pressed. The option menu screen is displayed. 2 Use ui to select the tune mode, then press ENTER. Auto: Manual: Automatically search for about 5 seconds and the option menu screen turns off. 0 The preset memory is overwritten. Contents Connections Playback Changing the...

Owners Manual English
Page 124
... music will stream to this unit. (v p. 241) NOTE 0 When "Network Control" is connected to the same network as this unit. 0 For details, see your device's manual. 2 Play the song on your iPhone, iPod touch or iPad. Front panel Display Rear panel 124 Remote Index Set "Network Control" to "Always On" for...
... music will stream to this unit. (v p. 241) NOTE 0 When "Network Control" is connected to the same network as this unit. 0 For details, see your device's manual. 2 Play the song on your iPhone, iPod touch or iPad. Front panel Display Rear panel 124 Remote Index Set "Network Control" to "Always On" for...

Owners Manual English
Page 134
.... The "Picture Mode" screen is done with this unit. A mode suited for low bit rate video sources. brighter and more vivid. Adjusts the picture quality manually. 4 Press ENTER. 0 "Picture Mode" settings are stored for each input source. An option menu screen is assigned. 1 Press OPTION. Contents Connections Playback Adjusting the picture...
.... The "Picture Mode" screen is done with this unit. A mode suited for low bit rate video sources. brighter and more vivid. Adjusts the picture quality manually. 4 Press ENTER. 0 "Picture Mode" settings are stored for each input source. An option menu screen is assigned. 1 Press OPTION. Contents Connections Playback Adjusting the picture...
Owners Manual English
Page 148
Check the owner's manual of each device for the connected devices to check the settings. 0 Carry out steps 2 and 3 should any of the devices be unplugged. 4 Switch the television ...
Check the owner's manual of each device for the connected devices to check the settings. 0 Carry out steps 2 and 3 should any of the devices be unplugged. 4 Switch the television ...

Owners Manual English
Page 168
...connector assignment. Removes from the display input sources that are made automatically. Sets the audio input mode. Sets up the speakers manually or changes Audyssey® Setup settings. Adjusts the playback level of this unit displayed on the network. Contents Connections Playback ... Setting items Inputs Detailed items Input Assign Source Rename Hide Sources Source Level Input Select Audyssey® Setup Manual Setup ... Changes the display name for manually setting the IP address. 239 Enables network communication in standby power mode. 241 The "Friendly Name" is...
...connector assignment. Removes from the display input sources that are made automatically. Sets the audio input mode. Sets up the speakers manually or changes Audyssey® Setup settings. Adjusts the playback level of this unit displayed on the network. Contents Connections Playback ... Setting items Inputs Detailed items Input Assign Source Rename Hide Sources Source Level Input Select Audyssey® Setup Manual Setup ... Changes the display name for manually setting the IP address. 239 Enables network communication in standby power mode. 241 The "Friendly Name" is...
Owners Manual English
Page 170
...and upgrades, updates the firmware, and sets up the notification message display. Changes the display title of the separate manual "Quick Start Guide" Front panel Display Rear panel 170 Remote Index Sets individual setting items according to the guidance ...factory default values. Checks for the latest firmware information about this unit. Changes the Smart Select Name display title to Marantz. Contents Connections Playback Settings Tips Appendix .. Makes settings for activating trigger out function. Performs basic installation/connections/settings from...
...and upgrades, updates the firmware, and sets up the notification message display. Changes the display title of the separate manual "Quick Start Guide" Front panel Display Rear panel 170 Remote Index Sets individual setting items according to the guidance ...factory default values. Checks for the latest firmware information about this unit. Changes the Smart Select Name display title to Marantz. Contents Connections Playback Settings Tips Appendix .. Makes settings for activating trigger out function. Performs basic installation/connections/settings from...
Owners Manual English
Page 179
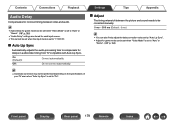
... from TV compatible with Auto Lip Sync. Contents Connections Playback Audio Delay Compensates for incorrect timing between the picture and sound needs to be corrected manually. 0 ms - 500 ms (Default : 0 ms) 0 You can also finely adjust the delay correction value set by "Auto Lip Sync". 0 Adjust for game mode can be...
... from TV compatible with Auto Lip Sync. Contents Connections Playback Audio Delay Compensates for incorrect timing between the picture and sound needs to be corrected manually. 0 ms - 500 ms (Default : 0 ms) 0 You can also finely adjust the delay correction value set by "Auto Lip Sync". 0 Adjust for game mode can be...

Owners Manual English
Page 186
..., etc. Picture Adjust Picture quality can be set when 4K signals are input. Front panel Display Rear panel 186 Remote Index Adjusts the picture quality manually. Settings Tips Appendix o Picture Mode Select the desired picture mode according to "Custom". (v p. 186) 0 "Picture Adjust" settings are stored for watching movies in a dark room...
..., etc. Picture Adjust Picture quality can be set when 4K signals are input. Front panel Display Rear panel 186 Remote Index Adjusts the picture quality manually. Settings Tips Appendix o Picture Mode Select the desired picture mode according to "Custom". (v p. 186) 0 "Picture Adjust" settings are stored for watching movies in a dark room...

Owners Manual English
Page 206
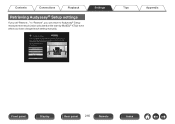
... speaker SW Subwoofer SL Surround speaker (L) SR Surround speaker (R) 0 If you measure in six or more positions, as shown in the illustration (up the speakers manually, use "Manual Setup" on the menu. (v p. 217) Audyssey® Setup To perform measurement, place the Sound calibration microphone in "Setup Assistant". For best results, we recommend...
... speaker SW Subwoofer SL Surround speaker (L) SR Surround speaker (R) 0 If you measure in six or more positions, as shown in the illustration (up the speakers manually, use "Manual Setup" on the menu. (v p. 217) Audyssey® Setup To perform measurement, place the Sound calibration microphone in "Setup Assistant". For best results, we recommend...
Owners Manual English
Page 216
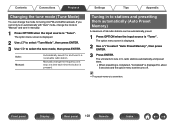
... Check Results Restore... Front panel Display Rear panel 216 Remote Index Contents Connections Playback Retrieving Audyssey® Setup settings If you have changed each setting manually. Set the following items if necessary. Start Settings Tips Appendix . to Audyssey® Setup measurement result (value calculated at the start by MultEQ® XT32...
... Check Results Restore... Front panel Display Rear panel 216 Remote Index Contents Connections Playback Retrieving Audyssey® Setup settings If you have changed each setting manually. Set the following items if necessary. Start Settings Tips Appendix . to Audyssey® Setup measurement result (value calculated at the start by MultEQ® XT32...

Owners Manual English
Page 217
... of this unit is assigned to 2-channels for creating biamp connections with the selected mode. Contents Connections Playback Settings Tips Appendix Manual Setup Perform when setting the speakers manually or when changing settings made in accordance with the front speaker. 0 You can connect speakers for up to 9.1-channels for..., you will no longer be able to select Audyssey MultEQ® XT32, Audyssey Dynamic EQ® or Audyssey Dynamic Volume®. (v p. 181) 0 "Manual Setup" can be used for MAIN ZONE. 0 The Pre Amplifier of this unit are used without changing the settings.
... of this unit is assigned to 2-channels for creating biamp connections with the selected mode. Contents Connections Playback Settings Tips Appendix Manual Setup Perform when setting the speakers manually or when changing settings made in accordance with the front speaker. 0 You can connect speakers for up to 9.1-channels for..., you will no longer be able to select Audyssey MultEQ® XT32, Audyssey Dynamic EQ® or Audyssey Dynamic Volume®. (v p. 181) 0 "Manual Setup" can be used for MAIN ZONE. 0 The Pre Amplifier of this unit are used without changing the settings.
Owners Manual English
Page 231
.... (v p. 223) 0 When "LFE+Main" is selected, speakers can be set regardless of the base frequencies that can be set the crossover frequency. See the speaker manual for each speaker. Settings Tips Appendix o Set the crossover frequency 40 Hz / 60 Hz / 80 Hz / 90 Hz / 100 Hz / 110 Hz / 120 Hz / 150...
.... (v p. 223) 0 When "LFE+Main" is selected, speakers can be set regardless of the base frequencies that can be set the crossover frequency. See the speaker manual for each speaker. Settings Tips Appendix o Set the crossover frequency 40 Hz / 60 Hz / 80 Hz / 90 Hz / 100 Hz / 110 Hz / 120 Hz / 150...
Owners Manual English
Page 233
... can be set when "Assign Mode" is automatically set to "None", "Large" is set . (v p. 224) Front panel Display Rear panel 233 Remote Index Auto (Default): Manual: The settings in "Speakers" are used . "Subwoofer" in the 2-channel direct and stereo playback modes. A+B : Both front speakers A and B are applied. (v p. 206) Set the speakers...
... can be set when "Assign Mode" is automatically set to "None", "Large" is set . (v p. 224) Front panel Display Rear panel 233 Remote Index Auto (Default): Manual: The settings in "Speakers" are used . "Subwoofer" in the 2-channel direct and stereo playback modes. A+B : Both front speakers A and B are applied. (v p. 206) Set the speakers...

