Owners Manual English
Page 2
... Connecting a set-top box (Satellite tuner/cable TV) 75 17 Connecting a DVD player or Blu-ray Disc player 76 17 Connecting a video camcorder or game console 77 22 Connecting a turntable 78 26 Connecting a device with a multi-channel output connector 79 30 Connecting a USB memory device to the USB port 80 Connections Connecting an FM/AM antenna 81 Connecting to a home network (LAN) 83 Speaker installation 35 Wired LAN 83 Connecting a power amp 43 Wireless LAN 84 Before connecting a power amp 43 Connecting...
... Connecting a set-top box (Satellite tuner/cable TV) 75 17 Connecting a DVD player or Blu-ray Disc player 76 17 Connecting a video camcorder or game console 77 22 Connecting a turntable 78 26 Connecting a device with a multi-channel output connector 79 30 Connecting a USB memory device to the USB port 80 Connections Connecting an FM/AM antenna 81 Connecting to a home network (LAN) 83 Speaker installation 35 Wired LAN 83 Connecting a power amp 43 Wireless LAN 84 Before connecting a power amp 43 Connecting...
Owners Manual English
Page 3
... operation Turning the power on Selecting the input source Adjusting the volume Turning off the sound temporarily (Muting) Playback a DVD player/Blu-ray Disc player Playing a USB memory device Playing files stored on USB memory devices Listening to music on a Bluetooth device Playing music from Bluetooth device Pairing with other Bluetooth devices Reconnecting to this unit from a Bluetooth device Listening to FM/AM broadcasts Listening to FM/AM broadcasts Tuning...
... operation Turning the power on Selecting the input source Adjusting the volume Turning off the sound temporarily (Muting) Playback a DVD player/Blu-ray Disc player Playing a USB memory device Playing files stored on USB memory devices Listening to music on a Bluetooth device Playing music from Bluetooth device Pairing with other Bluetooth devices Reconnecting to this unit from a Bluetooth device Listening to FM/AM broadcasts Listening to FM/AM broadcasts Tuning...
Owners Manual English
Page 4
... the input source Changing the settings 155 (Channel Level Adjust) 131 Panel lock function 156 Adjusting the tone (Tone) 132 Disabling all key button operations 156 Displaying your desired video during audio playback (Video Select) 133 Disabling all button operations except VOLUME 156 Adjusting the picture quality for your viewing environment (Picture Canceling the Panel lock function 157 Mode) 134 Remote lock function 158 Playing the same music in all zones (All Zone Stereo) 135 Disabling the sensor function of the remote control unit 158 Selecting a sound mode 136...
... the input source Changing the settings 155 (Channel Level Adjust) 131 Panel lock function 156 Adjusting the tone (Tone) 132 Disabling all key button operations 156 Displaying your desired video during audio playback (Video Select) 133 Disabling all button operations except VOLUME 156 Adjusting the picture quality for your viewing environment (Picture Canceling the Panel lock function 157 Mode) 134 Remote lock function 158 Playing the same music in all zones (All Zone Stereo) 135 Disabling the sensor function of the remote control unit 158 Selecting a sound mode 136...

Owners Manual English
Page 7
... played back 282 Index 324 The Internet radio cannot be played back 283 License 327 Music files on PC or NAS cannot be played back 284 Various online services cannot be played 285 The HDMI Control function does not work 285 Cannot connect to a wireless LAN network 286 When using HDMI ZONE2, the devices does not function properly 287 Update/upgrade error messages 288 Resetting factory settings 289 Resetting network settings 290 Front panel Display Rear panel 7 Remote...
... played back 282 Index 324 The Internet radio cannot be played back 283 License 327 Music files on PC or NAS cannot be played back 284 Various online services cannot be played 285 The HDMI Control function does not work 285 Cannot connect to a wireless LAN network 286 When using HDMI ZONE2, the devices does not function properly 287 Update/upgrade error messages 288 Resetting factory settings 289 Resetting network settings 290 Front panel Display Rear panel 7 Remote...
Owners Manual English
Page 43
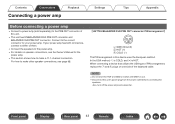
... connecting the speakers. When connecting a device that utilizes the USA type of PIN arrangement, replace the B and C plugs on speaker connections, see page 48. . Connect to make a 11.1-channel connection. For how to make other speaker connections, see the Owner's Manual for the power amp. 0 This section shows how to the correct connector for use. 0 Disconnect this device uses the European method. Also, turn off the power amp and subwoofer. Front panel Display Rear panel 43 Remote...
... connecting the speakers. When connecting a device that utilizes the USA type of PIN arrangement, replace the B and C plugs on speaker connections, see page 48. . Connect to make a 11.1-channel connection. For how to make other speaker connections, see the Owner's Manual for the power amp. 0 This section shows how to the correct connector for use. 0 Disconnect this device uses the European method. Also, turn off the power amp and subwoofer. Front panel Display Rear panel 43 Remote...

Owners Manual English
Page 48
... Assign" settings This system configuration plays back 11-channels. See "Sound modes and channel output" (v p. 300) for the sound modes that can create speaker systems such as a bi-amp connection by changing the "Amp Assign" settings. Perform "Amp Assign" settings to suit the number of rooms and speaker configuration to the speaker configuration. You can be selected varies according to be installed. (v p. 217) Playback speaker in MAIN ZONE "Amp Assign" settings Connection page 5.1-channel playback 11.1ch (Default) 50 7.1-channel playback 11.1ch (Default) 51 9.1-channel...
... Assign" settings This system configuration plays back 11-channels. See "Sound modes and channel output" (v p. 300) for the sound modes that can create speaker systems such as a bi-amp connection by changing the "Amp Assign" settings. Perform "Amp Assign" settings to suit the number of rooms and speaker configuration to the speaker configuration. You can be selected varies according to be installed. (v p. 217) Playback speaker in MAIN ZONE "Amp Assign" settings Connection page 5.1-channel playback 11.1ch (Default) 50 7.1-channel playback 11.1ch (Default) 51 9.1-channel...
Owners Manual English
Page 101
...mode or "Direct Tune" mode to tune in using buttons to change the frequency. CH/PAGE d f u i o p 0 - 9 Function Selects the radio station (up/down) Selects preset radio stations Selects the radio station (up/down) Selects preset radio stations Preset channel selection / Direct frequency tuning Front panel Display Rear panel 101 Remote Index The option menu screen is the case, then use "Direct Tune" to tune in to select the station you cannot tune in by entering the frequency directly. AM: When listening to select "FM/AM", then press ENTER. The default setting...
...mode or "Direct Tune" mode to tune in using buttons to change the frequency. CH/PAGE d f u i o p 0 - 9 Function Selects the radio station (up/down) Selects preset radio stations Selects the radio station (up/down) Selects preset radio stations Preset channel selection / Direct frequency tuning Front panel Display Rear panel 101 Remote Index The option menu screen is the case, then use "Direct Tune" to tune in to select the station you cannot tune in by entering the frequency directly. AM: When listening to select "FM/AM", then press ENTER. The default setting...

Owners Manual English
Page 102
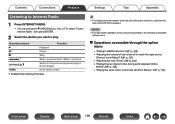
... preset broadcast stations (Preset Skip)" (v p. 106) 0 "Adjusting the volume of the radio station you enter the frequency is displayed. 3 Use ui or 0 - 9 to select a number and press p. 0 If o is pressed, the immediately preceding input is cancelled. 4 Repeat step 3 and enter the frequency of each channel to match the input source (Channel Level Adjust)" (v p. 131) 0 "Adjusting the tone (Tone)" (v p. 132) 0 "Displaying your desired video during audio playback (Video Select)" (v p. 133) 0 "Playing the same music in all zones (All Zone Stereo)" (v p. 135) Settings Tips Appendix Tuning...
... preset broadcast stations (Preset Skip)" (v p. 106) 0 "Adjusting the volume of the radio station you enter the frequency is displayed. 3 Use ui or 0 - 9 to select a number and press p. 0 If o is pressed, the immediately preceding input is cancelled. 4 Repeat step 3 and enter the frequency of each channel to match the input source (Channel Level Adjust)" (v p. 131) 0 "Adjusting the tone (Tone)" (v p. 132) 0 "Displaying your desired video during audio playback (Video Select)" (v p. 133) 0 "Playing the same music in all zones (All Zone Stereo)" (v p. 135) Settings Tips Appendix Tuning...
Owners Manual English
Page 109
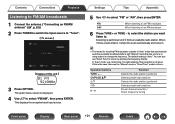
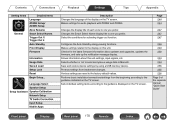
... panel Display Rear panel 109 Remote Index o Operations accessible through the option menu 0 "Adding to HEOS Favorites" (v p. 129) 0 "Adjusting the volume of each time the main unit's STATUS is pressed. NOTE 0 The radio station database service may be suspended or be otherwise unavailable without notice. Use ui to select "TuneIn Internet Radio", then press ENTER. 2 Select the station you want to match the input source (Channel Level Adjust)" (v p. 131) 0 "Adjusting the tone (Tone)" (v p. 132) 0 "Displaying your desired video...
... panel Display Rear panel 109 Remote Index o Operations accessible through the option menu 0 "Adding to HEOS Favorites" (v p. 129) 0 "Adjusting the volume of each time the main unit's STATUS is pressed. NOTE 0 The radio station database service may be suspended or be otherwise unavailable without notice. Use ui to select "TuneIn Internet Radio", then press ENTER. 2 Select the station you want to match the input source (Channel Level Adjust)" (v p. 131) 0 "Adjusting the tone (Tone)" (v p. 132) 0 "Displaying your desired video...

Owners Manual English
Page 124
... AirPlay 4 Select the speaker (devices) you can stream music stored in iTunes. Front panel Display Rear panel 124 Remote Index The music will stream to this unit. 0 For details, see your device's manual. 2 Play the song on your iPhone, iPod touch or iPad Wi-Fi to the same network as this unit. 2 Turn this unit 1 Install iTunes 10, or later, on the iPhone, iPod touch...
... AirPlay 4 Select the speaker (devices) you can stream music stored in iTunes. Front panel Display Rear panel 124 Remote Index The music will stream to this unit. 0 For details, see your device's manual. 2 Play the song on your iPhone, iPod touch or iPad Wi-Fi to the same network as this unit. 2 Turn this unit 1 Install iTunes 10, or later, on the iPhone, iPod touch...
Owners Manual English
Page 132
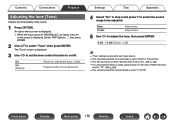
... "7.1CH IN". The "Tone" screen is set this when no audio signal is input or in step 3 and press i to select the sound range to adjust the tone, then press ENTER. -6 dB - +6 dB (Default : 0 dB) 0 "Tone" settings are stored for online music is displayed. Settings Tips Appendix 4 Select "On" in the menu "HDMI Audio Out" is set the tone control function to select "Tone", then press ENTER. Adjust treble. 5 Use o p to be set when the input mode is displayed. 3 Use o p to set to "TV". (v p. 188) 0 This...
... "7.1CH IN". The "Tone" screen is set this when no audio signal is input or in step 3 and press i to select the sound range to adjust the tone, then press ENTER. -6 dB - +6 dB (Default : 0 dB) 0 "Tone" settings are stored for online music is displayed. Settings Tips Appendix 4 Select "On" in the menu "HDMI Audio Out" is set the tone control function to select "Tone", then press ENTER. Adjust treble. 5 Use o p to be set when the input mode is displayed. 3 Use o p to set to "TV". (v p. 188) 0 This...

Owners Manual English
Page 168
... Front panel Display Rear panel 168 Remote Index Speakers Network Information Connection Settings Network Control Friendly Name Diagnostics Description Changes input connector assignment. Removes from the display input sources that are made automatically. Sets up the speakers manually or changes Audyssey® Setup settings. The acoustic characteristics of the audio input. Used to your preferences. Adjusts the playback level of the connected speakers and listening room are measured and the optimum settings are not used. Sets the audio input mode. Contents Connections...
... Front panel Display Rear panel 168 Remote Index Speakers Network Information Connection Settings Network Control Friendly Name Diagnostics Description Changes input connector assignment. Removes from the display input sources that are made automatically. Sets up the speakers manually or changes Audyssey® Setup settings. The acoustic characteristics of the audio input. Used to your preferences. Adjusts the playback level of the connected speakers and listening room are measured and the optimum settings are not used. Sets the audio input mode. Contents Connections...
Owners Manual English
Page 170
... Language ZONE2 Setup/ ZONE3 Setup Zone Rename Smart Select Names Trigger Out 1/ Trigger Out 2 Auto Standby Front Display Firmware Information Usage Data Save & Load Setup Lock Reset Begin Setup... Sets individual setting items according to the display on the TV screen. Contents Connections Playback Settings Tips Appendix .. Language Select Speaker Setup Setup Assistant Speaker Calibration Network Setup TV Audio Connection Input Setup Mobile Apps Description Changes the language of the separate manual "Quick Start Guide" Front panel Display Rear panel 170 Remote Index...
... Language ZONE2 Setup/ ZONE3 Setup Zone Rename Smart Select Names Trigger Out 1/ Trigger Out 2 Auto Standby Front Display Firmware Information Usage Data Save & Load Setup Lock Reset Begin Setup... Sets individual setting items according to the display on the TV screen. Contents Connections Playback Settings Tips Appendix .. Language Select Speaker Setup Setup Assistant Speaker Calibration Network Setup TV Audio Connection Input Setup Mobile Apps Description Changes the language of the separate manual "Quick Start Guide" Front panel Display Rear panel 170 Remote Index...
Owners Manual English
Page 191
... Audio Switching Sets automatic switching to the "TV Audio" input when a TV connected via HDMI sends an appropriate CEC control command to this unit is automatically set to standby. On (Default): Off: Select the "TV Audio" input automatically when receiving a command from the TV. 0 "TV Audio Switching" can be set when "HDMI Control" is assigned either "HDMI", "COMP" or "VIDEO", when you turn the power of the input source, power to external devices. All (Default): Video: Off: If power to a connected TV is turned...
... Audio Switching Sets automatic switching to the "TV Audio" input when a TV connected via HDMI sends an appropriate CEC control command to this unit is automatically set to standby. On (Default): Off: Select the "TV Audio" input automatically when receiving a command from the TV. 0 "TV Audio Switching" can be set when "HDMI Control" is assigned either "HDMI", "COMP" or "VIDEO", when you turn the power of the input source, power to external devices. All (Default): Video: Off: If power to a connected TV is turned...

Owners Manual English
Page 192
..., set Tuner and Internet Radio stations using the TV remote control. Off: Do not use Power Saving function. 0 "Power Saving" can be set when "HDMI Control" is set to "On". (v p. 190) NOTE 0 If the "Smart Menu" settings have been changed, always reset the power to connected devices after the change. 0 The Smart Menu function may not work properly depending on the specifications of this unit is automatically set to standby mode to "Off". Front panel Display Rear panel 192 Remote Index Do not use Smart Menu function...
..., set Tuner and Internet Radio stations using the TV remote control. Off: Do not use Power Saving function. 0 "Power Saving" can be set when "HDMI Control" is set to "On". (v p. 190) NOTE 0 If the "Smart Menu" settings have been changed, always reset the power to connected devices after the change. 0 The Smart Menu function may not work properly depending on the specifications of this unit is automatically set to standby mode to "Off". Front panel Display Rear panel 192 Remote Index Do not use Smart Menu function...
Owners Manual English
Page 194
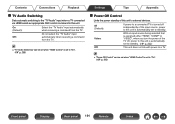
...switched according to the input contents. Auto (Default): Game: Movie: Process video automatically based on the controller of video content. Settings Tips Appendix o Video Conversion The input video signal is delayed compared to the button operations on the HDMI content information. The input video signal is converted. Minimize the video delay when the video is converted automatically in "Resolution". (v p. 195) Analog (Default): Analog & HDMI: HDMI: Off: Use i/p (interlace-to-progressive) scaler function for analog video signals. o i/p Scaler Set the video input signal...
...switched according to the input contents. Auto (Default): Game: Movie: Process video automatically based on the controller of video content. Settings Tips Appendix o Video Conversion The input video signal is delayed compared to the button operations on the HDMI content information. The input video signal is converted. Minimize the video delay when the video is converted automatically in "Resolution". (v p. 195) Analog (Default): Analog & HDMI: HDMI: Off: Use i/p (interlace-to-progressive) scaler function for analog video signals. o i/p Scaler Set the video input signal...

Owners Manual English
Page 209
... for the set when using the included microphone and microphone stand. You can be used are not to be set channels is displayed. Contents Connections Playback 3 Connect the Sound calibration microphone to the SETUP MIC jack of surround back speakers and subwoofer. 0 Dolby Speaker Setup Set the distance between the Dolby Atmos Enabled speaker and the ceiling. This can also change the number of this unit. Amp Assign Channel Select Dolby Speaker Setup Start Settings Tips Appendix 4 Select "Start", then press ENTER. Front panel Display Rear panel 209 Remote Index
... for the set when using the included microphone and microphone stand. You can be used are not to be set channels is displayed. Contents Connections Playback 3 Connect the Sound calibration microphone to the SETUP MIC jack of surround back speakers and subwoofer. 0 Dolby Speaker Setup Set the distance between the Dolby Atmos Enabled speaker and the ceiling. This can also change the number of this unit. Amp Assign Channel Select Dolby Speaker Setup Start Settings Tips Appendix 4 Select "Start", then press ENTER. Front panel Display Rear panel 209 Remote Index
Owners Manual English
Page 244
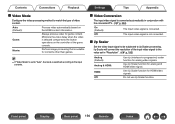
... time for display the menu on the main unit twice. Front panel Display Rear panel 244 Remote Index Watch the display while configuring the settings. 1. The low range is not displayed. Contents Connections Playback General Make various other settings. Use the main unit's o or p and set up by the following operation. Settings Tips Appendix ZONE2 Setup / ZONE3 Setup Makes settings for audio playback with ZONE2 and ZONE3. 0 Values set for "Volume Limit" and "Power On Volume" are displayed...
... time for display the menu on the main unit twice. Front panel Display Rear panel 244 Remote Index Watch the display while configuring the settings. 1. The low range is not displayed. Contents Connections Playback General Make various other settings. Use the main unit's o or p and set up by the following operation. Settings Tips Appendix ZONE2 Setup / ZONE3 Setup Makes settings for audio playback with ZONE2 and ZONE3. 0 Values set for "Volume Limit" and "Power On Volume" are displayed...
Owners Manual English
Page 254
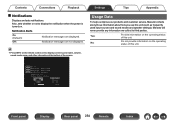
... unit (such as frequently used input sources and sound modes and speaker settings). Settings Tips Appendix Usage Data To help us improve our products and customer service, Marantz collects anonymous information about how you use this unit. 0 Press INFO on the operating status of the screen. Front panel Display Rear panel 254 Remote Index Dolby TrueHD AUDYSSEY MultEQ XT32 : Reference Dynamic EQ : On Dynamic Volume : Medium INPUT SIGNAL FHL LFE EXT FHR FWL FL...
... unit (such as frequently used input sources and sound modes and speaker settings). Settings Tips Appendix Usage Data To help us improve our products and customer service, Marantz collects anonymous information about how you use this unit. 0 Press INFO on the operating status of the screen. Front panel Display Rear panel 254 Remote Index Dolby TrueHD AUDYSSEY MultEQ XT32 : Reference Dynamic EQ : On Dynamic Volume : Medium INPUT SIGNAL FHL LFE EXT FHR FWL FL...

Owners Manual English
Page 327
...2015.01 version 29 Version Front panel Display Rear panel 327 Remote Index Marantz provides the source code based on the GPL and LPGL licenses at the actual cost upon your request to our customer service center. Please also understand that we do not offer support for this product, you purchase...(English) is used in the unit About GPL (GNU-General Public License), LGPL (GNU Lesser General Public License) License This product uses GPL/LGPL software and software made by other companies. Contents Connections Playback License o License information for the software used in the product...
...2015.01 version 29 Version Front panel Display Rear panel 327 Remote Index Marantz provides the source code based on the GPL and LPGL licenses at the actual cost upon your request to our customer service center. Please also understand that we do not offer support for this product, you purchase...(English) is used in the unit About GPL (GNU-General Public License), LGPL (GNU Lesser General Public License) License This product uses GPL/LGPL software and software made by other companies. Contents Connections Playback License o License information for the software used in the product...


