
Owners Manual
Page 5
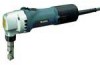
...die holder. Remove the die from the tool. Install the die on the machine so that the punch is switched off and unplugged before removing or installing the punch and die. Pull the punch out of the punch holder, A Hex wrench Bolts I I To install the punch and die, insert the punch into the punch... holder so that the tool is inserted through the hole in the punch faces toward the screw. Use ...
...die holder. Remove the die from the tool. Install the die on the machine so that the punch is switched off and unplugged before removing or installing the punch and die. Pull the punch out of the punch holder, A Hex wrench Bolts I I To install the punch and die, insert the punch into the punch... holder so that the tool is inserted through the hole in the punch faces toward the screw. Use ...
Owners Manual
Page 7
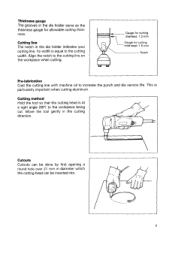
... line on the workpiece when cutting. - Move the tool gently in diameter which the cutting head can be inserted into. I The grooves in the die holder indicates your cutting line. Its width is at a right angle (90") to the workpiece being cut. This is particularly important when cutting aluminum ... Hold the tool so that the cutting head is equal to the cutting width. Thickness g-aug-e I 7 ness. Cutting line The notch in the die holder serve as the thickness gauge for cutting mild steel: 1.6 mm Notch Pre-lubrication Coat the cutting line with machine oil to increase the...
... line on the workpiece when cutting. - Move the tool gently in diameter which the cutting head can be inserted into. I The grooves in the die holder indicates your cutting line. Its width is at a right angle (90") to the workpiece being cut. This is particularly important when cutting aluminum ... Hold the tool so that the cutting head is equal to the cutting width. Thickness g-aug-e I 7 ness. Cutting line The notch in the die holder serve as the thickness gauge for cutting mild steel: 1.6 mm Notch Pre-lubrication Coat the cutting line with machine oil to increase the...
Owners Manual
Page 10
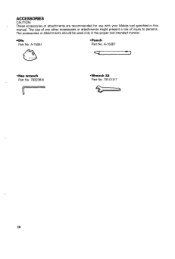
A-I 5051 *Punch Part No. These accessories or attachments are recommended for use of any other accessories or attachments might present a risk of injury to persons. The accessories or attachments should be used only in this manual. The use with your Makita tool specified in the proper and intended manner. ACCESSORIES CAUTION: . Die Part No. A-I 5067 *Hex wrench Part No. 783208-8 u *Wrench 32 Part No. 781013-7 10
A-I 5051 *Punch Part No. These accessories or attachments are recommended for use of any other accessories or attachments might present a risk of injury to persons. The accessories or attachments should be used only in this manual. The use with your Makita tool specified in the proper and intended manner. ACCESSORIES CAUTION: . Die Part No. A-I 5067 *Hex wrench Part No. 783208-8 u *Wrench 32 Part No. 781013-7 10
Parts Breakdown
Page 2
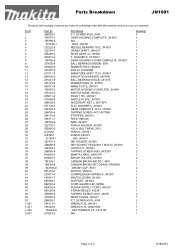
... RUBBER RING 19, JN1601 NAME PLATE, JN1601 MOTOR HOUSING COMPLETE, JN1601 SWITCH KNOB, JN1601 FIELD 115V, JN1601 BAFFLE PLATE, JN1601 WOODRUFF KEY 3, 9217SPC FLAT WASHER 6, JN1601 GEAR COMPLETE 13-37, JN1601 TAPPING SCREW 4X12,5477NB STOPPER, JN1601 PIN 6, HM1500 RAM, JN1601 PUNCH HOLDER, JN1601 H.S.H. BOLT M5X8, 2012 PUNCH, JN1601 PUNCH,JN1601 .DIE, JN1601 DIE HOLDER, JN1601 HEX SOCKET HEAD BOLT M3X12, JN1601 LOCK NUT, JN1601 TAPPING SCREW 4X65, HP2030 MAKITA LABEL, DA3010F BRUSH...
... RUBBER RING 19, JN1601 NAME PLATE, JN1601 MOTOR HOUSING COMPLETE, JN1601 SWITCH KNOB, JN1601 FIELD 115V, JN1601 BAFFLE PLATE, JN1601 WOODRUFF KEY 3, 9217SPC FLAT WASHER 6, JN1601 GEAR COMPLETE 13-37, JN1601 TAPPING SCREW 4X12,5477NB STOPPER, JN1601 PIN 6, HM1500 RAM, JN1601 PUNCH HOLDER, JN1601 H.S.H. BOLT M5X8, 2012 PUNCH, JN1601 PUNCH,JN1601 .DIE, JN1601 DIE HOLDER, JN1601 HEX SOCKET HEAD BOLT M3X12, JN1601 LOCK NUT, JN1601 TAPPING SCREW 4X65, HP2030 MAKITA LABEL, DA3010F BRUSH...