
Owners Manual
Page 5
... of the punch holder, A Hex wrench Bolts I I To install the punch and die, insert the punch into the punch holder so that the notch in the die holder. Then install the die holder on the die holder. To remove the punch and die, loosen the lock nut with machine oil and run the machine for... a while. Use the hex wrench to secure the die. Remove the die from the tool. D1e= Bolts 5 Use the hex wrench to secure the die holder. Install the die on the machine so that the tool is inserted through the hole in the punch faces toward...
... of the punch holder, A Hex wrench Bolts I I To install the punch and die, insert the punch into the punch holder so that the notch in the die holder. Then install the die holder on the die holder. To remove the punch and die, loosen the lock nut with machine oil and run the machine for... a while. Use the hex wrench to secure the die. Remove the die from the tool. D1e= Bolts 5 Use the hex wrench to secure the die holder. Install the die on the machine so that the tool is inserted through the hole in the punch faces toward...
Owners Manual
Page 6
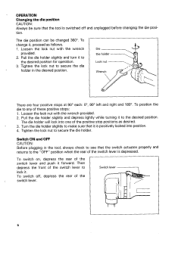
...positive stops: 1. There are four positive stops at 90" each: 0".90" left and right and 180". Switch lever 6 To position the die to make sure that the tool is positively locked into one of the switch lever to ,- Then depress the front of the positive stop positions..., proceed as desired. 3. Tighten the lock nut to secure the die holder in the desired position. Tighten the lock nut to secure the die holder. Loosen the lock nut with the wrench Die provided. \+ 2. . OPERATION Changing the die position CAUTION: Always be changed 360". To change it is switched ...
...positive stops: 1. There are four positive stops at 90" each: 0".90" left and right and 180". Switch lever 6 To position the die to make sure that the tool is positively locked into one of the switch lever to ,- Then depress the front of the positive stop positions..., proceed as desired. 3. Tighten the lock nut to secure the die holder in the desired position. Tighten the lock nut to secure the die holder. Loosen the lock nut with the wrench Die provided. \+ 2. . OPERATION Changing the die position CAUTION: Always be changed 360". To change it is switched ...
Owners Manual
Page 7
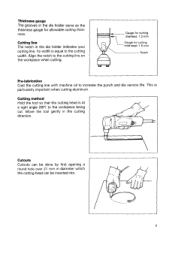
Cutting line The notch in diameter which the cutting head can be done by first opening a round hole over 21 mm in the die holder indicates your cutting line. I The grooves in the cutting direction. ness. Gauge for cutting stainless: 1.2 mm Gauge for allowable cutting thick- cutouts .... Its width is at a right angle (90") to the cutting width. Align the notch to increase the punch and die service life. Move the tool gently in the die holder serve as the thickness gauge for cutting mild steel: 1.6 mm Notch Pre-lubrication Coat the cutting line with machine oil...
Cutting line The notch in diameter which the cutting head can be done by first opening a round hole over 21 mm in the die holder indicates your cutting line. I The grooves in the cutting direction. ness. Gauge for cutting stainless: 1.2 mm Gauge for allowable cutting thick- cutouts .... Its width is at a right angle (90") to the cutting width. Align the notch to increase the punch and die service life. Move the tool gently in the die holder serve as the thickness gauge for cutting mild steel: 1.6 mm Notch Pre-lubrication Coat the cutting line with machine oil...
Owners Manual
Page 8
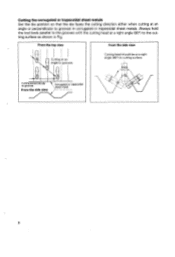
I From the top view From the side view Cutting at an angle to grooves Cutting head should be at a right angle (90")to the cutting surface as shown in corrugated or trapezoidal sheet metals. From the side view sheet metal 8 Cuttingthe corrugated or trapezoidalsheet metals Set the die position so that the die faces the cutting direction either when cutting a t an angle or perpendicular to grooves in Fig. Always hold the tool body parallel to the grooves with the cuttina head at a right angle (90") to cutting surface.
I From the top view From the side view Cutting at an angle to grooves Cutting head should be at a right angle (90")to the cutting surface as shown in corrugated or trapezoidal sheet metals. From the side view sheet metal 8 Cuttingthe corrugated or trapezoidalsheet metals Set the die position so that the die faces the cutting direction either when cutting a t an angle or perpendicular to grooves in Fig. Always hold the tool body parallel to the grooves with the cuttina head at a right angle (90") to cutting surface.
Owners Manual
Page 10
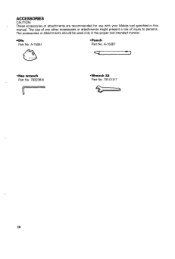
ACCESSORIES CAUTION: . The accessories or attachments should be used only in this manual. These accessories or attachments are recommended for use of any other accessories or attachments might present a risk of injury to persons. Die Part No. A-I 5051 *Punch Part No. The use with your Makita tool specified in the proper and intended manner. A-I 5067 *Hex wrench Part No. 783208-8 u *Wrench 32 Part No. 781013-7 10
ACCESSORIES CAUTION: . The accessories or attachments should be used only in this manual. These accessories or attachments are recommended for use of any other accessories or attachments might present a risk of injury to persons. Die Part No. A-I 5051 *Punch Part No. The use with your Makita tool specified in the proper and intended manner. A-I 5067 *Hex wrench Part No. 783208-8 u *Wrench 32 Part No. 781013-7 10
Parts Breakdown
Page 2
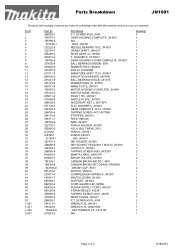
... 19, JN1601 NAME PLATE, JN1601 MOTOR HOUSING COMPLETE, JN1601 SWITCH KNOB, JN1601 FIELD 115V, JN1601 BAFFLE PLATE, JN1601 WOODRUFF KEY 3, 9217SPC FLAT WASHER 6, JN1601 GEAR COMPLETE 13-37, JN1601 TAPPING SCREW 4X12,5477NB STOPPER, JN1601 PIN 6, HM1500 RAM, JN1601 PUNCH HOLDER, JN1601 H.S.H. BOLT M5X8, 2012 PUNCH, JN1601 PUNCH,JN1601 .DIE, JN1601 DIE HOLDER, JN1601 HEX SOCKET HEAD BOLT M3X12, JN1601 LOCK NUT, JN1601 TAPPING SCREW 4X65, HP2030 MAKITA LABEL, DA3010F...
... 19, JN1601 NAME PLATE, JN1601 MOTOR HOUSING COMPLETE, JN1601 SWITCH KNOB, JN1601 FIELD 115V, JN1601 BAFFLE PLATE, JN1601 WOODRUFF KEY 3, 9217SPC FLAT WASHER 6, JN1601 GEAR COMPLETE 13-37, JN1601 TAPPING SCREW 4X12,5477NB STOPPER, JN1601 PIN 6, HM1500 RAM, JN1601 PUNCH HOLDER, JN1601 H.S.H. BOLT M5X8, 2012 PUNCH, JN1601 PUNCH,JN1601 .DIE, JN1601 DIE HOLDER, JN1601 HEX SOCKET HEAD BOLT M3X12, JN1601 LOCK NUT, JN1601 TAPPING SCREW 4X65, HP2030 MAKITA LABEL, DA3010F...
