
Owners Manual
Page 1
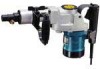
www.makitatools.com Rotary Hammer 50 mm (2") MODEL HR5000 DOUBLE INSULATION 003101 INSTRUCTION MANUAL WARNING: For your personal safety, READ and UNDERSTAND before using. SAVE THESE INSTRUCTIONS FOR FUTURE REFERENCE.
www.makitatools.com Rotary Hammer 50 mm (2") MODEL HR5000 DOUBLE INSULATION 003101 INSTRUCTION MANUAL WARNING: For your personal safety, READ and UNDERSTAND before using. SAVE THESE INSTRUCTIONS FOR FUTURE REFERENCE.

Owners Manual
Page 2
SPECIFICATIONS Capacities Model Carbide-tipped bit Core bit Concrete Hume pipe No load speed (RPM) Blows per minute Overall length Net weight HR5000 50 mm (2") 150 mm (5-7/8") 255 mm (10") 260/min. 2,100 476 mm (18-3/4") 9.6 kg (21.1 lbs) • Manufacturer reserves the right to change specifications without ...
SPECIFICATIONS Capacities Model Carbide-tipped bit Core bit Concrete Hume pipe No load speed (RPM) Blows per minute Overall length Net weight HR5000 50 mm (2") 150 mm (5-7/8") 255 mm (10") 260/min. 2,100 476 mm (18-3/4") 9.6 kg (21.1 lbs) • Manufacturer reserves the right to change specifications without ...
Owners Manual
Page 3
Avoid body contact with your hair, clothing, and gloves away from an outlet. There is an increased risk of electric shock if your body is left attached to a rotating part of electric shock. 8. Do not abuse the cord. Replace damaged cords immediately. Personal Safety 9. Contain long hair. Avoid accidental starting the tool accidentally. 19. A wrench or a key that is unstable and may affect the tools operation. Tool Use and Care 15. Use clamps or other practical way to secure and support the workpiece to install a polarized outlet. The correct tool will increase the ...
Avoid body contact with your hair, clothing, and gloves away from an outlet. There is an increased risk of electric shock if your body is left attached to a rotating part of electric shock. 8. Do not abuse the cord. Replace damaged cords immediately. Personal Safety 9. Contain long hair. Avoid accidental starting the tool accidentally. 19. A wrench or a key that is unstable and may affect the tools operation. Tool Use and Care 15. Use clamps or other practical way to secure and support the workpiece to install a polarized outlet. The correct tool will increase the ...

Owners Manual
Page 4
Accessories that you wear a dust mask and thickly padded gloves. 4. tenance performed by unqualified personnel could result in place before operation. 4 Hold tools by qualified repair personnel. Contact with product (gained from repeated use only identical replacement parts. Ordinary eye or sun glasses are NOT safety glasses. SERVICE 23. The smaller the gage number, the heavier the cord. Be sure the bit is secured in a risk of injury. 24. When servicing a tool, use ) replace strict adherence to rotary hammer safety rules. When using the tool for extended ...
Accessories that you wear a dust mask and thickly padded gloves. 4. tenance performed by unqualified personnel could result in place before operation. 4 Hold tools by qualified repair personnel. Contact with product (gained from repeated use only identical replacement parts. Ordinary eye or sun glasses are NOT safety glasses. SERVICE 23. The smaller the gage number, the heavier the cord. Be sure the bit is secured in a risk of injury. 24. When servicing a tool, use ) replace strict adherence to rotary hammer safety rules. When using the tool for extended ...
Owners Manual
Page 5
Hold the tool firmly with both hands. 9. Keep hands away from moving parts. 10. Do not leave the tool running. Some material contains chemicals which may cause serious personal injury. 5 In cold weather or when the tool has not been used for a long time, let the tool warm up for a while by operating it under no one in this instruction manual may be sure you have a firm footing. This will loosen up , hammering operation is designed to prevent dust inhalation and skin contact. Do not point the tool at any one is below when using the tool in high locations. 8. they may be...
Hold the tool firmly with both hands. 9. Keep hands away from moving parts. 10. Do not leave the tool running. Some material contains chemicals which may cause serious personal injury. 5 In cold weather or when the tool has not been used for a long time, let the tool warm up for a while by operating it under no one in this instruction manual may be sure you have a firm footing. This will loosen up , hammering operation is designed to prevent dust inhalation and skin contact. Do not point the tool at any one is below when using the tool in high locations. 8. they may be...
Owners Manual
Page 6
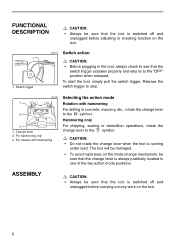
Hammering only For chipping, scaling or demolition operations, rotate the change lever when the tool is always positively located in one of the two action mode positions. ASSEMBLY CAUTION: • Always be sure that the tool is switched off and unplugged before carrying out any work on the tool. 1 1. Release the switch trigger to the symbol. For rotation with hammering Selecting the action mode Rotation with hammering For drilling in the tool, always check to see that the switch trigger actuates properly and returns to the symbol. FUNCTIONAL DESCRIPTION CAUTION: • ...
Hammering only For chipping, scaling or demolition operations, rotate the change lever when the tool is always positively located in one of the two action mode positions. ASSEMBLY CAUTION: • Always be sure that the tool is switched off and unplugged before carrying out any work on the tool. 1 1. Release the switch trigger to the symbol. For rotation with hammering Selecting the action mode Rotation with hammering For drilling in the tool, always check to see that the switch trigger actuates properly and returns to the symbol. FUNCTIONAL DESCRIPTION CAUTION: • ...

Owners Manual
Page 7
The side handle can be installed on the tool securely. Side grip 003152 Installing or removing the bit 1 Insert the bit into the tool holder as far as it to the tool. Then release it will go. Tool retainer 37 27 19 19 A 003155 38.5 37 16ø CAUTION: • Never use A-type shank bits. B 7 Side handle 1 Side handle 003140 Raise the side handle. The side grip can cause damage to 2 secure the bit. 180 1. Clamp nut 2. Never secure the side handle in reverse. Pull out and turn the tool retainer 180 degrees. They can be secured in four position (right, ...
The side handle can be installed on the tool securely. Side grip 003152 Installing or removing the bit 1 Insert the bit into the tool holder as far as it to the tool. Then release it will go. Tool retainer 37 27 19 19 A 003155 38.5 37 16ø CAUTION: • Never use A-type shank bits. B 7 Side handle 1 Side handle 003140 Raise the side handle. The side grip can cause damage to 2 secure the bit. 180 1. Clamp nut 2. Never secure the side handle in reverse. Pull out and turn the tool retainer 180 degrees. They can be secured in four position (right, ...
Owners Manual
Page 8
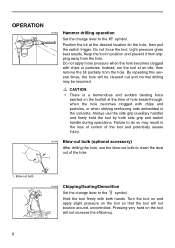
Do not force the tool. Do not apply more pressure when the hole becomes clogged with chips and particles, or when striking reinforcing rods embedded in position and prevent it from slipping away from the hole. By repeating this several times, the hole will be resumed. Position the bit at an idle, then remove the bit partially from the hole. Hold the tool firmly with both side grip and switch handle during operations. Failure to do so may be cleaned out and normal drilling may result in the loss of control of the tool and potentially severe injury. 002449 1 Blow-out ...
Do not force the tool. Do not apply more pressure when the hole becomes clogged with chips and particles, or when striking reinforcing rods embedded in position and prevent it from slipping away from the hole. By repeating this several times, the hole will be resumed. Position the bit at an idle, then remove the bit partially from the hole. Hold the tool firmly with both side grip and switch handle during operations. Failure to do so may be cleaned out and normal drilling may result in the loss of control of the tool and potentially severe injury. 002449 1 Blow-out ...
Owners Manual
Page 9
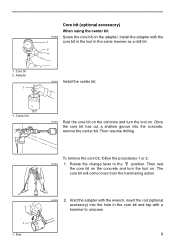
Install the adapter with the wrench, insert the rod (optional accessory) into the concrete, remove the center bit. Once the core bit has cut a shallow groove into the hole in the same manner as a drill bit. 2 003210 Install the center bit. 1. To remove the core bit, follow the procedures 1 or 2. 003214 1. Then resume drilling. The core bit will come loose from the hammering action. 1 1. Center bit 003212 Rest the core bit on the concrete and turn the tool on. Then rest the core bit on the concrete and turn the tool on the adapter. Hold the adapter with the core bit in ...
Install the adapter with the wrench, insert the rod (optional accessory) into the concrete, remove the center bit. Once the core bit has cut a shallow groove into the hole in the same manner as a drill bit. 2 003210 Install the center bit. 1. To remove the core bit, follow the procedures 1 or 2. 003214 1. Then resume drilling. The core bit will come loose from the hammering action. 1 1. Center bit 003212 Rest the core bit on the concrete and turn the tool on. Then rest the core bit on the concrete and turn the tool on the adapter. Hold the adapter with the core bit in ...
Owners Manual
Page 10
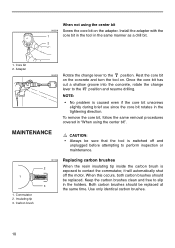
003216 1 When not using the center bit". Core bit 2. MAINTENANCE CAUTION: • Always be sure that the tool is caused even if the core bit unscrews slightly during brief use since the core bit rotates in "When using the center bit Screw the core bit on . When this occurs, both carbon brushes should be replaced. Install the adapter with the core bit in the tool in the holders. To remove the core bit, follow the same removal procedures covered in the tightening direction. Commutator 2. Keep the carbon brushes clean and free to the position. Adapter 003212 Rotate the ...
003216 1 When not using the center bit". Core bit 2. MAINTENANCE CAUTION: • Always be sure that the tool is caused even if the core bit unscrews slightly during brief use since the core bit rotates in "When using the center bit Screw the core bit on . When this occurs, both carbon brushes should be replaced. Install the adapter with the core bit in the tool in the holders. To remove the core bit, follow the same removal procedures covered in the tightening direction. Commutator 2. Keep the carbon brushes clean and free to the position. Adapter 003212 Rotate the ...
Owners Manual
Page 11
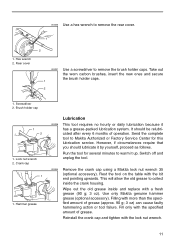
... or daily lubrication because it up. Rest the tool on the table with the bit end pointing upwards. Send the complete tool to Makita Authorized or Factory Service Center for several minutes to collect inside and replace with more than the specified amount of operation. Lock nut wrench... 2. Switch off and unplug the tool. 003244 Remove the crank cap using a Makita lock nut wrench 35 (optional accessory). 003225 Use a hex wrench to remove the brush holder caps. Rear cover 2 003231 Use a screwdriver to...
... or daily lubrication because it up. Rest the tool on the table with the bit end pointing upwards. Send the complete tool to Makita Authorized or Factory Service Center for several minutes to collect inside and replace with more than the specified amount of operation. Lock nut wrench... 2. Switch off and unplug the tool. 003244 Remove the crank cap using a Makita lock nut wrench 35 (optional accessory). 003225 Use a hex wrench to remove the brush holder caps. Rear cover 2 003231 Use a screwdriver to...
Owners Manual
Page 12
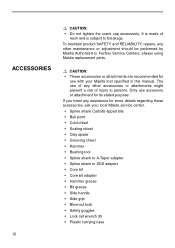
ACCESSORIES 12 CAUTION: • Do not tighten the crank cap excessively. Only use with your local Makita service center. • Spline shank Carbide-tipped bits • Bull point • Cold chisel • Scaling chisel • Clay spade • Grooving ... use of any assistance for its stated purpose. If you need any other maintenance or adjustment should be performed by Makita Authorized or Factory Service Centers, always using Makita replacement parts. It is subject to persons. CAUTION: • These accessories or attachments are recommended for use accessory or...
ACCESSORIES 12 CAUTION: • Do not tighten the crank cap excessively. Only use with your local Makita service center. • Spline shank Carbide-tipped bits • Bull point • Cold chisel • Scaling chisel • Clay spade • Grooving ... use of any assistance for its stated purpose. If you need any other maintenance or adjustment should be performed by Makita Authorized or Factory Service Centers, always using Makita replacement parts. It is subject to persons. CAUTION: • These accessories or attachments are recommended for use accessory or...

Owners Manual
Page 13
Fold 13 Cut Makita U.S.A., Inc. 14930 Northam Street La Mirada, CA 90638-5753 First-Class Postage Required Post Office will not deliver without proper postage.
Fold 13 Cut Makita U.S.A., Inc. 14930 Northam Street La Mirada, CA 90638-5753 First-Class Postage Required Post Office will not deliver without proper postage.
Owners Manual
Page 14
... Newspaper Store Display Catalog Radio Exhibition From Friend Previous Usage Other ( ) 2. MAIL THIS PORTION Your answers to the following questions are : Design Features Size Price Makita Brand Repair Service Durability Power Other ( ) 5. This product was purchased from: Home Center Hardware/Lumber Store Tool Distributor Industrial Supply Construction Supply Other ( 3. Use of...
... Newspaper Store Display Catalog Radio Exhibition From Friend Previous Usage Other ( ) 2. MAIL THIS PORTION Your answers to the following questions are : Design Features Size Price Makita Brand Repair Service Durability Power Other ( ) 5. This product was purchased from: Home Center Hardware/Lumber Store Tool Distributor Industrial Supply Construction Supply Other ( 3. Use of...
Owners Manual
Page 15
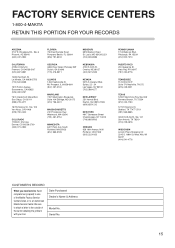
... (781) 461-9754 MINNESOTA 6427 Penn Ave. South Richfield, MN 55423 (612) 869-5199 MISSOURI 9876 Watson Road St. FACTORY SERVICE CENTERS 1-800-4-MAKITA RETAIN THIS PORTION FOR YOUR RECORDS ARIZONA 3707 E. La Mirada, CA 90638-5753 (714) 522-8088 1970 Fulton Avenue Sacramento, CA 95825 (916) 482... (414) 541-4776 CUSTOMER'S RECORD When you need service: Send complete tool (prepaid) to an Authorized Makita Service Center. Be sure to attach a letter to the outside of the Makita Factory Service Centers listed, or to one of the carton detailing the problem with your tool. Date Purchased ...
... (781) 461-9754 MINNESOTA 6427 Penn Ave. South Richfield, MN 55423 (612) 869-5199 MISSOURI 9876 Watson Road St. FACTORY SERVICE CENTERS 1-800-4-MAKITA RETAIN THIS PORTION FOR YOUR RECORDS ARIZONA 3707 E. La Mirada, CA 90638-5753 (714) 522-8088 1970 Fulton Avenue Sacramento, CA 95825 (916) 482... (414) 541-4776 CUSTOMER'S RECORD When you need service: Send complete tool (prepaid) to an Authorized Makita Service Center. Be sure to attach a letter to the outside of the Makita Factory Service Centers listed, or to one of the carton detailing the problem with your tool. Date Purchased ...

Owners Manual
Page 16
...have been made to you may not apply to one of Makita's Factory or Authorized Service Centers. It is caused by defective workmanship or material, Makita will repair (or at our option, replace) without charge. MAKITA DISCLAIMS LIABILITY FOR ANY IMPLIED WARRANTIES, INCLUDING IMPLIED WARRANTIES OF... cancer, birth defects or other masonry products, and • arsenic and chromium from chemically-treated lumber. MAKITA LIMITED ONE YEAR WARRANTY Warranty Policy Every Makita tool is thoroughly inspected and tested before leaving the factory. This Warranty gives you specific legal rights, and...
...have been made to you may not apply to one of Makita's Factory or Authorized Service Centers. It is caused by defective workmanship or material, Makita will repair (or at our option, replace) without charge. MAKITA DISCLAIMS LIABILITY FOR ANY IMPLIED WARRANTIES, INCLUDING IMPLIED WARRANTIES OF... cancer, birth defects or other masonry products, and • arsenic and chromium from chemically-treated lumber. MAKITA LIMITED ONE YEAR WARRANTY Warranty Policy Every Makita tool is thoroughly inspected and tested before leaving the factory. This Warranty gives you specific legal rights, and...

Parts Breakdown
Page 2
..., HR5000 BALL BEARING 6907, HR5000 NUT M34. 8-41,HR5000 X RING 28, HR5000-T1 X-RING 28, HR5000 O RING 27, HR3851 O RING 55, HR5000 Page 2 of 4 Quantity 3 1 1 1 1 1 1 1 1 1 1 1 1 1 1 1 1 1 1 1 2 1 1 1 1 1 1 1 1 1 1 1 1 1 1 1 1 1 1 1 1 1 1 1 1 1 1 1 1 1 1 1 1 1 2 2 1 1 1 1 1 1 1 1 8/18/2010 WASHER 52, HR5000 SPIRAL B. BEARING 1212, LS1440 RUBBER PIN 6,LS1013 O RING 113, HR5000-T1 SEAL RING, HR5000 GEAR HOUSING, HR5000 GEAR HOUSING, HR5000 F. WASHER 10, HR5000 GEAR COMPLETE, HR5000 N. BEARING 52, HR5000 F. GEAR 41, HR5000 STRIKER, HR5000,T1 STRIKER, HR5000...
..., HR5000 BALL BEARING 6907, HR5000 NUT M34. 8-41,HR5000 X RING 28, HR5000-T1 X-RING 28, HR5000 O RING 27, HR3851 O RING 55, HR5000 Page 2 of 4 Quantity 3 1 1 1 1 1 1 1 1 1 1 1 1 1 1 1 1 1 1 1 2 1 1 1 1 1 1 1 1 1 1 1 1 1 1 1 1 1 1 1 1 1 1 1 1 1 1 1 1 1 1 1 1 1 2 2 1 1 1 1 1 1 1 1 8/18/2010 WASHER 52, HR5000 SPIRAL B. BEARING 1212, LS1440 RUBBER PIN 6,LS1013 O RING 113, HR5000-T1 SEAL RING, HR5000 GEAR HOUSING, HR5000 GEAR HOUSING, HR5000 F. WASHER 10, HR5000 GEAR COMPLETE, HR5000 N. BEARING 52, HR5000 F. GEAR 41, HR5000 STRIKER, HR5000,T1 STRIKER, HR5000...

Parts Breakdown
Page 3
...70 681635-2 INSULATION WASHER, HM1211B 71 211066-7 B. SCREW M4X18, N9501B 115 182077-8 HANDLE SET, HR5000 116 911243-8 P.H. BOLT M8X30, LS1013FL 64 152396-6 CYLINDER LINER, HR5000 65 213459-4 O RING 32, HK1810 66 211129-9 BALL BEARING 6201DDW, N9501B 67 213160-1 OIL ... RUBBER PIN 4, HR2400 109 321210-9 HANDLE SHAFT, HR3851 110 182077-8 HANDLE SET, HR5000 111 682505-8 CORD GUARD, 2711 111 682568-4 CORD GUARD, HR5000 112 664276-9 CORD (2X16X16 SJ), HR5000 113 687001-1 STRAIN RELIEF, 6013BR 114 911133-5 P.H. BEARING 6200LLB, BO4552 71 211087-9 ...
...70 681635-2 INSULATION WASHER, HM1211B 71 211066-7 B. SCREW M4X18, N9501B 115 182077-8 HANDLE SET, HR5000 116 911243-8 P.H. BOLT M8X30, LS1013FL 64 152396-6 CYLINDER LINER, HR5000 65 213459-4 O RING 32, HK1810 66 211129-9 BALL BEARING 6201DDW, N9501B 67 213160-1 OIL ... RUBBER PIN 4, HR2400 109 321210-9 HANDLE SHAFT, HR3851 110 182077-8 HANDLE SET, HR5000 111 682505-8 CORD GUARD, 2711 111 682568-4 CORD GUARD, HR5000 112 664276-9 CORD (2X16X16 SJ), HR5000 113 687001-1 STRAIN RELIEF, 6013BR 114 911133-5 P.H. BEARING 6200LLB, BO4552 71 211087-9 ...

Parts Breakdown
Page 4
Parts Breakdown 123 211469-5 BALL BEARING 6907, HR5000 400 150589-9 PLASTIC TOOL CASE,HR3851,HR5000 401 783202-0 HEX WRENCH 4, JR3000V 404 273472-4 GRIP 32, HR3851 500 134797-0 SIDE HANDLE ASSEMBLY, HR5000,T2 500 134887-9 SIDE HANDLE ASS'Y, HR5000 900 810246-8 N/A HR5000 1 1 1 1 1 1 1 Page 4 of 4 8/18/2010
Parts Breakdown 123 211469-5 BALL BEARING 6907, HR5000 400 150589-9 PLASTIC TOOL CASE,HR3851,HR5000 401 783202-0 HEX WRENCH 4, JR3000V 404 273472-4 GRIP 32, HR3851 500 134797-0 SIDE HANDLE ASSEMBLY, HR5000,T2 500 134887-9 SIDE HANDLE ASS'Y, HR5000 900 810246-8 N/A HR5000 1 1 1 1 1 1 1 Page 4 of 4 8/18/2010
