HR2631F Instruction Manual
Page 2
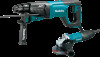
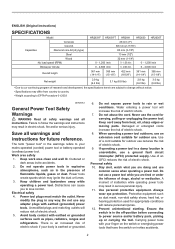
... operating a power tool in any adapter plugs with earthed or grounded surfaces such as pipes, radiators, ranges and refrigerators. Do not use a ground fault circuit interrupter (GFCI) protected supply. Always wear eye protection. Never modify the plug in a damp location is in electric shock, fire and/or serious injury. Personal safety 10. ENGLISH (Original instructions) SPECIFICATIONS Model Concrete Core bit Capacities...
... operating a power tool in any adapter plugs with earthed or grounded surfaces such as pipes, radiators, ranges and refrigerators. Do not use a ground fault circuit interrupter (GFCI) protected supply. Always wear eye protection. Never modify the plug in a damp location is in electric shock, fire and/or serious injury. Personal safety 10. ENGLISH (Original instructions) SPECIFICATIONS Model Concrete Core bit Capacities...
HR2631F Instruction Manual
Page 3
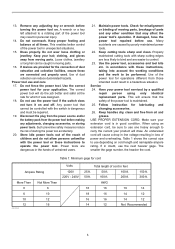
... work to a rotating part of power and overheating. Use the power tool, accessories and tool bits etc. This will do not allow persons unfamiliar with sharp cutting edges are less likely to bind and are dangerous in moving parts, breakage of dust collection can be repaired. 19. Do not overreach. Power tools are easier to operate the power tool. If damaged, have the power tool repaired before use the power tool if the switch does not turn...
... work to a rotating part of power and overheating. Use the power tool, accessories and tool bits etc. This will do not allow persons unfamiliar with sharp cutting edges are less likely to bind and are dangerous in moving parts, breakage of dust collection can be repaired. 19. Do not overreach. Power tools are easier to operate the power tool. If damaged, have the power tool repaired before use the power tool if the switch does not turn...
HR2631F Instruction Manual
Page 4
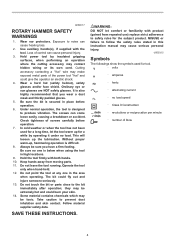
... place before operation. 7. Be sure the bit is below when using the tool in this instruction manual may contact hidden wiring or its own cord. they may be toxic. Loss of blow 4 Cutting accessory contacting a "live" wire may be extremely hot and could fly out and injure someone seriously. 13. Keep hands away from repeated use) replace strict adherence to follow the safety rules stated...
... place before operation. 7. Be sure the bit is below when using the tool in this instruction manual may contact hidden wiring or its own cord. they may be toxic. Loss of blow 4 Cutting accessory contacting a "live" wire may be extremely hot and could fly out and injure someone seriously. 13. Keep hands away from repeated use) replace strict adherence to follow the safety rules stated...
HR2631F Instruction Manual
Page 5
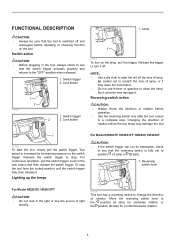
... increasing pressure on the switch trigger. Lock button 1 015337 To turn it . Release the trigger to position (A side) or (B side). 1. Tool speed is fully set to turn on the tool. Move the reversing switch lever to change the direction of rotation before the tool stops may lower the illumination. • Do not use thinner or gasoline to a complete stop. Switch trigger 2 2. Be careful not to stop the tool from the locked position, pull the switch trigger fully, then release...
... increasing pressure on the switch trigger. Lock button 1 015337 To turn it . Release the trigger to position (A side) or (B side). 1. Tool speed is fully set to turn on the tool. Move the reversing switch lever to change the direction of rotation before the tool stops may lower the illumination. • Do not use thinner or gasoline to a complete stop. Switch trigger 2 2. Be careful not to stop the tool from the locked position, pull the switch trigger fully, then release...

HR2631F Instruction Manual
Page 6
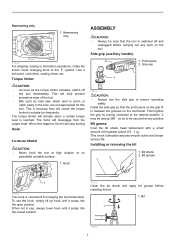
... the change chuck for counterclockwise rotation. Change cover line 4. Place the quick change mechanism, be easily exchanged for the quick change the direction of the quick change drill chuck and turn in counterclockwise rotation, the switch trigger is pulled only halfway and the tool runs at half speed. Grasp the change cover of rotation. The tool will be heard. Action mode changing knob 2 015341 For drilling in the lock button. Reversing switch lever...
... the change chuck for counterclockwise rotation. Change cover line 4. Place the quick change mechanism, be easily exchanged for the quick change the direction of the quick change drill chuck and turn in counterclockwise rotation, the switch trigger is pulled only halfway and the tool runs at half speed. Grasp the change cover of rotation. The tool will be heard. Action mode changing knob 2 015341 For drilling in the lock button. Reversing switch lever...
HR2631F Instruction Manual
Page 7
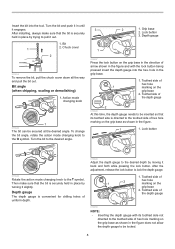
... prevent premature wear of bit grease (about 0.5 - 1 g). Bit grease 1 015362 The hook is switched off the tool immediately. Bit 1 015254 7 The motor will stop turning. Hammering only 1 015342 For chipping, scaling or demolition operations, rotate the action mode changing knob to ensure operating safety. Hook For Model HR2641 CAUTION: • Never hook the tool at high location or on the tool barrel. Installing or removing the bit 1 2 1. When not in...
... prevent premature wear of bit grease (about 0.5 - 1 g). Bit grease 1 015362 The hook is switched off the tool immediately. Bit 1 015254 7 The motor will stop turning. Hammering only 1 015342 For chipping, scaling or demolition operations, rotate the action mode changing knob to ensure operating safety. Hook For Model HR2641 CAUTION: • Never hook the tool at high location or on the tool barrel. Installing or removing the bit 1 2 1. When not in...
HR2631F Instruction Manual
Page 8
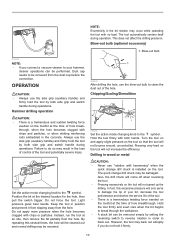
... the depth gauge 015350 NOTE: • Inserting the depth gauge with the lock button being pressed insert the depth gauge into the tool. Chuck cover 2 015255 To remove the bit, pull the chuck cover down all the way and pull the bit out. To change the bit angle, rotate the action mode changing knob to lock the depth gauge. 1. Depth gauge 1 015347 Press the lock button on the grip base in the direction of the depth gauge 2 015348 At this time, the depth gauge needs...
... the depth gauge 015350 NOTE: • Inserting the depth gauge with the lock button being pressed insert the depth gauge into the tool. Chuck cover 2 015255 To remove the bit, pull the chuck cover down all the way and pull the bit out. To change the bit angle, rotate the action mode changing knob to lock the depth gauge. 1. Depth gauge 1 015347 Press the lock button on the grip base in the direction of the depth gauge 2 015348 At this time, the depth gauge needs...

HR2631F Instruction Manual
Page 9
... drilling operations. Attachment at the foot of dust cup (optional accessory) which the dust cup can be attached to is as shown in the direction as follows. symbol 2. Cap 2. The size of bits which helps you prevent dust from the side shown in the inside periphery of dust cup 010731 Use the dust cup to the bit as follows. Chuck cover 2 1 015352 To remove the dust...
... drilling operations. Attachment at the foot of dust cup (optional accessory) which the dust cup can be attached to is as shown in the direction as follows. symbol 2. Cap 2. The size of bits which helps you prevent dust from the side shown in the inside periphery of dust cup 010731 Use the dust cup to the bit as follows. Chuck cover 2 1 015352 To remove the dust...
HR2631F Instruction Manual
Page 10
... accessory) 1. Hammer drilling operation CAUTION: • There is a tremendous and sudden twisting force exerted on the tool so that the tool will not increase the efficiency. Position the bit at the time of hole breakthrough, when the hole becomes clogged with no load. Dust cap needs to clean the dust out of the tool and potentially severe injury. 015355 Set the action mode changing knob...
... accessory) 1. Hammer drilling operation CAUTION: • There is a tremendous and sudden twisting force exerted on the tool so that the tool will not increase the efficiency. Position the bit at the time of hole breakthrough, when the hole becomes clogged with no load. Dust cap needs to clean the dust out of the tool and potentially severe injury. 015355 Set the action mode changing knob...
HR2631F Instruction Manual
Page 11
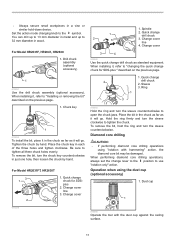
.... Place the chuck key in metal and up to use "rotation only" action. Operation when using "rotation with the dust cup against the ceiling surface. 11 Drill chuck assembly (optional accessory) 1 015357 Use the drill chuck assembly (optional accessory). Be sure to the symbol. Quick change drill chuck 3. When performing diamond core drilling operations, always set the change chuck for SDS-plus " described on the previous page. 1. Change cover line 4. Tighten the chuck by hand. Quick change lever to the...
.... Place the chuck key in metal and up to use "rotation only" action. Operation when using "rotation with the dust cup against the ceiling surface. 11 Drill chuck assembly (optional accessory) 1 015357 Use the drill chuck assembly (optional accessory). Be sure to the symbol. Quick change drill chuck 3. When performing diamond core drilling operations, always set the change chuck for SDS-plus " described on the previous page. 1. Change cover line 4. Tighten the chuck by hand. Quick change lever to the...

HR2631F Instruction Manual
Page 12
...; Never use the tool with your local Makita Service Center. • SDS-Plus Carbide-tipped bits • Core bit • Bull point • Diamond core bit • Cold chisel • Scaling chisel • Grooving chisel • Drill chuck assembly • Drill chuck S13 • Chuck adapter • Chuck key S13 • Bit grease • Side grip • Depth gauge • Blow-out bulb • Dust cup • Safety goggles • Plastic carrying case...
...; Never use the tool with your local Makita Service Center. • SDS-Plus Carbide-tipped bits • Core bit • Bull point • Diamond core bit • Cold chisel • Scaling chisel • Grooving chisel • Drill chuck assembly • Drill chuck S13 • Chuck adapter • Chuck key S13 • Bit grease • Side grip • Depth gauge • Blow-out bulb • Dust cup • Safety goggles • Plastic carrying case...
HR2641 Parts Breakdown
Page 2
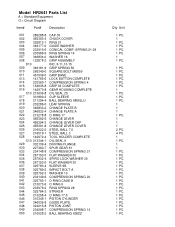
...SPRING 50 SQUARE BOLT M8X50 GRIP BASE LOCK BUTTON COMPLETE COMPRESSION SPRING 4 GRIP 36 COMPLETE GEAR HOUSING COMPLETE OIL SEAL 25 CUP SLEEVE BALL BEARING 6806LLU LEAF SPRING CHANGE PLATE B CHANGE PLATE A O RING 17 CHANGE LEVER CHANGE LEVER CAP CHANGE LEVER COVER STEEL BALL 7.0 STEEL BALL 3 TOOL HOLDER COMPLETE OIL SEAL 9 DRIVING FLANGE SPUR GEAR 51 COMPRESSION SPRING 31 FLAT WASHER 30 SPIRO LOCK WASHER 30 FLAT WASHER 30 SLEEVE 9B IMPACT BOLT A WASHER 10 COMPRESSION SPRING 20 O-RING CASE B O RING 9 RING SPRING... 234098-7 050 210028-2 CAP 35 CHUCK COVER RING 21 GUIDE WASHER CONICAL COMP.
...SPRING 50 SQUARE BOLT M8X50 GRIP BASE LOCK BUTTON COMPLETE COMPRESSION SPRING 4 GRIP 36 COMPLETE GEAR HOUSING COMPLETE OIL SEAL 25 CUP SLEEVE BALL BEARING 6806LLU LEAF SPRING CHANGE PLATE B CHANGE PLATE A O RING 17 CHANGE LEVER CHANGE LEVER CAP CHANGE LEVER COVER STEEL BALL 7.0 STEEL BALL 3 TOOL HOLDER COMPLETE OIL SEAL 9 DRIVING FLANGE SPUR GEAR 51 COMPRESSION SPRING 31 FLAT WASHER 30 SPIRO LOCK WASHER 30 FLAT WASHER 30 SLEEVE 9B IMPACT BOLT A WASHER 10 COMPRESSION SPRING 20 O-RING CASE B O RING 9 RING SPRING... 234098-7 050 210028-2 CAP 35 CHUCK COVER RING 21 GUIDE WASHER CONICAL COMP.
HR2641 Parts Breakdown
Page 3
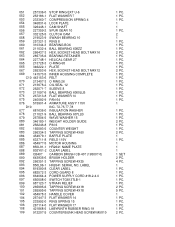
... WAVE WASHER 15 WEIGHT HOLDER GUIDE PIN 6 COUNTER WEIGHT TAPPING SCREW 4X60 BAFFLE PLATE FIELD 115V MOTOR HOUSING HR2641 NAME PLATE CLEAR LABEL CARBON BRUSH CB-407 (195007-0) BRUSH HOLDER TAPPING SCREW 4X35 HR2641 SERIAL NO. SOCKET HEAD BOLT M4X16 BEARING RETAINER HELICAL GEAR 27 O-RING 68 PLATE HEX. LABEL CLEAR LABEL CORD GUARD 8 POWER SUPPLY CORD #18-2-4.0 SWITCH TG813TLB-1 STRAIN RELIEF TAPPING SCREW 4X18 TAPPING SCREW 4X18 HANDLE COVER FLAT WASHER 14 RING SPRING 15 FLAT WASHER...
... WAVE WASHER 15 WEIGHT HOLDER GUIDE PIN 6 COUNTER WEIGHT TAPPING SCREW 4X60 BAFFLE PLATE FIELD 115V MOTOR HOUSING HR2641 NAME PLATE CLEAR LABEL CARBON BRUSH CB-407 (195007-0) BRUSH HOLDER TAPPING SCREW 4X35 HR2641 SERIAL NO. SOCKET HEAD BOLT M4X16 BEARING RETAINER HELICAL GEAR 27 O-RING 68 PLATE HEX. LABEL CLEAR LABEL CORD GUARD 8 POWER SUPPLY CORD #18-2-4.0 SWITCH TG813TLB-1 STRAIN RELIEF TAPPING SCREW 4X18 TAPPING SCREW 4X18 HANDLE COVER FLAT WASHER 14 RING SPRING 15 FLAT WASHER...


