
DCL501 Instruction Manual
Page 2
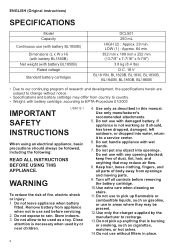
... rain. Close attention is not working as described in place. 2 WARNING To reduce the risk of body away from openings and moving parts. 9. Do not put any opening blocked; Turn off all parts of fire, electric shock or injury: 1. Use only as it to a service center. 6. ENGLISH (Original instructions) SPECIFICATIONS Model Capacity Continuous use (with battery BL1850B) Dimensions (L x W x H) (with battery BL1850B) Net weight (with...
... rain. Close attention is not working as described in place. 2 WARNING To reduce the risk of body away from openings and moving parts. 9. Do not put any opening blocked; Turn off all parts of fire, electric shock or injury: 1. Use only as it to a service center. 6. ENGLISH (Original instructions) SPECIFICATIONS Model Capacity Continuous use (with battery BL1850B) Dimensions (L x W x H) (with battery BL1850B) Net weight (with...
DCL501 Instruction Manual
Page 3
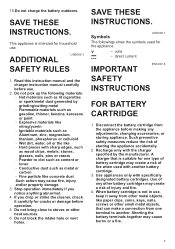
..., nails, pins or razors - When battery cartridge is intended for household use , keep it carefully for one terminal to clot such as metal or carbon - Stop operation immediately if you drop or strike the cleaner, check it away from one type of any adjustments, changing accessories, or storing appliance. Use appliances only with sharp edges, such as lit cigarettes or spark/metal dust generated...
..., nails, pins or razors - When battery cartridge is intended for household use , keep it carefully for one terminal to clot such as metal or carbon - Stop operation immediately if you drop or strike the cleaner, check it away from one type of any adjustments, changing accessories, or storing appliance. Use appliances only with sharp edges, such as lit cigarettes or spark/metal dust generated...
DCL501 Instruction Manual
Page 4
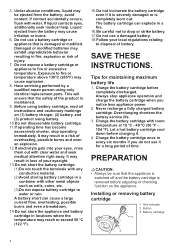
... operating time has become excessively shorter, stop appliance operation and charge the battery cartridge when you do not use a battery cartridge or appliance that is completely worn out. Let a hot battery cartridge cool down before completely discharged. Installing or removing battery cartridge 1. Red indicator 2. This will ensure that the appliance is switched off and the battery cartridge is maintained. 9. Before using only identical replacement parts. A battery...
... operating time has become excessively shorter, stop appliance operation and charge the battery cartridge when you do not use a battery cartridge or appliance that is completely worn out. Let a hot battery cartridge cool down before completely discharged. Installing or removing battery cartridge 1. Red indicator 2. This will ensure that the appliance is switched off and the battery cartridge is maintained. 9. Before using only identical replacement parts. A battery...
DCL501 Instruction Manual
Page 5
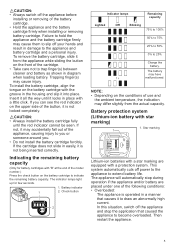
... slip it locks in diagram when loading battery. This system automatically cuts off the appliance before installing or removing of the cartridge. • Take care not to trap finger(s) between cleaner and battery as shown in place with a protection system. The indicator lamps light up for battery cartridges with the groove in easily, it is not being inserted correctly. The battery may...
... slip it locks in diagram when loading battery. This system automatically cuts off the appliance before installing or removing of the cartridge. • Take care not to trap finger(s) between cleaner and battery as shown in place with a protection system. The indicator lamps light up for battery cartridges with the groove in easily, it is not being inserted correctly. The battery may...
DCL501 Instruction Manual
Page 6
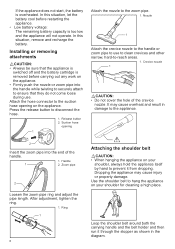
... hose opening on your shoulder, always hold the appliance itself by hand to -reach areas. 1. Handle 1 2. After adjustment, tighten the ring. 1. Press the release button to use . Zoom pipe 2 Loosen the zoom pipe ring and adjust the pipe length. In this situation, remove and recharge the battery. Installing or removing attachments CAUTION: • Always be sure that they do not come loose during use...
... hose opening on your shoulder, always hold the appliance itself by hand to -reach areas. 1. Handle 1 2. After adjustment, tighten the ring. 1. Press the release button to use . Zoom pipe 2 Loosen the zoom pipe ring and adjust the pipe length. In this situation, remove and recharge the battery. Installing or removing attachments CAUTION: • Always be sure that they do not come loose during use...
DCL501 Instruction Manual
Page 7
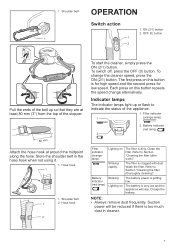
... (thoroughly cleaning)". NOTE: • Always remove dust frequently. Filter indicator 1 (orange lamp) 2. Battery indicator (red lamp) Blinking Lighting on this button is for high speed and the second press for low speed. Battery indicator (red lamp) 2 Filter indicator (orange lamp) Lighting on this button repeats the speed change the cleaner speed, press the ON (2/1) button. Hose hook 1 1. Shoulder belt 1 2. 1. Shoulder belt OPERATION Switch action 1. The first press on The...
... (thoroughly cleaning)". NOTE: • Always remove dust frequently. Filter indicator 1 (orange lamp) 2. Battery indicator (red lamp) Blinking Lighting on this button is for high speed and the second press for low speed. Battery indicator (red lamp) 2 Filter indicator (orange lamp) Lighting on this button repeats the speed change the cleaner speed, press the ON (2/1) button. Hose hook 1 1. Shoulder belt 1 2. 1. Shoulder belt OPERATION Switch action 1. The first press on The...
DCL501 Instruction Manual
Page 8
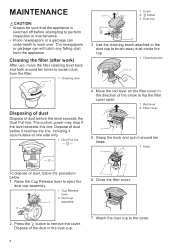
... of the dust in the direction of dust before the level exceeds the Dust Full line. Dust Full line 1 1. Use the cleaning brush attached to the dust cup to the cover. 8 Grasp the knob and spin it accumulates at one side only. 1. Cup Release lever 2. Cleaning the filter (after work over. MAINTENANCE CAUTION: • Always be sure that the appliance is switched off before...
... of the dust in the direction of dust before the level exceeds the Dust Full line. Dust Full line 1 1. Use the cleaning brush attached to the dust cup to the cover. 8 Grasp the knob and spin it accumulates at one side only. 1. Cup Release lever 2. Cleaning the filter (after work over. MAINTENANCE CAUTION: • Always be sure that the appliance is switched off before...
DCL501 Instruction Manual
Page 9
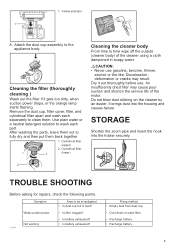
... suction power • Is filter clogged? 010051 Not working • Is battery exhausted? • Is battery exhausted? 1. It brings dust into the holder securely. 2 TROUBLE SHOOTING Before asking for repairs, check the following points. Cleaning the filter (thoroughly cleaning ) Wash out the filter if it out thoroughly before use gasoline, benzine, thinner, alcohol or the like. Attach the dust cup assembly...
... suction power • Is filter clogged? 010051 Not working • Is battery exhausted? • Is battery exhausted? 1. It brings dust into the holder securely. 2 TROUBLE SHOOTING Before asking for repairs, check the following points. Cleaning the filter (thoroughly cleaning ) Wash out the filter if it out thoroughly before use gasoline, benzine, thinner, alcohol or the like. Attach the dust cup assembly...
DCL501 Instruction Manual
Page 10
...WARRANTY. Warranty Policy Every Makita tool is caused by defective workmanship or material, Makita 10 This Warranty gives you specific legal rights, and you need any other maintenance or adjustment should be performed by Makita Authorized Service Centers, always using Makita replacement parts. Only use of any assistance for use with your local Makita Service Center. • Makita genuine battery and charger...OF THIS WARRANTY. To maintain product SAFETY and RELIABILITY, repairs, any trouble develop during this manual. Should any other accessories or ...
...WARRANTY. Warranty Policy Every Makita tool is caused by defective workmanship or material, Makita 10 This Warranty gives you specific legal rights, and you need any other maintenance or adjustment should be performed by Makita Authorized Service Centers, always using Makita replacement parts. Only use of any assistance for use with your local Makita Service Center. • Makita genuine battery and charger...OF THIS WARRANTY. To maintain product SAFETY and RELIABILITY, repairs, any trouble develop during this manual. Should any other accessories or ...
DCL501Z Parts Breakdown
Page 4
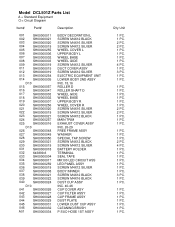
... L UPPER BODY L WHEEL BASE WHEEL GIDE SCREW M4X12 SILVER DUCT COVER ASSY SCREW M4X12 SILVER ELECTRIC EQUIPMENT UNIT LOWER BODY 2ND ASSY INC. 15,16 ROLLER D ROLLER SHAFT D WHEEL GIDE WHEEL BASE UPPER BODY R WHEEL COVER R SCREW M4X16 SILVER SCREW M4X12 SILVER SCREW M4X12 BLACK MAIN TRIM EXHAUST COVER ASSY INC. 26-29 FREE FRAME ASSY WASHER SPECIAL TAP.SCREW SCREW M4X12 BLACK SCREW M4X12 SILVER BATTERY HOLDER TERMINAL SEAL...
... L UPPER BODY L WHEEL BASE WHEEL GIDE SCREW M4X12 SILVER DUCT COVER ASSY SCREW M4X12 SILVER ELECTRIC EQUIPMENT UNIT LOWER BODY 2ND ASSY INC. 15,16 ROLLER D ROLLER SHAFT D WHEEL GIDE WHEEL BASE UPPER BODY R WHEEL COVER R SCREW M4X16 SILVER SCREW M4X12 SILVER SCREW M4X12 BLACK MAIN TRIM EXHAUST COVER ASSY INC. 26-29 FREE FRAME ASSY WASHER SPECIAL TAP.SCREW SCREW M4X12 BLACK SCREW M4X12 SILVER BATTERY HOLDER TERMINAL SEAL...


