
Owners Manual
Page 2
... part of drugs, alcohol or medication. A wrench or a key left attached to change without notice. • Note: Specifications may result in power tools that have the switch on . Keep work area clean and well lit. Electrical safety 4. Use safety equipment. Water entering a power tool will reduce risk of the warnings listed below may ignite the dust or fumes. 3. Damaged or entangled cords increase the risk of electric shock. 7. Remove any adapter...
... part of drugs, alcohol or medication. A wrench or a key left attached to change without notice. • Note: Specifications may result in power tools that have the switch on . Keep work area clean and well lit. Electrical safety 4. Use safety equipment. Water entering a power tool will reduce risk of the warnings listed below may ignite the dust or fumes. 3. Damaged or entangled cords increase the risk of electric shock. 7. Remove any adapter...

Owners Manual
Page 3
... shock the operator. 2. Such preventive safety measures reduce the risk of fire when used . in use the power tool if the switch does not turn it was designed. 17. Use power tools only with the charger specified by a qualified repair person using only identical replacement parts. This will not strike the floor, workbench, etc. 7. Keep handles dry, clean and free from the power tool before inserting battery pack. Hold power tool by hand or against...
... shock the operator. 2. Such preventive safety measures reduce the risk of fire when used . in use the power tool if the switch does not turn it was designed. 17. Use power tools only with the charger specified by a qualified repair person using only identical replacement parts. This will not strike the floor, workbench, etc. 7. Keep handles dry, clean and free from the power tool before inserting battery pack. Hold power tool by hand or against...
Owners Manual
Page 4
... . Red part 1 2. Operate the tool only when hand-held. 11. Do not touch the blade or the workpiece immediately after operation; V volts direct current no -load unnecessarily. 14. It may reach or exceed 50°C (122°F). 7. Always stop operating immediately. Always use the correct dust mask/respirator for maintaining maximum battery life 1. Do not disassemble battery cartridge. 3. If operating time has become excessively shorter, stop tool operation and...
... . Red part 1 2. Operate the tool only when hand-held. 11. Do not touch the blade or the workpiece immediately after operation; V volts direct current no -load unnecessarily. 14. It may reach or exceed 50°C (122°F). 7. Always stop operating immediately. Always use the correct dust mask/respirator for maintaining maximum battery life 1. Do not disassemble battery cartridge. 3. If operating time has become excessively shorter, stop tool operation and...

Owners Manual
Page 5
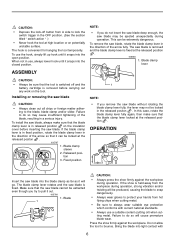
Insert it into the tool, always check to utilize a sharp, unused portion of its cutting edge, reposition the shoe to see the source of light directly. To prevent the switch trigger from accidentally pulled, the lock-off button from B side and pull the switch trigger. After use force when inserting the battery cartridge. Lamp A 1 2 006899 1. To secure the shoe, push the shoe button in the "B" direction with a little...
Insert it into the tool, always check to utilize a sharp, unused portion of its cutting edge, reposition the shoe to see the source of light directly. To prevent the switch trigger from accidentally pulled, the lock-off button from B side and pull the switch trigger. After use force when inserting the battery cartridge. Lamp A 1 2 006899 1. To secure the shoe, push the shoe button in the "B" direction with a little...
Owners Manual
Page 6
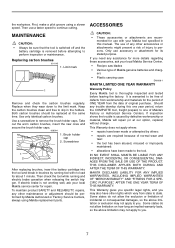
... 1. Blade clamp lever ASSEMBLY CAUTION: • Always be locked at the released position . Make sure that the saw blade cannot be extracted even though you do not insert the saw blade deep enough, the saw blade, always make sure that the tool is switched off button from A side to lock the switch trigger in the direction of the arrow so that the blade clamp lever is held away from hot flying chips when cutting...
... 1. Blade clamp lever ASSEMBLY CAUTION: • Always be locked at the released position . Make sure that the saw blade cannot be extracted even though you do not insert the saw blade deep enough, the saw blade, always make sure that the tool is switched off button from A side to lock the switch trigger in the direction of the arrow so that the blade clamp lever is held away from hot flying chips when cutting...
Owners Manual
Page 7
... and electric brake operation when releasing the switch trigger. First, make a pilot groove using Makita replacement parts. MAINTENANCE CAUTION: • Always be free of defects from workmanship and materials for the period of ONE YEAR from state to continue cutting. Limit mark 1 Remove and check the carbon brushes regularly. To maintain product SAFETY and RELIABILITY, repairs, any assistance for about 1 minute. Only use of any trouble develop during this manual...
... and electric brake operation when releasing the switch trigger. First, make a pilot groove using Makita replacement parts. MAINTENANCE CAUTION: • Always be free of defects from workmanship and materials for the period of ONE YEAR from state to continue cutting. Limit mark 1 Remove and check the carbon brushes regularly. To maintain product SAFETY and RELIABILITY, repairs, any assistance for about 1 minute. Only use of any trouble develop during this manual...
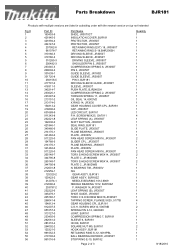
Parts Breakdown
Page 2
..., JR180D GUIDE SLEEVE, JR3060T PIN 3, BJR181 DRIVING SLEEVE GUIDE, JR3050T SLEEVE, JR3050T PUSH PLATE, BJR240SH COMPRESSION SPRING 2, JR3050T TORSION SPRING 17, JR3050T OIL SEAL 14, 6903VD X RING 14, JR3030 GEAR HOUSING COVER CPL.,BJR181 CAP, JR3050T LED CIRCUIT, BJR181 P.H. WASHER 14,JR3030T LEAF SPRING (B), JR3050T SHOE GUIDE, JR3050T TORX C.S.H.SCREW M6X16,JR3050T TAPPING SCREW, FLANGE 5X25, 5177B GEAR HOUSING CPL.,BJR181 C.S.H. SCREW M5X25, GA7911 LEAF SPRING (A), JR3050T SHIFT BUTTON, JR3050T SEAL RING, BJR181 SLIDE PLATE...
..., JR180D GUIDE SLEEVE, JR3060T PIN 3, BJR181 DRIVING SLEEVE GUIDE, JR3050T SLEEVE, JR3050T PUSH PLATE, BJR240SH COMPRESSION SPRING 2, JR3050T TORSION SPRING 17, JR3050T OIL SEAL 14, 6903VD X RING 14, JR3030 GEAR HOUSING COVER CPL.,BJR181 CAP, JR3050T LED CIRCUIT, BJR181 P.H. WASHER 14,JR3030T LEAF SPRING (B), JR3050T SHOE GUIDE, JR3050T TORX C.S.H.SCREW M6X16,JR3050T TAPPING SCREW, FLANGE 5X25, 5177B GEAR HOUSING CPL.,BJR181 C.S.H. SCREW M5X25, GA7911 LEAF SPRING (A), JR3050T SHIFT BUTTON, JR3050T SEAL RING, BJR181 SLIDE PLATE...
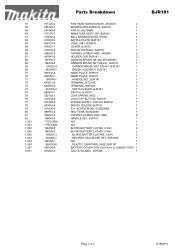
Parts Breakdown
Page 3
... ASS'Y 18V, BJR181 1 BALL BEARING 607ZZ, 9550H 1 BAFFLE PLATE, BJR181 1 YOKE UNIT, BSS610 1 COVER, BJR181 1 MOTOR HOUSING, BJR181 1 TAPPING SCREW 4X65, 5402NA 2 HOLDER CAP, BJR181 2 CARBON BRUSH CB-432, BTD200SH 1 CARBON BRUSH SET CB-441, BJR181 1 CARBON BRUSH SET CB-441, BJR181 1 BRUSH HOLDER R, BJR181 1 NAME PLATE, BJR181 1 NAME PLATE, BJR181 1 HANDLE SET, BJR181 1 TERMINAL, BTD140 1 TERMINAL, BDF454 1 SWITCH LEVER, BJR181 1 SWITCH, BJR181 1 LEAF SPRING, 6832 1 LOCK OFF BUTTON, BJR181 1 POWER SUPPLY CIRCUIT,BJR181 1 BRUSH HOLDER, BJR181 1 P.H.
... ASS'Y 18V, BJR181 1 BALL BEARING 607ZZ, 9550H 1 BAFFLE PLATE, BJR181 1 YOKE UNIT, BSS610 1 COVER, BJR181 1 MOTOR HOUSING, BJR181 1 TAPPING SCREW 4X65, 5402NA 2 HOLDER CAP, BJR181 2 CARBON BRUSH CB-432, BTD200SH 1 CARBON BRUSH SET CB-441, BJR181 1 CARBON BRUSH SET CB-441, BJR181 1 BRUSH HOLDER R, BJR181 1 NAME PLATE, BJR181 1 NAME PLATE, BJR181 1 HANDLE SET, BJR181 1 TERMINAL, BTD140 1 TERMINAL, BDF454 1 SWITCH LEVER, BJR181 1 SWITCH, BJR181 1 LEAF SPRING, 6832 1 LOCK OFF BUTTON, BJR181 1 POWER SUPPLY CIRCUIT,BJR181 1 BRUSH HOLDER, BJR181 1 P.H.


