Owners Manual
Page 1
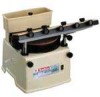
Sharpener 200 mm (7-718") MODEL 9820-2 INSTRUCTION MANUAL SPECIFICATIONS Wheel size 200 m m x 25 mm x 75 m m (7-7/8" x 1" x 3") No load speed 560 R/min. Overall length 390 mm (15-3/8") Net weight 1 1 kg (24.3 Ibs)
Sharpener 200 mm (7-718") MODEL 9820-2 INSTRUCTION MANUAL SPECIFICATIONS Wheel size 200 m m x 25 mm x 75 m m (7-7/8" x 1" x 3") No load speed 560 R/min. Overall length 390 mm (15-3/8") Net weight 1 1 kg (24.3 Ibs)
Owners Manual
Page 5
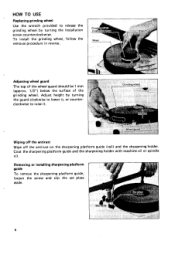
... having a maximum operating speed at least as high as "No Load RPM" marked on . 8. SAVE THESE INSTRUCTIONS. Use the upper surface of 5 m m (3/16") between the sharpening platform guide (rail) and the grinding wheel. 6. Store wheels in cold weather. Use grinding wheel suitable for cracks or damage before the switch is turned...
... having a maximum operating speed at least as high as "No Load RPM" marked on . 8. SAVE THESE INSTRUCTIONS. Use the upper surface of 5 m m (3/16") between the sharpening platform guide (rail) and the grinding wheel. 6. Store wheels in cold weather. Use grinding wheel suitable for cracks or damage before the switch is turned...
Owners Manual
Page 6
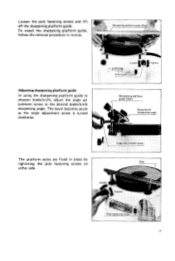
.... Wiping off the antirust Wipe off the antirust on the sharpening platform guide (rail) and the sharpening holder. Removing or installing sharpening platform guide To remove the sharpening platform guide, loosen the screw and slip the set plate aside. 6 Coat the sharpening platform guide and the sharpening holder with machine oil or spindle oil. Adjust height...
.... Wiping off the antirust Wipe off the antirust on the sharpening platform guide (rail) and the sharpening holder. Removing or installing sharpening platform guide To remove the sharpening platform guide, loosen the screw and slip the set plate aside. 6 Coat the sharpening platform guide and the sharpening holder with machine oil or spindle oil. Adjust height...
Owners Manual
Page 7
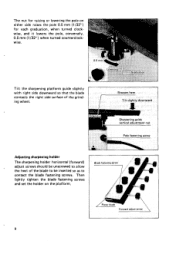
Sharpening platform guide (Rail) The platform poles are fixed in reverse. Loosen the pole fastening screws and lift off the sharpening platform guide. Adjusting sharpening platform guide In using the sharpening platform guide to sharpen blade/knife, adjust the angle adjustment screw to the desired blade/knife sharpening angle. The bevel becomes acute as the angle adjustment screw is turned clockwise. To install the sharpening platform guide, follow the removal procedure in place by tightening the pole fastening screws on Pole either side. 7
Sharpening platform guide (Rail) The platform poles are fixed in reverse. Loosen the pole fastening screws and lift off the sharpening platform guide. Adjusting sharpening platform guide In using the sharpening platform guide to sharpen blade/knife, adjust the angle adjustment screw to the desired blade/knife sharpening angle. The bevel becomes acute as the angle adjustment screw is turned clockwise. To install the sharpening platform guide, follow the removal procedure in place by tightening the pole fastening screws on Pole either side. 7
Owners Manual
Page 8
Adjusting sharpening holder I \ 8 The nut for each graduation, when turned clockwise, and it lowers the pole, conversely, 0.5 mm (1/32") when turned counterclockwise. Then lightly tighten the blade ... 0.5 mm (1/32") for raising or lowering the pole on the platform. - Blade I \ Forward adiurt screw I I I The sharpening holder horizontal (forward) adjust screws should be inserted so as to contact the blade fastening screws. Tilt the sharpening platform guide slightly with right side downward so that the blade contacts the right side surface...
Adjusting sharpening holder I \ 8 The nut for each graduation, when turned clockwise, and it lowers the pole, conversely, 0.5 mm (1/32") when turned counterclockwise. Then lightly tighten the blade ... 0.5 mm (1/32") for raising or lowering the pole on the platform. - Blade I \ Forward adiurt screw I I I The sharpening holder horizontal (forward) adjust screws should be inserted so as to contact the blade fastening screws. Tilt the sharpening platform guide slightly with right side downward so that the blade contacts the right side surface...
Owners Manual
Page 9
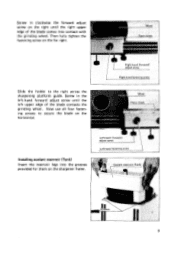
Installingcoolant reservoir (Tank) Insert the reservoir legs into contact with the grinding wheel. Then fully tighten the fastening screw on the sharpener frame. 9 Screw in clockwise the forward adjust screw on the horizontal. Now use all four fastening screws to the right across the sharpening platform guide. Slide the holder to secure the blade on the right until the left upper edge of the blade comes into the grooves provided for them on the far right. Screw in the left-hand forward adjust screw until the right upper edge of the blade contacts the grinding wheel.
Installingcoolant reservoir (Tank) Insert the reservoir legs into contact with the grinding wheel. Then fully tighten the fastening screw on the sharpener frame. 9 Screw in clockwise the forward adjust screw on the horizontal. Now use all four fastening screws to the right across the sharpening platform guide. Slide the holder to secure the blade on the right until the left upper edge of the blade comes into the grooves provided for them on the far right. Screw in the left-hand forward adjust screw until the right upper edge of the blade contacts the grinding wheel.
Owners Manual
Page 11
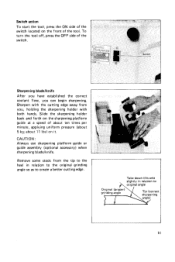
... this area slightly in relation t o A o r i g i l a l angle Original (proper) grinding angle Tip (correct sharpening 11 CAUTION : Always use sharpening platform guide or guide assembly (optional accessory) when sharpening bladdknife. about 11 Ibs) on the sharpening platform guide a t a speed of about ten times per minute, applying uniform pressure (about 5 kg; Slide the... sharpening holder back and forth on it. Switch action To start the tool, press the ON side of the switch located...
... this area slightly in relation t o A o r i g i l a l angle Original (proper) grinding angle Tip (correct sharpening 11 CAUTION : Always use sharpening platform guide or guide assembly (optional accessory) when sharpening bladdknife. about 11 Ibs) on the sharpening platform guide a t a speed of about ten times per minute, applying uniform pressure (about 5 kg; Slide the... sharpening holder back and forth on it. Switch action To start the tool, press the ON side of the switch located...
Owners Manual
Page 12
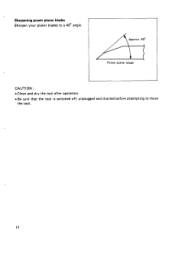
Sharpening power planer blades Sharpen your planer blades to move the tool. 12 Power planer blade CAUTION : *Clean and dry the tool after operation. 0 Be sure that the tool is switched off, unplugged and drained before attempting to a 40" angle.
Sharpening power planer blades Sharpen your planer blades to move the tool. 12 Power planer blade CAUTION : *Clean and dry the tool after operation. 0 Be sure that the tool is switched off, unplugged and drained before attempting to a 40" angle.
Owners Manual
Page 13
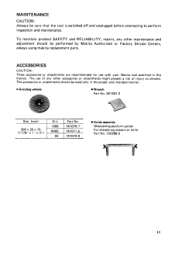
... Size (mm) I Grit I Part No. 200x25~75 (7-7/8" x 1" x 3") 741074-9 Guide assembly (Sharpening platform guide) For sharpening scissors or knife. ACCESSOR IES CAUTION : These accessories or attachments are recommended for use of injury to perform ...inspection and maintenance. Part No. 132386-5 13 The accessories or attachments should be sure that the tool is switched off and unplugged before attempting to persons. The use with your Makita...
... Size (mm) I Grit I Part No. 200x25~75 (7-7/8" x 1" x 3") 741074-9 Guide assembly (Sharpening platform guide) For sharpening scissors or knife. ACCESSOR IES CAUTION : These accessories or attachments are recommended for use of injury to perform ...inspection and maintenance. Part No. 132386-5 13 The accessories or attachments should be sure that the tool is switched off and unplugged before attempting to persons. The use with your Makita...
Owners Manual
Page 14
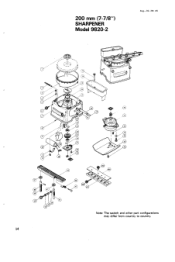
200 mm (7-7/8") SHARPENER Model 9820-2 Aug.-02-84 US Note: The switch and other part configurations may differ from country to country. 14
200 mm (7-7/8") SHARPENER Model 9820-2 Aug.-02-84 US Note: The switch and other part configurations may differ from country to country. 14
Parts Breakdown
Page 1
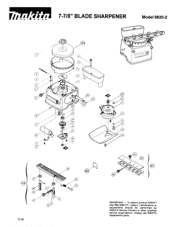
Always use MAKITA replacement parts. To assure product SAFETY and RELIABILITY. repairs, maintenance or adjustments should be performed by MAKITA Service Centers or other qualified service organizations. r r 7-7/8" BLADE SHARPENER Model 9820-2 01-96 IMPORTANT -
Always use MAKITA replacement parts. To assure product SAFETY and RELIABILITY. repairs, maintenance or adjustments should be performed by MAKITA Service Centers or other qualified service organizations. r r 7-7/8" BLADE SHARPENER Model 9820-2 01-96 IMPORTANT -


