Get support for Makita 7104L

Makita 7104L Support Question

Makita 7104L Support Question

Find answers below for this question about Makita 7104L.
Need a Makita 7104L manual? We have 3 online manuals for this item!
Question posted by bareis1 on February 25th, 2015

Sharpening The Cutter Chain

Is there a sharpening service for the cutter chain? Our zipcode is 95060

Current Answers

Answer #1: Posted by TommyKervz on February 25th, 2015 1:36 PM
This answer was accepted by the poster of the original question.
TommyKervz

Member since:
January 10th, 2013

Points: 17,776,843
1,100
points
Please call makita service center to find out if they do offer the sharpening service' makita contact details on the link http://www.makita.com/en-us/modules/service/fsc.aspx or forward the same question to Makita here


Hope that is helpful.
Kervz at www.satechhelp.co.za
Answer #2: Posted by waelsaidani1 on February 25th, 2015 12:12 PM
waelsaidani1

Member since:
May 12th, 2013

Points: 19,501,777
100
points
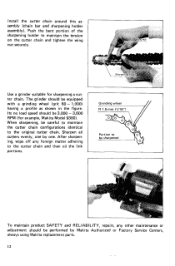
Hello refer to page 14 of the manual for instructions

Related Makita 7104L Manual Pages

Owners Manual - Page 1

MODEL 7104L INSTRUCTION MANUAL S P E C IF I CATIONS 7 7 1 Capacities Width of applicable workpiece iLonglludlndll hole depth 130 r n n 1 1518 I 155 m m 16 1 8 I 80 m m 308 mni 13 1/8 12 1 8 i Chain speed 300 m min !l 000 FPMi Dimensions !LxWxHI 512 m m x 2 9 8 m m x 513 m m 120 3 16 x 1 1 314 x 20 3/16 I Net weight 17 kg 137 4 lhsi
Owners Manual - Page 2

... c c e s sories. 15. when changing accessories such as blades, bits, cutters, and the like. 16. U S E RECOMMENDED ACCESSORIES. Learn the tools applications and limitations, a s well a s the specific potential hazards peculiar to it frees both hands t o operate tool. 1 3 . Make sure switch is in off position before servicing; MAKE WORKSHOP KID PROOF with padlocks, master switches, or by...
Owners Manual - Page 3

... other part that specified for alignment of moving parts, binding of moving parts, breakage of the blade or cutter only. 21. a s well a s damage t o the tool. A guard or other conditions that it c o m e s t o a complete stop. 2 2 . NEVER LEAVE TOOL RUNNING UNATTENDED. Using a power source with voltage greater than the nameplate rating is accidentally contacted. 19. Don...
Owners Manual - Page 4

... hands away from hitting the ground, floor, etc., causing damage t o the cutter chain at the time of hole breakthrough. 6. SAVE THESE INSTRUCTIONS. 4 Wear ear protectors. 4. Do not operate the tool with the safety cover open. Handle the cutter chain carefully; Replace cracked or damaged cutter chain immediately. 7 . Never yank cord t o disconnect it is for cracks or damage...
Owners Manual - Page 5

...switched off and unplugged before installing or removing the cutter chain. .Always close the chain cover after installing, removing or adjusting the cutter chain. Installing o r removing cutter chain WARNING: .Always be sure that the tool is a clearance of the cutter chain lightly. Semi-tighten the hex bolt. Close the chain cover. Additionally tighen slightly the adjusting screw. Turn the...
Owners Manual - Page 6

... wing bolt. When tightened, the tip of the wing bolt should contact the flat surface of the yellow indicator plate is 3 - 8 mm (1/8" - 5/16"). Move the tool so that the front vise contacts the side of the workpiece. Push the lever Turn the setting handle until the distance between the rear vise...
Owners Manual - Page 7

... indicator plate and indication plate. D o not apply excessive pressure to stop. After cutting, gently raise the tool head until the cutter chain attains full speed. WARNING: 0 Always hook the tool head back onto the hook when not operating the tool. 0 Never attempt t o cut in the workpiece. If the alignment is not secured firm- Then switch...
Owners Manual - Page 8

... the No. 2 set position Hole length to secure the gauge plate. A hole a little longer than predetermined may be enlarged transversely by adjusting the gauge plate. Cutter chain position Original position No. 1 set position No. 2 set position. 8 expansion of hole width is , 25 mm (1") - 18 mm (23/32") = 7 mm (9/32").Tighten the hex...
Owners Manual - Page 9

... use the perpen- Always safely hook the tool head back onto the hook when changing the cutter chain position. 9 Turn the adjusting hex bolt until the cutter chain reaches the desired position, then tighten the ...down on the right-hand grip and slightly raising the left -hand grip. To bring the cutter chain back t o the perpendicular (original) position, pull the lever (C) toward you while pressing ...
Owners Manual - Page 10

... hole. NOTE : Lap joints can be cut only on the front (side away from you) of the workpiece. 10 Always have the cutter chain set to enlarge a hole with this tool. When enlarging a hole both transversely I and longitudinally, c u t the holes in the order indicated from No. ( 1 ) to 130 mm (5-1/8") can be c u t with the...
Owners Manual - Page 11

... adjusting screw from the tool. Secure the sharpening holder to the tool. Take out the worn carbon brushes, insert the new ones and secure the brush holder caps. Replacing carbon brushes Remove and check the carbon brushes regularly. Use only Makita carbon brushes. Sharpening cutter chain Remove the chain bar and cutter chain from the chain bar. I \ Cutter chain 11 Replace when...
Owners Manual - Page 12

... chain. Install the cutter chain around this as shown in the figure. I I sembly (chain bar and sharpening holder assembly). The grinder should be equipped with a grinding wheel (grit 60 - 1.000) having a profile as - Sharpen all cutters evenly, one . After sharpening, wipe off any other maintenance or adjustment should be performed by one by Makita Authorized or Factory Service...
Owners Manual - Page 13

... be used only in this manual. To install the sprocket for 30" (1-3/16"), mount the sprocket onto the spindle with your Makita tool specified in the proper and intended manner. 0 Cutter chain 0 Sharpening holder assembly Part No. 123028-2 I 7 9 1 084-6 791088-8 *791174-5 Width 1 5mm (5/8") 16.5 mm (21/32") 18 mm (11/16") 21 mm (13...
Owners Manual - Page 16

... sprmng 2 0 Hex 8011 M 0 x 4 4 Hex Nul M 0 Lever c Tension Spring 1 2 Pl" 10 s p m g P," 4 20 Chain Cove! MODEL 7104L ,& DESCRIPTION & DESCRIPTION F s b - 0 1 - 0 9 EN MACHINE ~ 1 1 2 1 3 2 4 1 5 1 6 1 7 2... x 8 1Wcth Warherl Pan Head Screw M I N T E D IN JAPAN 1989-2E MA1 ut 73 1 cutter Chal" 14 1 " O K Shs'l 75 I Cham Bar 76 1 B ~ IaIearsng ioo8tt 77 1 Toothed ...
Parts Breakdown - Page 3

.... SPRING 12, 7104 PIN 10, 7104L SPRING PIN 4-20, 9031 CHAIN COVER, 7104L HEX. SPRING 13, 7104L RING 8, 7104L HOOK, 7104L PAN HEAD SCREW M6, 7104L NUT M10-20, 7104L THUMB SCREW M6X15, 5402A COMP. SCREW M4X8, 2708 P.H. SCREW M5X10, 1806B SWITCH CASE SET, 7104L SWITCH CASE SET, 7104L SWITCH, 7104L GEAR HOUSING, 7104L MOTOR HOUSING, 7104L MOTOR HOUSING, 7104L INS. SPRING 7, 3601B HEX...
Parts Breakdown - Page 4

...INDICATOR PLATE, 7104L 1 P.H. SPRING 25, 7104L 2 DISC, 7104L 1 SPRING PIN 6-24, 5600B 2 CHAIN BAR HOLDER, 7104L 1 SPRING PIN 5-40, 7104L 1 CUTTER CHAIN BLADE 18, 7104L 1 HEAD SHAFT, 7104L 1 CHAIN BAR ASSEMBLY 15-24MM, 7104L 1 BALL BEARING 1008LL, 7104L 1 TOOTHED WASHER 6, 7104L 1 COUNTERSUNK HEAD SCREW M6X,7104L 1 B. WASHER 9, 7104L 1 SLEEVE 9, 7104L 1 TENSION SPRING...
Parts Breakdown - Page 5

... 5-24, HR5210C 135 253808-3 F. WASHER 6, 2030S 133 911356-5 P.H. WASHER 8, 5037NB 402 123028-2 SHARPENING HOLDER ASS'Y, 7104L 403 921445-8 HEX BOLT M8X25, 7104L 404 182229-1 OIL SUPPLY 100CC, UC120DWA 405 242012-9 NOZZLE, 5012B 406 781204-0 WRENCH 13-17, 2114C 7104L 1 1 1 1 1 1 1 1 1 1 1 1 1 1 1 1 1 1 1 1 1 1 Page 5 of 5 8/18/2010 Parts Breakdown 131 321232-9 VISE SHAFT...
Flyer (English) - Page 1

...adjust tension knob) Model 7104L Specifications Capacities: Max. Cut 2-1/16" TO Max. Hole Depth No load speed Chain Speed AMPS Overall Dimensions Cord... Equipment • 23/32" (18.25 mm) Cutter Chain (A-16570) • Sharpening Holder (123028-2) • Wrench (781204-0) • 100cc Oil Supply (182229-1) Accessories • Cutter Chain Width Part Number 5/8" (15 mm) (791085-4) 21...
Flyer (English) - Page 2

... Tool Case (821134-4) • Guide Rule (123053-3) UPC Code 088381 00751 1 Master Carton 1 Standard Equipment • Sharpening Holder... (123055-9) • Wrench (782209-3) • Blade Gauge (123010-1) • Wing Nut (934301-3) • Planer Blade (793008-8) 16-5/16" Circular Saw (With Electric Brake) Model 5402NA •ELECTRIC BRAKE for fast stopping of cutter...

Similar Questions

Guide Assembly For Sharpening Scissors Or Knives Part No. 132386-5
I purchased Makita Sharpener Model 9820-2 used. It has the instruction manual with it. The manual li...
(Posted by Nstep84ne 1 month ago)
I Have A 132386-5 Guide Assembly For Sharpening Knives Or Scissors.
Is there a manual on how to use it? For the makita 9820-2.
(Posted by cgleith 10 years ago)
Lose Chain
cannot tighten chain anymore with wrench.is there a replacement part? also would like to buy Mak...
(Posted by angeladelaura 10 years ago)
Ask a New Question
Use the box below to post a new question about this Makita product .
Points & Prizes
  • You can earn points for nearly everything you do on HelpOwl.com
  • You can trade in those points for gift cards at leading retailers such as Amazon.com and Walmart
  • It's that simple!
See How it Works
Create a Free Account

Makita Manuals

Find free Makita 7104L manuals and user guides available at ManualOwl.com. Try out our unique manual viewer allowing you to interact with manuals from directly within your browser!

Makita Reviews

View thousands of Makita user reviews and customer ratings available at ReviewOwl.com.

Contact Information

Complete Makita customer service contact information including steps to reach representatives, hours of operation, customer support links and more from ContactHelp.com.

Scoreboard Ratings

See detailed Makita customer service rankings, employee comments and much more from our sister site.

Makita Recalls

Find comprehensive Makita recall information updated hourly on RecallOwl.com.