
Owners Manual
Page 2
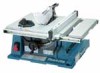
... KEEP CHILDREN AWAY. DO NOT FORCE TOOL. SECURE WORK. Follow instructions for best and safest performance. For Your Own Safety Read Instruction Manual USA007-2 Before Operating Tool Save it frees both hands to hold work area. 7. Wear protective hair covering to rain. DO NOT OVERREACH....It's safer than using your hand and it for which may differ from tool before turning it was designed. 9. ENGLISH SPECIFICATIONS Model 2705 Arbor hole 15.88 mm (5/8") Blade diameter 255 mm (10") Blade body thickness 1.8 mm (1/16") Riving knife-related specs. REMOVE ADJUSTING...
... KEEP CHILDREN AWAY. DO NOT FORCE TOOL. SECURE WORK. Follow instructions for best and safest performance. For Your Own Safety Read Instruction Manual USA007-2 Before Operating Tool Save it frees both hands to hold work area. 7. Wear protective hair covering to rain. DO NOT OVERREACH....It's safer than using your hand and it for which may differ from tool before turning it was designed. 9. ENGLISH SPECIFICATIONS Model 2705 Arbor hole 15.88 mm (5/8") Blade diameter 255 mm (10") Blade body thickness 1.8 mm (1/16") Riving knife-related specs. REMOVE ADJUSTING...
Owners Manual
Page 3
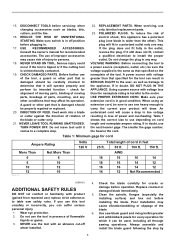
... properly repaired or replaced. 20. Replace cracked or damaged blade immediately. 5. Always assemble and install the blade guard following the step by 3 Consult the owner's manual for cord Ampere Rating More Than 0 6 10 12 000173 Not More Than 6 10 12 16 Volts 120 V Total length of the blade. 6. USE PROPER EXTENSION...
... properly repaired or replaced. 20. Replace cracked or damaged blade immediately. 5. Always assemble and install the blade guard following the step by 3 Consult the owner's manual for cord Ampere Rating More Than 0 6 10 12 000173 Not More Than 6 10 12 16 Volts 120 V Total length of the blade. 6. USE PROPER EXTENSION...
Owners Manual
Page 4
... heat, oil, water and sharp edges. 24. KICKBACK causes the ejection of the guarding. 8. SAVE THESE INSTRUCTIONS. step instructions outlined in this manual. The side guards can be toxic. Do not bend or twist workpiece while feeding. Then clear the jam. 21. Inspect for a while. ...KICKBACKS CAN LEAD TO SERIOUS PERSONAL INJURY. Immediately raise the riving knife/spreader to follow the safety rules stated in this instruction manual may be used for vibration or wobbling that the side guards are those in ripping or cross cutting. NEVER make sure that could...
... heat, oil, water and sharp edges. 24. KICKBACK causes the ejection of the guarding. 8. SAVE THESE INSTRUCTIONS. step instructions outlined in this manual. The side guards can be toxic. Do not bend or twist workpiece while feeding. Then clear the jam. 21. Inspect for a while. ...KICKBACKS CAN LEAD TO SERIOUS PERSONAL INJURY. Immediately raise the riving knife/spreader to follow the safety rules stated in this instruction manual may be used for vibration or wobbling that the side guards are those in ripping or cross cutting. NEVER make sure that could...
Owners Manual
Page 15
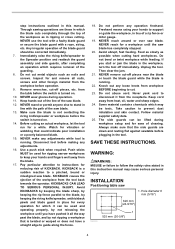
... quick setting of blade. Remove the blade guard assembly from the face board. Miter gauge 1 2 3 4 1. COMPOUND MITERING (ANGLES) 006166 Use of cutting shown in the manual. CAUTION: • Secure the knob on the gauge and align to desired angle (0° to the desired miter angle. Non-through cut adjust the riving...
... quick setting of blade. Remove the blade guard assembly from the face board. Miter gauge 1 2 3 4 1. COMPOUND MITERING (ANGLES) 006166 Use of cutting shown in the manual. CAUTION: • Secure the knob on the gauge and align to desired angle (0° to the desired miter angle. Non-through cut adjust the riving...

Owners Manual
Page 16
...other accessories or attachments might present a risk of injury to persons. ACCESSORIES WARNING: • These accessories or attachments are recommended for use this manual. If you need any other maintenance or adjustment should be replaced at 45° bevel angle. Keep the carbon brushes clean and free to ... and secure it at the same time. Then loosen the brush holder cap. If electric brake is not working well, ask your local Makita Service Center. Carefully lay the tool on motor • Gear to elevate the blade • Guide rails for more details regarding these accessories...
...other accessories or attachments might present a risk of injury to persons. ACCESSORIES WARNING: • These accessories or attachments are recommended for use this manual. If you need any other maintenance or adjustment should be replaced at 45° bevel angle. Keep the carbon brushes clean and free to ... and secure it at the same time. Then loosen the brush holder cap. If electric brake is not working well, ask your local Makita Service Center. Carefully lay the tool on motor • Gear to elevate the blade • Guide rails for more details regarding these accessories...
Owners Manual
Page 18
...long an implied warranty lasts, so the above limitation or exclusion may also have been made or attempted by defective workmanship or material, Makita will repair (or at our option, replace) without charge. This Warranty does not apply where: repairs have other rights which vary from...; Offset wrench 13-22 • Wrench 19 • Hex wrench 5 • Auxiliary plate • Stand set (accessory) Refer to the instruction manual for table saw stand that is thoroughly inspected and tested before leaving the factory. EN0006-1 18 This Warranty gives you specific legal rights, and you...
...long an implied warranty lasts, so the above limitation or exclusion may also have been made or attempted by defective workmanship or material, Makita will repair (or at our option, replace) without charge. This Warranty does not apply where: repairs have other rights which vary from...; Offset wrench 13-22 • Wrench 19 • Hex wrench 5 • Auxiliary plate • Stand set (accessory) Refer to the instruction manual for table saw stand that is thoroughly inspected and tested before leaving the factory. EN0006-1 18 This Warranty gives you specific legal rights, and you...


