Owners Manual
Page 5
...: Tune an AM radio to use any of the law. Funai shall aggressively enforce its protective case when it with actual recordable DVD discs. Cleaning the cabinet • Use a soft cloth slightly moistened with the design is true when the players are no...record high-quality video with AM radio or a digital camera (including built-in camera of the discs. • Always store the disc in this manual is strictly prohibited. Note: This is a registered trademark of Funai Electric Co., Ltd and may need to locate an Authorized Service Center. Playback Editing Function Setup VCR...
...: Tune an AM radio to use any of the law. Funai shall aggressively enforce its protective case when it with actual recordable DVD discs. Cleaning the cabinet • Use a soft cloth slightly moistened with the design is true when the players are no...record high-quality video with AM radio or a digital camera (including built-in camera of the discs. • Always store the disc in this manual is strictly prohibited. Note: This is a registered trademark of Funai Electric Co., Ltd and may need to locate an Authorized Service Center. Playback Editing Function Setup VCR...
Owners Manual
Page 6
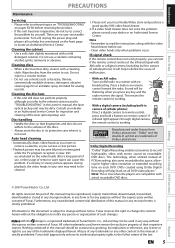
... AN EXTERNAL TUNER 13 SETTINGS FOR THE VIDEO INPUT 14 CONNECTION TO A TV 15 CONNECTION TO AN AUDIO SYSTEM 16 Basic Setup THE VCR / DVD RECORDER SWITCHING 17 GUIDE TO ON-SCREEN DISPLAYS AND MENUS . . . . 18 On-Screen Display / Menu 18 Main Menu 19 INITIAL... SETTING 20 SETTING THE CLOCK 21 Clock Setting 21 Recording INFORMATION ON DVD RECORDING 22 BEFORE RECORDING 23 Make Recording Compatible 23 Setting for Auto Chapter 23 BASIC RECORDING & ONE-TOUCH TIMER RECORDING 24 TIMER RECORDING 26 Hints for Timer Recording 29 SATELLITE LINK 30 OVERWRITING UNNECESSARY TITLE 32 Overwriting ...
... AN EXTERNAL TUNER 13 SETTINGS FOR THE VIDEO INPUT 14 CONNECTION TO A TV 15 CONNECTION TO AN AUDIO SYSTEM 16 Basic Setup THE VCR / DVD RECORDER SWITCHING 17 GUIDE TO ON-SCREEN DISPLAYS AND MENUS . . . . 18 On-Screen Display / Menu 18 Main Menu 19 INITIAL... SETTING 20 SETTING THE CLOCK 21 Clock Setting 21 Recording INFORMATION ON DVD RECORDING 22 BEFORE RECORDING 23 Make Recording Compatible 23 Setting for Auto Chapter 23 BASIC RECORDING & ONE-TOUCH TIMER RECORDING 24 TIMER RECORDING 26 Hints for Timer Recording 29 SATELLITE LINK 30 OVERWRITING UNNECESSARY TITLE 32 Overwriting ...
Owners Manual
Page 7
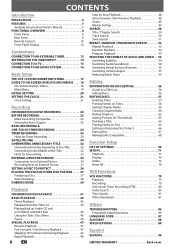
.../satellite box, is removed. Quick search for what you wish to a DVD disc. Compatibility DVD mode Available for playing back discs on recordings as you want to 6 hours for DVD, and 8 hours for VCR. For DVD-RW/ DVD-R, you make. Symbols Used in this unit. An index mark will be... marks on other units without PBC function Description refers to CD-RW/-R with DVD+RW/DVD-RW, which is rewritable repeatedly and DVD+R/DVD-R, which you want to page 67). * DVD-R recorded in the DVD+VR mode. DVD mode VCR mode This unit is applicable to all contents in the disc (refer to ...
.../satellite box, is removed. Quick search for what you wish to a DVD disc. Compatibility DVD mode Available for playing back discs on recordings as you want to 6 hours for DVD, and 8 hours for VCR. For DVD-RW/ DVD-R, you make. Symbols Used in this unit. An index mark will be... marks on other units without PBC function Description refers to CD-RW/-R with DVD+RW/DVD-RW, which is rewritable repeatedly and DVD+R/DVD-R, which you want to page 67). * DVD-R recorded in the DVD+VR mode. DVD mode VCR mode This unit is applicable to all contents in the disc (refer to ...

Owners Manual
Page 8
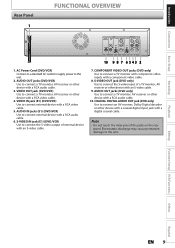
... to start the one -touch timer recording. 8. VIDEO input jack (E2) (DVD/VCR) Use to open . 4. SOURCE button (DVD/VCR) Press to operate. 12. OPEN/CLOSE A button (DVD)* Press to connect external device with a RCA video cable. 6. PLAY B button (DVD)* Press to start or resume playback. 9. RECORD I button (VCR) Press once to start a recording. VCR indicator Lights up when power is...
... to start the one -touch timer recording. 8. VIDEO input jack (E2) (DVD/VCR) Use to open . 4. SOURCE button (DVD/VCR) Press to operate. 12. OPEN/CLOSE A button (DVD)* Press to connect external device with a RCA video cable. 6. PLAY B button (DVD)* Press to start or resume playback. 9. RECORD I button (VCR) Press once to start a recording. VCR indicator Lights up when power is...
Owners Manual
Page 9
...digital input jack with an S-video cable. 7. VIDEO OUT jack (DVD/VCR) Use to connect the S-video output of the jacks on the rear panel. Recording Playback Editing Function Setup VCR Functions Others Español EN 9 Introduction Connections Basic Setup Rear ...Panel 1 FUNCTIONAL OVERVIEW DIGITAL AUDIO OUT DVD DVD/VCR AUDIO S-VIDEO COMPONENT S-VIDEO IN ---AUDIO---OUT OUT VIDEO OUT...
...digital input jack with an S-video cable. 7. VIDEO OUT jack (DVD/VCR) Use to connect the S-video output of the jacks on the rear panel. Recording Playback Editing Function Setup VCR Functions Others Español EN 9 Introduction Connections Basic Setup Rear ...Panel 1 FUNCTIONAL OVERVIEW DIGITAL AUDIO OUT DVD DVD/VCR AUDIO S-VIDEO COMPONENT S-VIDEO IN ---AUDIO---OUT OUT VIDEO OUT...
Owners Manual
Page 11
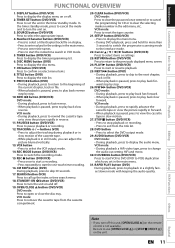
.... OPEN/CLOSE A button (DVD/VCR) DVD mode: Press to display the timer programming list. 6. TIMER button (DVD/VCR) Press to open or close the disc tray. PAUSE F button (DVD/VCR) Press to display the audio menu. AUDIO button (DVD/VCR) DVD mode: • During playback, press to pause playback or recording. 12. D.DUBBING button (DVD/VCR) Press to start a recording. • Press repeatedly to...
.... OPEN/CLOSE A button (DVD/VCR) DVD mode: Press to display the timer programming list. 6. TIMER button (DVD/VCR) Press to open or close the disc tray. PAUSE F button (DVD/VCR) Press to display the audio menu. AUDIO button (DVD/VCR) DVD mode: • During playback, press to pause playback or recording. 12. D.DUBBING button (DVD/VCR) Press to start a recording. • Press repeatedly to...

Owners Manual
Page 12
... / remaining time • Clock • Selected external input position • Remaining time for one-touch timer recording VCR : Appears when this unit is in DVD output mode and a disc is in DVD. : Appears when DVD is opening. Appears when the disc tray is in the unit. : Appears during duplication process. Current status of the unit...
... / remaining time • Clock • Selected external input position • Remaining time for one-touch timer recording VCR : Appears when this unit is in DVD output mode and a disc is in DVD. : Appears when DVD is opening. Appears when the disc tray is in the unit. : Appears during duplication process. Current status of the unit...
Owners Manual
Page 13
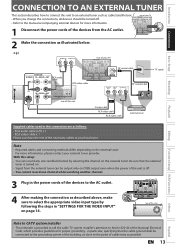
... the external tuner. VHF / UHF • When you change the connections, all devices should banetentnuarned off . • You cannot record one channel while watching another channel. 3 Plug in this setup: • You can be connected to the grounding system of the building... of the National Electrical Code, which provides guidelines for more information, please contact your TV DVD/VCR S-VIDEO IN ---AUDIO---OUT L RCA audio cable RCA video cable IN R IN ---VIDEO---OUT DIGITAL AUDIO OUT DVD DVD/VCR AUDIO S-VIDEO COMPONENT S-VIDEO IN ---AUDIO---OUT OUT VIDEO OUT Y L L PB /...
... the external tuner. VHF / UHF • When you change the connections, all devices should banetentnuarned off . • You cannot record one channel while watching another channel. 3 Plug in this setup: • You can be connected to the grounding system of the building... of the National Electrical Code, which provides guidelines for more information, please contact your TV DVD/VCR S-VIDEO IN ---AUDIO---OUT L RCA audio cable RCA video cable IN R IN ---VIDEO---OUT DIGITAL AUDIO OUT DVD DVD/VCR AUDIO S-VIDEO COMPONENT S-VIDEO IN ---AUDIO---OUT OUT VIDEO OUT Y L L PB /...
Owners Manual
Page 14
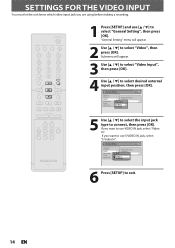
... 7 TIMER DISC MENU ABC 2 JKL 5 TUV 8 SPACE 0 o DEF 3 MNO 6 WXYZ 9 CLEAR SETUP s OK B TITLE RETURN p j B i F h g C TRACKING -- + VCR DVD REC REC MODE D.DUBBING AUDIO I CM SKIP SEARCH RAPID PLAY NB552 1 Press [SETUP] and use VIDEO IN jack, select "Video In". General Setting Playback Display... Video Recording Clock Reset All Progressive Scan TV Aspect E1V(Rideeaor)InpVuidteo Input E1Vi(dReeoarIn) E2S-(VFirdoenot)In 6 Press [SETUP] to select "...
... 7 TIMER DISC MENU ABC 2 JKL 5 TUV 8 SPACE 0 o DEF 3 MNO 6 WXYZ 9 CLEAR SETUP s OK B TITLE RETURN p j B i F h g C TRACKING -- + VCR DVD REC REC MODE D.DUBBING AUDIO I CM SKIP SEARCH RAPID PLAY NB552 1 Press [SETUP] and use VIDEO IN jack, select "Video In". General Setting Playback Display... Video Recording Clock Reset All Progressive Scan TV Aspect E1V(Rideeaor)InpVuidteo Input E1Vi(dReeoarIn) E2S-(VFirdoenot)In 6 Press [SETUP] to select "...
Owners Manual
Page 15
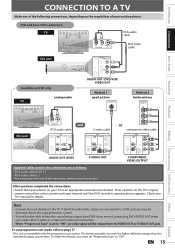
... page 77 • This unit is set progressive scan mode, refer to "ON". VCR and basic DVD connection TV RCA audio cable R L VIDEO AUDIO IN IN RCA video cable Recording Playback Editing Function Setup VCR Functions this unit DIGITAL AUDIO OUT DVD DVD/VCR AUDIO S-VIDEO COMPONENT S-VIDEO IN ---AUDIO---OUT OUT VIDEO OUT Y L L COAXIAL L OUT R PB...
... page 77 • This unit is set progressive scan mode, refer to "ON". VCR and basic DVD connection TV RCA audio cable R L VIDEO AUDIO IN IN RCA video cable Recording Playback Editing Function Setup VCR Functions this unit DIGITAL AUDIO OUT DVD DVD/VCR AUDIO S-VIDEO COMPONENT S-VIDEO IN ---AUDIO---OUT OUT VIDEO OUT Y L L COAXIAL L OUT R PB...
Owners Manual
Page 16
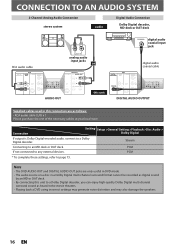
...OUT OUT VIDEO OUT Y L L COAXIAL L OUT R PB /CB IN PR /CR R R IN ---VIDEO---OUT AUDIO OUT R L AUDIO IN analog audio input jacks DVD/VCR S-VIDEO IN ---AUDIO---OUT L IN R IN ---VIDEO---OUT or this connection are as follows: • RCA audio cable (L/R) x 1 Please purchase the rest of the necessary..., refer to a Dolby Digital decoder. Note • The DVD AUDIO OUT and DIGITAL AUDIO OUT jacks are only useful in DVD mode. • The audio source on a disc in a Dolby Digital multi channel surround format cannot be recorded as digital sound by an MD or DAT deck. •...
...OUT OUT VIDEO OUT Y L L COAXIAL L OUT R PB /CB IN PR /CR R R IN ---VIDEO---OUT AUDIO OUT R L AUDIO IN analog audio input jacks DVD/VCR S-VIDEO IN ---AUDIO---OUT L IN R IN ---VIDEO---OUT or this connection are as follows: • RCA audio cable (L/R) x 1 Please purchase the rest of the necessary..., refer to a Dolby Digital decoder. Note • The DVD AUDIO OUT and DIGITAL AUDIO OUT jacks are only useful in DVD mode. • The audio source on a disc in a Dolby Digital multi channel surround format cannot be recorded as digital sound by an MD or DAT deck. •...

Owners Manual
Page 27
...VCR timer recording have not set for the other component (e.g., DVD) is connected, then press [B]. BS CS DR CD HDD DVD "VCR" will appear on the front panel display. When finished operating, press [TIMER SET] to resume the timer-standby mode. • In the timer-standby mode, you select the recording..., or correcting the timer programming information" on page 28. 1/1 6 Use [K / L] to "Recording Mode" on page 22 for DVD or "Recording" on page 79 for VCR. • You can check the remaining recordable space of the disc when you can turn on the disc and determines the appropriate...
...VCR timer recording have not set for the other component (e.g., DVD) is connected, then press [B]. BS CS DR CD HDD DVD "VCR" will appear on the front panel display. When finished operating, press [TIMER SET] to resume the timer-standby mode. • In the timer-standby mode, you select the recording..., or correcting the timer programming information" on page 28. 1/1 6 Use [K / L] to "Recording Mode" on page 22 for DVD or "Recording" on page 79 for VCR. • You can check the remaining recordable space of the disc when you can turn on the disc and determines the appropriate...
Owners Manual
Page 30
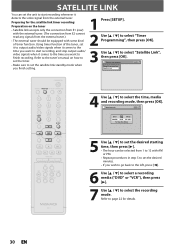
...link standby mode when you wish to go back to the left, press [{]. 6 Use [K / L] to select a recording media ("DVD" or "VCR"), then press [B]. 7 Use [K / L] to select the recording mode. Timer Programming Timer Programming Satellite Link STANDBY-ON SOURCE TIMER SET DISPLAY OPEN/CLOSE A .@/: 1 GHI 4 PQRS 7...Satellite Link", then press [OK]. Satellite Link Start 5:00PM DVD VCR DVD Mode SP (2Hr) To Standby Mode 5 Use [K / L] to set the desired starting time, then press [B]. • The hour can set the unit to start recording, and stop output audio/ video signals when it detects the...
...link standby mode when you wish to go back to the left, press [{]. 6 Use [K / L] to select a recording media ("DVD" or "VCR"), then press [B]. 7 Use [K / L] to select the recording mode. Timer Programming Timer Programming Satellite Link STANDBY-ON SOURCE TIMER SET DISPLAY OPEN/CLOSE A .@/: 1 GHI 4 PQRS 7...Satellite Link", then press [OK]. Satellite Link Start 5:00PM DVD VCR DVD Mode SP (2Hr) To Standby Mode 5 Use [K / L] to set the desired starting time, then press [B]. • The hour can set the unit to start recording, and stop output audio/ video signals when it detects the...

Owners Manual
Page 31
... Others Notes • If the signal of the unit. Refer to check the satellite link timer recording in progress. timer recording satellite link actual recording timer recording satellite link actual recording The first 2 minutes (at step 3. Satellite Link Start 5:00PM DVD VCR DVD Mode SP (2Hr) To Standby Mode In a second, the unit will be turned off . Introduction...
... Others Notes • If the signal of the unit. Refer to check the satellite link timer recording in progress. timer recording satellite link actual recording timer recording satellite link actual recording The first 2 minutes (at step 3. Satellite Link Start 5:00PM DVD VCR DVD Mode SP (2Hr) To Standby Mode In a second, the unit will be turned off . Introduction...

Owners Manual
Page 34
... IN ---AUDIO---OUT L L IN R R IN ---VIDEO---OUT RCA audio cable E2 to E2 IN E1 to E1 IN DIGITAL AUDIO OUT DVD DVD/VCR AUDIO S-VIDEO COMPONENT S-VIDEO IN ---AUDIO---OUT OUT VIDEO OUT Y L L COAXIAL R IN R R IN ---VIDEO---OUT front of this unit rear of this unit After ...connection are as described above, make sure to select the appropriate video input type by using S-video or RCA audio / video cables. EXTERNAL DEVICE RECORDING Connection to an External Device Connect the external device properly to either E2 (front) or E1 (rear) input jacks of this unit by following the...
... IN ---AUDIO---OUT L L IN R R IN ---VIDEO---OUT RCA audio cable E2 to E2 IN E1 to E1 IN DIGITAL AUDIO OUT DVD DVD/VCR AUDIO S-VIDEO COMPONENT S-VIDEO IN ---AUDIO---OUT OUT VIDEO OUT Y L L COAXIAL R IN R R IN ---VIDEO---OUT front of this unit rear of this unit After ...connection are as described above, make sure to select the appropriate video input type by using S-video or RCA audio / video cables. EXTERNAL DEVICE RECORDING Connection to an External Device Connect the external device properly to either E2 (front) or E1 (rear) input jacks of this unit by following the...
Owners Manual
Page 35
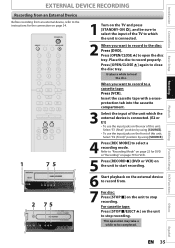
...while to be sure to select the input of this unit; When you want to record to a cassette tape: Press [VCR]. Refer to "Recording Mode" on page 22 for DVD or "Recording" on page 79 for the connection on page 34. This operation may take a ...9 CLEAR SETUP s OK B TITLE RETURN p j B i F h g C TRACKING -- + VCR DVD REC REC MODE D.DUBBING AUDIO I ] (DVD or VCR) on the unit to start recording. 6 Start playback on the external device to record from an external device, refer to the instructions for VCR. 5 Press [RECORD I CM SKIP SEARCH RAPID PLAY 1 75 2 75 1 Turn on the TV...
...while to be sure to select the input of this unit; When you want to record to a cassette tape: Press [VCR]. Refer to "Recording Mode" on page 22 for DVD or "Recording" on page 79 for the connection on page 34. This operation may take a ...9 CLEAR SETUP s OK B TITLE RETURN p j B i F h g C TRACKING -- + VCR DVD REC REC MODE D.DUBBING AUDIO I ] (DVD or VCR) on the unit to start recording. 6 Start playback on the external device to record from an external device, refer to the instructions for VCR. 5 Press [RECORD I CM SKIP SEARCH RAPID PLAY 1 75 2 75 1 Turn on the TV...

Owners Manual
Page 40
For Audio CD to stop the recording. VCR to DVD DUBBING MODE DVD to VCR 4 Use [K / L] to exit. General Setting Playback Display Video Recording Clock Reset All Auto Chapter Auto Finalize Dubbing MoDduebbing Mode Make Recording Compatible VCR DVD DVD VCR VCR", 5 Press [SETUP] to select "VCR then press [OK]. Press [VCR]. 5 Press [SETUP] to select a recording mode using [REC MODE]. 8 Press [D.DUBBING]. Then press [PAUSE...
For Audio CD to stop the recording. VCR to DVD DUBBING MODE DVD to VCR 4 Use [K / L] to exit. General Setting Playback Display Video Recording Clock Reset All Auto Chapter Auto Finalize Dubbing MoDduebbing Mode Make Recording Compatible VCR DVD DVD VCR VCR", 5 Press [SETUP] to select "VCR then press [OK]. Press [VCR]. 5 Press [SETUP] to select a recording mode using [REC MODE]. 8 Press [D.DUBBING]. Then press [PAUSE...

Owners Manual
Page 41
... CD You can only play back DVD recorded in VR mode or non compatible recording format On the following information. DVD-video title 1 title 2 chapter 1 chapter 2 chapter 1 chapter 2 chapter 3 track 1 audio CD, video CD track 2 track 3 track 4 track 5 folder 1 file 1 file 2 MP3 file 3 folder 2 file 4 file 5 Editing Function Setup VCR Functions Others Español...
... CD You can only play back DVD recorded in VR mode or non compatible recording format On the following information. DVD-video title 1 title 2 chapter 1 chapter 2 chapter 1 chapter 2 chapter 3 track 1 audio CD, video CD track 2 track 3 track 4 track 5 folder 1 file 1 file 2 MP3 file 3 folder 2 file 4 file 5 Editing Function Setup VCR Functions Others Español...

Owners Manual
Page 55
... camera angle is more angles. If noises appear on the TV screen during playing back discs recorded in a case sound is distorted. • The setting will be kept even when the unit is turned off. Press [DVD] first. 1) During playback, press [DISPLAY]. 2) Use [{ / B] to select , ... your existing 2 channel stereo system. Angle will switch each time you set "Angle Icon" to page 74. e.g.) DVD-video 1/ 5 1/ 5 0:01:00 / 1:23:45 DVD Video Recording Playback Editing Function Setup VCR Functions 3) Use [K / L] to select , then press [OK]. Refer to "OFF" in the playback picture.
... camera angle is more angles. If noises appear on the TV screen during playing back discs recorded in a case sound is distorted. • The setting will be kept even when the unit is turned off. Press [DVD] first. 1) During playback, press [DISPLAY]. 2) Use [{ / B] to select , ... your existing 2 channel stereo system. Angle will switch each time you set "Angle Icon" to page 74. e.g.) DVD-video 1/ 5 1/ 5 0:01:00 / 1:23:45 DVD Video Recording Playback Editing Function Setup VCR Functions 3) Use [K / L] to select , then press [OK]. Refer to "OFF" in the playback picture.

Owners Manual
Page 70
... Disc Full 15 minutes 30 minutes 60 minutes ON OFF General Setting End of Timer Rec ON OFF Dubbing Mode Pages 39-40 Make Recording Compatible Page 23 VCR DVD DVD VCR ON OFF Clock Page 21 Clock Setting Reset All Page 78 Yes No Contents Insert chapter marks at even time interval. Note •...
... Disc Full 15 minutes 30 minutes 60 minutes ON OFF General Setting End of Timer Rec ON OFF Dubbing Mode Pages 39-40 Make Recording Compatible Page 23 VCR DVD DVD VCR ON OFF Clock Page 21 Clock Setting Reset All Page 78 Yes No Contents Insert chapter marks at even time interval. Note •...


