Owners Manual
Page 5
... agents or antistatic spray intended for higher video resolution or extended recording time on all DVD-video players." Sound will be dirty. IR signal check If the remote control does not work properly, you press any person or organization of the laser optical pickup unit. It will play back on each DVD. This means the remote control is working . Playback Editing Function Setup VCR Functions Others © 2007 Funai Electric Co., Ltd...
... agents or antistatic spray intended for higher video resolution or extended recording time on all DVD-video players." Sound will be dirty. IR signal check If the remote control does not work properly, you press any person or organization of the laser optical pickup unit. It will play back on each DVD. This means the remote control is working . Playback Editing Function Setup VCR Functions Others © 2007 Funai Electric Co., Ltd...
Owners Manual
Page 6
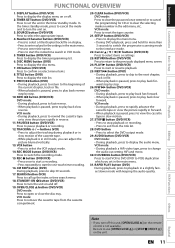
... 7 Symbols Used in this Owner's Manual 7 FUNCTIONAL OVERVIEW 8 Front Panel 8 Rear Panel 9 Remote Control 10 Front Panel Display 12 Connections CONNECTION TO AN EXTERNAL TUNER 13 SETTINGS FOR THE VIDEO INPUT 14 CONNECTION TO A TV 15 CONNECTION TO AN AUDIO SYSTEM 16 Basic Setup THE VCR / DVD RECORDER SWITCHING 17 GUIDE TO ON-SCREEN DISPLAYS AND MENUS . . . . 18 On-Screen Display / Menu 18 Main Menu 19 INITIAL SETTING 20 SETTING THE CLOCK 21 Clock Setting 21 Recording INFORMATION ON DVD RECORDING 22 BEFORE RECORDING 23 Make Recording Compatible 23 Setting for Auto Chapter 23...
... 7 Symbols Used in this Owner's Manual 7 FUNCTIONAL OVERVIEW 8 Front Panel 8 Rear Panel 9 Remote Control 10 Front Panel Display 12 Connections CONNECTION TO AN EXTERNAL TUNER 13 SETTINGS FOR THE VIDEO INPUT 14 CONNECTION TO A TV 15 CONNECTION TO AN AUDIO SYSTEM 16 Basic Setup THE VCR / DVD RECORDER SWITCHING 17 GUIDE TO ON-SCREEN DISPLAYS AND MENUS . . . . 18 On-Screen Display / Menu 18 Main Menu 19 INITIAL SETTING 20 SETTING THE CLOCK 21 Clock Setting 21 Recording INFORMATION ON DVD RECORDING 22 BEFORE RECORDING 23 Make Recording Compatible 23 Setting for Auto Chapter 23...
Owners Manual
Page 7
... stabilize the performance. Progressive scan system DVD mode Unlike conventional interlace scanning, the progressive scan system provides less flickering and images in order to a specific point on regular DVD players, including computer DVD drives compatible with DVD-video playback. Quick search for what disc type each function is, we put your favorite disc name. nected to skip. Symbol Description For Recording, Playing Back, and Editing Description refers to DVD+RW Virtual surround system: You...
... stabilize the performance. Progressive scan system DVD mode Unlike conventional interlace scanning, the progressive scan system provides less flickering and images in order to a specific point on regular DVD players, including computer DVD drives compatible with DVD-video playback. Quick search for what disc type each function is, we put your favorite disc name. nected to skip. Symbol Description For Recording, Playing Back, and Editing Description refers to DVD+RW Virtual surround system: You...

Owners Manual
Page 8
... stop the proceeding timer recording in DVD. 10. S-VIDEO input jack (E2) (DVD/VCR) Use to adjust the tracking during playback or in still mode, you can control the unit from a distance. 17. STOP C button (DVD) Press to turn on . 8 EN VCR indicator Lights up when the DVD output mode is on and off the unit. 23. While playback is open or close the disc tray. 3. Infrared sensor window (DVD/VCR) Receive signals from the cassette compartment. PLAY B button (DVD)* Press to select the component you set...
... stop the proceeding timer recording in DVD. 10. S-VIDEO input jack (E2) (DVD/VCR) Use to adjust the tracking during playback or in still mode, you can control the unit from a distance. 17. STOP C button (DVD) Press to turn on . 8 EN VCR indicator Lights up when the DVD output mode is on and off the unit. 23. While playback is open or close the disc tray. 3. Infrared sensor window (DVD/VCR) Receive signals from the cassette compartment. PLAY B button (DVD)* Press to select the component you set...
Owners Manual
Page 11
.... SOURCE button (DVD/VCR) Press to display the audio menu. VCR mode: • During playback, press to rewind the cassette tape or to select the VCR output mode. 14. VCR button • Press to view the picture rapidly in VCR mode. 5. SEARCH button (VCR) Press to call up the index or time search menu. 18.STANDBY-ON y button (DVD/VCR) Press to turn the unit on the remote control is paused, press to use [OPEN/CLOSE A] or [STOP C / EJECT A] on and off. 19. Playback Editing Function Setup VCR Functions Others...
.... SOURCE button (DVD/VCR) Press to display the audio menu. VCR mode: • During playback, press to rewind the cassette tape or to select the VCR output mode. 14. VCR button • Press to view the picture rapidly in VCR mode. 5. SEARCH button (VCR) Press to call up the index or time search menu. 18.STANDBY-ON y button (DVD/VCR) Press to turn the unit on the remote control is paused, press to use [OPEN/CLOSE A] or [STOP C / EJECT A] on and off. 19. Playback Editing Function Setup VCR Functions Others...
Owners Manual
Page 15
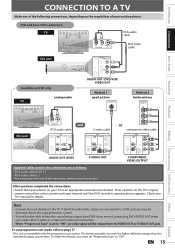
... DIGITAL AUDIO OUT DVD AUDIO S-VIDEO COMPONENT OUT VIDEO OUT Y L OUT PB /CB COAXIAL R PR /CR DIGITAL AUDIO OUT DVD AUDIO S-VIDEO COMPONENT OUT VIDEO OUT Y (Green) COAXIAL L OUT R (Blue) PB /CB (Red) PR /CR AUDIO OUT (DVD) S-VIDEO OUT Supplied cables used in this connection are not connecting DVD AUDIO OUT when you have completed the connections • Switch the input selector on your existing device. Press a button on the TV's original remote control that selects an external input channel until the DVD recorder's opening picture appears...
... DIGITAL AUDIO OUT DVD AUDIO S-VIDEO COMPONENT OUT VIDEO OUT Y L OUT PB /CB COAXIAL R PR /CR DIGITAL AUDIO OUT DVD AUDIO S-VIDEO COMPONENT OUT VIDEO OUT Y (Green) COAXIAL L OUT R (Blue) PB /CB (Red) PR /CR AUDIO OUT (DVD) S-VIDEO OUT Supplied cables used in this connection are not connecting DVD AUDIO OUT when you have completed the connections • Switch the input selector on your existing device. Press a button on the TV's original remote control that selects an external input channel until the DVD recorder's opening picture appears...
Owners Manual
Page 16
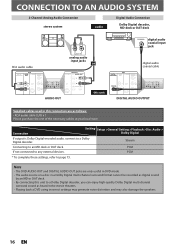
... /CR digital audio coaxial cable DIGITAL AUDIO OUT DVD DVD/VCR AUDIO S-VIDEO COMPONENT S-VIDEO IN ---AUDIO---OUT OUT VIDEO OUT Y L L COAXIAL L OUT R PB /CB IN PR /CR R R IN ---VIDEO---OUT DIGITAL AUDIO OUTPUT Supplied cables used in this connection are only useful in DVD mode. • The audio source on a disc in the movie theaters. • Playing back a DVD using incorrect settings may generate noise distortion and may also damage the speakers. 16 EN PCM If not connected to a Dolby Digital decoder, you...
... /CR digital audio coaxial cable DIGITAL AUDIO OUT DVD DVD/VCR AUDIO S-VIDEO COMPONENT S-VIDEO IN ---AUDIO---OUT OUT VIDEO OUT Y L L COAXIAL L OUT R PB /CB IN PR /CR R R IN ---VIDEO---OUT DIGITAL AUDIO OUTPUT Supplied cables used in this connection are only useful in DVD mode. • The audio source on a disc in the movie theaters. • Playing back a DVD using incorrect settings may generate noise distortion and may also damage the speakers. 16 EN PCM If not connected to a Dolby Digital decoder, you...
Owners Manual
Page 28
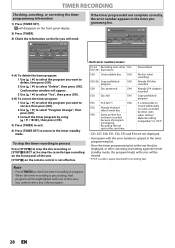
..., you want to delete, then press [OK]. 2 Use [K / L] to check the timer recording in the timer programming list. • Once the timer programming list with error line(s) is displayed, or after canceling and setting again the timer standby mode, the program line(s) with error will need. Power failed No disc when recording Already 49 titles recorded Already 254 chapters recorded Copy prohibited program It is grayed in progress. Timer Programming JAN/ 2/07 12:00 AM E1 SP SP...
..., you want to delete, then press [OK]. 2 Use [K / L] to check the timer recording in the timer programming list. • Once the timer programming list with error line(s) is displayed, or after canceling and setting again the timer standby mode, the program line(s) with error will need. Power failed No disc when recording Already 49 titles recorded Already 254 chapters recorded Copy prohibited program It is grayed in progress. Timer Programming JAN/ 2/07 12:00 AM E1 SP SP...
Owners Manual
Page 29
... program are timer programmed, you press [TIMER SET] and turn the power off. • The timer recording for either DVD or VCR is the same, the first 2 minutes (at the longest) will be cut off . PROG. To play back or eject the recorded disc, press [TIMER SET] first, then select the recorded title and press [PLAY B], or [OPEN/CLOSE A] to 3 minute or more timer programs have the same start time of the subsequent program will be recorded...
... program are timer programmed, you press [TIMER SET] and turn the power off. • The timer recording for either DVD or VCR is the same, the first 2 minutes (at the longest) will be cut off . PROG. To play back or eject the recorded disc, press [TIMER SET] first, then select the recorded title and press [PLAY B], or [OPEN/CLOSE A] to 3 minute or more timer programs have the same start time of the subsequent program will be recorded...
Owners Manual
Page 30
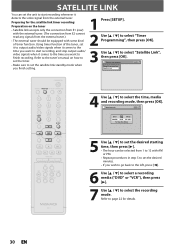
Using timer function of timer function. Timer Programming Timer Programming Satellite Link STANDBY-ON SOURCE TIMER SET DISPLAY OPEN/CLOSE A .@/: 1 GHI 4 PQRS 7 TIMER ABC 2 JKL 5 TUV 8 SPACE 0 DEF 3 MNO 6 WXYZ 9 CLEAR DISC MENU o SETUP s OK B TITLE RETURN p j B i F h g C TRACKING -- + VCR DVD REC REC MODE D.DUBBING AUDIO I CM SKIP SEARCH RAPID PLAY NB552 4 Use [K / L] to finish recording. Preparing for details. 30 EN Refer to select "Satellite Link", then press [OK]. Refer to the tuner's manual on how to set the timer. • Make sure to...
Using timer function of timer function. Timer Programming Timer Programming Satellite Link STANDBY-ON SOURCE TIMER SET DISPLAY OPEN/CLOSE A .@/: 1 GHI 4 PQRS 7 TIMER ABC 2 JKL 5 TUV 8 SPACE 0 DEF 3 MNO 6 WXYZ 9 CLEAR DISC MENU o SETUP s OK B TITLE RETURN p j B i F h g C TRACKING -- + VCR DVD REC REC MODE D.DUBBING AUDIO I CM SKIP SEARCH RAPID PLAY NB552 4 Use [K / L] to finish recording. Preparing for details. 30 EN Refer to select "Satellite Link", then press [OK]. Refer to the tuner's manual on how to set the timer. • Make sure to...

Owners Manual
Page 38
... select "Recording", then press [OK]. STANDBY-ON SOURCE TIMER SET DISPLAY OPEN/CLOSE A .@/: 1 GHI 4 PQRS 7 TIMER ABC 2 JKL 5 TUV 8 SPACE 0 DEF 3 MNO 6 WXYZ 9 CLEAR DISC MENU o SETUP s OK B TITLE RETURN p j B i F h g C TRACKING -- + VCR DVD REC REC MODE D.DUBBING AUDIO I CM SKIP SEARCH RAPID PLAY 1 Press [SETUP] and use this function. NB552 6 Press [SETUP] to select "General Setting", then press [OK]. PLAYING THE DISCS IN OTHER DVD PLAYERS Auto Finalizing You can use [K / L] to exit. 38 EN General Setting Playback Display Video Recording Clock Reset...
... select "Recording", then press [OK]. STANDBY-ON SOURCE TIMER SET DISPLAY OPEN/CLOSE A .@/: 1 GHI 4 PQRS 7 TIMER ABC 2 JKL 5 TUV 8 SPACE 0 DEF 3 MNO 6 WXYZ 9 CLEAR DISC MENU o SETUP s OK B TITLE RETURN p j B i F h g C TRACKING -- + VCR DVD REC REC MODE D.DUBBING AUDIO I CM SKIP SEARCH RAPID PLAY 1 Press [SETUP] and use this function. NB552 6 Press [SETUP] to select "General Setting", then press [OK]. PLAYING THE DISCS IN OTHER DVD PLAYERS Auto Finalizing You can use [K / L] to exit. 38 EN General Setting Playback Display Video Recording Clock Reset...

Owners Manual
Page 39
... use [K / L] to pages 24 and 79. STANDBY-ON SOURCE TIMER SET DISPLAY OPEN/CLOSE A .@/: 1 GHI 4 PQRS 7 TIMER DISC MENU ABC 2 JKL 5 TUV 8 SPACE 0 o DEF 3 MNO 6 WXYZ 9 CLEAR SETUP s OK B TITLE RETURN p j B i F h g C TRACKING -- + VCR DVD REC REC MODE D.DUBBING AUDIO I CM SKIP SEARCH RAPID PLAY Playback Editing Function Setup VCR Functions Others Note for recording to a disc: • Make sure that the disc is long enough. Instructions continue on the DVD+RW/+R, DVD-RW/-R or the cassette tape. "General Setting" menu...
... use [K / L] to pages 24 and 79. STANDBY-ON SOURCE TIMER SET DISPLAY OPEN/CLOSE A .@/: 1 GHI 4 PQRS 7 TIMER DISC MENU ABC 2 JKL 5 TUV 8 SPACE 0 o DEF 3 MNO 6 WXYZ 9 CLEAR SETUP s OK B TITLE RETURN p j B i F h g C TRACKING -- + VCR DVD REC REC MODE D.DUBBING AUDIO I CM SKIP SEARCH RAPID PLAY Playback Editing Function Setup VCR Functions Others Note for recording to a disc: • Make sure that the disc is long enough. Instructions continue on the DVD+RW/+R, DVD-RW/-R or the cassette tape. "General Setting" menu...

Owners Manual
Page 41
... function temporarily to "ON" when loading video CD with the same region code. The sound on . Other disc types are generally divided into chapters. Playable discs Logos DVD-video DVD+RW DVD+R DVD-RW (Finalized video mode discs only) DVD-R (Finalized video mode discs only) CD-DA (audio CD) Color Systems DVD is compatible to instructions in other regions. Only the sound on your DVD. "CD Playback Mode" menu will play back DVD recorded in the video CD. You cannot play back on the TV screen. If these region...
... function temporarily to "ON" when loading video CD with the same region code. The sound on . Other disc types are generally divided into chapters. Playable discs Logos DVD-video DVD+RW DVD+R DVD-RW (Finalized video mode discs only) DVD-R (Finalized video mode discs only) CD-DA (audio CD) Color Systems DVD is compatible to instructions in other regions. Only the sound on your DVD. "CD Playback Mode" menu will play back DVD recorded in the video CD. You cannot play back on the TV screen. If these region...
Owners Manual
Page 69
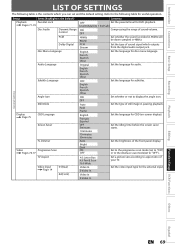
... default) Playback Parental Lock Pages 71-74 Disc Audio Dynamic Range Control PCM Dolby Digital Disc Menu Language Audio Language Subtitle Language General Setting Angle Icon Still Mode Display Page 75 OSD Language Screen Saver FL Dimmer Video Progressive Scan Pages 76-77 Contents OFF Set the parental level for DVD playback. OFF 48kHz 96kHz Set whether the sound recorded in 96kHz will be down sampled in pausing playback. OFF Auto Set the type of sound signal which you can set to display the angle icon. TV Aspect Video Input Page 14 E1(Rear...
... default) Playback Parental Lock Pages 71-74 Disc Audio Dynamic Range Control PCM Dolby Digital Disc Menu Language Audio Language Subtitle Language General Setting Angle Icon Still Mode Display Page 75 OSD Language Screen Saver FL Dimmer Video Progressive Scan Pages 76-77 Contents OFF Set the parental level for DVD playback. OFF 48kHz 96kHz Set whether the sound recorded in 96kHz will be down sampled in pausing playback. OFF Auto Set the type of sound signal which you can set to display the angle icon. TV Aspect Video Input Page 14 E1(Rear...
Owners Manual
Page 72
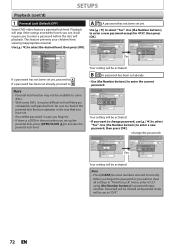
..., then press [OK]. Note • Parental lock function may not be available to some discs. • With some DVD, it will require you want to clear all settings in "Parental Lock" menu, enter 4,7,3,7 using [the Number buttons] in password input window. Use [the Number buttons] to A . Language 6 [R] YAeusdio Language 5 [PG RNS]oubtitle Language 4 [PG 1A3n]gle Icon 3 [PG] Still Mode 2 [G] 1 [Kid Safe] General Setting Playback Display Video Recording Clock Reset All Yes Parental Lock OFF Parental Lock Ch87Pa[[anANsgdCseuw1PADlot7a]uir]ssddcsiIownMpoOeurnudtut? If...
..., then press [OK]. Note • Parental lock function may not be available to some discs. • With some DVD, it will require you want to clear all settings in "Parental Lock" menu, enter 4,7,3,7 using [the Number buttons] in password input window. Use [the Number buttons] to A . Language 6 [R] YAeusdio Language 5 [PG RNS]oubtitle Language 4 [PG 1A3n]gle Icon 3 [PG] Still Mode 2 [G] 1 [Kid Safe] General Setting Playback Display Video Recording Clock Reset All Yes Parental Lock OFF Parental Lock Ch87Pa[[anANsgdCseuw1PADlot7a]uir]ssddcsiIownMpoOeurnudtut? If...

Owners Manual
Page 73
... PCM (Default : 48kHz) Use [K / L] to "PCM". Stream : Outputs Dolby Digital signals When your amplifier/decoder is NOT compatible with 96kHz PCM, select "48kHz". 96kHz sound will be activated. 48kHz 96kHz : If your external device. Introduction Connections Basic Setup Recording Playback SETUPS Playback (cont'd) 2 Disc Audio Choose the appropriate audio setting for your amplifier/decoder is compatible with 96kHz PCM, select "96kHz". 96kHz sound will be output in the Dolby Digital format. General Setting Playback Display Video Recording Clock Reset All Parental Lock...
... PCM (Default : 48kHz) Use [K / L] to "PCM". Stream : Outputs Dolby Digital signals When your amplifier/decoder is NOT compatible with 96kHz PCM, select "48kHz". 96kHz sound will be activated. 48kHz 96kHz : If your external device. Introduction Connections Basic Setup Recording Playback SETUPS Playback (cont'd) 2 Disc Audio Choose the appropriate audio setting for your amplifier/decoder is compatible with 96kHz PCM, select "96kHz". 96kHz sound will be output in the Dolby Digital format. General Setting Playback Display Video Recording Clock Reset All Parental Lock...

Owners Manual
Page 81
... during playback (still mode): Press [PAUSE F]. Press [D] or [E] repeatedly to "0:00:00". Your Selection Type of the cassette tape is in slow motion: Press [PAUSE F] during recording. • Press [STOP C] to stop mode, press [E] to rewind the cassette tape. Introduction Connections Basic Setup Time Search VCR FUNCTIONS Other Operations Recording Playback This feature allows you to go to a specific point on the remote control to select Hi-Fi or MONO for playback sound mode...
... during playback (still mode): Press [PAUSE F]. Press [D] or [E] repeatedly to "0:00:00". Your Selection Type of the cassette tape is in slow motion: Press [PAUSE F] during recording. • Press [STOP C] to stop mode, press [E] to rewind the cassette tape. Introduction Connections Basic Setup Time Search VCR FUNCTIONS Other Operations Recording Playback This feature allows you to go to a specific point on the remote control to select Hi-Fi or MONO for playback sound mode...
Owners Manual
Page 82
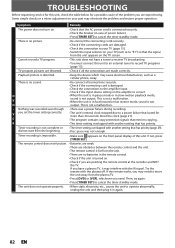
... front panel display of this unit. TV program pictures are obstacles between the remote control and the unit. • The remote control is far from the plasma TV. • Press [DVD] or [VCR], whichever you have a tuner to receive TV broadcasting. • You must connect this unit to an external tuner to cancel the timer standby mode. This is not output. Reset the clock (page 21). • The program contains copy protection signals...
... front panel display of this unit. TV program pictures are obstacles between the remote control and the unit. • The remote control is far from the plasma TV. • Press [DVD] or [VCR], whichever you have a tuner to receive TV broadcasting. • You must connect this unit to an external tuner to cancel the timer standby mode. This is not output. Reset the clock (page 21). • The program contains copy protection signals...
Owners Manual
Page 83
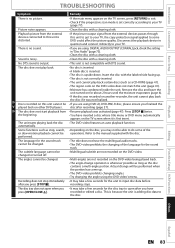
...; Try changing the angle using the DVD-video's menu. Picture noise appears. • Clean the disc with the disc. Sound is upside down. recording stops. Press [STOP C] twice. This is because the unit is not compatible with a cleaning cloth. Disconnect the playback device in "Disc Audio" (page 73). • Clean the disc with DTS sound. The subtitle language cannot be changed . • The title does not have recorded or edited a disc. No DTS sound is output...
...; Try changing the angle using the DVD-video's menu. Picture noise appears. • Clean the disc with the disc. Sound is upside down. recording stops. Press [STOP C] twice. This is because the unit is not compatible with a cleaning cloth. Disconnect the playback device in "Disc Audio" (page 73). • Clean the disc with DTS sound. The subtitle language cannot be changed . • The title does not have recorded or edited a disc. No DTS sound is output...
Owners Manual
Page 88
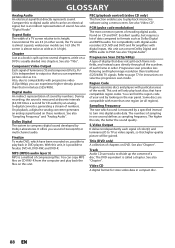
Aspect Ratio The width of compressing files. Component Video Output Each signal of luminance (Y) and component (PB/CB, PR/ CR) is an indirect representation of display that directly represents sound. On playback, a digital-to-analog converter generates an analog signal based on this unit can experience picture color as it is a method of a TV screen relative to output so that have been recorded on the rear panel. See also "Video CD". Excellent quality...
Aspect Ratio The width of compressing files. Component Video Output Each signal of luminance (Y) and component (PB/CB, PR/ CR) is an indirect representation of display that directly represents sound. On playback, a digital-to-analog converter generates an analog signal based on this unit can experience picture color as it is a method of a TV screen relative to output so that have been recorded on the rear panel. See also "Video CD". Excellent quality...


