Quick Start Guide
Page 1
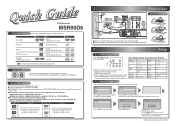
... AUDIO OUT COAXIAL (Back of this sheet. IDiscs that are proven to be recorded to Channel Preset. Remote Control 2 Setup 2 - 1 Watching on TV Press [STANDBY-ON ] to ...00 Kenwood LXI-Series Magnavox AUX 00 AUX CHANNEL Sony Toshiba Zenith VIDEO1, VIDEO2, VIDEO3 TV/GAME 00 2 - 2 Initial Setup Set up the following discs. recording time (SLP mode):...Setting. DVD Recorder MSR90D6 Playable discs Disc DVD-VIDEO This unit is a trademark of DVD Format/Logo Licensing Corporation. Logo Disc DVD-R (VIDEO mode, Finalized) Logo DVD+RW CD-DA (AUDIO CD) DVD+R DVD+R Double Layer DVD-RW (...
... AUDIO OUT COAXIAL (Back of this sheet. IDiscs that are proven to be recorded to Channel Preset. Remote Control 2 Setup 2 - 1 Watching on TV Press [STANDBY-ON ] to ...00 Kenwood LXI-Series Magnavox AUX 00 AUX CHANNEL Sony Toshiba Zenith VIDEO1, VIDEO2, VIDEO3 TV/GAME 00 2 - 2 Initial Setup Set up the following discs. recording time (SLP mode):...Setting. DVD Recorder MSR90D6 Playable discs Disc DVD-VIDEO This unit is a trademark of DVD Format/Logo Licensing Corporation. Logo Disc DVD-R (VIDEO mode, Finalized) Logo DVD+RW CD-DA (AUDIO CD) DVD+R DVD+R Double Layer DVD-RW (...
Quick Start Guide
Page 6
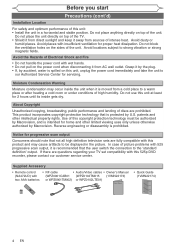
.... Do not block the ventilation holes on the power cord when disconnecting it by the plug. • If, by U.S. Supplied Accessory • Remote control (NA472UD) with this 525p DVD recorder, please contact our customer service center. Before you start Precautions (cont'd) Installation Location For safety and optimum performance of this unit: • Install...
.... Do not block the ventilation holes on the power cord when disconnecting it by the plug. • If, by U.S. Supplied Accessory • Remote control (NA472UD) with this 525p DVD recorder, please contact our customer service center. Before you start Precautions (cont'd) Installation Location For safety and optimum performance of this unit: • Install...
Quick Start Guide
Page 7
... from Dolby Laboratories. Note: This is working . • With a digital camera (including built-in camera of cellular phone): Direct a digital camera to remote control, press and hold a button on recordable DVD discs. Do not use solvents such as benzine, thinner, commercially available cleaners, detergent, abrasive cleaning agents or antistatic spray intended for inspection...
... from Dolby Laboratories. Note: This is working . • With a digital camera (including built-in camera of cellular phone): Direct a digital camera to remote control, press and hold a button on recordable DVD discs. Do not use solvents such as benzine, thinner, commercially available cleaners, detergent, abrasive cleaning agents or antistatic spray intended for inspection...
Quick Start Guide
Page 8
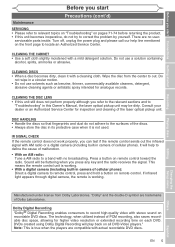
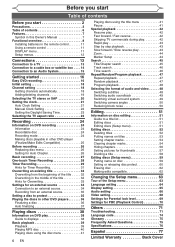
...'s Manual 7 Functional overview 8 Installing batteries in the remote control 11 Using a remote control 11 DISPLAY menu 11 Setup menus 12 Connections 13 Connection to a TV 13 Connection to a cable box or satellite box . . . . . 14 Connection to an Audio System 15 Getting started 16 Easy DVD recording 16 Initial setting 18 Channel setting 18 Getting...
...'s Manual 7 Functional overview 8 Installing batteries in the remote control 11 Using a remote control 11 DISPLAY menu 11 Setup menus 12 Connections 13 Connection to a TV 13 Connection to a cable box or satellite box . . . . . 14 Connection to an Audio System 15 Getting started 16 Easy DVD recording 16 Initial setting 18 Channel setting 18 Getting...
Quick Start Guide
Page 12
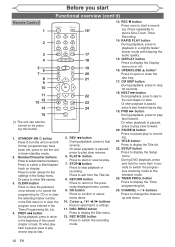
... button Press to skip 30 seconds. 18. CM SKIP button During playback, press to switch the recording mode. 13. TIMER PROG. button Press to open or close the disc tray. 17. OPEN/...CLOSE A button* Press to display the Timer programming list. 24. Before you start Functional overview (cont'd) Remote Control 1 16* 2 3 17 4 18 5 19 6 7 20 8 21 9 10 11 22 13 12... pause play reverse step by press- SETUP button Press to the interlace mode. 23. During DVD playback, press and hold for CD or to clear the selecting marker number in a slightly ...
... button Press to skip 30 seconds. 18. CM SKIP button During playback, press to switch the recording mode. 13. TIMER PROG. button Press to open or close the disc tray. 17. OPEN/...CLOSE A button* Press to display the Timer programming list. 24. Before you start Functional overview (cont'd) Remote Control 1 16* 2 3 17 4 18 5 19 6 7 20 8 21 9 10 11 22 13 12... pause play reverse step by press- SETUP button Press to the interlace mode. 23. During DVD playback, press and hold for CD or to clear the selecting marker number in a slightly ...
Quick Start Guide
Page 13
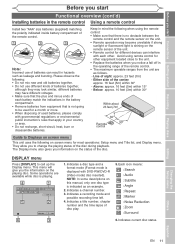
...is displayed with governmental regulations or environmental public instruction's rules that is playing. 4 1 11 0:00:00 DVD+RW CH 2 5 2 HQ(1Hr) 1:01 6 3 1. Keep in mind the following when using remote control for other . Above: approx. 16 feet (5m) within 30° Within about 23 feet (...bursting. Playing discs Editing Changing the Setup menu Others Español EN 11 Indicates current disc status. Indicates a recording mode and possible recording time left. 4. Either side of the disc during playback. Below: approx. 10 feet (3m) within 15° - Avoid...
...is displayed with governmental regulations or environmental public instruction's rules that is playing. 4 1 11 0:00:00 DVD+RW CH 2 5 2 HQ(1Hr) 1:01 6 3 1. Keep in mind the following when using remote control for other . Above: approx. 16 feet (5m) within 30° Within about 23 feet (...bursting. Playing discs Editing Changing the Setup menu Others Español EN 11 Indicates current disc status. Indicates a recording mode and possible recording time left. 4. Either side of the disc during playback. Below: approx. 10 feet (3m) within 15° - Avoid...
Quick Start Guide
Page 15
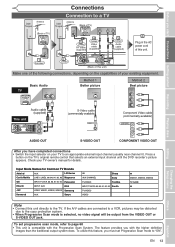
...Check your TV owner's manual for Common TV Brands Admiral AUX LXI-Series Curtis Mathis LINE1, LINE2, 00, 90, 91, 92, 93 Magnavox GE INPUT, TV/VCR, 00, 90, 91, 92, 93 Panasonic Hitachi INPUT, AUX RCA JVC VIDEO, VIDEO1, VIDEO2, VIDEO3 Samsung Kenwood... Progressive Scan System. To utilize this feature, you have completed connections • Switch the input selector on the TV's original remote control that selects an external input channel until the DVD recorder's picture appears. Basic Audio TV R L Method 1 Better picture S-VIDEO IN Method 2 Best picture COMPONENT VIDEO IN Y...
...Check your TV owner's manual for Common TV Brands Admiral AUX LXI-Series Curtis Mathis LINE1, LINE2, 00, 90, 91, 92, 93 Magnavox GE INPUT, TV/VCR, 00, 90, 91, 92, 93 Panasonic Hitachi INPUT, AUX RCA JVC VIDEO, VIDEO1, VIDEO2, VIDEO3 Samsung Kenwood... Progressive Scan System. To utilize this feature, you have completed connections • Switch the input selector on the TV's original remote control that selects an external input channel until the DVD recorder's picture appears. Basic Audio TV R L Method 1 Better picture S-VIDEO IN Method 2 Best picture COMPONENT VIDEO IN Y...
Quick Start Guide
Page 18
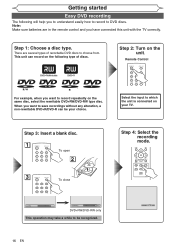
... TV. Note: Make sure batteries are several types of discs. When you want to DVD discs. There are in the remote control and you to understand easily how to record to record repeatedly on the same disc, select the rewritable DVD+RW/DVD-RW type disc. This unit can be recognized. 16 EN HQ (1Hr) 0:58...
... TV. Note: Make sure batteries are several types of discs. When you want to DVD discs. There are in the remote control and you to understand easily how to record to record repeatedly on the same disc, select the rewritable DVD+RW/DVD-RW type disc. This unit can be recognized. 16 EN HQ (1Hr) 0:58...
Quick Start Guide
Page 37
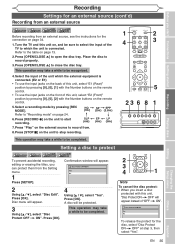
.... 4. Disc Protect ON OFF Yes No To release the protect for an external source (cont'd) Recording from an external source +VR +VR DVD+RW DVD+R DVD-RW DVD-R Before recording from . 8. Refer to record from an external source, see the instructions for the connection on page 24. Press [OK]. 4...select the input of "OFF ON". Refer to close the disc tray. Press [RECORD I] on the remote control. 5. This operation may take a while to start Connections Getting started Recording Playing discs Recording Settings for the disc, select "Disc Protect ON OFF" at step 3, then...
.... 4. Disc Protect ON OFF Yes No To release the protect for an external source (cont'd) Recording from an external source +VR +VR DVD+RW DVD+R DVD-RW DVD-R Before recording from . 8. Refer to record from an external source, see the instructions for the connection on page 24. Press [OK]. 4...select the input of "OFF ON". Refer to close the disc tray. Press [RECORD I] on the remote control. 5. This operation may take a while to start Connections Getting started Recording Playing discs Recording Settings for the disc, select "Disc Protect ON OFF" at step 3, then...
Quick Start Guide
Page 73
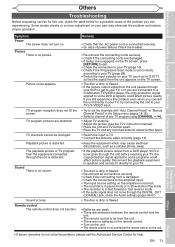
... [RETURN] to exit. • Check the connection to your TV (such as a cellular phone, away. • If the playback picture output from a DVD player, VCR or tuner goes through the DIGITAL OUT (COAXIAL) jack, check the Audio settings (pages 66-67). • The disc is dirty or flawed... setting on the amplifier is incorrect. • The recorder is in pause mode or in Slow-motion Play mode. • The recorder is in the remote control. • Turn on the TV screen. • The disc is no picture. Remote control The remote control does not function. TV program reception does not...
... [RETURN] to exit. • Check the connection to your TV (such as a cellular phone, away. • If the playback picture output from a DVD player, VCR or tuner goes through the DIGITAL OUT (COAXIAL) jack, check the Audio settings (pages 66-67). • The disc is dirty or flawed... setting on the amplifier is incorrect. • The recorder is in pause mode or in Slow-motion Play mode. • The recorder is in the remote control. • Turn on the TV screen. • The disc is no picture. Remote control The remote control does not function. TV program reception does not...


