

User manual, English
Page 1
READ YOUR QUICK-USE GUIDE AND/OR OWNER'S MANUAL FIRST FOR QUICK TIPS THAT MAKE USING YOUR MAGNAVOX PRODUCT MORE ENJOYABLE. NEED HELP FAST? E9490UD_EN.qx3 04.9.21 10:54 AM Page 1 OWNER'S MANUAL MRV700VR DIGITAL VIDEO DISC RECORDER & VIDEO CASSETTE RECORDER THANK YOU FOR CHOOSING MAGNAVOX. IF YOU HAVE READ YOUR INSTRUCTIONS AND STILL NEED ASSISTANCE, YOU MAY ACCESS OUR ONLINE HELP AT WWW.MAGNAVOX.COM OR CALL 1-800-705-2000 WHILE WITH YOUR PRODUCT. ®
READ YOUR QUICK-USE GUIDE AND/OR OWNER'S MANUAL FIRST FOR QUICK TIPS THAT MAKE USING YOUR MAGNAVOX PRODUCT MORE ENJOYABLE. NEED HELP FAST? E9490UD_EN.qx3 04.9.21 10:54 AM Page 1 OWNER'S MANUAL MRV700VR DIGITAL VIDEO DISC RECORDER & VIDEO CASSETTE RECORDER THANK YOU FOR CHOOSING MAGNAVOX. IF YOU HAVE READ YOUR INSTRUCTIONS AND STILL NEED ASSISTANCE, YOU MAY ACCESS OUR ONLINE HELP AT WWW.MAGNAVOX.COM OR CALL 1-800-705-2000 WHILE WITH YOUR PRODUCT. ®

User manual, English
Page 3
... interlock defeated. Use shielded cables to the 'standard definition' output. Note to Cable TV Installer This reminder is intended for help. Notice for a Class B digital device, pursuant to Part 15 of the FCC Rules.These limits are fully compatible with... this model 525p DVD player, please contact our customer service center. Copyright Protection Unauthorized copying, broadcasting, public performance, and lending of Discs are questions regarding your TV set compatibility with Part 15 of Conformity Model Number: MRV700VR Trade Name: Magnavox Responsible Party: Philips...
... interlock defeated. Use shielded cables to the 'standard definition' output. Note to Cable TV Installer This reminder is intended for help. Notice for a Class B digital device, pursuant to Part 15 of the FCC Rules.These limits are fully compatible with... this model 525p DVD player, please contact our customer service center. Copyright Protection Unauthorized copying, broadcasting, public performance, and lending of Discs are questions regarding your TV set compatibility with Part 15 of Conformity Model Number: MRV700VR Trade Name: Magnavox Responsible Party: Philips...

User manual, English
Page 5
... VCR Recording Options Videotape Recording 69 Record One Channel/Watch Another (VCR 70 One-Touch Recording (VCR 71 Rerecording (Tape Duplication 72 DVD to Videotape Duplication 73 Recording from External Devices (VCR 74 Tape Playback Features Tape Counter 75 Time Search, Index Search 76 Special Effects Playback (Videotape 77 Automatic Operation Features 78 Information You May Need Glossary 79-80 Helpful...
... VCR Recording Options Videotape Recording 69 Record One Channel/Watch Another (VCR 70 One-Touch Recording (VCR 71 Rerecording (Tape Duplication 72 DVD to Videotape Duplication 73 Recording from External Devices (VCR 74 Tape Playback Features Tape Counter 75 Time Search, Index Search 76 Special Effects Playback (Videotape 77 Automatic Operation Features 78 Information You May Need Glossary 79-80 Helpful...

User manual, English
Page 10
... Antenna In jack on your TV. C03" appears on the display panel, you need to use of both VCR and DVD modes. 1 Connect your Antenna or Cable TV signal to the ANTENNA IN jack on the rear of the Recorder and the TV to a power outlet. 4 Press STANDBY-ON y to turn on the... Setup screen on the TV. Check your TV's manual for this connection). Connect the other end of the Recorder. Press DVD on the remote.Then press and hold the Number 3 button on the remote instead.) Helpful Hint • If "IS TV ON? E9490UD_EN.qx3 04.9.21 10:54 AM Page 10 10 Hookups...
... Antenna In jack on your TV. C03" appears on the display panel, you need to use of both VCR and DVD modes. 1 Connect your Antenna or Cable TV signal to the ANTENNA IN jack on the rear of the Recorder and the TV to a power outlet. 4 Press STANDBY-ON y to turn on the... Setup screen on the TV. Check your TV's manual for this connection). Connect the other end of the Recorder. Press DVD on the remote.Then press and hold the Number 3 button on the remote instead.) Helpful Hint • If "IS TV ON? E9490UD_EN.qx3 04.9.21 10:54 AM Page 10 10 Hookups...

User manual, English
Page 11
...Connect them to continue. Press DVD on the remote.Then press and hold the Number 4 button on the remote for several seconds until you used the RF coaxial cable as your TV. If your TV manual for step 3). Helpful Hints • To watch TV, put the Recorder in Monitor mode and on ...channel 3 or 4. (Press MONITOR on the Recorder's remote.) Change TV channels at your Cable Box/Satellite Receiver's output channel) if you turn...
...Connect them to continue. Press DVD on the remote.Then press and hold the Number 4 button on the remote for several seconds until you used the RF coaxial cable as your TV. If your TV manual for step 3). Helpful Hints • To watch TV, put the Recorder in Monitor mode and on ...channel 3 or 4. (Press MONITOR on the Recorder's remote.) Change TV channels at your Cable Box/Satellite Receiver's output channel) if you turn...

User manual, English
Page 12
...TV owner's manual for details. Your TV remote may have it to the correct Component Video In channel. (See next step.) You cannot see the DVD background picture or Initial Setup screen on the rear of visible picture lines per field, providing a jitter-free, sharp, quiet picture. See page 63....your TV and set to Interlaced. It is set it on the correct Component Video In channel. 7 Turn on the Recorder. Helpful Hints • If your TV has Progressive Scan, connect the Recorder's COMPONENT VIDEO OUT (Y PB PR) jacks to the TV's left/right AUDIO IN jacks. C03" appears on the ...
...TV owner's manual for details. Your TV remote may have it to the correct Component Video In channel. (See next step.) You cannot see the DVD background picture or Initial Setup screen on the rear of visible picture lines per field, providing a jitter-free, sharp, quiet picture. See page 63....your TV and set to Interlaced. It is set it on the correct Component Video In channel. 7 Turn on the Recorder. Helpful Hints • If your TV has Progressive Scan, connect the Recorder's COMPONENT VIDEO OUT (Y PB PR) jacks to the TV's left/right AUDIO IN jacks. C03" appears on the ...

User manual, English
Page 13
..., you need to turn on the TV and have a button or switch that selects the S-Video In channel. Helpful Hint • On the TV, the S-Video In jack may be labelled RF In,Antenna In, or 75 ...ohm. Check your TV's manual for details. 5 Connect the power cords of the Recorder and the TV to a power outlet. 6 Press STANDBY-ON y to the S-Video In channel. (See next step...on the TV power. Set the TV to your lowest TV channel and change channels down until you see the DVD background picture or Initial Setup screen on the TV. Or, go to the S-Video In channel. This is ...
..., you need to turn on the TV and have a button or switch that selects the S-Video In channel. Helpful Hint • On the TV, the S-Video In jack may be labelled RF In,Antenna In, or 75 ...ohm. Check your TV's manual for details. 5 Connect the power cords of the Recorder and the TV to a power outlet. 6 Press STANDBY-ON y to the S-Video In channel. (See next step...on the TV power. Set the TV to your lowest TV channel and change channels down until you see the DVD background picture or Initial Setup screen on the TV. Or, go to the S-Video In channel. This is ...

User manual, English
Page 14
... on the correct Video In channel. 7 Turn on the TV power. Helpful Hint • The TV's Video In jack is not channel 3 or 4. Or, go to your lowest TV channel and change channels down until you see the DVD background picture or Initial Setup screen. The Initial Setup screen will appear.... It may have it to your TV manual. C03" appears on the display panel, you need to turn on the rear of the Recorder. 2 Connect the Recorder's yellow VIDEO OUT jack to the correct Video In channel. (See next step.) You cannot see the Initial Setup screens until you turn ...
... on the correct Video In channel. 7 Turn on the TV power. Helpful Hint • The TV's Video In jack is not channel 3 or 4. Or, go to your lowest TV channel and change channels down until you see the DVD background picture or Initial Setup screen. The Initial Setup screen will appear.... It may have it to your TV manual. C03" appears on the display panel, you need to turn on the rear of the Recorder. 2 Connect the Recorder's yellow VIDEO OUT jack to the correct Video In channel. (See next step.) You cannot see the Initial Setup screens until you turn ...

User manual, English
Page 15
... TV remote may have it on the correct Video In channel. 8 Turn on the Recorder. Or, go to your lowest TV channel and change channels down until you need one video connection. Helpful Hints • Set Analog output accordingly. Use the supplied video cable that selects the ...Video In channel. Refer to the Stereo owner's manual. 7 Press STANDBY-ON y to turn on the TV power. Set the TV to continue. See page 65. • To use Component Video or S-Video instead, see the DVD...
... TV remote may have it on the correct Video In channel. 8 Turn on the Recorder. Or, go to your lowest TV channel and change channels down until you need one video connection. Helpful Hints • Set Analog output accordingly. Use the supplied video cable that selects the ...Video In channel. Refer to the Stereo owner's manual. 7 Press STANDBY-ON y to turn on the TV power. Set the TV to continue. See page 65. • To use Component Video or S-Video instead, see the DVD...

User manual, English
Page 16
...to continue. Or, go to your Stereo to the correct Digital Audio In channel or sound source. Helpful Hints • Digital audio is not channel 3 or 4 if you see pages 12 and 13....; To use Component Video or S-Video instead, see the DVD background picture or Initial Setup screen on the TV. Choose the correct Video In channel at the VCR. • Set Digital output accordingly. Your TV's Antenna .... 4 Connect the supplied RF coaxial cable to the ANTENNA OUT jack on the rear of the Recorder. See page 64. C03" appears on the display panel, you need one video connection. E9490UD_EN....
...to continue. Or, go to your Stereo to the correct Digital Audio In channel or sound source. Helpful Hints • Digital audio is not channel 3 or 4 if you see pages 12 and 13....; To use Component Video or S-Video instead, see the DVD background picture or Initial Setup screen on the TV. Choose the correct Video In channel at the VCR. • Set Digital output accordingly. Your TV's Antenna .... 4 Connect the supplied RF coaxial cable to the ANTENNA OUT jack on the rear of the Recorder. See page 64. C03" appears on the display panel, you need one video connection. E9490UD_EN....

User manual, English
Page 17
... a Camcorder is a common connection possibility. One set of the Recorder to start recording on the front of the Recorder instead, choose channel EXT 1 or EXT 2. Most audio cables are copy protected. Helpful Hints • Most prerecorded videotapes and DVDs are red and white. See your VCR/Camcorder manual to the EXT 1 COMPONENT VIDEO IN jacks. Press...
... a Camcorder is a common connection possibility. One set of the Recorder to start recording on the front of the Recorder instead, choose channel EXT 1 or EXT 2. Most audio cables are copy protected. Helpful Hints • Most prerecorded videotapes and DVDs are red and white. See your VCR/Camcorder manual to the EXT 1 COMPONENT VIDEO IN jacks. Press...

User manual, English
Page 18
...way to quit the Initial Setup is on the Disc.The DVD Disc menu will scroll across the display panel when you to disconnect the power cord. The Recorder will play Discs in the language you set up the Recorder. These on-screen messages and menus will appear on the...The Initial Setup information shows on your TV. During Initial Setup,"IS TV ON? Press K or L to continue 1 2-3 Helpful Hint • The Recorder's features will appear in the Recorder's Audio Language menu. To change setup items later. Even though your TV may override your selection in the same language if ...
...way to quit the Initial Setup is on the Disc.The DVD Disc menu will scroll across the display panel when you to disconnect the power cord. The Recorder will play Discs in the language you set up the Recorder. These on-screen messages and menus will appear on the...The Initial Setup information shows on your TV. During Initial Setup,"IS TV ON? Press K or L to continue 1 2-3 Helpful Hint • The Recorder's features will appear in the Recorder's Audio Language menu. To change setup items later. Even though your TV may override your selection in the same language if ...

User manual, English
Page 20
...Recorder in VCR mode.The VCR light will appear on the front of the Recorder. 3 Press PLAY B. 4 Press STOP C to stop playback. 5 Press PREV/REW H to rewind the videotape. 6 After the videotape stops, press OPEN/CLOSE/EJECT A to remove the videotape. 1 Turn on the TV. 2 Insert a videotape in the cassette compartment. 6 5 3 4 Helpful... connected the Recorder to use the DVD module.This will appear on the TV. These hookups are using the RF coaxial cable or composite video in the cassette compartment of the Recorder. Set it to view videotape, please DO NOT use the VCR features. See...
...Recorder in VCR mode.The VCR light will appear on the front of the Recorder. 3 Press PLAY B. 4 Press STOP C to stop playback. 5 Press PREV/REW H to rewind the videotape. 6 After the videotape stops, press OPEN/CLOSE/EJECT A to remove the videotape. 1 Turn on the TV. 2 Insert a videotape in the cassette compartment. 6 5 3 4 Helpful... connected the Recorder to use the DVD module.This will appear on the TV. These hookups are using the RF coaxial cable or composite video in the cassette compartment of the Recorder. Set it to view videotape, please DO NOT use the VCR features. See...

User manual, English
Page 21
... facing up . Auto resume is Locked by Access Control, you purchase the Recorder. However, you start at which you play the DVD.To play the DVD from its beginning, restart play will show on the Recorder. See page 56. Helpful Hints • If the Disc is On when you must enter the four...-digit code or unlock the Disc. See pages 57-61. • DVDs have a region code.Your Recorder will disappear ...
... facing up . Auto resume is Locked by Access Control, you purchase the Recorder. However, you start at which you play the DVD.To play the DVD from its beginning, restart play will show on the Recorder. See page 56. Helpful Hints • If the Disc is On when you must enter the four...-digit code or unlock the Disc. See pages 57-61. • DVDs have a region code.Your Recorder will disappear ...
User manual, English
Page 22
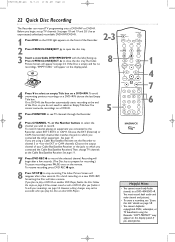
... PROTECT" may not be accessible when you connected the other DVD Players. 5 7 6 Helpful Hints • You cannot record only Audio (sound) to open the disc tray. 3 Insert a recordable DVD+RW/DVD+R with the label facing up TV channels. See page 11. 7 Press DVD REC I again. 8 Press STOP C to stop recording.The Index Picture Screen will begin , set the...
... PROTECT" may not be accessible when you connected the other DVD Players. 5 7 6 Helpful Hints • You cannot record only Audio (sound) to open the disc tray. 3 Insert a recordable DVD+RW/DVD+R with the label facing up TV channels. See page 11. 7 Press DVD REC I again. 8 Press STOP C to stop recording.The Index Picture Screen will begin , set the...

User manual, English
Page 24
... the last entry of a DVD+R or DVD+RW. Helpful Hints • When VCR REC I is pressed in DVD mode. See page 68. SYSTEM MENU Button Press to DVD mode and starts recording on the DVD+R/DVD+RW. OK Button Press to access or remove the Timer Recording menu in DVD mode, the Recorder switches to VCR mode and starts recording on the videotape. •...
... the last entry of a DVD+R or DVD+RW. Helpful Hints • When VCR REC I is pressed in DVD mode. See page 68. SYSTEM MENU Button Press to DVD mode and starts recording on the DVD+R/DVD+RW. OK Button Press to access or remove the Timer Recording menu in DVD mode, the Recorder switches to VCR mode and starts recording on the videotape. •...

User manual, English
Page 27
...OUT Y EXT2 VIDEO IN VIDEO OUT ANTENNA IN EXT2 L IN R OUT PB L L AUDIO IN AUDIO OUT OUT PR R R DVD DVD/VCR DVD COAXIAL DIGITAL AUDIO OUT Jack Connect a coaxial digital audio cable (not supplied) here and to the ANTENNA IN jack on other equipment. ...See page 16. These jacks supply audio for DVD mode. Helpful Hints • Use the same EXT (external) number for each pair of other equipment. See page 17. See page... the unit permanently. • You only need one audio and one video connection to the Recorder.
...OUT Y EXT2 VIDEO IN VIDEO OUT ANTENNA IN EXT2 L IN R OUT PB L L AUDIO IN AUDIO OUT OUT PR R R DVD DVD/VCR DVD COAXIAL DIGITAL AUDIO OUT Jack Connect a coaxial digital audio cable (not supplied) here and to the ANTENNA IN jack on other equipment. ...See page 16. These jacks supply audio for DVD mode. Helpful Hints • Use the same EXT (external) number for each pair of other equipment. See page 17. See page... the unit permanently. • You only need one audio and one video connection to the Recorder.

User manual, English
Page 28
...in the lower left corner of the menu. You are finished. 1,4,7 1-6 Helpful Hints • Access added channels by pressing CHANNEL +/ -. Installation K Auto Ch. Beside each channel number, you will appear briefly in DVD mode. "Stored" will erase and replace all the menus when you are ...finished. Press SYSTEM MENU. Programming u B Add/Delete Channels B L VCR Plus+ ch. E9490UD_EN.qx3 04.9.21 10:54 AM Page 28 28 TV Channel Programming Although the Recorder selects available TV...
...in the lower left corner of the menu. You are finished. 1,4,7 1-6 Helpful Hints • Access added channels by pressing CHANNEL +/ -. Installation K Auto Ch. Beside each channel number, you will appear briefly in DVD mode. "Stored" will erase and replace all the menus when you are ...finished. Press SYSTEM MENU. Programming u B Add/Delete Channels B L VCR Plus+ ch. E9490UD_EN.qx3 04.9.21 10:54 AM Page 28 28 TV Channel Programming Although the Recorder selects available TV...

User manual, English
Page 29
...or L to enter the corresponding Channel number from your local newspaper. Helpful Hint • Only memorized channels will only take a few minutes. VCR Plus+ ch. Channel K K... Repeat steps 4-5 as often as necessary to select a VCR Plus+ Ch. Press s to select in the top left corner of...MENU repeatedly to remove all the menus. Since the channel numbers of the Recorder. 1 Press SYSTEM MENU. number, then press s or B to select VCR Plus+ Ch. (channel), then press B. Press DVD so the DVD light appears on the screen. 5 Press OK to store the Channel number...
...or L to enter the corresponding Channel number from your local newspaper. Helpful Hint • Only memorized channels will only take a few minutes. VCR Plus+ ch. Channel K K... Repeat steps 4-5 as often as necessary to select a VCR Plus+ Ch. Press s to select in the top left corner of...MENU repeatedly to remove all the menus. Since the channel numbers of the Recorder. 1 Press SYSTEM MENU. number, then press s or B to select VCR Plus+ Ch. (channel), then press B. Press DVD so the DVD light appears on the screen. 5 Press OK to store the Channel number...

User manual, English
Page 30
... do not need to set the clock only if the PBS channel is On. • The Recorder can set the clock when you complete Initial Setup. See page 31. 8 1,8 1-7 Helpful Hints • The Recorder may see page 28. E9490UD_EN.qx3 04.9.21 10:54 AM Page 30 30 Clock Setting Time/...Date Automatic The Recorder can use the time zone from a different time zone than the one in DVD mode. If the Recorder chooses an incorrect PBS channel or...
... do not need to set the clock only if the PBS channel is On. • The Recorder can set the clock when you complete Initial Setup. See page 31. 8 1,8 1-7 Helpful Hints • The Recorder may see page 28. E9490UD_EN.qx3 04.9.21 10:54 AM Page 30 30 Clock Setting Time/...Date Automatic The Recorder can use the time zone from a different time zone than the one in DVD mode. If the Recorder chooses an incorrect PBS channel or...


