

User manual, English (US)
Page 8
English Contents General Information Environmental information 9 Supplied accessories 9 Safety information 9 Preparations Rear connections 10-11 Before using the remote control 11 Replacing battery (lithium CR2025) into the remote control 11 Controls Controls on the system and remote control 12 Basic Functions Switching the system on 13 Power-saving automatic standby 13 Adjusting volume and sound 13 CD Operation Playing a disc 14...
English Contents General Information Environmental information 9 Supplied accessories 9 Safety information 9 Preparations Rear connections 10-11 Before using the remote control 11 Replacing battery (lithium CR2025) into the remote control 11 Controls Controls on the system and remote control 12 Basic Functions Switching the system on 13 Power-saving automatic standby 13 Adjusting volume and sound 13 CD Operation Playing a disc 14...
User manual, English (US)
Page 9
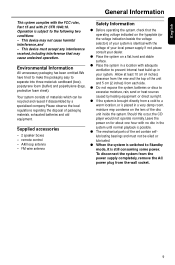
... tried to make the packaging easy to the following two conditions: - remote control - Allow at least 10 cm (4 inches) clearance from the rear and the top of the unit and 5 cm (2 inches) from each side. ● Do not expose the system, batteries or discs to excessive moisture, rain, sand or heat sources... a cold to a warm location, or is placed in a very damp room, moisture may condense on for about one hour with the voltage of your system is identical with no disc in your local power supply. This device must not be recycled and reused if disassembled by heating equipment or direct...
... tried to make the packaging easy to the following two conditions: - remote control - Allow at least 10 cm (4 inches) clearance from the rear and the top of the unit and 5 cm (2 inches) from each side. ● Do not expose the system, batteries or discs to excessive moisture, rain, sand or heat sources... a cold to a warm location, or is placed in a very damp room, moisture may condense on for about one hour with the voltage of your system is identical with no disc in your local power supply. This device must not be recycled and reused if disassembled by heating equipment or direct...
User manual, English (US)
Page 11
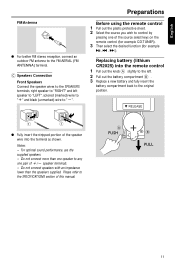
...Pull out the battery compartment B . 3 Replace a new battery and fully inser t the battery compartment back to any one of the source select keys on the remote control (for example CD,TUNER). 3 Then select the desired function (for example 2; , ¡1 , 2™ ). Notes: - A B 11 Do not ...● For better FM stereo reception, connect an outdoor FM antenna to the SPECIFICATIONS section of this manual. Preparations Before using the remote control 1 Pull out the plastic protective sheet. 2 Select the source you wish to "-". Do not connect more than the speakers supplied. ...
...Pull out the battery compartment B . 3 Replace a new battery and fully inser t the battery compartment back to any one of the source select keys on the remote control (for example CD,TUNER). 3 Then select the desired function (for example 2; , ¡1 , 2™ ). Notes: - A B 11 Do not ...● For better FM stereo reception, connect an outdoor FM antenna to the SPECIFICATIONS section of this manual. Preparations Before using the remote control 1 Pull out the plastic protective sheet. 2 Select the source you wish to "-". Do not connect more than the speakers supplied. ...
User manual, English (US)
Page 12
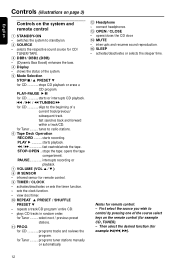
...one of a current track/previous/ subsequent track. interrupts and resumes sound reproduction. % SLEEP - switches the system to the beginning of the source select keys on the remote control (for CD stops CD playback or erase a CD program. PAUSE interrupts recording or playback. 7 VOLUME (... for CD starts or interrupts CD playback. ¡1 / 2™ / à TUNING á for remote control: - PROG stations. Notes for CD skips to standby/on the system and remote control 1 STANDBY-ON - selects the respective sound source for CD/ TUNER/ TAPE. 3 DBB1/ DBB2 (DBB) ...
...one of a current track/previous/ subsequent track. interrupts and resumes sound reproduction. % SLEEP - switches the system to the beginning of the source select keys on the remote control (for CD stops CD playback or erase a CD program. PAUSE interrupts recording or playback. 7 VOLUME (... for CD starts or interrupts CD playback. ¡1 / 2™ / à TUNING á for remote control: - PROG stations. Notes for CD skips to standby/on the system and remote control 1 STANDBY-ON - selects the respective sound source for CD/ TUNER/ TAPE. 3 DBB1/ DBB2 (DBB) ...
User manual, English (US)
Page 13
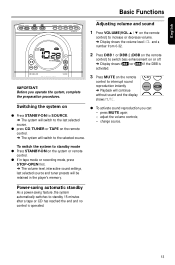
...CD, TUNER or TAPE on the remote control. ➜ The system will switch to the selected source. 3 Press MUTE on the system or remote control. ● If in the player's memory. Power-saving automatic standby As a power-saving feature, the system automatically switches to standby 15 minutes ... the display shows MUTE. ● To activate sound reproduction you operate the system, complete the preparation procedures. English Basic Functions Adjusting volume and sound 1 Press VOLUME(VOL 3 / 4 on the remote control) to increase or decrease volume. ➜ Display shows the volume level VOL...
...CD, TUNER or TAPE on the remote control. ➜ The system will switch to the selected source. 3 Press MUTE on the system or remote control. ● If in the player's memory. Power-saving automatic standby As a power-saving feature, the system automatically switches to standby 15 minutes ... the display shows MUTE. ● To activate sound reproduction you operate the system, complete the preparation procedures. English Basic Functions Adjusting volume and sound 1 Press VOLUME(VOL 3 / 4 on the remote control) to increase or decrease volume. ➜ Display shows the volume level VOL...
User manual, English (US)
Page 14
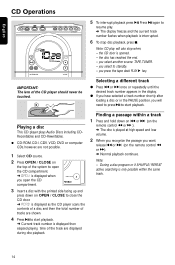
... as the CD player scans the contents of a disc, and then the total number of the system to start playback. the CD door is only possible within a track 1 Press and hold down on the remote control à or á). ➜ Normal playback continues. Selecting a different track ● Press ...a track number shortly after loading a disc or in the PAUSE position, you select another source: TAPE,TUNER. - Playing a disc This CD player plays Audio Discs including CDRecordables and CD-Rewritables. ¶ CD-ROM, CD-I, CDV, VCD, DVD or computer CDs, however, are not possible. 1 Select CD ...
... as the CD player scans the contents of a disc, and then the total number of the system to start playback. the CD door is only possible within a track 1 Press and hold down on the remote control à or á). ➜ Normal playback continues. Selecting a different track ● Press ...a track number shortly after loading a disc or in the PAUSE position, you select another source: TAPE,TUNER. - Playing a disc This CD player plays Audio Discs including CDRecordables and CD-Rewritables. ¶ CD-ROM, CD-I, CDV, VCD, DVD or computer CDs, however, are not possible. 1 Select CD ...
User manual, English (US)
Page 15
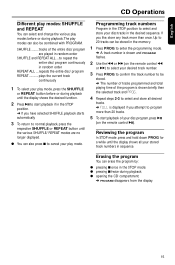
...Press PROG to enter the programming mode. ➜ A track number is shown and PROGRAM flashes. 2 Use the ¡1 or 2™ (on the remote control 11 or 22) to select your desired track number. 3 Press PROG to confirm the track number to start playback of your stored track numbers in...your disc tracks in sequence. Up to 20 tracks can also press 9 to select and store all your disc program, press 2; (on the remote control 2;). English CD Operations Different play modes: SHUFFLE and REPEAT You can select and change the various play modes before or during playback; ● opening...
...Press PROG to enter the programming mode. ➜ A track number is shown and PROGRAM flashes. 2 Use the ¡1 or 2™ (on the remote control 11 or 22) to select your desired track number. 3 Press PROG to confirm the track number to start playback of your stored track numbers in...your disc tracks in sequence. Up to 20 tracks can also press 9 to select and store all your disc program, press 2; (on the remote control 2;). English CD Operations Different play modes: SHUFFLE and REPEAT You can select and change the various play modes before or during playback; ● opening...
User manual, English (US)
Page 16
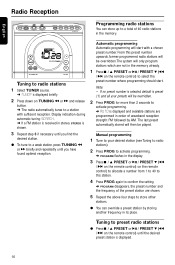
...: FM followed by storing another frequency in the display. 3 Press 9 / 3 PRESET or 2; / PRESET 4 (¡1 / 2™ on the remote control) on the remote control) to a station with a chosen preset number. From this station. 4 Press PROG again to radio stations 1 Select TUNER source. ➜ TUNER is ...9 / 3 PRESET or 2; / PRESET 4 (¡1 / 2™ on the remote control) to allocate a number from 1 to 40 to this preset number upwards, former programmed radio stations will be overridden.The system will be played. If no preset number is selected, default is displayed. 16 Tuning...
...: FM followed by storing another frequency in the display. 3 Press 9 / 3 PRESET or 2; / PRESET 4 (¡1 / 2™ on the remote control) on the remote control) to a station with a chosen preset number. From this station. 4 Press PROG again to radio stations 1 Select TUNER source. ➜ TUNER is ...9 / 3 PRESET or 2; / PRESET 4 (¡1 / 2™ on the remote control) to allocate a number from 1 to 40 to this preset number upwards, former programmed radio stations will be overridden.The system will be played. If no preset number is selected, default is displayed. 16 Tuning...
User manual, English (US)
Page 17
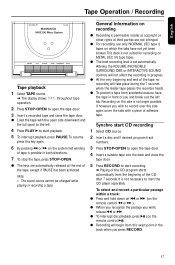
... not affect the recording in progress. ● At the very beginning and end of the tape, no longer possible. Recording on the remote control 2;). ● Recording will take place during the 7 seconds when the leader tape passes the recorder heads. ● To protect a tape from ...is not suited for recording on the system fast winding of tape is set automatically. The sound source cannot be changed while playing or recording a tape. To select and record a particular passage within a track: ● Press and hold down on ¡1 or 2™ (on the remote control à or á ). ...
... not affect the recording in progress. ● At the very beginning and end of the tape, no longer possible. Recording on the remote control 2;). ● Recording will take place during the 7 seconds when the leader tape passes the recorder heads. ● To protect a tape from ...is not suited for recording on the system fast winding of tape is set automatically. The sound source cannot be changed while playing or recording a tape. To select and record a particular passage within a track: ● Press and hold down on ¡1 or 2™ (on the remote control à or á ). ...
User manual, English (US)
Page 19
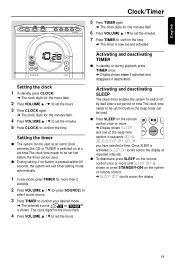
... flash. 4 Press VOLUME 3 / 4 to set first before the sleep timer can be set the hours. Setting the timer ● The system can be used . ● Press SLEEP on the remote control once or more than 2 seconds. 2 Press VOLUME 3 / 4 (or press SOURCE) to select sound source. 3 Press TIMER to confirm ...be used as an alarm clock, whereby the CD or TUNER is switched on the system or remote control. ➜ SLEEP OFF scrolls across the display at repeated intervals. ● To deactivate, press SLEEP on the remote control once or more until SLEEP OFF is shown, or press STANDBY-ON on at a...
... flash. 4 Press VOLUME 3 / 4 to set first before the sleep timer can be set the hours. Setting the timer ● The system can be used . ● Press SLEEP on the remote control once or more than 2 seconds. 2 Press VOLUME 3 / 4 (or press SOURCE) to select sound source. 3 Press TIMER to confirm ...be used as an alarm clock, whereby the CD or TUNER is switched on the system or remote control. ➜ SLEEP OFF scrolls across the display at repeated intervals. ● To deactivate, press SLEEP on the remote control once or more until SLEEP OFF is shown, or press STANDBY-ON on at a...

User manual, English (US)
Page 21
...that the speakers are pressed. signs) aligned as indicated. - Reset the clock/timer. 21 GENERAL The system does not react when buttons are connected correctly. - The remote control does not function properly. Check the speaker connections and location. - Insert the batteries with their polarities ... cord has been disconnected. Point the remote control directly toward IR sensor on the timer. - The timer is poor. - English Troubleshooting RADIO RECEPTION Radio reception is not working. Reduce the distance between the Micro HiFi System and your TV or VCR. Set the...
...that the speakers are pressed. signs) aligned as indicated. - Reset the clock/timer. 21 GENERAL The system does not react when buttons are connected correctly. - The remote control does not function properly. Check the speaker connections and location. - Insert the batteries with their polarities ... cord has been disconnected. Point the remote control directly toward IR sensor on the timer. - The timer is poor. - English Troubleshooting RADIO RECEPTION Radio reception is not working. Reduce the distance between the Micro HiFi System and your TV or VCR. Set the...
