

User manual, English (US)
Page 1
I PORTAN M Return your Warranty Registration Card within 10 days S E E WHY E INSID CALL US BEFORE YOU CONSIDER RETURNING THE PRODUCT! 1-800-705-2000 or Visit us ! MME-100 MICRO HI-FI STEREO SYSTEM Need help you to help ? T! Call us on the web at www.magnavox.com 1 User guide S M A RT. Magnavox representatives are ready to start enjoying your new product. V E RY S M A RT. We can guide you through Connections, First-time Setup, or any of the Features.We want you with any questions about your new product right away!
I PORTAN M Return your Warranty Registration Card within 10 days S E E WHY E INSID CALL US BEFORE YOU CONSIDER RETURNING THE PRODUCT! 1-800-705-2000 or Visit us ! MME-100 MICRO HI-FI STEREO SYSTEM Need help you to help ? T! Call us on the web at www.magnavox.com 1 User guide S M A RT. Magnavox representatives are ready to start enjoying your new product. V E RY S M A RT. We can guide you through Connections, First-time Setup, or any of the Features.We want you with any questions about your new product right away!
User manual, English (US)
Page 4
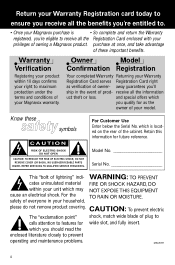
... the Serial No. purchase at once, and take advantage of your Magnavox warranty. Warranty Verification Registering your product within your unit which is • So complete and return the Warranty registered, you're eligible to receive all the Registration Card enclosed with your privileges of owning a Magnavox product. which may NOT EXPOSE THIS EQUIPMENT cause an electrical shock. Owner Model...
... the Serial No. purchase at once, and take advantage of your Magnavox warranty. Warranty Verification Registering your product within your unit which is • So complete and return the Warranty registered, you're eligible to receive all the Registration Card enclosed with your privileges of owning a Magnavox product. which may NOT EXPOSE THIS EQUIPMENT cause an electrical shock. Owner Model...
User manual, English (US)
Page 5
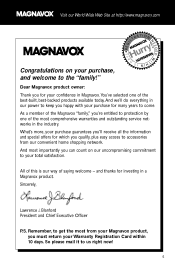
... Magnavox product, you qualify, plus easy access to get the most from our convenient home shopping network. Congratulations on our uncompromising commitment to your Warranty Registration Card within 10 days. and thanks for your confidence in our power to keep you 'll receive... J. As a member of saying welcome - And most comprehensive warranties and outstanding service networks in a Magnavox product. AYS REGIS NEEDED W ITHIN 10 D Visit our World Wide Web Site at http://www.magnavox.com TRATION Hurry! Dear Magnavox product owner: Thank you 're entitled to us right now! 5
... Magnavox product, you qualify, plus easy access to get the most from our convenient home shopping network. Congratulations on our uncompromising commitment to your Warranty Registration Card within 10 days. and thanks for your confidence in our power to keep you 'll receive... J. As a member of saying welcome - And most comprehensive warranties and outstanding service networks in a Magnavox product. AYS REGIS NEEDED W ITHIN 10 D Visit our World Wide Web Site at http://www.magnavox.com TRATION Hurry! Dear Magnavox product owner: Thank you 're entitled to us right now! 5
User manual, English (US)
Page 6
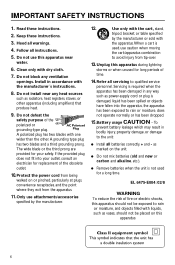
... with the manufacturer´s instructions. 8. A grounding type plug has two blades and a third grounding prong. EL 6475-E004: 02/8 WARNING To reduce the risk of time. 14. IMPORTANT SAFETY INSTRUCTIONS 1. Do not defeat the safety purpose of the obsolete outlet. 10.Protect the power cord from being walked on the unit. ● Do not mix batteries (old and new...
... with the manufacturer´s instructions. 8. A grounding type plug has two blades and a third grounding prong. EL 6475-E004: 02/8 WARNING To reduce the risk of time. 14. IMPORTANT SAFETY INSTRUCTIONS 1. Do not defeat the safety purpose of the obsolete outlet. 10.Protect the power cord from being walked on the unit. ● Do not mix batteries (old and new...

User manual, English (US)
Page 8
... Rear connections 10-11 Before using the remote control 11 Replacing battery (lithium CR2025) into the remote control 11 Controls Controls on the system and remote control 12 Basic Functions Switching the system on 13 Power-saving automatic standby 13 Adjusting volume and sound 13 CD Operation Playing a disc 14 Selecting a different track 14 Finding a passage within a track 14 Different play modes: Shuffle and Repeat ..... 15 Programming track numbers 15 Reviewing the program 15 Erasing the program 15 Radio Reception Tuning to radio stations 16 Programming radio stations 16...
... Rear connections 10-11 Before using the remote control 11 Replacing battery (lithium CR2025) into the remote control 11 Controls Controls on the system and remote control 12 Basic Functions Switching the system on 13 Power-saving automatic standby 13 Adjusting volume and sound 13 CD Operation Playing a disc 14 Selecting a different track 14 Finding a passage within a track 14 Different play modes: Shuffle and Repeat ..... 15 Programming track numbers 15 Reviewing the program 15 Erasing the program 15 Radio Reception Tuning to radio stations 16 Programming radio stations 16...
User manual, English (US)
Page 9
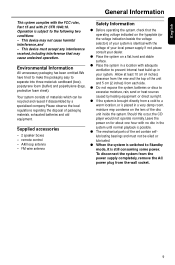
... operating voltage indicated on the typeplate (or the voltage indication beside the voltage selector) of your dealer. ● Place the system on the lens of the disc unit inside the system. Supplied accessories - 2 speaker boxes - remote control - Leave the power on for about one hour with the voltage of materials which can be oiled or lubricated. ● When the system is switched to Standby mode...
... operating voltage indicated on the typeplate (or the voltage indication beside the voltage selector) of your dealer. ● Place the system on the lens of the disc unit inside the system. Supplied accessories - 2 speaker boxes - remote control - Leave the power on for about one hour with the voltage of materials which can be oiled or lubricated. ● When the system is switched to Standby mode...
User manual, English (US)
Page 10
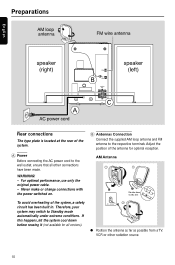
... power cord to the wall outlet, ensure that all versions). ● Position the antenna as far as possible from a TV, VCR or other connections have been made. Adjust the position of the antenna for all other radiation source. 10 B Antennas Connection Connect the supplied AM loop antenna and FM antenna to Standby mode automatically under extreme conditions. For optimal performance, use only the original power cable...
... power cord to the wall outlet, ensure that all versions). ● Position the antenna as far as possible from a TV, VCR or other connections have been made. Adjust the position of the antenna for all other radiation source. 10 B Antennas Connection Connect the supplied AM loop antenna and FM antenna to Standby mode automatically under extreme conditions. For optimal performance, use only the original power cable...
User manual, English (US)
Page 11
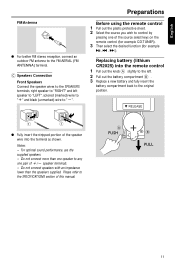
... control by pressing one pair of the source select keys on the remote control (for example CD,TUNER). 3 Then select the desired function (for example 2; , ¡1 , 2™ ). Preparations Before using the remote control 1 Pull out the plastic protective sheet. 2 Select the source you wish to "-". A B 11 Do not connect speakers with an impedance lower than one speaker to the SPECIFICATIONS section of the speaker...
... control by pressing one pair of the source select keys on the remote control (for example CD,TUNER). 3 Then select the desired function (for example 2; , ¡1 , 2™ ). Preparations Before using the remote control 1 Pull out the plastic protective sheet. 2 Select the source you wish to "-". A B 11 Do not connect speakers with an impedance lower than one speaker to the SPECIFICATIONS section of the speaker...
User manual, English (US)
Page 12
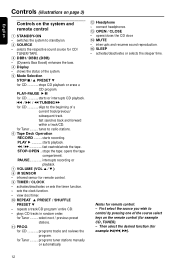
... 3 PRESET / SHUFFLE PRESET 4 - interrupts and resumes sound reproduction. % SLEEP - fast searches back and forward within a track/CD. for Tuner tunes to the beginning of a current track/previous/ subsequent track. connect headphones. # OPEN / CLOSE - Notes for example 2;,¡1, 2™). 12 Then select the desired function (for remote control: - switches the system to control by pressing one of the system. 5 Mode Selection STOP 9 / 3 PRESET 4 for CD stops CD playback or erase a CD program. fast rewinds/winds the tape. stops...
... 3 PRESET / SHUFFLE PRESET 4 - interrupts and resumes sound reproduction. % SLEEP - fast searches back and forward within a track/CD. for Tuner tunes to the beginning of a current track/previous/ subsequent track. connect headphones. # OPEN / CLOSE - Notes for example 2;,¡1, 2™). 12 Then select the desired function (for remote control: - switches the system to control by pressing one of the system. 5 Mode Selection STOP 9 / 3 PRESET 4 for CD stops CD playback or erase a CD program. fast rewinds/winds the tape. stops...
User manual, English (US)
Page 13
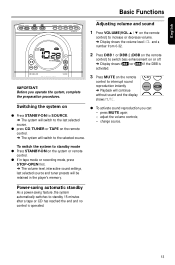
...; Playback will be retained in tape mode or recording mode, press STOP•OPEN first. ➜ The volume level, interactive sound settings, last selected source and tuner presets will continue without sound and the display shows MUTE. ● To activate sound reproduction you operate the system, complete the preparation procedures. change source. English Basic Functions Adjusting volume and sound 1 Press VOLUME(VOL 3 / 4 on the remote control) to increase or decrease volume. ➜ Display shows the volume level VOL and a number from...
...; Playback will be retained in tape mode or recording mode, press STOP•OPEN first. ➜ The volume level, interactive sound settings, last selected source and tuner presets will continue without sound and the display shows MUTE. ● To activate sound reproduction you operate the system, complete the preparation procedures. change source. English Basic Functions Adjusting volume and sound 1 Press VOLUME(VOL 3 / 4 on the remote control) to increase or decrease volume. ➜ Display shows the volume level VOL and a number from...
User manual, English (US)
Page 14
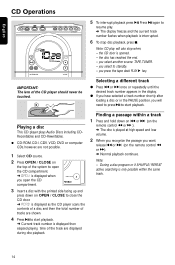
... play will need to standby. - Note: - During a disc program or if SHUFFLE/ REPEAT active, searching is only possible within a track 1 Press and hold down on the remote control à or á). ➜ Normal playback continues. Note: CD play . ➜ The display freezes and the current track number flashes when playback is displayed as the CD player scans the contents of a disc, and then the total number of tracks are displayed during disc playback...
... play will need to standby. - Note: - During a disc program or if SHUFFLE/ REPEAT active, searching is only possible within a track 1 Press and hold down on the remote control à or á). ➜ Normal playback continues. Note: CD play . ➜ The display freezes and the current track number flashes when playback is displayed as the CD player scans the contents of a disc, and then the total number of tracks are displayed during disc playback...
User manual, English (US)
Page 15
... select and change the various play modes before or during playback; ● opening the CD compartment; ➜ PROGRAM disappears from the display. 15 Erasing the program You can also press 9 to 20 tracks can also be stored. ➜ The number of tracks programmed and total playing time of the program is displayed if you attempt to select and store your disc program, press 2; (on the remote control 2;). Reviewing the program In STOP mode, press...
... select and change the various play modes before or during playback; ● opening the CD compartment; ➜ PROGRAM disappears from the display. 15 Erasing the program You can also press 9 to 20 tracks can also be stored. ➜ The number of tracks programmed and total playing time of the program is displayed if you attempt to select and store your disc program, press 2; (on the remote control 2;). Reviewing the program In STOP mode, press...
User manual, English (US)
Page 16
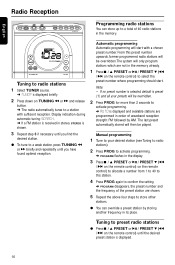
... confirm the setting. ➜ PROGRAM disappears, the preset number and the frequency of the preset station are programmed in order of 40 radio stations in stereo, STEREO is received in the memory. The last preset automatically stored will then be overridden.The system will be played. Manual programming 1 Tune to select the preset number where programming should start with sufficient reception. If no preset number is selected, default is displayed. 16 English Radio Reception Programming radio stations You can override a preset station by...
... confirm the setting. ➜ PROGRAM disappears, the preset number and the frequency of the preset station are programmed in order of 40 radio stations in stereo, STEREO is received in the memory. The last preset automatically stored will then be overridden.The system will be played. Manual programming 1 Tune to select the preset number where programming should start with sufficient reception. If no preset number is selected, default is displayed. 16 English Radio Reception Programming radio stations You can override a preset station by...
User manual, English (US)
Page 17
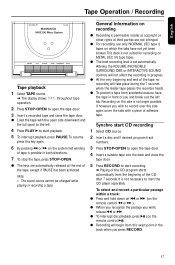
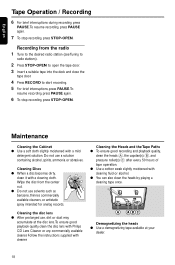
... CD player separately. The sound source cannot be changed while playing or recording a tape. Altering the VOLUME, INCREDIBLE SURROUND, DBB or INTERACTIVE SOUND controls will not affect the recording in progress. ● At the very beginning and end of the tape, no longer possible. English Tape Operation / Recording Tape playback 1 Select TAPE source. ➜ The display shows TAPE throughout tape operation. 2 Press STOP•OPEN to open the tape door. 3 Insert a recorded tape and close the tape door...
... CD player separately. The sound source cannot be changed while playing or recording a tape. Altering the VOLUME, INCREDIBLE SURROUND, DBB or INTERACTIVE SOUND controls will not affect the recording in progress. ● At the very beginning and end of the tape, no longer possible. English Tape Operation / Recording Tape playback 1 Select TAPE source. ➜ The display shows TAPE throughout tape operation. 2 Press STOP•OPEN to open the tape door. 3 Insert a recorded tape and close the tape door...
User manual, English (US)
Page 18
Wipe the disc from the radio 1 Tune to the desired radio station (see Tuning to radio stations). 2 Press STOP•OPEN to open the tape door. 3 Insert a suitable tape into the deck and close the tape door. 4 Press RECORD to start recording. 5 For brief interruptions, press PAUSE.To resume recording, press PAUSE again. 6 To stop recording, press STOP•OPEN. Maintenance Cleaning the Cabinet ● Use a soft cloth slightly...
Wipe the disc from the radio 1 Tune to the desired radio station (see Tuning to radio stations). 2 Press STOP•OPEN to open the tape door. 3 Insert a suitable tape into the deck and close the tape door. 4 Press RECORD to start recording. 5 For brief interruptions, press PAUSE.To resume recording, press PAUSE again. 6 To stop recording, press STOP•OPEN. Maintenance Cleaning the Cabinet ● Use a soft cloth slightly...
User manual, English (US)
Page 19
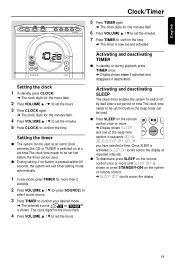
... used . ● Press SLEEP on the remote control once or more until SLEEP OFF is shown, or press STANDBY-ON on the system or remote control. ➜ SLEEP OFF scrolls across the display at repeated intervals. ● To deactivate, press SLEEP on at a set time.The clock time needs to be set and activated. Setting the clock 1 In standby, press CLOCK. ➜ The clock digits for the hours flash. 2 Press VOLUME 3 / 4 to set...
... used . ● Press SLEEP on the remote control once or more until SLEEP OFF is shown, or press STANDBY-ON on the system or remote control. ➜ SLEEP OFF scrolls across the display at repeated intervals. ● To deactivate, press SLEEP on at a set time.The clock time needs to be set and activated. Setting the clock 1 In standby, press CLOCK. ➜ The clock digits for the hours flash. 2 Press VOLUME 3 / 4 to set...
User manual, English (US)
Page 20
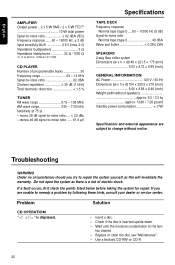
...; (1) (3 Ω, 200 Hz- 12.5kHz, 10% THD) CD PLAYER Number of electric shock. Use a finalized CD-RW or CD-R. 20 If you try to repair the system yourself, as there is inserted upside down. - Wait until the moisture condensation at 75 Ω - Problem Solution CD OPERATION "nO dISc" is displayed. - Troubleshooting WARNING Under no circumstances should you are subject to...
...; (1) (3 Ω, 200 Hz- 12.5kHz, 10% THD) CD PLAYER Number of electric shock. Use a finalized CD-RW or CD-R. 20 If you try to repair the system yourself, as there is inserted upside down. - Wait until the moisture condensation at 75 Ω - Problem Solution CD OPERATION "nO dISc" is displayed. - Troubleshooting WARNING Under no circumstances should you are subject to...

User manual, English (US)
Page 21
.... - The left and right sound outputs are connected correctly. - The Clock/Timer setting is of poor quality. Check that the speakers are reversed. Point the remote control directly toward IR sensor on the timer. - TAPE OPERATION / RECORDING Recording or playback cannot be heard or is erased. - The remote control does not function properly. Replace the batteries. - Reset the clock/timer. 21 Use only normal (IEC I) tape for example) before pressing the function button (2;, ¡1, 2™). - The...
.... - The left and right sound outputs are connected correctly. - The Clock/Timer setting is of poor quality. Check that the speakers are reversed. Point the remote control directly toward IR sensor on the timer. - TAPE OPERATION / RECORDING Recording or playback cannot be heard or is erased. - The remote control does not function properly. Replace the batteries. - Reset the clock/timer. 21 Use only normal (IEC I) tape for example) before pressing the function button (2;, ¡1, 2™). - The...
User manual, English (US)
Page 22
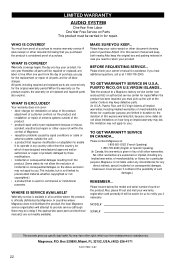
...; labor charges for installation or setup of the product, adjustment of customer controls on the product, and installation or repair of antenna systems outside the unit. • a product that requires modification or adaptation to enable it to operate in any implied warranties of this warranty is used for repair. MAKE SURE YOU KEEP... Please keep both nearby. LIMITED WARRANTY AUDIO SYSTEM One Year Free Labor One Year Free Service on Parts This product must be...
...; labor charges for installation or setup of the product, adjustment of customer controls on the product, and installation or repair of antenna systems outside the unit. • a product that requires modification or adaptation to enable it to operate in any implied warranties of this warranty is used for repair. MAKE SURE YOU KEEP... Please keep both nearby. LIMITED WARRANTY AUDIO SYSTEM One Year Free Labor One Year Free Service on Parts This product must be...

User manual, Spanish
Page 1
We can guide you through Connections, First-time Setup, or any of the Features.We want you to help ? Magnavox representatives are ready to start enjoying your Warranty Registration Card within 10 days S E E E WHY INSID CALL US BEFORE YOU CONSIDER RETURNING THE PRODUCT! 1-800-705-2000 or Visit us ! MME100 MICRO HI-FI STEREO SYSTEM Need help you with any questions about your new product. T! User guide S M A RT. V E RY S M A RT. I PORTAN M Return your new product right away! Call us on the web at www.magnavox.com 1
We can guide you through Connections, First-time Setup, or any of the Features.We want you to help ? Magnavox representatives are ready to start enjoying your Warranty Registration Card within 10 days S E E E WHY INSID CALL US BEFORE YOU CONSIDER RETURNING THE PRODUCT! 1-800-705-2000 or Visit us ! MME100 MICRO HI-FI STEREO SYSTEM Need help you with any questions about your new product. T! User guide S M A RT. V E RY S M A RT. I PORTAN M Return your new product right away! Call us on the web at www.magnavox.com 1

