User manual, English (US)
Page 8
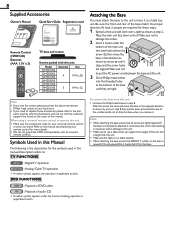
...resulting in this unit • Unscrew the Phillips head screws in the base. Refer to our brand. To remove the base from this manual. If the base is applicable to have any questions, please visit our website at www.magnavox.com/support Quick Star t EN Installation FR Installation ... to put the AC power cord between the base and the unit. 3 Drive Phillips head screws into base holes (shown by arrow ➀), then move the base in step 2, then pull the base up toward the rear of this unit: Model 32MD311B 32MD301B 26MD311B 26MD301B 22MD311B 19MD311B 19MD301B Quantity 4 3 Size...
...resulting in this unit • Unscrew the Phillips head screws in the base. Refer to our brand. To remove the base from this manual. If the base is applicable to have any questions, please visit our website at www.magnavox.com/support Quick Star t EN Installation FR Installation ... to put the AC power cord between the base and the unit. 3 Drive Phillips head screws into base holes (shown by arrow ➀), then move the base in step 2, then pull the base up toward the rear of this unit: Model 32MD311B 32MD301B 26MD311B 26MD301B 22MD311B 19MD311B 19MD301B Quantity 4 3 Size...

User manual, English (US)
Page 9
... change -2.5° 10° the angle of the unit (-2.5° to prevent damage or injury from your furniture tightly using wood screws (not supplied) in the battery compartment. INTRODUCTION Mounting the Unit on your Wood Stand, Furniture and other wood item. Tilt Stand...try to follow the correct polarity as shown. • Recommended screw dimension : 0.201 x 0.788 inches(5.1 x 20 mm) English 9 Installing the Batteries Install the batteries (AAA, 1.5V x 2) matching the polarity indicated inside battery compartment of the base as indicated in the 2 holes at the back of the ...
... change -2.5° 10° the angle of the unit (-2.5° to prevent damage or injury from your furniture tightly using wood screws (not supplied) in the battery compartment. INTRODUCTION Mounting the Unit on your Wood Stand, Furniture and other wood item. Tilt Stand...try to follow the correct polarity as shown. • Recommended screw dimension : 0.201 x 0.788 inches(5.1 x 20 mm) English 9 Installing the Batteries Install the batteries (AAA, 1.5V x 2) matching the polarity indicated inside battery compartment of the base as indicated in the 2 holes at the back of the ...


