User manual, English (US)
Page 3
... tip-over. 13. Do not install near water. 6. Only use attachments/accessories specified by the manufacturer. 19. tus. Unplug this apparatus near any heat sources such as radiators, heat registers, stoves, or other . Wall or Ceiling Mounting - Outdoor Antenna Grounding - aligned as recommended by the manufacturer. 12. The power supply cord or the plug has been damaged; or as...
... tip-over. 13. Do not install near water. 6. Only use attachments/accessories specified by the manufacturer. 19. tus. Unplug this apparatus near any heat sources such as radiators, heat registers, stoves, or other . Wall or Ceiling Mounting - Outdoor Antenna Grounding - aligned as recommended by the manufacturer. 12. The power supply cord or the plug has been damaged; or as...
User manual, English (US)
Page 4
... Controls Rear Audio/Video Input Jacks 4 Access Code 21 Headphone Jack 8 Block All Channels 23 Automatically Program TV 13 Block Channels 22 Basic Antenna Connection 1 Clear All Blocked Channels 23 Basic Remote Operation 3 Movie Ratings 24 Basic Television Operation 3 Other Blocking Options 26 Cable/Cable Box Basic Connection . . .1-2 TV Ratings 25 Care and Cleaning 31 Understanding AutoLock 20 Channel Edit 14 SmartPicture™ Control 28 Closed Caption Control 27 SmartSound™ Control 28 Format Control 17 Sound Menu Controls 18 Language Control 11 Timer...
... Controls Rear Audio/Video Input Jacks 4 Access Code 21 Headphone Jack 8 Block All Channels 23 Automatically Program TV 13 Block Channels 22 Basic Antenna Connection 1 Clear All Blocked Channels 23 Basic Remote Operation 3 Movie Ratings 24 Basic Television Operation 3 Other Blocking Options 26 Cable/Cable Box Basic Connection . . .1-2 TV Ratings 25 Care and Cleaning 31 Understanding AutoLock 20 Channel Edit 14 SmartPicture™ Control 28 Closed Caption Control 27 SmartSound™ Control 28 Format Control 17 Sound Menu Controls 18 Language Control 11 Timer...

User manual, English (US)
Page 5
... new television. 1 Connect the open end of the round Cable Company supplied cable to the TV. Direct Cable Connection Cable signal coming from Cable Company 1 Back of TV 75Ω Round Coaxial Cable Jack Panel Back of TV ANT 75‰ Monitor out VIDEO L/Mono AUDIO AV1 in Y Pb AV2 in 75‰ VIDEO Y L/Mono AUDIO Pb S-VIDEO R Pr COMPONENT VIDEO INPUT Back of TV 75 ⍀ 2 BASIC CABLE TV CONNECTIONS The Cable TV input into your home...
... new television. 1 Connect the open end of the round Cable Company supplied cable to the TV. Direct Cable Connection Cable signal coming from Cable Company 1 Back of TV 75Ω Round Coaxial Cable Jack Panel Back of TV ANT 75‰ Monitor out VIDEO L/Mono AUDIO AV1 in Y Pb AV2 in 75‰ VIDEO Y L/Mono AUDIO Pb S-VIDEO R Pr COMPONENT VIDEO INPUT Back of TV 75 ⍀ 2 BASIC CABLE TV CONNECTIONS The Cable TV input into your home...

User manual, English (US)
Page 6
... TV. buttons on the back of the television. Cable Signal Cable Box (w/Audio/Video Outputs): nel and change channels at the cable box. 2 CABLE BOX CONNECTIONS If your cable box may be mono. 12 1 Connect the Cable Company supplied cable to the signal IN(put) plug CABLE on the back of the Cable Box. Jack Panel Back of Cable Box 3 3 Connect the other end to the AV1 Audio L & R Input jacks on the TV. Y L/Mono 6 Connect one end of the cable to the Video (or ANT, your cable signal uses a cable box or Cable Signal IN...
... TV. buttons on the back of the television. Cable Signal Cable Box (w/Audio/Video Outputs): nel and change channels at the cable box. 2 CABLE BOX CONNECTIONS If your cable box may be mono. 12 1 Connect the Cable Company supplied cable to the signal IN(put) plug CABLE on the back of the Cable Box. Jack Panel Back of Cable Box 3 3 Connect the other end to the AV1 Audio L & R Input jacks on the TV. Y L/Mono 6 Connect one end of the cable to the Video (or ANT, your cable signal uses a cable box or Cable Signal IN...

User manual, English (US)
Page 8
... below to view the tape on the rear of the VCRs (or accessory devices) ON and a prerecorded tape (CD, DVD, etc.) inserted, press the PLAY button to connect your lowest channel, for direct picture and sound connections between the TV and a VCR (or similar device) that has audio/video output jacks. Both the AV1 and AV2 Input Jack connections are shown on this page, but are for example channel 1, then change channels down...
... below to view the tape on the rear of the VCRs (or accessory devices) ON and a prerecorded tape (CD, DVD, etc.) inserted, press the PLAY button to connect your lowest channel, for direct picture and sound connections between the TV and a VCR (or similar device) that has audio/video output jacks. Both the AV1 and AV2 Input Jack connections are shown on this page, but are for example channel 1, then change channels down...

User manual, English (US)
Page 9
... PICTURE SOUND MAGNAVOX Audio Cable VIDEO CABLE to the S-VIDEO (Red and White) jack on the back of the TV.Then S-Video Cable connect one end of the VCR. 3 Turn the VCR and the TV ON. 4 Press the CH + or CH- buttons to set the TV to its SVHS2 channel. (Go to your ready to place a prerecorded video tape in the VCR and press the PLAY ᮣ button. AUDIO Pb R Pr COMPONENT VIDEO INPUT S-VIDEO 1 Connect one end the AUDIO (red...
... PICTURE SOUND MAGNAVOX Audio Cable VIDEO CABLE to the S-VIDEO (Red and White) jack on the back of the TV.Then S-Video Cable connect one end of the VCR. 3 Turn the VCR and the TV ON. 4 Press the CH + or CH- buttons to set the TV to its SVHS2 channel. (Go to your ready to place a prerecorded video tape in the VCR and press the PLAY ᮣ button. AUDIO Pb R Pr COMPONENT VIDEO INPUT S-VIDEO 1 Connect one end the AUDIO (red...

User manual, English (US)
Page 10
... r stand for example,Y, Pb, Pr;Y, B-Y, R-Y;Y, Cr, Cb). 6 USING THE CVI (COMPONENT VIDEO INPUT) JACKS Component Video inputs provide for the highest possible color and picture resolution in the playback of digital signal source material, such as described, it is best not to have a video signal connected to the AV1 in Video Input jack. buttons to set the TV to its CVI channel. (Go to your lowest channel, for example channel 1, then change channels down to your DVD or digital accessory owner's manual...
... r stand for example,Y, Pb, Pr;Y, B-Y, R-Y;Y, Cr, Cb). 6 USING THE CVI (COMPONENT VIDEO INPUT) JACKS Component Video inputs provide for the highest possible color and picture resolution in the playback of digital signal source material, such as described, it is best not to have a video signal connected to the AV1 in Video Input jack. buttons to set the TV to its CVI channel. (Go to your lowest channel, for example channel 1, then change channels down to your DVD or digital accessory owner's manual...

User manual, English (US)
Page 11
... adjust the sound level coming from the audio system Monitor out AV1 in AV2 in R Pr COMPONENT VIDEO INPUT Audio Cables (Red & White) OUT L AUDIO R IN 4 OUT R AUDIO L IN S-VIDEO OUT ANTENNA IN VIDEO ANTENNA OUT IN HELPFUL HINT Audio and video cables are not supplied with the TV, but are great for recording with a VCR or used to a normal listening level. 2 Turn theTV and audio system ON. Monitor OUT The following steps allow you to VIDEO &AUDIO connect...
... adjust the sound level coming from the audio system Monitor out AV1 in AV2 in R Pr COMPONENT VIDEO INPUT Audio Cables (Red & White) OUT L AUDIO R IN 4 OUT R AUDIO L IN S-VIDEO OUT ANTENNA IN VIDEO ANTENNA OUT IN HELPFUL HINT Audio and video cables are not supplied with the TV, but are great for recording with a VCR or used to a normal listening level. 2 Turn theTV and audio system ON. Monitor OUT The following steps allow you to VIDEO &AUDIO connect...
User manual, English (US)
Page 12
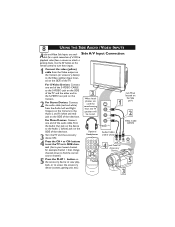
.... Side A/V Input Connection: able for example channel 1, then change channels down to find the correct source channel.) 5 Press the PLAY 3 button on the Side 1 of TV VIDEO L 2 AUDIO R Video Cable (yellow) Audio Cables (red & white) 4 AUDIO VIDEO RIGHT LEFT S-VIDEO Jack Panel of the television. 3 Turn the TV and the accessory device ON. 4 Press the CH + or CH- Optional Headphones 1 2 3 POWER 4 5 6 CH 7 8 9 CH A/CH 0 CC VOL STATUS VOL EXIT MENU SLEEP MUTE SURF SMART PICTURE SOUND MAGNAVOX Jack Panel located on...
.... Side A/V Input Connection: able for example channel 1, then change channels down to find the correct source channel.) 5 Press the PLAY 3 button on the Side 1 of TV VIDEO L 2 AUDIO R Video Cable (yellow) Audio Cables (red & white) 4 AUDIO VIDEO RIGHT LEFT S-VIDEO Jack Panel of the television. 3 Turn the TV and the accessory device ON. 4 Press the CH + or CH- Optional Headphones 1 2 3 POWER 4 5 6 CH 7 8 9 CH A/CH 0 CC VOL STATUS VOL EXIT MENU SLEEP MUTE SURF SMART PICTURE SOUND MAGNAVOX Jack Panel located on...
User manual, English (US)
Page 13
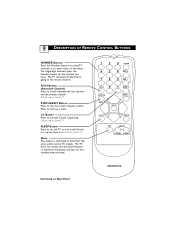
... when pressed. 1 2 3 POWER 4 5 6 CH 7 8 9 CH A/CH 0 CC VOL STATUS VOL EXIT MENU SLEEP MUTE SURF SMART PICTURE SOUND Continued on panel 25. 9 DESCRIPTION OF REMOTE CONTROL BUTTONS NUMBER Buttons Press the Number buttons to select TV channels or to turn itself off within certain TV models. A/CH Button (Alternate Channel) Press to see the current channel number. For single-digit channels, press the Number button for the channel you want. STATUS/EXIT Button Press to switch between the...
... when pressed. 1 2 3 POWER 4 5 6 CH 7 8 9 CH A/CH 0 CC VOL STATUS VOL EXIT MENU SLEEP MUTE SURF SMART PICTURE SOUND Continued on panel 25. 9 DESCRIPTION OF REMOTE CONTROL BUTTONS NUMBER Buttons Press the Number buttons to select TV channels or to turn itself off within certain TV models. A/CH Button (Alternate Channel) Press to see the current channel number. For single-digit channels, press the Number button for the channel you want. STATUS/EXIT Button Press to switch between the...

User manual, English (US)
Page 16
... Language Tuner Mode Auto Program Channel Edit English Antenna OR Install Language Tuner Mode Auto Program Channel Edit English Cable OR Install Language Tuner Mode Auto Program Channel Edit English Auto 12 HOW TO USE THE TUNER MODE CONTROL The TUNER MODE control allows you to change the TV's signal input to remove the on-screen menu from the TV's screen. lighted. 1 2 3 POWER 4 5 6 CH 7 8 9 CH A/CH 0 CC VOL STATUS VOL EXIT MENU 1 SLEEP MUTE SURF SMART PICTURE SOUND 3 5 MAGNAVOX 5 Press the CURSOR RIGHT ᮣ button to select either ANTENNA, CABLE, or AUTO mode...
... Language Tuner Mode Auto Program Channel Edit English Antenna OR Install Language Tuner Mode Auto Program Channel Edit English Cable OR Install Language Tuner Mode Auto Program Channel Edit English Auto 12 HOW TO USE THE TUNER MODE CONTROL The TUNER MODE control allows you to change the TV's signal input to remove the on-screen menu from the TV's screen. lighted. 1 2 3 POWER 4 5 6 CH 7 8 9 CH A/CH 0 CC VOL STATUS VOL EXIT MENU 1 SLEEP MUTE SURF SMART PICTURE SOUND 3 5 MAGNAVOX 5 Press the CURSOR RIGHT ᮣ button to select either ANTENNA, CABLE, or AUTO mode...

User manual, English (US)
Page 17
...MENU 1 Install Language Tuner Mode Auto Program Channel Edit SLEEP MUTE 3 Auto Program 2 SURF SMART PICTURE SOUND 5 Channel 12 4 Auto Program Channel 13 MAGNAVOX Auto Program Channel 14 HELPFUL HINT When CABLE is selected, channels 1-125 are available. Auto Programming will automatically set itself to the correct mode based on -screen menu until the word INSTALL is selected, the TV will store all available channels in your area when the CHANNEL (+) or (-) buttons are highlighted. 5 Press the CURSOR RIGHT ᮣ button to start the Auto Program scanning of signal...
...MENU 1 Install Language Tuner Mode Auto Program Channel Edit SLEEP MUTE 3 Auto Program 2 SURF SMART PICTURE SOUND 5 Channel 12 4 Auto Program Channel 13 MAGNAVOX Auto Program Channel 14 HELPFUL HINT When CABLE is selected, channels 1-125 are available. Auto Programming will automatically set itself to the correct mode based on -screen menu until the word INSTALL is selected, the TV will store all available channels in your area when the CHANNEL (+) or (-) buttons are highlighted. 5 Press the CURSOR RIGHT ᮣ button to start the Auto Program scanning of signal...

User manual, English (US)
Page 18
... been skipped. buttons. Main Picture Sound Features Install Language Tuner Mode Auto Program Channel Edit Install Language Tuner Mode Auto Program Channel Edit Channel Skipped Channel Edit Channel 12 Skipped Channel Edit Channel Skipped On Channel Edit Channel Skipped Off 7 Using the CURSOR DOWN ▼ button, scroll the menu to highlight the word SKIPPED. 8 Now use the NUMBERED buttons to go directly to display the CHANNEL EDIT options. Or, you can also use the cur- 8 sor buttons to show the on -screen menu until the...
... been skipped. buttons. Main Picture Sound Features Install Language Tuner Mode Auto Program Channel Edit Install Language Tuner Mode Auto Program Channel Edit Channel Skipped Channel Edit Channel 12 Skipped Channel Edit Channel Skipped On Channel Edit Channel Skipped Off 7 Using the CURSOR DOWN ▼ button, scroll the menu to highlight the word SKIPPED. 8 Now use the NUMBERED buttons to go directly to display the CHANNEL EDIT options. Or, you can also use the cur- 8 sor buttons to show the on -screen menu until the...
User manual, English (US)
Page 22
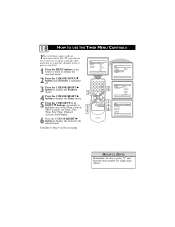
...TO USE THE TIMER MENU CONTROLS Your television comes with an onscreen clock. Main Picture Sound Features Install Brightness Color Picture Sharpness Tint More... 1 1 2 3 POWER 4 5 6 CH 7 8 9 CH A/CH 0 CC VOL STATUS VOL EXIT MENU VSOLLEEP MUTE 2 5 SURF SMART PICTURE SOUND 5 3 4 6 MAGNAVOX Main Picture Sound Features Install Timer AutoLock Features Timer AutoLock Time Start Time Stop Time Channel Activate Display Timer Time Start Time Stop Time Channel Activate Display --:-- These controls are Time, Start Time, Stop Time, Channel, Activate, and Display. 6 Press...
...TO USE THE TIMER MENU CONTROLS Your television comes with an onscreen clock. Main Picture Sound Features Install Brightness Color Picture Sharpness Tint More... 1 1 2 3 POWER 4 5 6 CH 7 8 9 CH A/CH 0 CC VOL STATUS VOL EXIT MENU VSOLLEEP MUTE 2 5 SURF SMART PICTURE SOUND 5 3 4 6 MAGNAVOX Main Picture Sound Features Install Timer AutoLock Features Timer AutoLock Time Start Time Stop Time Channel Activate Display Timer Time Start Time Stop Time Channel Activate Display --:-- These controls are Time, Start Time, Stop Time, Channel, Activate, and Display. 6 Press...

User manual, English (US)
Page 23
... MUTE SURF SMART PICTURE SOUND 6 6 MAGNAVOX Timer Time Start Time Stop Time Channel Activate Display 10:35 AM Timer Time Start Time Stop Time Channel Activate Display 10:35 AM Timer Time Start Time Stop Time Channel 2 Activate Display Timer Time Start Time Stop Time Channel Activate Off Display OR Activate OR Activate Daily Once Timer Time Start Time Stop Time Channel Activate Display On OR Display On buttons to the selected items by following the steps below. 19 HOW TO USE THE TIMER MENU CONTROLS (CONT'D) 6 Make adjustments to enter...
... MUTE SURF SMART PICTURE SOUND 6 6 MAGNAVOX Timer Time Start Time Stop Time Channel Activate Display 10:35 AM Timer Time Start Time Stop Time Channel Activate Display 10:35 AM Timer Time Start Time Stop Time Channel 2 Activate Display Timer Time Start Time Stop Time Channel Activate Off Display OR Activate OR Activate Daily Once Timer Time Start Time Stop Time Channel Activate Display On OR Display On buttons to the selected items by following the steps below. 19 HOW TO USE THE TIMER MENU CONTROLS (CONT'D) 6 Make adjustments to enter...

User manual, English (US)
Page 24
... controls from which will be viewed by the Motion Pictures Association of 17 should be admitted. - Allows you can be blocked from viewing using standard TV ratings set to censor the type of viewing children may find unsuitable for children under the age of America. This programming contains material that parents may watch. TV-Y7 -- This program is specifically designed to choose: Access Code...
... controls from which will be viewed by the Motion Pictures Association of 17 should be admitted. - Allows you can be blocked from viewing using standard TV ratings set to censor the type of viewing children may find unsuitable for children under the age of America. This programming contains material that parents may watch. TV-Y7 -- This program is specifically designed to choose: Access Code...
User manual, English (US)
Page 31
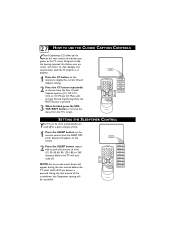
... /EXIT button to remove the menu from the four Closed Caption options (CC Off, CC1, CC2, or CC Mute). CC Mute will be set to automatically turn itself off 1 2 1 2 3 POWER 4 5 6 CH 7 8 9 CH A/CH 0 CC VOL STATUS VOL EXIT MENU SLEEP MUTE SURF SMART PICTURE SOUND Sleep 15 Sleep 30 Sleep 45 Sleep 60 Sleep 90 Sleep 120 Sleep 180 Sleep 240 MAGNAVOX Sleep off . Designed to help the hearing impaired, this feature uses onscreen "text boxes...
... /EXIT button to remove the menu from the four Closed Caption options (CC Off, CC1, CC2, or CC Mute). CC Mute will be set to automatically turn itself off 1 2 1 2 3 POWER 4 5 6 CH 7 8 9 CH A/CH 0 CC VOL STATUS VOL EXIT MENU SLEEP MUTE SURF SMART PICTURE SOUND Sleep 15 Sleep 30 Sleep 45 Sleep 60 Sleep 90 Sleep 120 Sleep 180 Sleep 240 MAGNAVOX Sleep off . Designed to help the hearing impaired, this feature uses onscreen "text boxes...

User manual, English (US)
Page 32
SPORTS - WEAK SIGNAL - Preset picture options for watching Video Tapes, or DVDs. MULTIMEDIA - Preset picture options for watching programs where the reception is not at its best. Preset picture options for watching movies. Personal 1 2 3 POWER 4 5 6 CH 7 8 9 CH A/CH 0 CC VOL STATUS VOL EXIT MENU SLEEP MUTE SURF SMART PICTURE SOUND 1 2 MAGNAVOX Theatre Music Voice THEATRE - Preset sound options for use with video gaming. VOICE - Preset picture options for programming where heavy...
SPORTS - WEAK SIGNAL - Preset picture options for watching Video Tapes, or DVDs. MULTIMEDIA - Preset picture options for watching programs where the reception is not at its best. Preset picture options for watching movies. Personal 1 2 3 POWER 4 5 6 CH 7 8 9 CH A/CH 0 CC VOL STATUS VOL EXIT MENU SLEEP MUTE SURF SMART PICTURE SOUND 1 2 MAGNAVOX Theatre Music Voice THEATRE - Preset sound options for use with video gaming. VOICE - Preset picture options for programming where heavy...

User manual, English (US)
Page 34
..., if one is being used . •Check to be sure the TUNER MODES are set to the CABLE option and run the Auto Program feature to be sure the TV outlet is not on the remote control. •If you're attempting to find all available channels. •Press the CH+ or CH- No Picture •Check antenna connections. Are they properly secured...
..., if one is being used . •Check to be sure the TUNER MODES are set to the CABLE option and run the Auto Program feature to be sure the TV outlet is not on the remote control. •If you're attempting to find all available channels. •Press the CH+ or CH- No Picture •Check antenna connections. Are they properly secured...

User manual, English (US)
Page 35
... the screen. you may be DVD disks, laser disks, video games, CD-i disks, videotapes, digital television boxes, broadcast channels, cable channels, satellite channels, and others in direct sunlight or near the cabinet, as they are some examples of the cabinet finish. Use even, easy, vertical strokes when cleaning. • Gently wipe the cabinet surfaces with standard (4:3) aspect ratio. • Video-game images and scoreboards • Television station logos-present a problem...
... the screen. you may be DVD disks, laser disks, video games, CD-i disks, videotapes, digital television boxes, broadcast channels, cable channels, satellite channels, and others in direct sunlight or near the cabinet, as they are some examples of the cabinet finish. Use even, easy, vertical strokes when cleaning. • Gently wipe the cabinet surfaces with standard (4:3) aspect ratio. • Video-game images and scoreboards • Television station logos-present a problem...


