

User manual, English (US)
Page 3
... of Antenna Grounding as practical. A polarized plug has two blades with a cart, stand, tripod, bracket, or table specified by the manufacturer. 19. Protect the power cord from being walked on the top of cable entry as per NEC - Use only with one wider than the other apparatus (including amplifiers) that may result in accordance with a dry cloth. 7. The power supply cord...
... of Antenna Grounding as practical. A polarized plug has two blades with a cart, stand, tripod, bracket, or table specified by the manufacturer. 19. Protect the power cord from being walked on the top of cable entry as per NEC - Use only with one wider than the other apparatus (including amplifiers) that may result in accordance with a dry cloth. 7. The power supply cord...
User manual, English (US)
Page 4
...new Color Television. Closed Captioning: Allows you to read TV program dialog or voice conversations as you want your children viewing inappropriate material. Child Lock: Locks the buttons on -screen text. SmartPicture™: Lets you set the TV's sound settings for the current programming. Table of Contents Introduction Welcome/TV Registration 2 Safety/Precautions 3 Table of Contents 4 Features 4 Getting Started Basic Cable TV Connection 5 Basic Antenna Connection 6 Basic TV to VCR (Accessory) Connection 7 Basic TV and Remote Control Operations 8 Remote Control 9 Setup Menus...
...new Color Television. Closed Captioning: Allows you to read TV program dialog or voice conversations as you want your children viewing inappropriate material. Child Lock: Locks the buttons on -screen text. SmartPicture™: Lets you set the TV's sound settings for the current programming. Table of Contents Introduction Welcome/TV Registration 2 Safety/Precautions 3 Table of Contents 4 Features 4 Getting Started Basic Cable TV Connection 5 Basic Antenna Connection 6 Basic TV to VCR (Accessory) Connection 7 Basic TV and Remote Control Operations 8 Remote Control 9 Setup Menus...
User manual, English (US)
Page 5
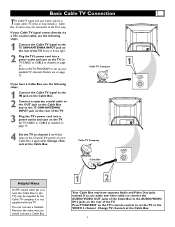
... AUTO PROGRAM to the 75 OHM ANTENNA INPUT jack on the rear of the TV. You can connect a Satellite Receiver the same way you have separate Audio and Video Out jacks instead. Change TV channels at the Cable Box. In either case, the connection to CABLE as detailed on the rear of the TV. 3 Plug the TV's power cord into a power outlet and turn on page 12. Set TV/CABLE to the TV is not supplied with the TV. Your Cable Box may include a Cable Box...
... AUTO PROGRAM to the 75 OHM ANTENNA INPUT jack on the rear of the TV. You can connect a Satellite Receiver the same way you have separate Audio and Video Out jacks instead. Change TV channels at the Cable Box. In either case, the connection to CABLE as detailed on the rear of the TV. 3 Plug the TV's power cord into a power outlet and turn on page 12. Set TV/CABLE to the TV is not supplied with the TV. Your Cable Box may include a Cable Box...

User manual, English (US)
Page 6
... (not supplied with TV). 2 Push the round end of the adapter or antenna cable onto the 75 OHM ANTENNA INPUT jack on the rear of the TV. 1 If your available TV channels. Refer to AUTO PROGRAM to set up your antenna has a round cable (75 ohm) on the end, then you're ready to connect it down tight. 3 Plug the TV's power cord into a power outlet and turn on the rear of the TV. Go...
... (not supplied with TV). 2 Push the round end of the adapter or antenna cable onto the 75 OHM ANTENNA INPUT jack on the rear of the TV. 1 If your available TV channels. Refer to AUTO PROGRAM to set up your antenna has a round cable (75 ohm) on the end, then you're ready to connect it down tight. 3 Plug the TV's power cord into a power outlet and turn on the rear of the TV. Go...
User manual, English (US)
Page 7
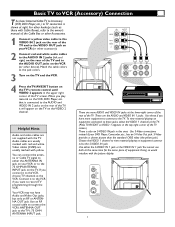
... not supplied with the picture display. Use S-Video connections instead if your VCR or to the AUDIO IN 2 jacks (left and right) on the rear of the TV screen.When you play material on the VCR (or other accessory). 2 Connect red and white audio cables to the 75 OHM ANTENNA INPUT jack on equipment connected to TV connection is shown at right. Choose the VIDEO 1 channel to view material playing on the TV. IN1 R AUDIO L (MONO) VIDEO S-VIDEO IN 2 VIDEO OUTPUT 75 OHM ANTENNA INPUT L(MONO) L AUDIO...
... not supplied with the picture display. Use S-Video connections instead if your VCR or to the AUDIO IN 2 jacks (left and right) on the rear of the TV screen.When you play material on the VCR (or other accessory). 2 Connect red and white audio cables to the 75 OHM ANTENNA INPUT jack on equipment connected to TV connection is shown at right. Choose the VIDEO 1 channel to view material playing on the TV. IN1 R AUDIO L (MONO) VIDEO S-VIDEO IN 2 VIDEO OUTPUT 75 OHM ANTENNA INPUT L(MONO) L AUDIO...

User manual, English (US)
Page 9
... TV's on-screen menu. Remote Control STANDBY y Button Press to turn the TV on or off . TV/AV/EXIT Button Press to remove a menu from the screen. For single-digit channels, press "0" first, then the number of the four sound effect settings: THEATRE, PERSONAL, VOICE, or MUSIC. Press to select TV channels or the Audio/Video In channels (VIDEO 1 or VIDEO 2). SMART SOUND Button Press to select one of the channel. Press to go to the previous menu or to remove a TV menu. SMART PICTURE Button...
... TV's on-screen menu. Remote Control STANDBY y Button Press to turn the TV on or off . TV/AV/EXIT Button Press to remove a menu from the screen. For single-digit channels, press "0" first, then the number of the four sound effect settings: THEATRE, PERSONAL, VOICE, or MUSIC. Press to select TV channels or the Audio/Video In channels (VIDEO 1 or VIDEO 2). SMART SOUND Button Press to select one of the channel. Press to go to the previous menu or to remove a TV menu. SMART PICTURE Button...
User manual, English (US)
Page 11
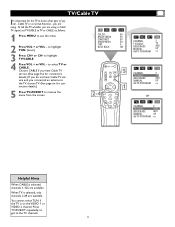
...- SND SET TUN. When TV is on the VIDEO 1 or VIDEO 2 channel. TV/Cable TV It's important for connection details.) 5 Press TV/AV/EXIT to remove the menu from the screen. Choose CABLE if you have Cable TV service. (See page five for connection details.) If you do not have Cable TV service and you are using a Cable TV signal, set TV/CABLE to TV or CABLE as follows. 1 Press MENU to see the menu. 2 Press VOL + or VOL - PIC. SND SET COLOR BRIGHTNESS...
...- SND SET TUN. When TV is on the VIDEO 1 or VIDEO 2 channel. TV/Cable TV It's important for connection details.) 5 Press TV/AV/EXIT to remove the menu from the screen. Choose CABLE if you have Cable TV service. (See page five for connection details.) If you do not have Cable TV service and you are using a Cable TV signal, set TV/CABLE to TV or CABLE as follows. 1 Press MENU to see the menu. 2 Press VOL + or VOL - PIC. SND SET COLOR BRIGHTNESS...
User manual, English (US)
Page 12
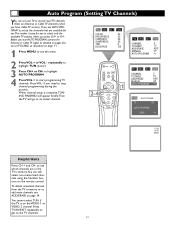
... channel setup is on the VIDEO 1 or VIDEO 2 channel. STANDBY MUTE SLEEP CALL BOOKMARK SMART PICTURE MTS SMART SOUND TV/AV EXIT MENU 2-4 CH VOL VOL CH 1 3 2 4 6 5 7 DISPLAY 8 9 100 0 1 PIC. COLOR 50 BRIGHTNESS 50 CONTRAST 50 SHARPNESS 50 TINT 0 BLUE BACK ON PIC. TV AUTO PROGRAM 45 AUTO PROGRAM STOP } TV 25 AUTO MONO Helpful Hints Press CH + and CH- Auto Program (Setting TV Channels) You can still select non-memorized channels using the Number buttons on the remote control. Press TV/AV...
... channel setup is on the VIDEO 1 or VIDEO 2 channel. STANDBY MUTE SLEEP CALL BOOKMARK SMART PICTURE MTS SMART SOUND TV/AV EXIT MENU 2-4 CH VOL VOL CH 1 3 2 4 6 5 7 DISPLAY 8 9 100 0 1 PIC. COLOR 50 BRIGHTNESS 50 CONTRAST 50 SHARPNESS 50 TINT 0 BLUE BACK ON PIC. TV AUTO PROGRAM 45 AUTO PROGRAM STOP } TV 25 AUTO MONO Helpful Hints Press CH + and CH- Auto Program (Setting TV Channels) You can still select non-memorized channels using the Number buttons on the remote control. Press TV/AV...
User manual, English (US)
Page 13
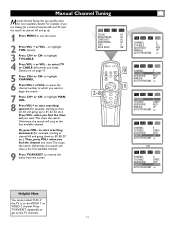
... going down to select TV or CABLE (whichever you quickly select the next available channel. SND SET TUN. COLOR 50 BRIGHTNESS 50 CONTRAST 50 SHARPNESS 50 TINT 0 BLUE BACK ON STANDBY MUTE SLEEP CALL BOOKMARK SMART PICTURE MTS SMART SOUND TV/AV EXIT MENU 2-8 CH VOL VOL CH 1 3 2 4 6 5 7 DISPLAY 8 9 100 0 9 1 PIC. SND SET TUN. CHANNEL 8 TV/CABLE CABLE ADD/ERASE ADD MANUAL UP AUTO PROGRAM ] PIC. to highlight TUN. (tuner). 3 Press CH+ or...
... going down to select TV or CABLE (whichever you quickly select the next available channel. SND SET TUN. COLOR 50 BRIGHTNESS 50 CONTRAST 50 SHARPNESS 50 TINT 0 BLUE BACK ON STANDBY MUTE SLEEP CALL BOOKMARK SMART PICTURE MTS SMART SOUND TV/AV EXIT MENU 2-8 CH VOL VOL CH 1 3 2 4 6 5 7 DISPLAY 8 9 100 0 9 1 PIC. SND SET TUN. CHANNEL 8 TV/CABLE CABLE ADD/ERASE ADD MANUAL UP AUTO PROGRAM ] PIC. to highlight TUN. (tuner). 3 Press CH+ or...

User manual, English (US)
Page 15
.... to highlight your TV picture, select a channel and follow the steps below. 1 Press MENU to see below). 4 Press TV/AV/EXIT to increase or decrease the element you can turn itself off the air for the night). SND SET TUN. COLOR Add or reduce color. to remove the menu from the screen. CONTRAST Adjust the distinction between the black and white parts of the picture. TINT Obtain...
.... to highlight your TV picture, select a channel and follow the steps below. 1 Press MENU to see below). 4 Press TV/AV/EXIT to increase or decrease the element you can turn itself off the air for the night). SND SET TUN. COLOR Add or reduce color. to remove the menu from the screen. CONTRAST Adjust the distinction between the black and white parts of the picture. TINT Obtain...
User manual, English (US)
Page 16
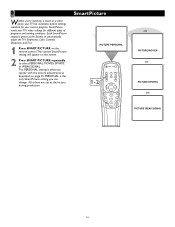
SmartPicture resets your TV's video settings for your TV has automatic picture settings matched for different types of programs and viewing conditions. PERSONAL is what you specify with the picture adjustments as described on the screen. 2 Press SMART PICTURE repeatedly to select PERSONAL, MOVIES, SPORTS, or WEAK SIGNAL. All others are set at the factory to automatically adjust the TV's Brightness, Color, Contrast, Sharpness, and Tint. 1 Press SMART PICTURE on the remote control.The current...
SmartPicture resets your TV's video settings for your TV has automatic picture settings matched for different types of programs and viewing conditions. PERSONAL is what you specify with the picture adjustments as described on the screen. 2 Press SMART PICTURE repeatedly to select PERSONAL, MOVIES, SPORTS, or WEAK SIGNAL. All others are set at the factory to automatically adjust the TV's Brightness, Color, Contrast, Sharpness, and Tint. 1 Press SMART PICTURE on the remote control.The current...

User manual, English (US)
Page 18
...- STANDBY MUTE SLEEP CALL BOOKMARK SMART PICTURE MTS SMART SOUND TV/AV EXIT MENU 12 CH VOL VOL CH 1 1 3 2 4 6 5 7 9 DISPLAY 8 100 0 2-11 9 Press VOL+ or VOL- to which the TV will be the time at which the TV turns on at a specific time, use the On-Timer. to confirm your choice. 12Press TV/AV/EXIT to remove the menu. SET TIMER OFF TIMER ] ON TIMER ] CLOCK SET ] SET ON TIMER AM 7:50 CHANNEL 8 TV/CABLE TV ‡ OFF...
...- STANDBY MUTE SLEEP CALL BOOKMARK SMART PICTURE MTS SMART SOUND TV/AV EXIT MENU 12 CH VOL VOL CH 1 1 3 2 4 6 5 7 9 DISPLAY 8 100 0 2-11 9 Press VOL+ or VOL- to which the TV will be the time at which the TV turns on at a specific time, use the On-Timer. to confirm your choice. 12Press TV/AV/EXIT to remove the menu. SET TIMER OFF TIMER ] ON TIMER ] CLOCK SET ] SET ON TIMER AM 7:50 CHANNEL 8 TV/CABLE TV ‡ OFF...

User manual, English (US)
Page 20
... TV programming. 1 Press MENU to highlight CLOSED CAPTION. 4 Press VOL+ or VOL- The TV volume will show closed caption program. COLOR 50 BRIGHTNESS 50 CONTRAST 50 SHARPNESS 50 TINT 0 BLUE BACK ON STANDBY MUTE SLEEP CALL BOOKMARK SMART PICTURE MTS TV/AV SMART SOUND EXIT MENU 2-6 CH VOL VOL CH 1 3 2 4 6 5 7 DISPLAY 8 9 100 0 7 1 PIC. See your selection. 7 Press TV/AV/EXIT to display the CLOSED CAPTION menu. 5 Press CH+ or CH- CLOSED CAPTION ] PARENTAL CONTROL ] TIMER ] LANGUAGE ] CHILD LOCK ON SET CLOSED CAPTION...
... TV programming. 1 Press MENU to highlight CLOSED CAPTION. 4 Press VOL+ or VOL- The TV volume will show closed caption program. COLOR 50 BRIGHTNESS 50 CONTRAST 50 SHARPNESS 50 TINT 0 BLUE BACK ON STANDBY MUTE SLEEP CALL BOOKMARK SMART PICTURE MTS TV/AV SMART SOUND EXIT MENU 2-6 CH VOL VOL CH 1 3 2 4 6 5 7 DISPLAY 8 9 100 0 7 1 PIC. See your selection. 7 Press TV/AV/EXIT to display the CLOSED CAPTION menu. 5 Press CH+ or CH- CLOSED CAPTION ] PARENTAL CONTROL ] TIMER ] LANGUAGE ] CHILD LOCK ON SET CLOSED CAPTION...

User manual, English (US)
Page 24
.... CLOSED CAPTION ] PARENTAL CONTROL ] TIMER ] LANGUAGE ] CHILD LOCK ON SET PARENTAL CONTROL ENTER SECRET CODE: SET PARENTAL CONTROL MPAA RATING TV PARENTAL GUIDELINES BLOCK UNRATED OFF BLOCK NO RATING OFF MASTER ENABLE OFF SET MPAA CLEAR G PG PG-13 R NC-17 X Helpful Hint Blocking any rating (ON) will be used to block. 9 Press VOL+ or VOL- to display the SECRET CODE screen. 5 Press the Number buttons to remove the menu. When you want to censor programming...
.... CLOSED CAPTION ] PARENTAL CONTROL ] TIMER ] LANGUAGE ] CHILD LOCK ON SET PARENTAL CONTROL ENTER SECRET CODE: SET PARENTAL CONTROL MPAA RATING TV PARENTAL GUIDELINES BLOCK UNRATED OFF BLOCK NO RATING OFF MASTER ENABLE OFF SET MPAA CLEAR G PG PG-13 R NC-17 X Helpful Hint Blocking any rating (ON) will be used to block. 9 Press VOL+ or VOL- to display the SECRET CODE screen. 5 Press the Number buttons to remove the menu. When you want to censor programming...

User manual, English (US)
Page 26
to remove the menu from the screen. CLOSED CAPTION ] PARENTAL CONTROL ] TIMER ] LANGUAGE ] CHILD LOCK ON SET PARENTAL CONTROL ENTER SECRET CODE: SET PARENTAL CONTROL MPAA RATING TV PARENTAL GUIDELINES BLOCK UNRATED ON BLOCK NO RATING ON MASTER ENABLE ON or OFF or OFF or OFF 26 When ON, all blocking/censoring is enabled.When OFF, all blocking/censoring is ON. to see the SECRET CODE screen. 5 Press the Number buttons to enter...
to remove the menu from the screen. CLOSED CAPTION ] PARENTAL CONTROL ] TIMER ] LANGUAGE ] CHILD LOCK ON SET PARENTAL CONTROL ENTER SECRET CODE: SET PARENTAL CONTROL MPAA RATING TV PARENTAL GUIDELINES BLOCK UNRATED ON BLOCK NO RATING ON MASTER ENABLE ON or OFF or OFF or OFF 26 When ON, all blocking/censoring is enabled.When OFF, all blocking/censoring is ON. to see the SECRET CODE screen. 5 Press the Number buttons to enter...

User manual, English (US)
Page 27
... SET TUN. CLOSED CAPTION ] PARENTAL CONTROL ] TIMER ] LANGUAGE ] CHILD LOCK OFF 27 to remove the menu from the screen. CHILD LOCK ON will appear briefly on the TV screen each time you press a button on the front of the TV. PIC. You can still operate the TV with the remote control.You can use the POWER button on the front of the TV, but only to show the on-screen menu. 2 Press VOL+ or VOL- Child Lock Child Lock...
... SET TUN. CLOSED CAPTION ] PARENTAL CONTROL ] TIMER ] LANGUAGE ] CHILD LOCK OFF 27 to remove the menu from the screen. CHILD LOCK ON will appear briefly on the TV screen each time you press a button on the front of the TV. PIC. You can still operate the TV with the remote control.You can use the POWER button on the front of the TV, but only to show the on-screen menu. 2 Press VOL+ or VOL- Child Lock Child Lock...
User manual, English (US)
Page 31
... channel selection. • Add the channel number(s) into the outlet. Press the STANDBY button to find all available channels. Details are on page 12. • Press TV/AV/EXIT on the remote control to the TV's Audio and Video In jacks. buttons to adjust the volume. • Press the MUTE button on the remote control to set correctly. No Picture • Check the antenna or Cable TV connections. Use VIDEO 1 and VIDEO 2 to view material on other equipment (Camcorder,VCR...
... channel selection. • Add the channel number(s) into the outlet. Press the STANDBY button to find all available channels. Details are on page 12. • Press TV/AV/EXIT on the remote control to the TV's Audio and Video In jacks. buttons to adjust the volume. • Press the MUTE button on the remote control to set correctly. No Picture • Check the antenna or Cable TV connections. Use VIDEO 1 and VIDEO 2 to view material on other equipment (Camcorder,VCR...

User manual, English (US)
Page 32
... near a heating appliance). • Allow a free flow of the TV screen if the TV programming covers this news. • Shopping channel logos, pricing displays - Do not display the same images too frequently; This is viewed on the TV screen. These cause a problem if they are some DVDs. • Video-game images and scoreboards • Television station logos - Avoid wearing jewelry or using anything abrasive. Use a clean, dry cloth to dry the...
... near a heating appliance). • Allow a free flow of the TV screen if the TV programming covers this news. • Shopping channel logos, pricing displays - Do not display the same images too frequently; This is viewed on the TV screen. These cause a problem if they are some DVDs. • Video-game images and scoreboards • Television station logos - Avoid wearing jewelry or using anything abrasive. Use a clean, dry cloth to dry the...

User manual, English (US)
Page 33
... Installation 8 Blue Back (background 15 Brightness 15 Cable TV Connection 5 Channel Setup 12 Child Lock 27 Cleaning 32 Clock 17 Closed Captions 20 Color 15 Contrast 15 Factory Service 34-35 Glossary 33 Helpful Hints 31 Language 10 Manual Channel Tuning 13 Mono 30 MTS 30 On-Timer 18 Off-Timer 19 Parental Controls Blocking Options 26 Movie Ratings 24 Secret Code 23 TV Ratings 25 Understanding Parental Control 22 Picture 15 Registration 2 Remote Control 8-9 Safety 3 Second Audio Program (SAP...
... Installation 8 Blue Back (background 15 Brightness 15 Cable TV Connection 5 Channel Setup 12 Child Lock 27 Cleaning 32 Clock 17 Closed Captions 20 Color 15 Contrast 15 Factory Service 34-35 Glossary 33 Helpful Hints 31 Language 10 Manual Channel Tuning 13 Mono 30 MTS 30 On-Timer 18 Off-Timer 19 Parental Controls Blocking Options 26 Movie Ratings 24 Secret Code 23 TV Ratings 25 Understanding Parental Control 22 Picture 15 Registration 2 Remote Control 8-9 Safety 3 Second Audio Program (SAP...

User manual, English (US)
Page 36
..., adjust- Also keep the original box and packing material in all replaced and repaired parts also expires. TO GET WARRANTY SERVICE IN U.S.A., PUERTO RICO, OR U.S. Please contact Magnavox at: 1-800-705-2000 (In Canada, this express warranty. Please record below the model and serial numbers found on all countries where the product is free. Please check your warranty registration card promptly. WHERE IS SERVICE AVAILABLE? MODEL SERIAL...
..., adjust- Also keep the original box and packing material in all replaced and repaired parts also expires. TO GET WARRANTY SERVICE IN U.S.A., PUERTO RICO, OR U.S. Please contact Magnavox at: 1-800-705-2000 (In Canada, this express warranty. Please record below the model and serial numbers found on all countries where the product is free. Please check your warranty registration card promptly. WHERE IS SERVICE AVAILABLE? MODEL SERIAL...


