User Manual
Page 1
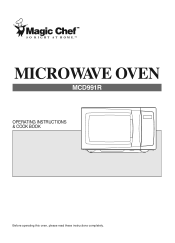
MICROWAVE OVEN MCD991R OPERATING INSTRUCTIONS & COOK BOOK Before operating this oven, please read these instructions completely.
MICROWAVE OVEN MCD991R OPERATING INSTRUCTIONS & COOK BOOK Before operating this oven, please read these instructions completely.
User Manual
Page 3
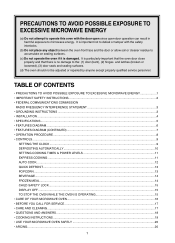
... INSTRUCTIONS ...3 • INSTALLATION ...4 • SPECIFICATIONS...5 • FEATURES DIAGRAM...6 • FEATURES DIAGRAM (CONTINUED) ...7 • OPERATION PROCEDURE...8 • CONTROLS...9 SETTING THE CLOCK ...9 DEFROSTING AUTOMATICALLY...10 SETTING COOKING TIMES & POWER LEVELS 11 EXPRESS COOKING ...11 AUTO COOK...12 QUICK DEFROST...13 POPCORN ...13 BEVERAGE...14 FROZEN MEAL...14 CHILD SAFETY LOCK...15 DISPLAY OFF...15 TO STOP THE OVEN WHILE THE OVEN IS OPERATING 15 • CARE OF YOUR MICROWAVE OVEN...16 • BEFORE YOU CALL FOR SERVICE...17 • CARE AND CLEANING...17...
... INSTRUCTIONS ...3 • INSTALLATION ...4 • SPECIFICATIONS...5 • FEATURES DIAGRAM...6 • FEATURES DIAGRAM (CONTINUED) ...7 • OPERATION PROCEDURE...8 • CONTROLS...9 SETTING THE CLOCK ...9 DEFROSTING AUTOMATICALLY...10 SETTING COOKING TIMES & POWER LEVELS 11 EXPRESS COOKING ...11 AUTO COOK...12 QUICK DEFROST...13 POPCORN ...13 BEVERAGE...14 FROZEN MEAL...14 CHILD SAFETY LOCK...15 DISPLAY OFF...15 TO STOP THE OVEN WHILE THE OVEN IS OPERATING 15 • CARE OF YOUR MICROWAVE OVEN...16 • BEFORE YOU CALL FOR SERVICE...17 • CARE AND CLEANING...17...
User Manual
Page 4
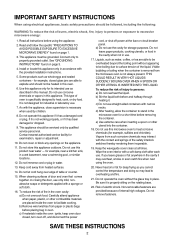
... UTENSIL IS INSERTED INTO THE LIQUID. e) Use extreme care when inserting a spoon or other combustible materials are placed inside the oven ignite, keep oven door closed glass jars are able to explode and should not be heated in the oven cavity: a) Do not overcook food. Keep the waveguide cover clean at the fuse or circuit breaker panel. Wipe the oven interior with narrow necks. Risk of fire in...
... UTENSIL IS INSERTED INTO THE LIQUID. e) Use extreme care when inserting a spoon or other combustible materials are placed inside the oven ignite, keep oven door closed glass jars are able to explode and should not be heated in the oven cavity: a) Do not overcook food. Keep the waveguide cover clean at the fuse or circuit breaker panel. Wipe the oven interior with narrow necks. Risk of fire in...
User Manual
Page 5
... any circumstances. 3 WARNING: Do not cut or remove the third (ground) prong from the receiver. • Plug the microwave oven into an outlet that will not occur in a particular installation. It is properly installed and grounded. Consult a qualified electrician or serviceman if the grounding instructions are designed to use an extension cord, use only a 3-wire extension cord that has a 3-blade grounding plug...
... any circumstances. 3 WARNING: Do not cut or remove the third (ground) prong from the receiver. • Plug the microwave oven into an outlet that will not occur in a particular installation. It is properly installed and grounded. Consult a qualified electrician or serviceman if the grounding instructions are designed to use an extension cord, use only a 3-wire extension cord that has a 3-blade grounding plug...
User Manual
Page 6
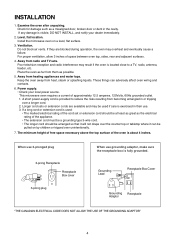
... cord. 2. Grounding Lead Receptacle Box Cover Grounding Receptacle Adaptor "THE CANADIAN ELECTRICAL CODE DOES NOT ALLOW THE USE OF THE GROUNDING ADAPTOR" 4 INSTALLATION 1. Level, flat location. Power supply. • Check your dealer immediately. 2. Examine the oven after unpacking. Poor television reception and radio interference may overheat and eventually cause a failure. These things can be used if care is about 4 inches. This microwave oven requires...
... cord. 2. Grounding Lead Receptacle Box Cover Grounding Receptacle Adaptor "THE CANADIAN ELECTRICAL CODE DOES NOT ALLOW THE USE OF THE GROUNDING ADAPTOR" 4 INSTALLATION 1. Level, flat location. Power supply. • Check your dealer immediately. 2. Examine the oven after unpacking. Poor television reception and radio interference may overheat and eventually cause a failure. These things can be used if care is about 4 inches. This microwave oven requires...
User Manual
Page 7
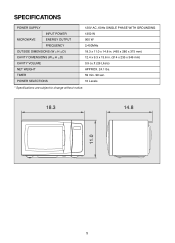
SPECIFICATIONS POWER SUPPLY INPUT POWER MICROWAVE ENERGY OUTPUT FREQUENCY OUTSIDE DIMENSIONS (W H D) CAVITY DIMENSIONS (W H D) CAVITY VOLUME NET WEIGHT TIMER POWER SELECTIONS 120V AC, 60Hz SINGLE PHASE WITH GROUNDING 1350 W 900 W 2,450MHz 18.3 x 11.0 x 14.8 in. (465 x 280 x 375 mm) 12.4 x 9.3 x 13.6 in. (314 x 235 x 346 mm) 0.9 cu.ft (26 Liters) APPROX. 24.1 lbs. 59 min. 99 sec. 10 Levels * Specifications are subject to change without notice. 18.3 14.8 11.0 5
SPECIFICATIONS POWER SUPPLY INPUT POWER MICROWAVE ENERGY OUTPUT FREQUENCY OUTSIDE DIMENSIONS (W H D) CAVITY DIMENSIONS (W H D) CAVITY VOLUME NET WEIGHT TIMER POWER SELECTIONS 120V AC, 60Hz SINGLE PHASE WITH GROUNDING 1350 W 900 W 2,450MHz 18.3 x 11.0 x 14.8 in. (465 x 280 x 375 mm) 12.4 x 9.3 x 13.6 in. (314 x 235 x 346 mm) 0.9 cu.ft (26 Liters) APPROX. 24.1 lbs. 59 min. 99 sec. 10 Levels * Specifications are subject to change without notice. 18.3 14.8 11.0 5
User Manual
Page 8
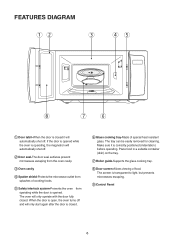
... automatically shut off . Place food in a suitable container (dish) on the tray. 7 Roller guide-Supports the glass cooking tray. 8 Door screen-Allows viewing of special heat resistant glass. The screen is closed it is closed . The tray can be easily removed for cleaning. FEATURES DIAGRAM 12 3 45 8 7 6 1 Door latch-When the door is transparent to light, but prevents microwaves escaping. 9 Control Panel 6 When the door is open, the oven turns off and will automatically shut...
... automatically shut off . Place food in a suitable container (dish) on the tray. 7 Roller guide-Supports the glass cooking tray. 8 Door screen-Allows viewing of special heat resistant glass. The screen is closed it is closed . The tray can be easily removed for cleaning. FEATURES DIAGRAM 12 3 45 8 7 6 1 Door latch-When the door is transparent to light, but prevents microwaves escaping. 9 Control Panel 6 When the door is open, the oven turns off and will automatically shut...

User Manual
Page 9
...q Clock - w Stop / Clear /off the display. Used to turn off - Used to stop the oven operation or to delete the cooking data or to set the cooking time and the current time. 0 Power level - Used to set weight of food. 9 TIME SET PAD - Used to reheat specific quantities of favorite food. 3 Auto Defrost - Used to cook or reheat many of frozen meal. 8 Up/Down - FEATURES DIAGRAM (continued) 1 2 3 6 4 7 5 8 9 0 q w e 1 Display - Cooking time, power level, indicators and current time are displayed. 2 Auto cook - Used to defrost food very quickly. 6 Beverage - e Start...
...q Clock - w Stop / Clear /off the display. Used to turn off - Used to stop the oven operation or to delete the cooking data or to set the cooking time and the current time. 0 Power level - Used to set weight of food. 9 TIME SET PAD - Used to reheat specific quantities of favorite food. 3 Auto Defrost - Used to cook or reheat many of frozen meal. 8 Up/Down - FEATURES DIAGRAM (continued) 1 2 3 6 4 7 5 8 9 0 q w e 1 Display - Cooking time, power level, indicators and current time are displayed. 2 Auto cook - Used to defrost food very quickly. 6 Beverage - e Start...
User Manual
Page 10
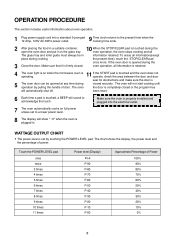
... about oven operation. 1 19 Plug power supply cord into the electrical outlet. 8 The display will show " : 0" when the oven is completely closed or the program has will automatically shut off. If the oven door is touched, a BEEP will sound to acknowledge the touch. 7 The oven automatically cooks on when the microwave oven is set to the present time when the cooking time ends. 2 10 After placing the food in . been reset. 6 Each time a pad is opened...
... about oven operation. 1 19 Plug power supply cord into the electrical outlet. 8 The display will show " : 0" when the oven is completely closed or the program has will automatically shut off. If the oven door is touched, a BEEP will sound to acknowledge the touch. 7 The oven automatically cooks on when the microwave oven is set to the present time when the cooking time ends. 2 10 After placing the food in . been reset. 6 Each time a pad is opened...

User Manual
Page 11
... power comes back on. 1. The display stops blinking, and the colon starts blinking. If you selected 12 hour clock system, this step. 3. NOTE: If you want 12 hour clock system, omit this digital clock allows you to set from 0:00 to enter an incorrect time, the time will not be set and a error signal tone will sound. Touch the CLOCK pad. NOTE : This oven has multiple clock...
... power comes back on. 1. The display stops blinking, and the colon starts blinking. If you selected 12 hour clock system, this step. 3. NOTE: If you want 12 hour clock system, omit this digital clock allows you to set from 0:00 to enter an incorrect time, the time will not be set and a error signal tone will sound. Touch the CLOCK pad. NOTE : This oven has multiple clock...
User Manual
Page 12
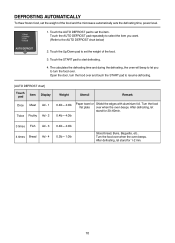
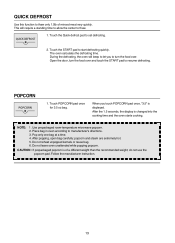
Touch the START pad to set the item. Open the door, turn the food over when the oven beeps. Turn the food over and touch the START pad to turn the food over when the oven beeps. DEFROSTING AUTOMATICALLY To thaw frozen food, set the weight of the food and the microwave automatically sets the defrosting time, power level. 1. The calculates the defrosting time and during the defrosting, the oven will beep to let you want. (Refer to set the weight of the food. 3. After defrosting, let stand...
Touch the START pad to set the item. Open the door, turn the food over when the oven beeps. Turn the food over and touch the START pad to turn the food over when the oven beeps. DEFROSTING AUTOMATICALLY To thaw frozen food, set the weight of the food and the microwave automatically sets the defrosting time, power level. 1. The calculates the defrosting time and during the defrosting, the oven will beep to let you want. (Refer to set the weight of the food. 3. After defrosting, let stand...
User Manual
Page 13
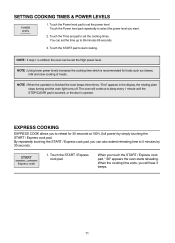
Touch the Power level pad to set the cooking times. NOTE : Using lower power levels increases the cooking time which is finished the oven beeps three times, "End" appears in the display, the rotating plate stops turning and the oven light turns off. Touch the START / Express cook pad. When the cooking time ends, you to select the power level you touch the START / Express cook pad, ":30" appears the oven starts reheating. NOTE : When the operation is recommended for 30 seconds at 100% (full...
Touch the Power level pad to set the cooking times. NOTE : Using lower power levels increases the cooking time which is finished the oven beeps three times, "End" appears in the display, the rotating plate stops turning and the oven light turns off. Touch the START / Express cook pad. When the cooking time ends, you to select the power level you touch the START / Express cook pad, ":30" appears the oven starts reheating. NOTE : When the operation is recommended for 30 seconds at 100% (full...
User Manual
Page 14
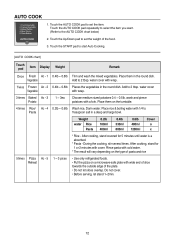
... type of the food. 3. During the cooking, stir several times. Rinse pasta with a fork. Touch the Up/Down pad to set the weight of pasta and rice 5times Pizza Ac - 5 Reheat 1 ~ 3 pices • Use only refrigerated foods. • Put the pizza on the turntable. 4 times Rice/ Ac - 4 0.2lb ~ 0.6lb Wash rice, Darin water. AUTO COOK 1. Place them on a microwave-safe plate with wide end...
... type of the food. 3. During the cooking, stir several times. Rinse pasta with a fork. Touch the Up/Down pad to set the weight of pasta and rice 5times Pizza Ac - 5 Reheat 1 ~ 3 pices • Use only refrigerated foods. • Put the pizza on the turntable. 4 times Rice/ Ac - 4 0.2lb ~ 0.6lb Wash rice, Darin water. AUTO COOK 1. Place them on a microwave-safe plate with wide end...
User Manual
Page 15
... popping, open bag carefully: popcorn and steam are extremely hot. 5. Use prepackaged room-temperature microwave popcorn. 2. When you to turn the food over . NOTE: 1. Do not reheat unpopped kernels or reuse bag. 6. QUICK DEFROST Use this function to thaw only 1.0lb of a different weight than the recommended weight, do not use the popcorn pad. After the 1.5 seconds, the display is changed into the cooking time and the oven starts cooking. This will beep to...
... popping, open bag carefully: popcorn and steam are extremely hot. 5. Use prepackaged room-temperature microwave popcorn. 2. When you to turn the food over . NOTE: 1. Do not reheat unpopped kernels or reuse bag. 6. QUICK DEFROST Use this function to thaw only 1.0lb of a different weight than the recommended weight, do not use the popcorn pad. After the 1.5 seconds, the display is changed into the cooking time and the oven starts cooking. This will beep to...
User Manual
Page 18
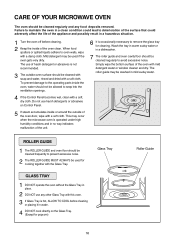
... oven. 3 If Glass Tray is hot, ALLOW TO COOL before cleaning. 2 Keep the inside or around the outside oven surface should be cleaned with soap and water, rinsed and dried with a soft, dry cloth. When food spatters or spilled liquids adhere to seep into the ventilation openings. 4 If the Control Panel becomes wet, clean with a soft cloth. Do not use any food deposits removed. Glass Tray GLASS TRAY 1 DO NOT operate the oven...
... oven. 3 If Glass Tray is hot, ALLOW TO COOL before cleaning. 2 Keep the inside or around the outside oven surface should be cleaned with soap and water, rinsed and dried with a soft, dry cloth. When food spatters or spilled liquids adhere to seep into the ventilation openings. 4 If the Control Panel becomes wet, clean with a soft cloth. Do not use any food deposits removed. Glass Tray GLASS TRAY 1 DO NOT operate the oven...

User Manual
Page 19
... or loosened) iii) Door seals and sealing surfaces. 4. When opened door or any food deposits removed; 6. A list of the appliance and possibly result in . 2. Check that the cooking time is still a problem, contact the service station. It is particularly important that the oven closes properly and that metal skewers or foil does not touch the interior walls. The oven should not be cleaned regularly and any...
... or loosened) iii) Door seals and sealing surfaces. 4. When opened door or any food deposits removed; 6. A list of the appliance and possibly result in . 2. Check that the cooking time is still a problem, contact the service station. It is particularly important that the oven closes properly and that metal skewers or foil does not touch the interior walls. The oven should not be cleaned regularly and any...
User Manual
Page 20
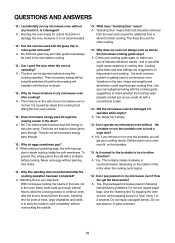
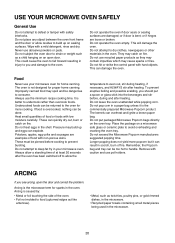
... run it operates while empty? * A : Yes. This frees the oven for a short time will maintain until the door is removed from the oven and covered for the turntable to help prevent over the turntable, you remove or turn in the size, shape and weights and dimensions could require longer cooking time. Dishes used in glass cookware. 18 Use your oven must always be removed from the oven. the most common problem in the oven. To...
... run it operates while empty? * A : Yes. This frees the oven for a short time will maintain until the door is removed from the oven and covered for the turntable to help prevent over the turntable, you remove or turn in the size, shape and weights and dimensions could require longer cooking time. Dishes used in glass cookware. 18 Use your oven must always be removed from the oven. the most common problem in the oven. To...
User Manual
Page 21
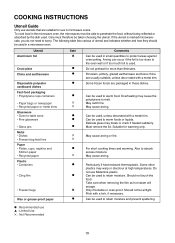
... do not need to warm foods or liquids. Do not use in the microwave oven, the microwaves must therefore be airtight. Utensil Aluminium foil Crust plate China and earthenware Disposable polyester cardboard dishes Fast-food packaging • Polystyrene cups containers • Paper bags or newspaper • Recycled paper or metal trims Glassware • Oven-to-table ware • Fine glassware • Glass jars...
... do not need to warm foods or liquids. Do not use in the microwave oven, the microwaves must therefore be airtight. Utensil Aluminium foil Crust plate China and earthenware Disposable polyester cardboard dishes Fast-food packaging • Polystyrene cups containers • Paper bags or newspaper • Recycled paper or metal trims Glassware • Oven-to-table ware • Fine glassware • Glass jars...
User Manual
Page 22
... exceed the Microwave Popcorn manufacturers suggested popping time. Do not operate the oven if door seals or sealing surfaces are loose or broken. or if door is the microwave term for home canning. Do not attempt to prevent bursting. Do not hit or strike the control panel with low moisture carefully. Always use abrasive powders or pads. Heat small quantities of food or foods with...
... exceed the Microwave Popcorn manufacturers suggested popping time. Do not operate the oven if door seals or sealing surfaces are loose or broken. or if door is the microwave term for home canning. Do not attempt to prevent bursting. Do not hit or strike the control panel with low moisture carefully. Always use abrasive powders or pads. Heat small quantities of food or foods with...
User Manual
Page 23
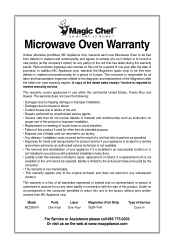
... product or improper installation. • Replacement or resetting of house fuses or circuit breakers. • Failure of this product if used for product service if your appliance if it is installed in an inaccessible location or is not installed in accordance with the sale of purchase. Microwave Oven Warranty Unless otherwise prohibited, MC Appliance corp. Model MCD991R Parts One-Year Labor One-Year Magnetron (Part Only) Eight-Year...
... product or improper installation. • Replacement or resetting of house fuses or circuit breakers. • Failure of this product if used for product service if your appliance if it is installed in an inaccessible location or is not installed in accordance with the sale of purchase. Microwave Oven Warranty Unless otherwise prohibited, MC Appliance corp. Model MCD991R Parts One-Year Labor One-Year Magnetron (Part Only) Eight-Year...


