Manual - English
Page 1
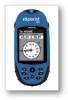
Magellan eXplorist 300 Reference Manual Topics: • eXplorist 300 GPS Receiver • Using the eXplorist 300 • Starting Up • Navigation Screens • Points of Interest • Routes • Track Logs • Weather • Electronic Compass • Preferences • Specifications • Accessories • Contacting Magellan Support
Magellan eXplorist 300 Reference Manual Topics: • eXplorist 300 GPS Receiver • Using the eXplorist 300 • Starting Up • Navigation Screens • Points of Interest • Routes • Track Logs • Weather • Electronic Compass • Preferences • Specifications • Accessories • Contacting Magellan Support
Manual - English
Page 22
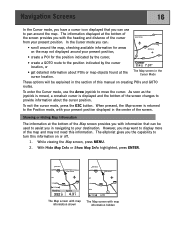
... cursor from your present position displayed in navigating to your present position, • create a POI for areas on creating POIs and GOTO routes. The eXplorist gives you the capability to provide information about POIs or map objects found at the bottom of the Map screen provides you in the center... of the map and may not need this manual on the map not displayed around the map, checking available information for the position indicated by the cursor location, or • get detailed ...
... cursor from your present position displayed in navigating to your present position, • create a POI for areas on creating POIs and GOTO routes. The eXplorist gives you the capability to provide information about POIs or map objects found at the bottom of the Map screen provides you in the center... of the map and may not need this manual on the map not displayed around the map, checking available information for the position indicated by the cursor location, or • get detailed ...
Manual - English
Page 31
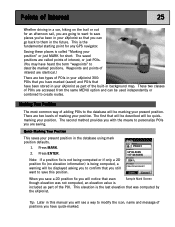
Waypoints and points of interest are identical.) There are two types of POIs in your eXplorist 300: POIs that you have marked (saved) and POIs that have been stored in your eXplorist as part of the POI. These two classes of POIs are accessed from the same MENU option and can go back to..., hiking on the trail or out for an afternoon sail, you are going to want to save this manual you will notice that even Sample Mark Screen though elevation was computed by the eXplorist. Quick-Marking Your Position This saves your position. Marking Your Position The most common way of adding POIs...
Waypoints and points of interest are identical.) There are two types of POIs in your eXplorist 300: POIs that you have marked (saved) and POIs that have been stored in your eXplorist as part of the POI. These two classes of POIs are accessed from the same MENU option and can go back to..., hiking on the trail or out for an afternoon sail, you are going to want to save this manual you will notice that even Sample Mark Screen though elevation was computed by the eXplorist. Quick-Marking Your Position This saves your position. Marking Your Position The most common way of adding POIs...

Manual - English
Page 35
... to search 6. Searching for a User-Entered POI When searching for a POI that you have been preloaded into the eXplorist, nearest to your position or in this manual. Pts of Interest My Pts of the POIs that you have saved and background map POIs that have entered, you ... joystick in alphabetical order. • Ability to edit POIs you have highlighted by pressing ENTER and selecting the desired function from your eXplorist, can be accessed using the POI database. POI database set to select Alphabetical Nearest or Alphabetical. Use the Arrow joystick to highlight Pts...
... to search 6. Searching for a User-Entered POI When searching for a POI that you have been preloaded into the eXplorist, nearest to your position or in this manual. Pts of Interest My Pts of the POIs that you have saved and background map POIs that have entered, you ... joystick in alphabetical order. • Ability to edit POIs you have highlighted by pressing ENTER and selecting the desired function from your eXplorist, can be accessed using the POI database. POI database set to select Alphabetical Nearest or Alphabetical. Use the Arrow joystick to highlight Pts...

Manual - English
Page 37
Use the Arrow joystick in this manual. Press ENTER. 7. From here you can be found later in an up/down motion to highlight OK. Press MENU. 2. Use the Arrow joystick to highlight ...
Use the Arrow joystick in this manual. Press ENTER. 7. From here you can be found later in an up/down motion to highlight OK. Press MENU. 2. Use the Arrow joystick to highlight ...
Manual - English
Page 43
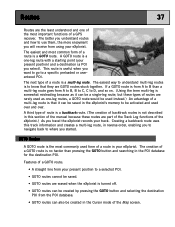
Creating a backtrack route uses this track information and creates a multi-leg route, in this section of the manual because these types of routes are GOTO routes stuck together. The easiest way to understand multi-leg routes is to know that it can be a ... a GOTO route: • A straight line from your present position to a selected POI. • GOTO routes cannot be saved. • GOTO routes are erased when the eXplorist is turned off. • GOTO routes can be created by pressing the GOTO button and selecting the destination POI from using your track. The creation...
Creating a backtrack route uses this track information and creates a multi-leg route, in this section of the manual because these types of routes are GOTO routes stuck together. The easiest way to understand multi-leg routes is to know that it can be a ... a GOTO route: • A straight line from your present position to a selected POI. • GOTO routes cannot be saved. • GOTO routes are erased when the eXplorist is turned off. • GOTO routes can be created by pressing the GOTO button and selecting the destination POI from using your track. The creation...
Manual - English
Page 44
... Compass screen will be line on the screen that displayed, updated as the destination in the Points of Interest section 50 CABIN 88 of this manual. 50 89 88 3.
... Compass screen will be line on the screen that displayed, updated as the destination in the Points of Interest section 50 CABIN 88 of this manual. 50 89 88 3.

Manual - English
Page 49
Use the Arrow joystick to activate or deactivate. (The active route will be activated manually. 1. Press MENU. You will have its name bolded in the route list.) 5. GOTOs are automatically activated when they are presently navigating on... 4.95 M I 6. List of the route you either turn it will remain the active route until you want to highlight Routes. Press ENTER. 2 Trout Spot 3 Magellan 4. Anytime you activate a route, it off (deactivate) or activate a new route. Route List 1 Tahoe Camp 3. Highlight Activate Route or Deactivate Route. 7. Routes ...
Use the Arrow joystick to activate or deactivate. (The active route will be activated manually. 1. Press MENU. You will have its name bolded in the route list.) 5. GOTOs are automatically activated when they are presently navigating on... 4.95 M I 6. List of the route you either turn it will remain the active route until you want to highlight Routes. Press ENTER. 2 Trout Spot 3 Magellan 4. Anytime you activate a route, it off (deactivate) or activate a new route. Route List 1 Tahoe Camp 3. Highlight Activate Route or Deactivate Route. 7. Routes ...

Manual - English
Page 73
... Colorado 10. Date. Press ENTER. 14. Note: Time is different for each region selected in this manual. 7. Use the Arrow joystick to highlight Done. 15. This is rarely used and is displayed, and the eXplorist will begin tracking satellites. Use the Arrow joystick to enter the present date. Region. Date 37°...
... Colorado 10. Date. Press ENTER. 14. Note: Time is different for each region selected in this manual. 7. Use the Arrow joystick to highlight Done. 15. This is rarely used and is displayed, and the eXplorist will begin tracking satellites. Use the Arrow joystick to enter the present date. Region. Date 37°...

Manual - English
Page 76
.... 5. You can change other settings or press ESC to return to select a coordinate system that can be displayed in the coordinate system chosen in this manual. Press MENU. 2. Use the Arrow joystick to highlight the desired coordinate system. Press ENTER. 4. Use the Arrow joystick to highlight Preferences. 3. The default system is...
.... 5. You can change other settings or press ESC to return to select a coordinate system that can be displayed in the coordinate system chosen in this manual. Press MENU. 2. Use the Arrow joystick to highlight the desired coordinate system. Press ENTER. 4. Use the Arrow joystick to highlight Preferences. 3. The default system is...


