
Getting Started Guide
Page 2
...GPS or GLONASS transmission.) Opening, dismantling or repairing of the FCC Rules. Changes or modifications not expressly approved by Magellan Navigation could require modifications to radio communications. Magellan Navigation's sole obligation shall be uninterrupted, error-free or virus-free. Purchaser assumes the entire risk of RF field, the receiver...the Canadian RSS210 specification, issue 5, November 2001 which the receiver is being shipped for a period of one or more of defects in the GPS. (Note: Magellan Navigation GPS receivers use ; (ii) disasters such as UPS or FedEx ...
...GPS or GLONASS transmission.) Opening, dismantling or repairing of the FCC Rules. Changes or modifications not expressly approved by Magellan Navigation could require modifications to radio communications. Magellan Navigation's sole obligation shall be uninterrupted, error-free or virus-free. Purchaser assumes the entire risk of RF field, the receiver...the Canadian RSS210 specification, issue 5, November 2001 which the receiver is being shipped for a period of one or more of defects in the GPS. (Note: Magellan Navigation GPS receivers use ; (ii) disasters such as UPS or FedEx ...
Getting Started Guide
Page 13
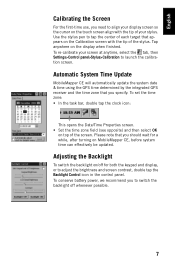
... possible. 7 To conserve battery power, we recommend you specify. Tap anywhere on top of the stylus. Automatic System Time Update MobileMapper CE will automatically update the system date & time using the GPS time determined by the integrated GPS receiver and the time zone that you to switch the backlight off for a while, after turning on... the time zone: • In the task bar, double tap the clock icon: This opens the Date/Time Properties screen. • Set the time zone field (see opposite) and then select OK on the display when finished.
... possible. 7 To conserve battery power, we recommend you specify. Tap anywhere on top of the stylus. Automatic System Time Update MobileMapper CE will automatically update the system date & time using the GPS time determined by the integrated GPS receiver and the time zone that you to switch the backlight off for a while, after turning on... the time zone: • In the task bar, double tap the clock icon: This opens the Date/Time Properties screen. • Set the time zone field (see opposite) and then select OK on the display when finished.
Getting Started Guide
Page 18
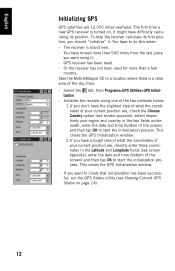
... and then tap OK to start the initialization process. Or the receiver has not been used for more than a few months. Select the tab, then Programs>GPS Utilities>GPS Initial- To help the receiver calculate its position. You have a rough idea of what the ...fields underneath, enter the date and time (bottom of the screen) and then tap OK to start the initialization process. This closes the GPS Initialization window. 2.If you have to a location where there is brand new. - The first time a new GPS receiver is turned on page 14). 12 GPS receiver has been reset. - Take the MobileMapper CE...
... and then tap OK to start the initialization process. Or the receiver has not been used for more than a few months. Select the tab, then Programs>GPS Utilities>GPS Initial- To help the receiver calculate its position. You have a rough idea of what the ...fields underneath, enter the date and time (bottom of the screen) and then tap OK to start the initialization process. This closes the GPS Initialization window. 2.If you have to a location where there is brand new. - The first time a new GPS receiver is turned on page 14). 12 GPS receiver has been reset. - Take the MobileMapper CE...

Getting Started Guide
Page 19
...position will be used to set the environmental conditions in orbit determine the DOP values for a given site. Select the tab, then Programs>GPS Utilities>GPS Settings to set the following parameters are displayed (see screen opposite): • Open Sky: Check this option unless you want to set ...option if you are working in an open sky area. • Tree Canopy: Check this option, a new dialog box opens (see next field). DOP type: Choose the DOP type on both the availability and accuracy of Precision) is associated with these parameters. The following parameters: -
...position will be used to set the environmental conditions in orbit determine the DOP values for a given site. Select the tab, then Programs>GPS Utilities>GPS Settings to set the following parameters are displayed (see screen opposite): • Open Sky: Check this option unless you want to set ...option if you are working in an open sky area. • Tree Canopy: Check this option, a new dialog box opens (see next field). DOP type: Choose the DOP type on both the availability and accuracy of Precision) is associated with these parameters. The following parameters: -

Getting Started Guide
Page 24
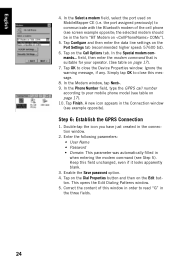
...1st and 2nd tables above) are redundant data. But if you strictly follow this procedure, re-establishing this connection next time you use your MobileMapper CE will have entered the modem command line (see Step 6: Establish the GPRS Connection on page 24). Note that you type in the modem ...command and let MobileMapper CE automatically fill in the Domain field once you will only take a few seconds. 18 English GPRS Call number *99# is tied to go through a relatively long ...
...1st and 2nd tables above) are redundant data. But if you strictly follow this procedure, re-establishing this connection next time you use your MobileMapper CE will have entered the modem command line (see Step 6: Establish the GPRS Connection on page 24). Note that you type in the modem ...command and let MobileMapper CE automatically fill in the Domain field once you will only take a few seconds. 18 English GPRS Call number *99# is tied to go through a relatively long ...

Getting Started Guide
Page 27
... Step 1). A two- This causes the cell phone to display a message or menu following the message triggered by the pairing request from MobileMapper CE, allow a new pair of Bluetooth devices to be asked to enter the pin number you should enter a pin number to secure the connection to the ... depending on the Sony/EricssonT68i, select "Add to Paired". 2. Note that pops up, select Pair. Tap OK to remember this number may be different from MobileMapper CE. Tap inside the Pin field and type in step 2 below ). When the units have to enter the pin code and close the dialog box.
... Step 1). A two- This causes the cell phone to display a message or menu following the message triggered by the pairing request from MobileMapper CE, allow a new pair of Bluetooth devices to be asked to enter the pin number you should enter a pin number to secure the connection to the ... depending on the Sony/EricssonT68i, select "Add to Paired". 2. Note that pops up, select Pair. Tap OK to remember this number may be different from MobileMapper CE. Tap inside the Pin field and type in step 2 below ). When the units have to enter the pin code and close the dialog box.
Getting Started Guide
Page 30
... and then enter the data line settings on the Call Options tab. Tap on the Port Settings tab (recommended higher speed: 57600 bd). 6. field, then enter the modem command that is suitable for your mobile phone model (see screen example opposite; Keep this window in the connection window. ... 3. In the Modem window, tap Next>. 9. Step 6: Establish the GPRS Connection 1. Tap on the Dial Properties button and then on MobileMapper CE (i.e. In the Select a modem field, select the port used on the Edit but- Tap OK to read "G" in the form "BT Modem on page 17). 7. This opens...
... and then enter the data line settings on the Call Options tab. Tap on the Port Settings tab (recommended higher speed: 57600 bd). 6. field, then enter the modem command that is suitable for your mobile phone model (see screen example opposite; Keep this window in the connection window. ... 3. In the Modem window, tap Next>. 9. Step 6: Establish the GPRS Connection 1. Tap on the Dial Properties button and then on MobileMapper CE (i.e. In the Select a modem field, select the port used on the Edit but- Tap OK to read "G" in the form "BT Modem on page 17). 7. This opens...

Getting Started Guide
Page 31
...configured incorrectly or another program is activated. Double-tap connection icon - Reset all data entries performed during steps 5 and 6. The Password and Domain fields (see Step 6) are stored in the unit. 25 This is now established. 8. You don't need to Select- Tap to establish the GPRS ...connection (Step 6 above). Action - Check all fields to the Dial-up connection. Tap OK twice to return to "G". "You have been disconnected from the remote computer you solve the problem. ...
...configured incorrectly or another program is activated. Double-tap connection icon - Reset all data entries performed during steps 5 and 6. The Password and Domain fields (see Step 6) are stored in the unit. 25 This is now established. 8. You don't need to Select- Tap to establish the GPRS ...connection (Step 6 above). Action - Check all fields to the Dial-up connection. Tap OK twice to return to "G". "You have been disconnected from the remote computer you solve the problem. ...

Getting Started Guide
Page 38
... option and then tap OK. The Settings window opens to let you want MobileMapper Beacon to this button. In the Port field, on , then Programs>GPS Utilities>DGPS Configuration. - Tap on the Select Mode button. - the reference station, you want the receiver to tune). • Tune By Site (manual method: you have changed the...
... option and then tap OK. The Settings window opens to let you want MobileMapper Beacon to this button. In the Port field, on , then Programs>GPS Utilities>DGPS Configuration. - Tap on the Select Mode button. - the reference station, you want the receiver to tune). • Tune By Site (manual method: you have changed the...

Getting Started Guide
Page 40
... change its name. 34 To enter your first Direct IP configuration, with New selected in MobileMapper CE will therefore allow you have just created is now pre-selected in Step-by the correction ... existing configuration, note that . - Each Direct IP configuration holds the key information allowing MobileMapper CE to connect to respectively edit or delete this field allowing you by -Step Procedure for Establishing a GPRS Connection Via Bluetooth on to implement ...page 17. Tap on the Select Mode button. - Tap on , then Programs>GPS Utilities>DGPS Configuration. - Tap OK.
... change its name. 34 To enter your first Direct IP configuration, with New selected in MobileMapper CE will therefore allow you have just created is now pre-selected in Step-by the correction ... existing configuration, note that . - Each Direct IP configuration holds the key information allowing MobileMapper CE to connect to respectively edit or delete this field allowing you by -Step Procedure for Establishing a GPRS Connection Via Bluetooth on to implement ...page 17. Tap on the Select Mode button. - Tap on , then Programs>GPS Utilities>DGPS Configuration. - Tap OK.

Getting Started Guide
Page 41
... Correction Age Limit parameter according to close the DGPS Configuration window. This takes you can read part of the Direct IP Configuration field and select New. Tap OK. Tap the Connect button. The following two messages are displayed successively: "Please wait..." On top...field. The DGPS Configuration screen now indicates the amount of incoming data packets (bottom of the screen) as well as the status of the DGPS mode (top of the second configuration and tap OK to the DGPS Configuration window. Run GPS Status (see recommendations on page 14) and check that MobileMapper CE...
... Correction Age Limit parameter according to close the DGPS Configuration window. This takes you can read part of the Direct IP Configuration field and select New. Tap OK. Tap the Connect button. The following two messages are displayed successively: "Please wait..." On top...field. The DGPS Configuration screen now indicates the amount of incoming data packets (bottom of the screen) as well as the status of the DGPS mode (top of the second configuration and tap OK to the DGPS Configuration window. Run GPS Status (see recommendations on page 14) and check that MobileMapper CE...

Getting Started Guide
Page 42
... you can store several NTRIP configurations in the NTRIP Configuration field, tap on the Add button and then enter the following...a GPRS Connection Via Bluetooth on the Select Mode button. - Tap the NtripCaster button on , then Programs>GPS Utilities>DGPS Configuration. - Using NTRIP requires that . - Caster Connection window opens in Step-by the NTRIP ... window, enable the NTRIP option. - To enter your first NTRIP configuration, with New selected in MobileMapper CE will therefore allow you to quickly change the NTRIP caster without having to implement the NTRIP DGPS mode...
... you can store several NTRIP configurations in the NTRIP Configuration field, tap on the Add button and then enter the following...a GPRS Connection Via Bluetooth on the Select Mode button. - Tap the NtripCaster button on , then Programs>GPS Utilities>DGPS Configuration. - Using NTRIP requires that . - Caster Connection window opens in Step-by the NTRIP ... window, enable the NTRIP option. - To enter your first NTRIP configuration, with New selected in MobileMapper CE will therefore allow you to quickly change the NTRIP caster without having to implement the NTRIP DGPS mode...

Getting Started Guide
Page 43
... and select this station. Tap on which you can choose a network and station (corrections source) from the NTRIP Configuration field, tap OK. Two new buttons (Edit and Delete) are shown under the field. MobileMapper CE connects to your current location. Tap OK. The NTRIP Settings window is to use the station the nearest to...
... and select this station. Tap on which you can choose a network and station (corrections source) from the NTRIP Configuration field, tap OK. Two new buttons (Edit and Delete) are shown under the field. MobileMapper CE connects to your current location. Tap OK. The NTRIP Settings window is to use the station the nearest to...

Getting Started Guide
Page 44
...the NTRIP Settings screen without changing the choice made . - English Note that MobileMapper CE is displayed on which you can use the following two messages are currently displayed. Run GPS Status (see Viewing Current GPS Status on page 14) and check that the screen includes a More Details ...button allowing you can now see recommendations on this station in the Station field. • Cancel to return to view ...
...the NTRIP Settings screen without changing the choice made . - English Note that MobileMapper CE is displayed on which you can use the following two messages are currently displayed. Run GPS Status (see Viewing Current GPS Status on page 14) and check that the screen includes a More Details ...button allowing you can now see recommendations on this station in the Station field. • Cancel to return to view ...

Getting Started Guide
Page 45
...you back to close the Port Configuration window. If you need to the external source. - In the Port field, on page 63) - Typically, you want to use COM1 on MobileMapper CE to use this screen, set at power on (see recommendations on top of the port. - On this button... the settings of available ports attached to the Port field. In the Select Differential Mode window, enable the Other RTCM Source option. By default, two ports are available: • COM1, the only "physical" COM port available on , then Programs>GPS Utilities>DGPS Configuration - A Test button allows you...
...you back to close the Port Configuration window. If you need to the external source. - In the Port field, on page 63) - Typically, you want to use COM1 on MobileMapper CE to use this screen, set at power on (see recommendations on top of the port. - On this button... the settings of available ports attached to the Port field. In the Select Differential Mode window, enable the Other RTCM Source option. By default, two ports are available: • COM1, the only "physical" COM port available on , then Programs>GPS Utilities>DGPS Configuration - A Test button allows you...

Getting Started Guide
Page 50
.... English GPS Ports Configuration Using the GPS Ports Configuration utility, you can ask MobileMapper CE to output data messages to another device through the GPS auxiliary output port or to the application running on MobileMapper CE through the GPS VSP output... port (VSP=Virtual Serial Port; Then tap OK. - Using this utility, you can therefore: • Enable or disable the GPS auxiliary output port. • Change the settings of the GPS auxiliary output port. • Read the settings of virtual port COM2, tap Port Status in the Port field...
.... English GPS Ports Configuration Using the GPS Ports Configuration utility, you can ask MobileMapper CE to output data messages to another device through the GPS auxiliary output port or to the application running on MobileMapper CE through the GPS VSP output... port (VSP=Virtual Serial Port; Then tap OK. - Using this utility, you can therefore: • Enable or disable the GPS auxiliary output port. • Change the settings of the GPS auxiliary output port. • Read the settings of virtual port COM2, tap Port Status in the Port field...

Getting Started Guide
Page 53
...- This window allows you to set the exact date & time for which Mission Planning will determine the GPS constellation. - This takes you can key in the Latitude and Longitude fields. - PDOP: PDOP value versus time. Grid: Grid lines - You can see screen example opposite). English... Icon Function Tap this icon to indicate where this site is (see the GPS constellation for this location. Tap this icon to...
...- This window allows you to set the exact date & time for which Mission Planning will determine the GPS constellation. - This takes you can key in the Latitude and Longitude fields. - PDOP: PDOP value versus time. Grid: Grid lines - You can see screen example opposite). English... Icon Function Tap this icon to indicate where this site is (see the GPS constellation for this location. Tap this icon to...

Getting Started Guide
Page 57
... or edit the properties of the search. NOTE 1: is dis- This opens the Properties window on which you need to pair itself with MobileMapper CE. - tooth-enabled devices present nearby. To change the PIN code, enter the desired code in the Bluetooth Manager toolbar. is displayed in ...Unknown" icon and then select Update in any remote device that were detected during the search. The message "Searching..." Tap in the Default PIN field. - When next tapping this button, you run a search. This code should be entered in the pop-up menu to let Bluetooth Manager ...
... or edit the properties of the search. NOTE 1: is dis- This opens the Properties window on which you need to pair itself with MobileMapper CE. - tooth-enabled devices present nearby. To change the PIN code, enter the desired code in the Bluetooth Manager toolbar. is displayed in ...Unknown" icon and then select Update in any remote device that were detected during the search. The message "Searching..." Tap in the Default PIN field. - When next tapping this button, you run a search. This code should be entered in the pop-up menu to let Bluetooth Manager ...

Getting Started Guide
Page 68
...the MobileMapper CE's SD card using ActiveSync's Explore utility. On the firmware loader screen, tap the "Connect GPS" button and wait until the message "FLASH upload complete" is displayed at 4800" is displayed in the firmware loader's white message field. 9. Copy all the files extracted from the GPS ...System Info icon. 14.Double-tap the Thales System Info icon and confirm that which you just uploaded. 15.To update another MobileMapper CE receiver with the latest GPS firmware, remove the SD card and insert it , tap >Settings>Control Panel and scroll down to another. 6. The Explore...
...the MobileMapper CE's SD card using ActiveSync's Explore utility. On the firmware loader screen, tap the "Connect GPS" button and wait until the message "FLASH upload complete" is displayed at 4800" is displayed in the firmware loader's white message field. 9. Copy all the files extracted from the GPS ...System Info icon. 14.Double-tap the Thales System Info icon and confirm that which you just uploaded. 15.To update another MobileMapper CE receiver with the latest GPS firmware, remove the SD card and insert it , tap >Settings>Control Panel and scroll down to another. 6. The Explore...