
Getting Started Guide
Page 2
...you. These limits are not limited to changes in the position, health or geometry of a defect, Magellan Navigation will not occur in the GPS. (Note: Magellan Navigation GPS receivers use ; (ii) disasters such as UPS or FedEx when returning a product for 90 days from ...satellite or modifications to normal wear and tear; (2) batteries and finishes; (3) installations or defects resulting from the date of the package. Government and GLONASS is operated by Magellan Navigation with no guarantee that the receiver will substantially conform to correct the interference by one year...
...you. These limits are not limited to changes in the position, health or geometry of a defect, Magellan Navigation will not occur in the GPS. (Note: Magellan Navigation GPS receivers use ; (ii) disasters such as UPS or FedEx when returning a product for 90 days from ...satellite or modifications to normal wear and tear; (2) batteries and finishes; (3) installations or defects resulting from the date of the package. Government and GLONASS is operated by Magellan Navigation with no guarantee that the receiver will substantially conform to correct the interference by one year...

Getting Started Guide
Page 3
...Magellan Navigation global positioning system (GPS) receivers are navigation aids, and are excluded from installation; (5) any damage caused by law. current user doc- Purchaser is governed by Magellan Navigation, (8) that may be free from defects in it will substantially conform to normal wear and tear; (2) batteries... product with a copy of the original sales receipt to you purchased the product. MAGELLAN NAVIGATION WARRANTY Magellan Navigation warrants their GPS receivers and hardware accessories to locality (including Directive 1999/44/EC in the EC Member ...
...Magellan Navigation global positioning system (GPS) receivers are navigation aids, and are excluded from installation; (5) any damage caused by law. current user doc- Purchaser is governed by Magellan Navigation, (8) that may be free from defects in it will substantially conform to normal wear and tear; (2) batteries... product with a copy of the original sales receipt to you purchased the product. MAGELLAN NAVIGATION WARRANTY Magellan Navigation warrants their GPS receivers and hardware accessories to locality (including Directive 1999/44/EC in the EC Member ...

Getting Started Guide
Page 5
... 1 Key Features 1 Software Provided as Standard 2 About Windows CE .NET 2 Receiver Description 3 Front Panel 3 Back Panel 3 Side Panel 4 I/O Module 4 Resetting MobileMapper CE 4 Preparing for First-Time Use 5 Charging the battery 5 Turning the Receiver On 6 Calibrating the Screen 7 Automatic System Time Update 7 Adjusting... GPS Status Menu Bar 16 Connecting the Internal GPS Receiver to your Application ..... 17 Step-by-Step Procedure for Establishing a GPRS Connection Via Bluetooth 18 Introduction 18 The First Time You Use MobileMapper CE 20 Step1: Ask MobileMapper CE ...
... 1 Key Features 1 Software Provided as Standard 2 About Windows CE .NET 2 Receiver Description 3 Front Panel 3 Back Panel 3 Side Panel 4 I/O Module 4 Resetting MobileMapper CE 4 Preparing for First-Time Use 5 Charging the battery 5 Turning the Receiver On 6 Calibrating the Screen 7 Automatic System Time Update 7 Adjusting... GPS Status Menu Bar 16 Connecting the Internal GPS Receiver to your Application ..... 17 Step-by-Step Procedure for Establishing a GPRS Connection Via Bluetooth 18 Introduction 18 The First Time You Use MobileMapper CE 20 Step1: Ask MobileMapper CE ...

Getting Started Guide
Page 6
...Memory Management 42 Power Modes 42 Turning Off MobileMapper CE Manually 43 Checking Battery Status 43 LED Indicators 43 Memory Management 43 GPS Utilities 44 DGPS Configuration 44 GPS Initialization 44 GPS Ports Configuration 45 GPS Reset 46 GPS Settings 47 GPS Status 47 Mission Planning 47 Switching Between Two... Accuracy 58 General Guidelines 58 Recording Data for Post-Processing 59 Appendices 61 Updating MobileMapper CE OS Firmware 61 Updating MobileMapper CE GPS Firmware 62 About Almanac Files 64 Choosing the Appropriate Real-Time Correction Age Limit ..... 64 Assessing...
...Memory Management 42 Power Modes 42 Turning Off MobileMapper CE Manually 43 Checking Battery Status 43 LED Indicators 43 Memory Management 43 GPS Utilities 44 DGPS Configuration 44 GPS Initialization 44 GPS Ports Configuration 45 GPS Reset 46 GPS Settings 47 GPS Status 47 Mission Planning 47 Switching Between Two... Accuracy 58 General Guidelines 58 Recording Data for Post-Processing 59 Appendices 61 Updating MobileMapper CE OS Firmware 61 Updating MobileMapper CE GPS Firmware 62 About Almanac Files 64 Choosing the Appropriate Real-Time Correction Age Limit ..... 64 Assessing...

Getting Started Guide
Page 7
Built-in alphanumeric keyboard - All-day rechargeable, removable Li-ion battery - Being an open-platform Windows CE device, MobileMapper CE allows you to choose the GIS software that integrates submeter GPS with Microsoft Windows CE .NET in your Windows CE GPS handheld computer. Rugged and waterproof design - Embedded Microsoft Windows CE .NET operating system - It will give you useful information...
Built-in alphanumeric keyboard - All-day rechargeable, removable Li-ion battery - Being an open-platform Windows CE device, MobileMapper CE allows you to choose the GIS software that integrates submeter GPS with Microsoft Windows CE .NET in your Windows CE GPS handheld computer. Rugged and waterproof design - Embedded Microsoft Windows CE .NET operating system - It will give you useful information...
Getting Started Guide
Page 9
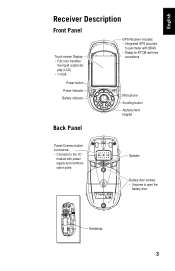
English Receiver Description Front Panel Touch screen Display: • Full color transflec- tive liquid crystal display (LCD) • ¼ VGA GPS Receiver includes: • Integrated GPS accurate to sub-meter with SBAS • Ready for RTCM real-time corrections Power button Power indicator Battery indicator Microphone Scrolling button Alphanumeric keypad Back Panel Power/Communication connectors: • Connects to the I/O module with power supply and communication ports Speaker Battery door screws: • Unscrew to open the battery door Handstrap 3
English Receiver Description Front Panel Touch screen Display: • Full color transflec- tive liquid crystal display (LCD) • ¼ VGA GPS Receiver includes: • Integrated GPS accurate to sub-meter with SBAS • Ready for RTCM real-time corrections Power button Power indicator Battery indicator Microphone Scrolling button Alphanumeric keypad Back Panel Power/Communication connectors: • Connects to the I/O module with power supply and communication ports Speaker Battery door screws: • Unscrew to open the battery door Handstrap 3

Getting Started Guide
Page 11
Open the battery door. 3. Attach the Clip-on I/O module to the MobileMapper CE handheld as shown below (insert lower part first): 5 Locate the removable battery. 2. Insert the battery into the battery compartment in the back of the MobileMapper CE handheld as shown below : 4. English Preparing for First-Time Use Charging the battery Before using your MobileMapper CE handheld PC, you must first charge the battery: 1. Close the battery door and tighten the screws. 5.
Open the battery door. 3. Attach the Clip-on I/O module to the MobileMapper CE handheld as shown below (insert lower part first): 5 Locate the removable battery. 2. Insert the battery into the battery compartment in the back of the MobileMapper CE handheld as shown below : 4. English Preparing for First-Time Use Charging the battery Before using your MobileMapper CE handheld PC, you must first charge the battery: 1. Close the battery door and tighten the screws. 5.

Getting Started Guide
Page 12
Turning the Receiver On Once you have charged the battery in your MobileMapper CE, press the red power button to turn it charge the battery for up to this input 7. Power button 6 To detach the clip-on I/O module, press the release button on . English 6. Connect the AC adapter (see below) and then let it on the module. Connect cable from AC adapter to six hours.
Turning the Receiver On Once you have charged the battery in your MobileMapper CE, press the red power button to turn it charge the battery for up to this input 7. Power button 6 To detach the clip-on I/O module, press the release button on . English 6. Connect the AC adapter (see below) and then let it on the module. Connect cable from AC adapter to six hours.
Getting Started Guide
Page 13
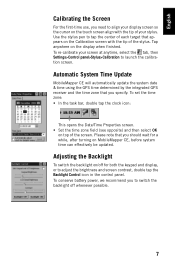
... conserve battery power, we recommend you should wait for both the keypad and display, or to launch the calibration screen. English Calibrating the Screen For the first-time use, you specify. Automatic System Time Update MobileMapper CE will automatically update the system date & time using the GPS time determined by the integrated GPS receiver and the.... • Set the time zone field (see opposite) and then select OK on the display when finished. Adjusting the Backlight To switch the backlight on MobileMapper CE, before system time can effectively be updated.
... conserve battery power, we recommend you should wait for both the keypad and display, or to launch the calibration screen. English Calibrating the Screen For the first-time use, you specify. Automatic System Time Update MobileMapper CE will automatically update the system date & time using the GPS time determined by the integrated GPS receiver and the.... • Set the time zone field (see opposite) and then select OK on the display when finished. Adjusting the Backlight To switch the backlight on MobileMapper CE, before system time can effectively be updated.

Getting Started Guide
Page 47
...Shut Down Mode: The system is used , the external power source also automatically recharges the internal battery. English Power & Memory Management Power Modes MobileMapper CE comes with a fully charged battery. In order to switch on . To switch off . In the Backlight Control dialog that opens ...(see op- You can configure the MobileMapper CE handheld to switch on the backlights again. The MobileMapper CE system has three power saving modes when the battery power is shut down. Then make the necessary changes in advanced power ...
...Shut Down Mode: The system is used , the external power source also automatically recharges the internal battery. English Power & Memory Management Power Modes MobileMapper CE comes with a fully charged battery. In order to switch on . To switch off . In the Backlight Control dialog that opens ...(see op- You can configure the MobileMapper CE handheld to switch on the backlights again. The MobileMapper CE system has three power saving modes when the battery power is shut down. Then make the necessary changes in advanced power ...
Getting Started Guide
Page 48
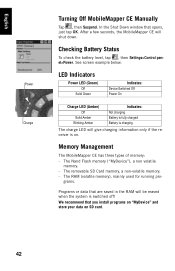
... To check the battery level, tap , then Settings>Control panel>Power. The removable SD Card memory, a non-volatile memory. - See screen example below. Memory Management The MobileMapper CE has three types of memory: - grams. Programs or data that you install programs on "MyDevice" ... Battery is fully charged Battery is charging The charge LED will shut down. English Power Charge Turning Off MobileMapper CE Manually Tap , then Suspend. In the Shut Down window that opens, just tap OK. After a few seconds, the MobileMapper CE will give charging information only if the receiver...
... To check the battery level, tap , then Settings>Control panel>Power. The removable SD Card memory, a non-volatile memory. - See screen example below. Memory Management The MobileMapper CE has three types of memory: - grams. Programs or data that you install programs on "MyDevice" ... Battery is fully charged Battery is charging The charge LED will shut down. English Power Charge Turning Off MobileMapper CE Manually Tap , then Suspend. In the Shut Down window that opens, just tap OK. After a few seconds, the MobileMapper CE will give charging information only if the receiver...

Getting Started Guide
Page 66
... card. With the SD card inserted into MobileMapper CE, doubletap the My Computer icon on MobileMapper CE and either attach it to external power or make sure that you want to MobileMapper CE's MyDevice folder. 3. The image file cannot be in the battery (tap Start>Settings>Control Panel>Power). 2....in the /Mobile Mapping/MM CE/Firmware/OS Firmware/ folder. 1. You will see the "Are you certain that there is at least a 25% charge in the MyDevice directory." 5. English Appendices Updating MobileMapper CE OS Firmware The current version of MobileMapper CE Operating System (OS) firmware can...
... card. With the SD card inserted into MobileMapper CE, doubletap the My Computer icon on MobileMapper CE and either attach it to external power or make sure that you want to MobileMapper CE's MyDevice folder. 3. The image file cannot be in the battery (tap Start>Settings>Control Panel>Power). 2....in the /Mobile Mapping/MM CE/Firmware/OS Firmware/ folder. 1. You will see the "Are you certain that there is at least a 25% charge in the MyDevice directory." 5. English Appendices Updating MobileMapper CE OS Firmware The current version of MobileMapper CE Operating System (OS) firmware can...

Getting Started Guide
Page 72
English Index Symbols , *99# 17 18 A AC adapter 6 , ActiveSync 9 61 Almanac data 63 Authentication 52 Automatic tuning 32 Autonomous GPS 14 Azmth/Elvn 15 B Backlight 7 , Battery door 3 5 , , Beacon 28 30 31 , , , Bluetooth Manager 20 22 49 65 C Calibrating the screen 7 Carrier 25 CD 9 Charging 5 Cold Reset ...45 , COM2 16 44 Custom 13 D DC Power Input 4 , , , DGPS Configuration 30 32 34 36, 39, 40 Dial-up Networking 22 Differential GPS 14 , , ...
English Index Symbols , *99# 17 18 A AC adapter 6 , ActiveSync 9 61 Almanac data 63 Authentication 52 Automatic tuning 32 Autonomous GPS 14 Azmth/Elvn 15 B Backlight 7 , Battery door 3 5 , , Beacon 28 30 31 , , , Bluetooth Manager 20 22 49 65 C Calibrating the screen 7 Carrier 25 CD 9 Charging 5 Cold Reset ...45 , COM2 16 44 Custom 13 D DC Power Input 4 , , , DGPS Configuration 30 32 34 36, 39, 40 Dial-up Networking 22 Differential GPS 14 , , ...


