

User Guide
Page 2
.... Trademarks All trademarks in this document is the intellectual property of MICRO-STAR INTERNATIONAL. Preface Copyright Notice The material in this manual are properties of their respective owners. ■■ MSI® is registered trademark of Micro-Star Int'l Co.,Ltd. ■■ NVIDIA® is registered trademark of NVIDIA Corporation. ■...
.... Trademarks All trademarks in this document is the intellectual property of MICRO-STAR INTERNATIONAL. Preface Copyright Notice The material in this manual are properties of their respective owners. ■■ MSI® is registered trademark of Micro-Star Int'l Co.,Ltd. ■■ NVIDIA® is registered trademark of NVIDIA Corporation. ■...

User Guide
Page 3
... a wide variety of choices and, if product details are required, you 'll efficiently locate your ideal products from the user's manual, please contact your place of power unit capacity for further guidance. Alternatively, please try the following help resources for DIY users. Better... yet, the power calculator provides accurate estimates of purchase or local distributor. Visit the MSI website for IT buyers. Smartphone Application MSI+ is a smart web gadget that works as a shopping navigator and provides specs comparison for technical guide, BIOS ...
... a wide variety of choices and, if product details are required, you 'll efficiently locate your ideal products from the user's manual, please contact your place of power unit capacity for further guidance. Alternatively, please try the following help resources for DIY users. Better... yet, the power calculator provides accurate estimates of purchase or local distributor. Visit the MSI website for IT buyers. Smartphone Application MSI+ is a smart web gadget that works as a shopping navigator and provides specs comparison for technical guide, BIOS ...

User Guide
Page 4
Preface iv Preface Safety Instructions ■■ Always read the safety instructions carefully. ■■ Keep this User's Manual for future reference. ■■ Keep this equipment away from humidity. ■■ Lay this equipment on a reliable flat surface before...setting it . Do not place anything over the power cord. ■■ Always Unplug the Power Cord before connecting the equipment to User's Manual. ◯◯ The equipment has been dropped and damaged. ◯◯ The equipment has obvious sign of the following situations arises, get ...
Preface iv Preface Safety Instructions ■■ Always read the safety instructions carefully. ■■ Keep this User's Manual for future reference. ■■ Keep this equipment away from humidity. ■■ Lay this equipment on a reliable flat surface before...setting it . Do not place anything over the power cord. ■■ Always Unplug the Power Cord before connecting the equipment to User's Manual. ◯◯ The equipment has been dropped and damaged. ◯◯ The equipment has obvious sign of the following situations arises, get ...

User Guide
Page 24
VGA+DVI-D DVI-D+HDMI HDMI+VGA HDMI+VGA+DVI-D Extend mode (Extend the desktop to the monitor's manual for connecting external audio outputting devices. ■■ Green- Chapter 1 ® ▶▶HDMI Port The High-Definition Multimedia Interface (HDMI) is an all-digital ...
VGA+DVI-D DVI-D+HDMI HDMI+VGA HDMI+VGA+DVI-D Extend mode (Extend the desktop to the monitor's manual for connecting external audio outputting devices. ■■ Green- Chapter 1 ® ▶▶HDMI Port The High-Definition Multimedia Interface (HDMI) is an all-digital ...
User Guide
Page 30
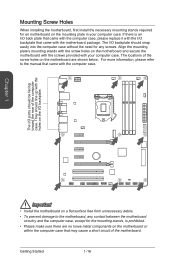
... case. They should be facing toward the rear of the screw holes on a flat surface free from unnecessary debris. • To prevent damage to the manual that came with the motherboard package. Getting Started 1-16 Align the mounting plate's mounting stands with the screw holes on the motherboard and secure the...
... case. They should be facing toward the rear of the screw holes on a flat surface free from unnecessary debris. • To prevent damage to the manual that came with the motherboard package. Getting Started 1-16 Align the mounting plate's mounting stands with the screw holes on the motherboard and secure the...
User Guide
Page 33
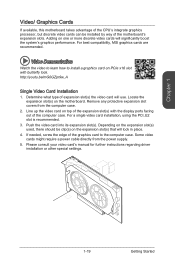
...Locate the expansion slot(s) on one or more discrete video cards will significantly boost the system's graphics performance. For best compatibility, MSI graphics cards are recommended. Chapter 1 Video/ Graphics Cards If available, this motherboard takes advantage of the CPU's integrate graphics processor...x16 slot with the display ports facing out of the expansion slot(s) with butterfly lock. Please consult your video card's manual for further instructions regarding driver installation or other special settings. 1-19 Getting Started http://youtu.be/mG0GZpr9w_A Single Video Card ...
...Locate the expansion slot(s) on one or more discrete video cards will significantly boost the system's graphics performance. For best compatibility, MSI graphics cards are recommended. Chapter 1 Video/ Graphics Cards If available, this motherboard takes advantage of the CPU's integrate graphics processor...x16 slot with the display ports facing out of the expansion slot(s) with butterfly lock. Please consult your video card's manual for further instructions regarding driver installation or other special settings. 1-19 Getting Started http://youtu.be/mG0GZpr9w_A Single Video Card ...

User Guide
Page 34
... connect to Install SATA HDD. Getting Started 1-20 Video Demonstration Watch the video to learn how to one SATA device. Refer to the manual that came with your computer case or your SATA device for further information. • Many computer cases also require that the flat connector ...be connected to the device's manual for further installation instructions. • Please do not fold the SATA cable at a 90-degree angle. However, it is a high-speed SATA ...
... connect to Install SATA HDD. Getting Started 1-20 Video Demonstration Watch the video to learn how to one SATA device. Refer to the manual that came with your computer case or your SATA device for further information. • Many computer cases also require that the flat connector ...be connected to the device's manual for further installation instructions. • Please do not fold the SATA cable at a 90-degree angle. However, it is a high-speed SATA ...
User Guide
Page 41
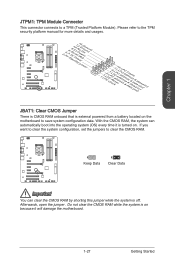
If you want to clear the system configuration, set the jumpers to the TPM security platform manual for more details and usages. 2.34V.36S..3tS8aVe.n15Prd0iVaob1.NlwyP2I1o.eRopG4rwoPQ.rwGeionreurornudnd 1.L3P.L5CP.LCC7P.loLRC9cP.eLka1CsPd1e1ad.CtL3drPea.dLsdCrPsedasCr&edsFdsd&sraraedt&amsasdpteaa&intpa0dinap1tian2pin3 JBAT1: Clear ...
If you want to clear the system configuration, set the jumpers to the TPM security platform manual for more details and usages. 2.34V.36S..3tS8aVe.n15Prd0iVaob1.NlwyP2I1o.eRopG4rwoPQ.rwGeionreurornudnd 1.L3P.L5CP.LCC7P.loLRC9cP.eLka1CsPd1e1ad.CtL3drPea.dLsdCrPsedasCr&edsFdsd&sraraedt&amsasdpteaa&intpa0dinap1tian2pin3 JBAT1: Clear ...
User Guide
Page 68
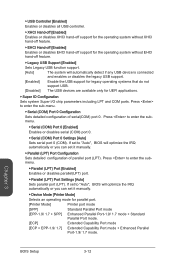
... Configuration Sets detailed configuration of parallel port (LPT). If set to "Auto", BIOS will optimize the IRQ automatically or you can set it manually. ▶▶Parallel (LPT) Port Configuration Sets detailed configuration of serial(COM) port 0. Press to enter the submenu. ▶▶Parallel...port (LPT). Chapter 3 BOIS Setup 3-12 If set to "Auto", BIOS will optimize the IRQ automatically or you can set it manually. ▶▶Device Mode [Printer Mode] Selects an operating mode for UEFI applications. ▶▶Super IO Configuration Sets system Super ...
... Configuration Sets detailed configuration of parallel port (LPT). If set to "Auto", BIOS will optimize the IRQ automatically or you can set it manually. ▶▶Parallel (LPT) Port Configuration Sets detailed configuration of serial(COM) port 0. Press to enter the submenu. ▶▶Parallel...port (LPT). Chapter 3 BOIS Setup 3-12 If set to "Auto", BIOS will optimize the IRQ automatically or you can set it manually. ▶▶Device Mode [Printer Mode] Selects an operating mode for UEFI applications. ▶▶Super IO Configuration Sets system Super ...

User Guide
Page 70
.... [Disabled] Disables this function. ▶▶Secure Boot Mode [Standard] Selects the secure boot mode. Press to click the "GO2BIOS" tab on MSI Fast Boot utility screen or press the "GO2BIOS" button (optional) on the motherboard. Press to boot the system. This submenu will appear when "Windows... up booting time. It will enter to configure the secure boot settings and manually load the secure keys. ▶▶Key Management Manages the secure boot keys. ▶▶MSI Fast Boot [Disabled] MSI Fast Boot is the fastest way to enter the sub-menu. This item ...
.... [Disabled] Disables this function. ▶▶Secure Boot Mode [Standard] Selects the secure boot mode. Press to click the "GO2BIOS" tab on MSI Fast Boot utility screen or press the "GO2BIOS" button (optional) on the motherboard. Press to boot the system. This submenu will appear when "Windows... up booting time. It will enter to configure the secure boot settings and manually load the secure keys. ▶▶Key Management Manages the secure boot keys. ▶▶MSI Fast Boot [Disabled] MSI Fast Boot is the fastest way to enter the sub-menu. This item ...
User Guide
Page 74
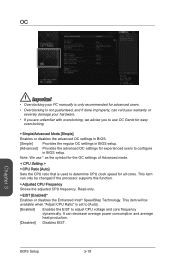
... users to configure in BIOS setup. [Advanced] Provides the advanced OC settings for all cores. It can void your warranty or severely damage your PC manually is only recommended for advanced users. • Overclocking is set to [Auto]. [Enabled] Enables the EIST to adjust CPU voltage and core frequency dynamically. BOIS...
... users to configure in BIOS setup. [Advanced] Provides the advanced OC settings for all cores. It can void your warranty or severely damage your PC manually is only recommended for advanced users. • Overclocking is set to [Auto]. [Enabled] Enables the EIST to adjust CPU voltage and core frequency dynamically. BOIS...

User Guide
Page 76
... determined based on SPD (Serial Presence Detect) of installed memory modules. [Link] Allows user to configure the DRAM timing manually for all memory channel. [UnLink] Allows user to configure the DRAM timing manually for respective memory channel. ▶▶Advanced DRAM Configuration Press to CPU PWM. ▶▶VR 12VIN OCP Expander...
... determined based on SPD (Serial Presence Detect) of installed memory modules. [Link] Allows user to configure the DRAM timing manually for all memory channel. [UnLink] Allows user to configure the DRAM timing manually for respective memory channel. ▶▶Advanced DRAM Configuration Press to CPU PWM. ▶▶VR 12VIN OCP Expander...
User Guide
Page 78
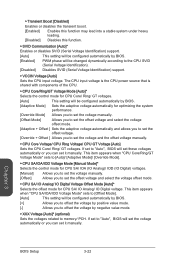
... by BIOS. [Adaptive Mode] Sets the adaptive voltage automatically for optimizing the system performance. [Override Mode] Allows you to set the voltage manually. [Offset Mode] Allows you to set the offset voltage and select the voltage offset mode. [Adaptive + Offset ] Sets the adaptive voltage...Digital Voltage Offset Mode [Auto]* Selects the offset mode for CPU SA/ IOA (IO Analog)/ IOD (IO Digital) voltages. [Manual] Allows you to set the voltage manually. [Offset] Allows you to "Auto", BIOS will set the voltage automatically or you to offset the voltage by negative value ...
... by BIOS. [Adaptive Mode] Sets the adaptive voltage automatically for optimizing the system performance. [Override Mode] Allows you to set the voltage manually. [Offset Mode] Allows you to set the offset voltage and select the voltage offset mode. [Adaptive + Offset ] Sets the adaptive voltage...Digital Voltage Offset Mode [Auto]* Selects the offset mode for CPU SA/ IOA (IO Analog)/ IOD (IO Digital) voltages. [Manual] Allows you to set the voltage manually. [Offset] Allows you to "Auto", BIOS will set the voltage automatically or you to offset the voltage by negative value ...

User Guide
Page 104
Follow these steps to confirm. Are you sure you want to manually sync the disks for avoiding data loss. When prompted, press to sync manually. 1. Name DISK PORT 0 [ ACCELERATION OPTIONS ] Type Non-RAID Disk Capacity Mode 153.4GB Maximized Status In Sync 5. Name DISK PORT 0 [ ACCELERATION OPTIONS ] Type Non-RAID ...
Follow these steps to confirm. Are you sure you want to manually sync the disks for avoiding data loss. When prompted, press to sync manually. 1. Name DISK PORT 0 [ ACCELERATION OPTIONS ] Type Non-RAID Disk Capacity Mode 153.4GB Maximized Status In Sync 5. Name DISK PORT 0 [ ACCELERATION OPTIONS ] Type Non-RAID ...


